Transcription
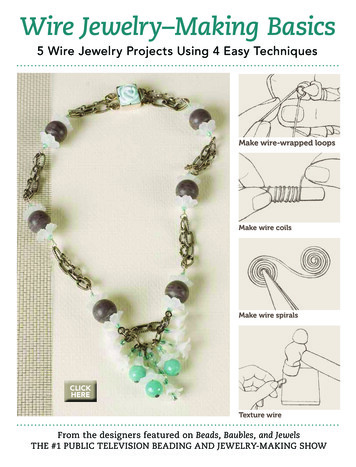
Wire Jewelry–Making Basics5 Wire Jewelry Projects Using 4 Easy TechniquesMake wire-wrapped loopsMake wire coilsMake wire spiralsclickhereTexture wireFrom the designers featured on Beads, Baubles, and JewelsTHE #1 PUBLIC TELEVISION BEADING AND JEWELRY-MAKING SHOW
Wire Jewelry—Making Basics5 Wire Jewelry Projects Using 4 Easy Techniques1 TECHNIQUE: wrapped loops3 LUCITE BLUES NECKLACEMELINDA BARTA5 TECHNIQUE: coils6 FLOWER BOUQUET NECKLACEDERYA AKSOY7 TECHNIQUE: spirals8 ROSE GLOW NECKLACEJAMIE HOGSETT9 TECHNIQUE: texture10 FILIGREE LINK BRACELETJANICE BERKEBILEMIXED TECHNIQUES:11 RINGS OF SATURNMARLENE BLESSING12 TECHNIQUES 2010 Interweave. Not to be reprinted. All rights reserved.page ii
TECHNIQUE:wrapped loops123Wrapped Loops1. To form a wrapped loop, make a 90 bendat least 2" from the end of the wire.42, 3. Holding the wire so that the bent piece ispointing toward you, grasp the wire after thebend with round-nose pliers and form asimple loop with a tail that overlaps the bend.4. Hold the loop with flat- or chain-nose pliersand use another pair of pliers or your fingersto wrap the tail tightly down the neck of thewire to create a couple of coils.55. Trim the wire as closely to the neckof the wire as possible.6. Use flat- or chain-nose pliers or the frontnotch of crimping pliers to softly press theremaining wire tail against the neck ofthe wire.6 2010 Interweave. Not to be reprinted. All rights reserved.page 1
How to:Double Wrapped Loops7 o make a double wrapped loop, simply create aTwrapped loop as usual, then use the tail wire tocoil back up over the first coils, toward the loop; trim.Wrapped-loop Links7. To make a wrapped-loop link, form awrapped loop on each end of a bead. Repeatwith another bead, attaching one of the loopsto a loop of the first link before coiling thetail down the neck of the wire.8Wrapped-loop Bails8. Center the bead on a 3" or longer piece ofwire. Bend both ends of the wire up the sidesof the bead.9, 10. Bend one end straight up at the center ofthe bead and the other horizontally, so thatit is perpendicular to the first wire. Wrap thehorizontal wire around the straight-up wireto form a couple of coils.911, 12. Form a wrapped loop with the straight-up wire,wrapping it back down over the alreadyformed coils.1011[ tips ]12 Use round- or flat-nose pliers to squeeze togetherthe coils if you made them too far apart. 2010 Interweave. Not to be reprinted. All rights reserved.page 2
LUCITE BLUES NECKLACEMELINDA BARTAFlirty vintage Luciteflowers, classy glassand stone beads, andpatinated chain evokethe sentiments ofbygone times. 2010 Interweave. Not to be reprinted. All rights reserved.page 3
Materials4 clear/white 3mm fire-polished rounds24 aqua 3mm fire-polished rounds7 aquamarine 5 3mm faceted rondelles3 amazonite 9mm faceted rounds6 marbled gray 12mm vintage Lucite rounds14 white matte 15 5mm vintage Lucite flowers9 white matte 13 7mm vintage Lucite flowers1 sterling silver 15 25mm 2-strand box clasp with aquaflower inlay10 gunmetal 2" head pins4 gunmetal 5mm jump rings18" of sterling silver 24-gauge half-hard wire71 2" of silver 6 11mm textured oval chain8" of silver 4–5 4–6mm textured longand-short chainToolsWire cuttersChain-nose pliersRound-nose pliersF i n i s h e d S i z e : 1 8 1 2"Strand1: Cut the oval chain into six 1" piecesDangles8: Use a head pin to string the follow-and one 11 2" piece. Cut the longand-short chain into six 1" piecesand one 2" piece.2: Use 1 jump ring to attach 1 piece of1" oval chain to one loop of one halfof the clasp. Repeat using 1 pieceof 1" long-and-short chain and theother loop of the same half of theclasp.3: Use 3" of wire to form a wrappedloop that attaches to the free endsof both chains from the previousstep; string 1 aqua round, one15 5mm flower, 1 gray round, one15 5mm flower, and 1 aqua round.Form a wrapped loop that attachesto the end of 1 piece of 1" ovalchain and 1 piece of 1" long-andshort chain.4: Repeat Step 3.5: Repeat Step 3 using the 1 1 2" pieceof oval chain and the 2" piece oflong-and-short chain.6: Repeat Step 3 three times.7: Repeat Step 2 to attach the free endsof the last chains used to the clasp.ing bead sequences, then form asimple loop:Dangle A: one 13x7mm flower.Repeat.Dangle B: one 13x7mm flower and1 aqua round. Repeat.Dangle C: one 13x7mm flower,1 aquamarine rondelle, and 1 aquaround.Dangle D: 1 amazonite round, one13x7mm flower, and 1 aqua round.Dangle E: one 13 7mm flower, 1 aquamarine rondelle, 1 clear/white round,and 1 aqua round.Dangle F: 1 amazonite round, one15 5mm flower, 1 aquamarine rondelle, and 1 aqua round.Dangle G: 1 amazonite round, one15 5mm flower, one 13 7mm flower,1 aquamarine rondelle, 1 clear/whiteround, and 1 aqua round.Dangle H: 1 aqua round, 1 aquamarine rondelle, one 13 7mm flower,1 aqua round, 1 aquamarine rondelle, 1 aqua round, 1 clear/whiteround, 1 aqua round, 1 aquamarinerondelle, 1 aqua round, and 1 clear/white round.9: Attach dangles to the 2" piece oflong-and-short chain in the center ofthe necklace by opening and closingthe simple loops as you wouldjump rings and placing the longestdangles at the center and the shortest at the ends of the chain.Resources: Check your local bead shop or contact: Clasp: Jess Imports (wholesale only), (415) 626-1433, www.jessimports.com. Chain: ADAdornments, kathyd33@yahoo.com, www.adadornments.com. Wire, head pins, and jump rings: Fusionbeads.com, (888) 781-3559. Luciterounds and flowers: Art & Soul Beads, (812) 285-0000, www.artandsoulbeads.com. Fire-polished and amazonite rounds: Let It Bead, (303)788-1466. Aquamarine rondelles: Desert Gems, (303) 426-4411, www.desertgemsinc.com. 2010 Interweave. Not to be reprinted. All rights reserved.page 4
TECHNIQUE:coilsHow to:2. To remove the coil, slide it off themandrel. Add a simple loop oneither end to use the coil as is orcut the coil to make jump rings orsplit rings.1. To make a coil, use one hand to holdthe end of your wire against a mandrel(or whatever object you want to coilaround). With the other hand, wrapthe wire around the mandrel.21[ tips ]Coiling GizmoFor fast, easy coils, use a Coiling Gizmo, a toolwith which you make coils on a coiling rod by turninga hand crank. (If using this tool, see the manufacturer’smanual for detailed instructions.) 2010 Interweave. Not to be reprinted. All rights reserved.page 5
FLOWER BOUQUET NECKLACEDERYA AKSOYDerya turnsbeaded head pinsinto a cutebouquet pendantthat’s easy tomake and funto wear.Materials11 light Siam AB 4mm crystal bicones1 brass 5 7mm lobster clasp13 brass 11 2" 22-gauge head pins1 brass 11 2" 22-gauge eye pin1 brass 5mm jump ring1 brass 6mm jump ring161 2" of brass 2mm chainToolsRound-nose pliersFlat-nose pliersFinished Size: 17"Flowers1: Use a head pin to string 1 crystal. Useflat-nose pliers to fold the last 1 8" ofthe head pin onto itself. Repeat tentimes for a total of 11 flowers.to coil the other end of the eye pinaround the head-pin coils. Gentlycurve the flower ends of the headpins with your fingers to open upthe bouquet.Bouquet2: Hold the flowers together in a bunch,Necklace3: Attach the eye pin to the center linkpushing the crystals to the head endsof the pins and staggering the “stems”to give the bouquet a more naturallook. Use flat-nose pliers to coil a headpin around the middle of the bouquet;repeat with another head pin. Holdthe eye pin behind the center coils ofthe bouquet with the eye end about1 4" above the coils; use flat-nose pliersof the chain as you would a jumpring. Use the 5mm jump ring toattach the lobster clasp to one endof the chain. Attach the 6mm jumpring to the other end of the chain.Resources: Check your local bead shopor contact: Crystals and similar brass findings: Fusionbeads.com, (888) 781-3559. 2010 Interweave. Not to be reprinted. All rights reserved.page 6
TECHNIQUE:spiralsHow to:OXIDIZING1. To start a spiral (or scroll), make a small loopat the end of a wire with round-nose pliers.2. Enlarge the piece by holding onto the spiralwith chain-nose pliers and pushing the wireover the previous spiral with your fingersfor as many revolutions as desired.3. If desired, bend the tail wire 90 at the topof the spiral. Use as a head pin or form a simpleloop to attach to other items.1S-SHAPED DOUBLE SPIRALS4. To create double spirals in the form of an S,scroll one to the center of the wire.5. Repeat on the other end of the wire, spiralingthe wire in the opposite direction.2354 2010 Interweave. Not to be reprinted. All rights reserved.page 7
ROSE GLOW NECKLACEJAMIE HOGSETTSpiral drops dress upfoil-lined coins in this chunkywrapped-loop necklace.Materials1: Use 3" of silver wire to form a double-6: Attach 8" of beading wire to one1 g eggplant matte size 11 seed beads5 purple 18mm faceted glass rounds4 purple foil-lined 28mm glass coins2 sterling silver 6 16mm cones1 sterling silver 12mm toggle clasp6 sterling silver 2mm crimp tubes24" of .019 beading wire45" of silver 22-gauge wirewrapped loop; string 1 purple roundand form a double-wrapped loop.2: Use 6" of silver wire to form awrapped loop that attaches to theprevious double-wrapped loop,leaving a 2" tail after wrapping; string1 coin and form a wrapped loop,leaving another 2" tail. Use the 2"tails to form spirals that rest on topof each side of the coin.3: Use 3" of silver wire to form a doublewrapped loop that attaches to theprevious wrapped loop; string 1purple round and form a doublewrapped loop.4: Repeat Steps 2 and 3 three times,attaching the last purple round tothe ring half of the clasp beforeforming a double-wrapped loop.5: Use 3" of silver wire to form awrapped loop; repeat.of the wrapped loops formed inStep 5 using a crimp tube. String61 2" of seed beads, 1 crimp tube,and the other wrapped loop formedin Step 5; pass back through the tubeand crimp. Repeat entire step twice.7: Use one of the wrapped-loop wires tostring the wide end of 1 cone and forma double-wrapped loop that attachesto the bar half of the clasp. Repeat,attaching the double-wrapped loopto the first double-wrapped loopformed in Step 1.ToolsWire cuttersFlat-nose pliersRound-nose pliersCrimping pliersF i n i s h e d S i z e : 1 9 1 2"Resources: Check your local bead shopor contact: Seed beads: Beyond Beadery,(800) 840-5548, www.beyondbeadery.com. Coins and rounds: Jo-Ann Fabricand Craft Stores, (888) 739-4120, www.joann.com. Cones and clasp: Bead Cache,(970) 224-4322, www.bead-cache.com. 2010 Interweave. Not to be reprinted. All rights reserved.page 8
TECHNIQUE:textureOxidizingTo create the appearance of textureby patinating metal (usually fine orsterling silver) with liver of sulfur ineither liquid or chunk form, followthese instructions adapted from KateMcKinnon’s “Hot Wire” article inBeadwork magazine (June/July 2006).Clean your metal piece with soap andwarm water if it is dirty or oily.Find four glass, stainless steel, orceramic bowls. Fill the first with enoughliver-of-sulfur solution to cover the pieceof metal: Liver of sulfur in liquid form isready to use, but can be diluted; dissolvethe chunk form in water followingthe manufacturer’s instructions. Fill asecond bowl with very hot water (whichspeeds up the patination process) anda third with cold water (which slowsdown the process). Fill the fourth bowlwith cold water mixed with about atablespoon of baking soda (which actsas a neutralizing agent).How to:When you are pleased with the color,dip the metal into the cold water withbaking soda to stop the reaction, thenrinse and dry. Brush, sand, or polishthe surface for interesting results. Ifyou don’t like the patina, you can easilyremove it by sanding or brushing it. Ifdesired, seal your piece with any sprayfixative meant for metal; unsealedpieces will age, develop more patina, orbecome shiny with wear.HammeringPounding wire not only creates greattexture, but also strengthens metal.To hammer, place your wire on a steelbench block. Use the flat end of achasing hammer to flatten the wire, thenuse the ball end of the hammer to addtexture.Use stainless steel tweezers or plasticor wood tongs to dip the metal into theliver-of-sulfur solution. Rinse in the hotor cold water. Continue to dip and rinseoften to gradually build a patina.[ tips ]Lightly sand or brush the piece with abrass or wire brush, sandpaper, very finesteel wool, or other abrasive betweendips to give more depth to the patina—atextured surface picks up more patinathan a smooth surface.WORKING WITH LIVER OF SULFUR Take the following precautions when using liver ofsulfur: keep it away from acids, wear gloves to avoidcontact with the skin, and work in a well-ventilatedarea since the fumes are toxic. Store both liquid and chunk forms of liver of sulfurin tightly sealed light- and air-proof containers. 2010 Interweave. Not to be reprinted. All rights reserved.page 9
FILIGREE LINK BRACELETJANICE BERKEBILEHammer, spiral, and link—that'sall it takes to make Janice'sgorgeous spiral-link bracelet.Materials12 sterling silver 6mm jump rings2 sterling silver 8mm jump rings15" of sterling silver 22-gauge wire28" of copper 16-gauge wireToolsFlush cuttersRound-nose pliersChain-nose pliersLong round-nose pliersChasing hammerBench blockPounding padF i n i s h e d S i z e : 7 1 4"Filigree links1: Cut five 5" pieces of copper wire, one 3"Clasp5: Repeat Step 2 with the 3" copper wire. Usepiece of copper wire, and five 3" piecesof silver wire.2: Use the flat end of the hammer to flatten1 4" on both ends of each piece of copperwire, creating a paddle on each end.3: Use each piece of copper wire to make aloosely wrapped S-shaped double-spirallink. Hammer the outside edges of eachlink with the flat end of the hammer, thenwith the ball end.round-nose pliers to form a small spiral ateach end of the wire, rolling each spiraltoward the center, but in opposite directions from each other. Grasp the wire withthe widest (back) end of the long roundnose pliers about 1 4" from one spiral, withthe spiral facing up. Press the wire aroundthe nose of the pliers to form a hook shape.Repeat in the opposite direction at the otherend of the wire to form an S. Hammer therounded ends of the clasp with the flat endof the hammer, then with the ball end.Coiling4: Using 1 piece of silver wire and, leavinga 1 2" tail, form three coils around thecenter of 1 link. If necessary, use chainnose pliers to bunch the coils togethertightly. Trim each end to 1 2" and use theends to form tight spirals that roll towardthe center of the link. Repeat entire stepwith the remaining links. Gently curveeach link with your fingers to wrap gentlyaround the wrist.Bracelet assembly6: Use two 6mm jump rings to attach oneend of 1 link to one end of another link.Repeat three times. Use two 6mm jumprings to attach one of the end links to theclasp. Connect the two 8mm jump ringsand use two 6mm jump rings to attachone of them to the other end link.7: If desired, patinate the bracelet using liverof sulfur.Resources: Check your local bead shop or contact: Jump rings and wire: Quiltworks Northwest,(425) 453-6005, www.quiltworksnw.com. 2010 Interweave. Not to be reprinted. All rights reserved.page 10
RINGS OF SATURNMARLENE BLESSINGThe planetary look of theseborosilicate rondelles,coupled with the glasspendant, make this a trulygalactic necklace. All it takesis a little stringing, a coupleof jump rings, and sometwists of wire! 2010 Interweave. Not to be reprinted. All rights reserved.page 11
Materials8 assorted 14 8mm borosilicate (boro) rondelles1 purple 22mm lampworked glass disc1 red-and-orange 38mm lampworked glass disc12 Thai silver 9 6mm spacers6 Thai silver 6 55mm hammered noodles1 sterling silver 15mm toggle clasp2 sterling silver 10mm jump rings28" of dark red 2mm leather cord12" of sterling silver 22-gauge half-hard wire10" of sterling silver 20-gauge half-hard wireToolsRound-nose pliersChain-nose pliersWire cuttersF i n i s h e d S i z e : 2 4 " p l u s 1 7 8" p e n d a n tPendant1: Use 5" of 20-gauge wire to form a wrapped loop. Use theother end of the wire to string the 38mm and 22mm discs,then make a 90 bend 3 4" from the base of the wrappedloop. Use the end of the wire to form a spiral that rests ontop of the 22mm disc.2: Form a spiral on one end of 5" of 20-gauge wire, then stringthe two discs, front side first. Press the spiral flat on top ofthe 22mm disc. Use the other end of the wire at the backof the discs to wrap around the neck of the wrapped-loopwire, then bring the wire to the front of the discs, wrap itaround one of the spirals formed previously, and form asmall spiral at the end of the wire.Necklace strand3: Use the cord to string 1 boro, 1 spacer, 1 noodle, and 1 spacerthree times. String 1 boro.4: String the wrapped loop formed in Step 1.5: Repeat Step 3, reversing the stringing sequence.6: Center all the beads on the cord. Fold one of the cord endsin half, then use 6" of 22-gauge wire to make about 17 coilsaround the cord end to secure the cord loop; repeat withthe other cord end.7: Use 1 jump ring to attach one half of the clasp to one ofthe cord loops; repeat with the other half of the clasp andcord loop.Resources: Contact your local bead shop or contact: Borosilicaterondelles and glass discs: Bokamo Designs, (913) 648-4296, www.bokamodesigns.com. Thai silver noodles and spacers: SomersetSilver (wholesale only), (425) 641-3666, www.somerset-silver.com.Jump rings: Via Murano, (877) 842-6872, www.viamurano.com.Leather cord: Leather Cord USA, (877) 700-2673, www.leathercordusa.com. 2010 Interweave. Not to be reprinted. All rights reserved.page 12
Techniquesflush/wirecuttersTo explore stringing further, consult Getting Started Stringing Beads and Stringing Style (both from Interweave).Crimpingcrimp tubeare seamlessmetal tubes used to securethe end of a beading wire.To use, string a crimp tubeand the connection finding(i.e., the loop of the clasp).Pass back through the tube,leaving a short tail. Use theback notch of the crimpingpliers to press the length ofthe tube down between thewires, enclosing them in separate chambers of the crescentshape. Rotate the tube 90 and use the front notch ofthe pliers to fold the twochambers onto themselves,forming a clean cylinder. Trimthe excess wire.CRIMP BEADS are serratedmetal beads. Twisted crimptubes and crimp beads can besecured by squeezing themflat with chain- or flat-nosepliers.CRIMP COVERS hide crimptubes and give a professionalfinish. To attach, gently hold acrimp coverin the frontnotch of thecrimpingpliers. Insertthe crimpedplacing atube andcrimp covergentlysqueeze the pliers, encasingthe tube inside the cover.CRIMP TUBESCRIMP/CORD ENDSconsist of a loopattached to a tube.Dab the leather,plastic, ribbon, orother cord withjewelry glue, thenplace it in thecrimp/cordcrimp/cord end.endIf you’re using acrimp end, crimp it as youwould a crimp tube.WIREGUARDS provide asmooth metal channel toprotect the stringing materialfrom chaffingagainst a connector. Stringa crimp tube,then pass upthrough onehalf of thewireguardguard anddown the otherhalf. Pass the guard and wirethrough the loop of the connector, pass the wire backthrough the crimp tube, snugthe tube up to the guard, thencrimp.WireworkingMETAL WIRE comes in manyfinishes and gauges. Thelower the gauge number, thethicker the wire. The hardnessor softness of wire is called“temper.” Most wire comes indead-soft, half-hard, and hardtempers. Unless otherwisenoted, wire used in this issueis half-hard—the best temperfor making strong loops andother shapes.opening a jump ringconnect holesand loops. Open a jump ringby grasping each side of itsopening with a pair of pliers;don’t pull apart. Instead, twistin opposite directions so thatyou can open and closewithout distorting the shape.JUMP RINGSsimple loopTo form a SIMPLE LOOP, useflat-nose pliers to make a 90 bend at least 1/2" from the endof the wire. Use round-nosepliers to grasp the wire afterthe bend; roll the plierstoward the bend, but not pastit, to preserve the 90 bend.Use your thumb to continuethe wrap around the nose ofthe pliers. Trim the wire nextto the bend. Open a simpleloop just as you would a jumpring.conehead pinseye pinsHEAD PINS are straight wireswith a flat disc, ball, or othershape at one end. EYE PINSare straight wires that end ina loop.For additional technique information,including videos and illustrations,visit beadingdaily.com and click onthe “glossary” tab. 2010 Interweave. Not to be reprinted. All rights reserved.page 13Use CONES to finish a multistrand piece. Attach eachstrand of beads to a wrappedloop or an eye pin. Use thewrapped-loop wire or eye pinto string the wide end of acone, covering the ends of thestrands; form a wrapped loopat the tip of the cone thatattaches to a clasp
with another bead, attaching one of the loops to a loop of the first link before coiling the tail down the neck of the wire. Wrapped-Loop baiLs 8. Center the bead on a 3" or longer piece of wire. Bend both ends of the wire up the sides of the bead. 9, 10. Bend one end straight up at the center of the