Transcription
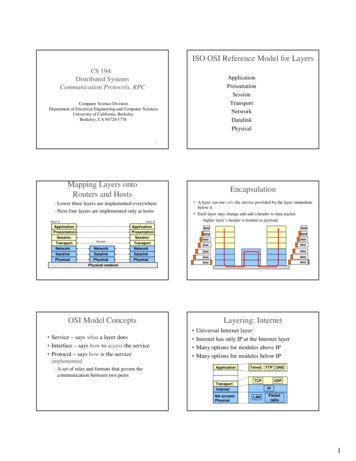
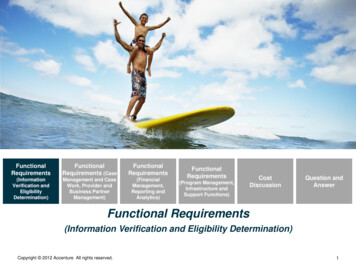
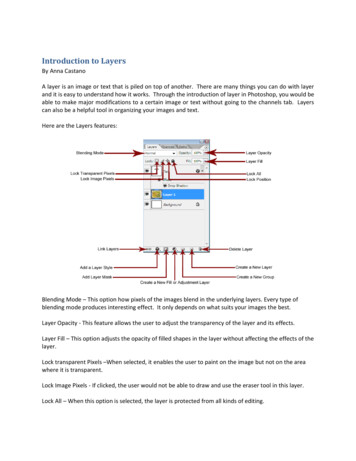
Introduction to LayersBy Anna CastanoA layer is an image or text that is piled on top of another. There are many things you can do with layerand it is easy to understand how it works. Through the introduction of layer in Photoshop, you would beable to make major modifications to a certain image or text without going to the channels tab. Layerscan also be a helpful tool in organizing your images and text.Here are the Layers features:Blending Mode – This option how pixels of the images blend in the underlying layers. Every type ofblending mode produces interesting effect. It only depends on what suits your images the best.Layer Opacity - This feature allows the user to adjust the transparency of the layer and its effects.Layer Fill – This option adjusts the opacity of filled shapes in the layer without affecting the effects of thelayer.Lock transparent Pixels –When selected, it enables the user to paint on the image but not on the areawhere it is transparent.Lock Image Pixels - If clicked, the user would not be able to draw and use the eraser tool in this layer.Lock All – When this option is selected, the layer is protected from all kinds of editing.
Lock Position – If this one is clicked, the user would be able to make all kinds of editing except formoving the image or text.Link Layers – After Shift selecting all the layers that the user wants to be linked, click this icon. Thisfeature enables the user to move several layers all at once.Add a Layer Style – The user would be able to add effects in the layer by clicking on this feature. A lot ofeffects can be applied all at once by this feature.Add Layer Mask – Allows the user to paint the image without affecting the original image. It can also beused for adding mask for text and images, in which a particular portion of the image or text can be seenthrough masking its underlying layer.Create a New Fill or Adjustment Layer – This feature enables the user to make adjustments that can bestill be deleted even after the program is closed without affecting the original image.Create a New Group - This is very helpful in organizing text and images especially if the user is workingon a lot of layers and elements.Create a New Layer – When clicked, this option will create a new blank layer.Delete Layer – The user can drag the layer on this icon or select the layer first then click this option inorder to delete it.The Layer WindowText Layer – This layer contains text characters that can be edited.Normal Layer – Layer that usually contains images.Indicates Visibility – This icon would be able to hide or show the layer.
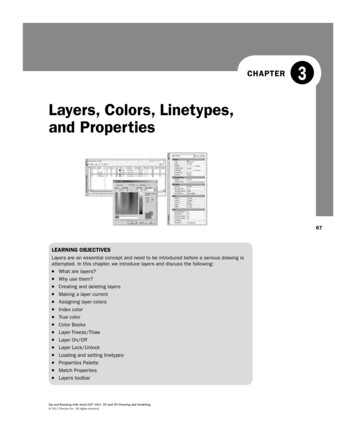
Layer Effects – Allows the user to see what effects are used in the layer.Layers TutorialIn this poster tutorial, you will learn the basic things you can do with layers. This will help youunderstand more the layer features.1. Open all the images that you need. In this tutorial, I have a guitar, which I will be using as themain image and 3 wallpapers as the backgrounds.2. Create a new document.
3. Drag all the layers in the new document.4. After changing the name of the layers, let’s start on the guitar layer. Hide first the other layersso that we could focus on the guitar layer.
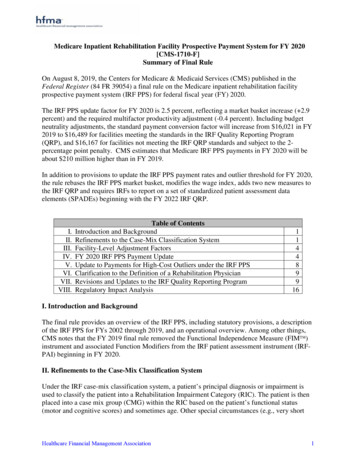
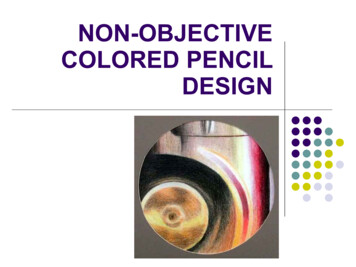
5. Change the scale of the image by pressing Ctrl T then press the Shift key while dragging thecorners to preserve the proportion of the image. In this tutorial, to make the poster moreinteresting, I enlarge the picture more than 100% to focus on the interesting part of the image.6. Click on the Add vector mask option in the Layers Palette. Notice that a white square appearsbeside the guitar layer.7. In the toolbar menu, select the Brush tool. When you set the foreground color into black, andpaint it into the image, it makes that portion of the image invisible. When you set theforeground color to white, it makes that portion of the image visible.
8. Continue to paint with black the unnecessary part of the image. You can always switch to thewhite foreground color in case you accidentally erase the part of the image that you need to bevisible.9. After cleaning the background of the image, turn on the visibility of the techno layer.
10. Select the techno layer then go to Edit Transform Flip Horizontal.11. Notice that some of the details of the techno layer go underneath the guitar layer. In order tomake it visible, using the Rectangular Marquee Tool, select the part that you want to copy.
12. Go to Edit Copy then Edit Paste.13. A new layer will be created.14. Using the Move Tool, move the new layer to the left side so that it would be visible.
15. In order for the image to blend in the background, use the Eraser Tool to erase the corners ofthe image. Make sure to use the airbrush.16. Shift Select the techno layer and Layer 1 then click on the arrow in the corner of the layerwindow. Select Merge Layers.
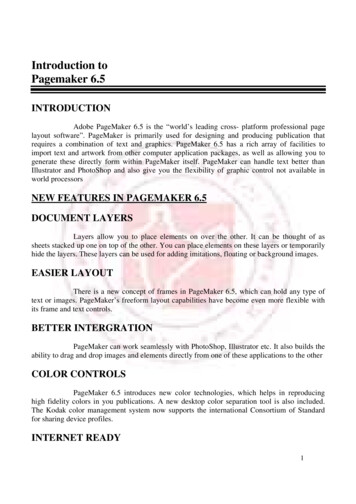
17. Turn on the visibility of the classic layer.18. Play with the blending mode of the classic layer. In this case, I decided to choose the Colorblending mode.19. If you are contented with the blending mode of the classic layer, select the flower layer.
20. Turn on the visibility of the flower layer.21. Play with the blending mode of the flower layer. I chose Multiply for this particular poster.22. Using the eraser tool, play with the flower layer. Erase some of the details of the flower layer inorder to give emphasis on the other layers.
23. Select guitar layer and duplicate it by dragging it to the New Layer button.24. Hide the guitar copy layer then select the guitar layer. Change the blending mode of the guitarlayer to Overlay.25. So this is what we have so far.
26. Turn on the visibility of the guitar copy layer then set the blending mode to Luminosity.27. Then we can improve the effects of the image by going to Filter Brush Strokes Accented Edges.
28. A dialogue box will appear. Just accept the default by clicking OK.29. To soften the image a bit, set the Opacity to 83%.30. We can add text in the poster by clicking on the Horizontal Type Tool in the toolbar.
31. Let’s type in UNPLUGGED. You can select the font type and the font size of your choice.32. Select the line tool then draw a line around the text.33. Duplicate the Shape Layer by dragging it to the New Layer button.
34. Select the new shape layer then go to Edit Transform Path Flip Vertical.35. Move the two Shapes Layers and the UNPLUGGED text.
36. If you are happy with what you have, click on the arrow on the corner of the layers window thenselect Merge Layers.37. Double click on the Set the background color in the toolbar then click on the on the yellowishportion of the background image. Click OK.
38. Make sure that the Shape 1 Copy layer is selected. Go to Filter Brush Strokes Spatter.39. A dialogue box will appear. Make the necessary adjustments then click OK.40. To make the text more interesting, adjust it by pressing Ctrl T so that you can adjust the sizeand rotate the text. After you are done with the necessary adjustments, hit the enter key.
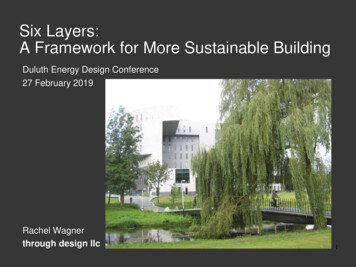
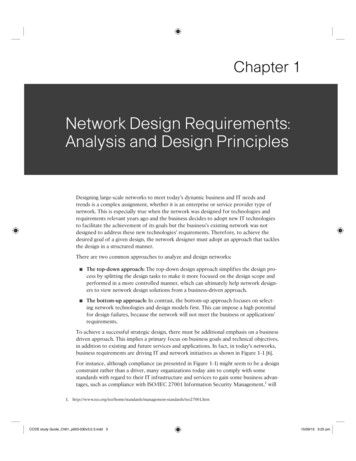
Here is the final poster.
Link Layers – After Shift selecting all the layers that the user wants to be linked, click this icon. This feature enables the user to move several layers all at once. Add a Layer Style – The user would be able to add effects in the layer by clicking on this feature. A l