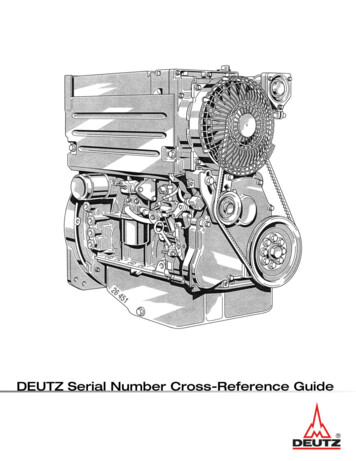
Transcription
Small EngineCarburetor TipsA Guide to Small EngineCarburetor Service andTr o u b l e s h o o t i n g601
259
Carburetor AdjustmentsSmall Engine Carburetor TipsCommentsAbout the techniques: The techniques described in thisbooklet have been tried and tested over the years by smallengine repair technicians and back-yard-mechanics alike.I acknowledge that they may not be the ONLY techniquesavailable for small engine carburetor troubleshooting andrepair, and they may not be the best possible techniques,but they were chosen for this booklet because they havebeen proven to work in the vast majority of cases and theyare the easiest to understand and to perform.The outcome: As stated at the beginning of this booklet,there are so many different types of carburetors in use today that it would have taken volumes to address the issues, benefits, and shortcomings of each specific one.I believe have done my best to provide you with a genericworking knowledge of small engine carburetors, and to offer informed suggestions as to the nature of certain operations, problems, and remedial measures.I sincerely hope that the final outcome of this booklet isone that has met your small engine needs.For additional assistance, or to offer your comments andsuggestions, please feel free to email me at:There are several companies that manufacturecarburetors for gasoline powered small engines,and there are many different models and stylesof carburetors in use. In some cases the differences may be subtle, while in other cases thedifferences are drastic. Therefore, this bookletwill approach the subject of small engine carburetor problems from a generic view.This booklet will help you determine whether ornot your small engine problem is in fact relatedto the carburetor, and provide instructions toremedy the most common carburetor problems.The bowl and float style carburetor is the mostcommon, and problematic, carburetor used onsmall engines. You will, therefore, find this styleused in many of the illustrations throughout thisbooklet. While you may have a different stylecarburetor on your machine, the remedies described here-in will work with most any type ofcarburetor.Tekbook@attbi.com583
FinalComments457
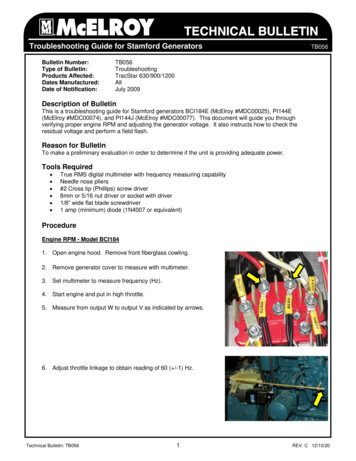
Carburetor AdjustmentsIdle Speed AdjustmentTurn the Idle Speed Adjustment screw until it “just” contacts the mechanical throttle linkage arm. This will prevent the engine from dropping below “stall” speed whenyou move the throttle to slow.You must now readjust the main valveCarburetorBasics565
Carburetor AdjustmentsHigh Idle AdjustmentAllow the machine to run until it reaches normal operatingtemperature, then set the mechanical speed control(throttle) on the machine’s handle to the fastest possiblespeed.Begin turning the high Idle Valve screw inward (clockwise)until you hear the engine change speed.If the engine begins to run slower, turn the screw in theother direction. The machine should begin to run faster.Continue increasing the engine’s speed (by turning thescrew) until the engine either begins to sputter or beginsto slow down again. Once this happens, return the screwto the position where the engine was running at it’s fastest speed.This adjustment is complete.Low Idle AdjustmentMove the mechanical throttle to the engines slowest speedand perform the same procedure on the low idle valve thatyou just used on the high idle valve, until you reach theslowest speed at which the engine continues to runsmoothly without stalling.NOTE: It may be necessary to back-off the mechanical idlespeed adjustment screw first.655
Carburetor AdjustmentsCarburetor BasicsRule-of-ThumbBefore we get started it is important for you to understandsome simple and basic concepts about carburetorsIf engine will not startA general rule of thumb for all adjustable valves is togently turn the valve inward (clockwise) until it seats,(DO NOT OVER-TIGHTEN) and then back the valve out(counter-clockwise) one full turn.Regardless of the type, style, or manufacturer,every carburetor, performs the same function:1) to mix fuel (gasoline) and oxygen (air) in the exactproportions needed to sustain combustion2) To send that mixture to the combustion chamberwhere it is converted into energy to perform work.In many (if not most) cases, where the valve is not damaged and the ports are not obstructed, this will providesufficient fuel to allow the small engine to start and run.If this fails, you may have to experiment with your particular machine by changing the number of turns anywhere from a low of one–half turn, to a high of twocomplete turns (it is not an exact science).In order to accomplish the above, a carburetor requires two things:Fine tuning of these valves will be required once the machine can remain running on it’s own.1) an adequate supply of fresh, clean fuel2) an adequate supply of clean airMain Valve AdjustmentOnce the engine can remain running on it’s own, adjust themain valve by turning it in either, or both, directions untilthe engine runs smoothly at all speeds.This will have to be repeated after high and low idle adjustments are made.54Removing, restricting, or contaminating either of thesetwo, will impede, or prevent, your carburetor from performing it’s function.It’s a fairly simple formula but one which can not bechanged:Air Fuel Combustible mixture7
Carburetor BasicsAll small engines require these basic elementsin order to operate:FUEL - AIR - COMPRESSION - SPARKRemove any one of these and theengine won’t run These basicelements areour mainconcernHigh Idle AdjustmentThe High Idle Adjustment (usually indicated by the letter“H” stamped on the carb) is a valve that controls fuelflow when the engine is running at it’s fastest speed.Turning the screw clockwise will case the machine to runslower. Counter-clockwise will make it run faster.This must be adjusted BEFORE thelow idle is adjusted and only whenthe machine’s throttle (speed control) is set at the fastest setting.FUEL - Fresh, clean, gasoline ofan octane rating recommendedby the manufacturer. AIR - Mixes with fuel to make itcombustible. COMPRESSION - Fuel and airmixture are compressed insidethe engine. Carburetor AdjustmentsSPARK - Produced by the “sparkplug”. It ignites the compressedfuel and air mixture and forcesthe piston to turn the engine.8Main ValveThe main valve controls the flow of fuel from the bowl tothe throat of the carburetor. Turning the screw clockwiserestricts the flow of fuel. Counter-clockwise increases theflow of fuel.53
Carburetor AdjustmentsCarburetor BasicsIdle Speed AdjustmentHow It WorksAs the name implies, the Idle Speed Adjustment controlsthe speed (in RPMs) at which the engine idles. It is amechanical adjustment and not a fuel valve.1. FUEL4. SPARKFuel flows from thefuel tank to thecarburetorThe spark plug ignitesthe mixture andpushes the piston2. AIR3. COMPRESSIONAir enters thecarburetor and mixeswith the fuelFuel and air mixture iscompressed by thepistonTightening (turning clockwise) the screw will push themechanical arm outward and make the machine idlefaster, while turning it counter-clockwise (loosening) willcause the machine to idle slower. This adjustment simplydetermines how far the throttle linkage can move towardthe slow position.This must be adjusted AFTER the high and low idlevalves (if present) are adjusted.Low Idle AdjustmentThe Low Idle Adjustment (usually indicated by the letter “L”stamped on the carb) is a valve that controls fuel flowwhen the engine is at idle. Turning the screw clockwise willcause the machine to run slower. Counter-clockwise willmake it run faster.This is adjusted only when the machine’s throttle (speed control) is set atthe slowest setting.529
Carburetor BasicsCarburetor Adjustments(1)The carburetor is the heart of the small engine. Thedrawing below represents the most common design: abasic "bowl and float” type carburetor with adjustablevalves. The carburetor on your machine may besomewhat different and may not include a bowl, butmany of the other parts will be basically the same and inapproximately the same location.TWO ADJUSTMENTS(2)Choke LinkageThrottle LinkageTHREE ADJUSTMENTSIdle Speed Screw(3)Choke PlateIdle Mixture ValveFOUR ADJUSTMENTSFuel Bowl(4)Main Valve(5)1051
Carburetor AdjustmentsThere is no gauge with which a small engine carburetor canbe properly adjusted, nor is there a chart, table, or diagramI can provide that will assist you in properly adjusting it.The art of adjusting a small engine carburetor comes fromtraining and experience. A small engine technician adjustsmore by feel and sound than by manufacturer’s specs andthis is something that comes only from experience.That being said, I will provide you with some very basic,“rule of thumb” techniques. I do not guarantee that theywill make your machine run smoothly (or even correctly).Some small engine carburetors have no adjustable featuresat all. Of those that do have adjustable features, most havetwo adjustments, some have a third, and others may havea fourth. These are:CarburetorMaintenanceTWO ADJUSTMENTSIdle speed adjustment (1)Main Valve (2)THREE ADJUSTMENTS(1) and (2) plus:Mixture Valve (3)FOUR ADJUSTMENTS(1) and (2) plus:High Idle Valve (4)Low Idle (5)5011
CarburetorAdjustments1249
Carburetor MaintenancePreventive MaintenanceBefore we get into solving your carburetor problems, letstake a few minutes to talk about preventing them.While it is the most important part of a small engine, thecarburetor is often, unfortunately, the most neglectedpart. Hidden behind (or beneath) the air filter, the carburetor is truly “out of sight, out of mind” until somethinggoes wrong.A good program of regular maintenance can help insurethat your carburetor performs as intended, and may helpavoid costly repairs.Here are some simple suggestions to keep your carburetor functioning smoothly:1) Keep the carburetor covered: removing the housingthat covers the carburetor (usually the air filter housing) can allow dust, (and other foreign particles) andwater to enter the carburetor2) Lubricate the carburetor: the occasional use of agood quality spray lubricant, applied lightly to allmoving parts and to the linkage, will insure smoothoperation3) Clean the exterior of the carburetor frequently: Sawdust, grass clippings, grease, and grime can interferewith the linkage.4) Clean the inside of the carburetor: an occasional shotof carburetor cleaner directly into the throat of thecarburetor will go a long way toward avoiding potential problems.4813
Carburetor MaintenanceCarburetor Service and RepairPreventive MaintenanceThe Float AssemblyGasolineTo Remove The Needle ValveAs stated earlier, your carburetor requires an adequatesupply of fresh fuel (gasoline) in order to perform properly.Gasoline has a relatively short, useful, life span. If youhave ever pumped your own gas on a hot summer day,you have seen the vapors rising from the spout. It is actually these vapors which are the most combustible component of the fuel.Gasoline begins to evaporate almost the instant you purchase it. The older it gets, the more of it‘s highly combustible vapors it looses. As more and more vapors arelost, the gasoline becomes less and less combustible.Old, stale, gasoline which has lost all of it’s vapors is saidto have “turned to varnish”.Varnish is a brownish residue left in fuel cans, fuel tanks,carburetors, and fuel lines, once the gasoline has completely evaporated. However, long before the vaporshave completely evaporated, the fuel will reach a pointwhere it is extremely difficult (or impossible) to burn.After taking photo or drawing picture, locate the retaining wire on the needle valve. Observe the direction of it’sposition and how it wraps around the valve and proceeds under the lip of the float.The next step will remove the retaining wire and allowthe needle valve to drop out of position BE PREPAREDTO CATCH IT!While supporting the float, use needle-nose pliers togently remove the retaining wire. The needle valve willnow drop out of position (you may have to lower thefloat a bit to make room for the valve to drop out. Placevalve and wire in a safe place.Carburetor cleaner and a very fine wire can be used toclean the needle valve fuel jet (port)To Remove The FloatOnce the needle valve is removed, the float can be removed by pushing the float shaft out with an awl orother small tool. This will allow the float to drop out.You could, in all reality, have a full tank of gas, but yoursmall engine will not run!Most small engines are designed to use REGULAR unleadedgasoline (unless otherwise noted in your owners manual)14Float ShaftReverse the above steps to reinstall float and needle valve47
Carburetor Service and RepairCarburetor MaintenanceThe Float AssemblyPreventive MaintenanceIt is for good reason that I have by-passed the float assembly in the previous chapter. Although the float canbecome defective and the needle valve can becomeclogged, the float assembly is a very tricky item to workon and should only be repaired or replaced by a trainedsmall engine technician.GasolineIt is also important to note that, unless otherwise noted inyour owners manual, gasoline mixed with oil is to be usedonly in 2-cycle engines of the type used on chain saws,string trimmers, and some (smaller) lawn mowers.However, in the interest of providing information tothose who feel they have the ability to undertake thischore, I provide the following, generic information.Most machines however, use 4-cycle engines which have aseparate oil reservoir and require no additives to the fuel.With the bowl removed (as instructed in the previouschapter) inspect the float, for damage, especially pinholes.Needle ValveGasoline StabilizerAlso note any liquidthat may be insidethe float. Thereshould be NONE!Because gasoline can break-down and leave behind theresidue referred to as varnish, using gasoline that hasbeen in your machine, or in storage, for more than twomonths is not recommended.Leaks can sometimesbe detected by genRetainingtly heating the floatWire(once removed from the machine) and then submersing itin water. If bubbles rise the float is defective.Machines that must be stored "ready for immediateuse" (such as emergency generators), and for the seasonalstorage of your machine, fuel should be treated with agasoline stabilizer to prevent varnishing.FloatIf the float or needle valve must be removed:I highly recommend taking a very close-up photo, ordrawing a detailed picture of the float and valve beforeremoving. This will provide a reference to correctly reassemble the float, valve, and retaining wire.46Gasoline Stabilizer is a liquid product that is added togasoline to extend the life of the fuel and insure long termfreshness. It is available at most auto parts dealers andwhere small-engine powered machines are sold.Instructions for proper mixing will be included with thestabilizer.15
Carburetor MaintenanceCarburetor Service and RepairPreventive MaintenancePreventive MaintenancePurging the Fuel SystemAir FiltersWe mentioned earlier that the second component required by your carburetor is an adequate supply of cleanair. In order to insure that the air reaching your carburetor remains clean, the manufacturer installed an air filterspecifically designed to filter out foreign particles whileallowing the proper amount of air to reach the carburetor.Not all 4-cycle small engines will have an air filter, sinceair filters are designed for engines used in dusty areas(like lawnmowers and chainsaws), but those that do, willhave one of three types: "paper element", "foam filter",or "two-stage filter" consisting of a paper elementsurrounded by a foam filter.Chainsaws, and other 2-cycle machines, may have a flatfilter (made of a thin, cloth-like, fabric), a cartridge stylefilter, or a plastic cone shaped filter made of fine mesh.Step #7: Reassembling the Fuel System1. Reattach the fuel tank (if removed)2. Replace fuel filter3. Reconnect all fuel lines (replacement with new lines isrecommended) making sure that all hose clamps aretight.4. Insure that fuel shut-off (if equipped) it turned to theON position5. Fill fuel tank with clean, fresh gasoline of at least 87octane. Watch for leaks and tighten clamps andnuts as needed.6. Replace oil drain plug and refill oil supply. (If unsure ofoil requirement, 10W30 automotive motor oil will suffice in warm climates)7. Install new spark plug and reconnect plug wireIt is very important that these filters remain on the machine, and that you KEEP THEM CLEAN.Most manufacturers recommend that you clean orreplace the filter after every 20 hours of use. Machinesused in dusty areas, such as chainsaws and chippers,should have the filter changed much more often.16Now reassemble the fuel system, fill will a smallamount of fresh gasoline, and attempt to start theengine. If engine will not start go to next section.45
Carburetor Service and RepairService and MaintenancePurging the Fuel SystemTypical Air Filter StylesTwo-Cycle FiltersStep #6b: Reassembling the CarburetorIf you have removed the main valve part-by-part1. Line up the valve (center it) over the hole in the bottom of the retaining nut. Make sure to replace parts inthe reverse order from which they came out if valveconsisted of more than one part2. Carefully thread the valve back into the retaining nutby hand.3. Make finger tight.4. Using appropriate tool (screw driver, or wrench) slowlyturn the valve clockwise (tighten) until it seats. DONOT OVER TIGHTEN5. When valve is seated, begin to slowly turn the valvecounter-clockwise the exact number of turns that yourecorded earlier6. The slot (or scratch) on the head of the valve shouldalign perfectly with the scratches you made earlier onthe bowl.7. A minor adjustment can be expected at this time but ifalignment is off by more than 1/8 turn remove thevalve and repeat above.Fabric StyleCartridge Style4-CyclePaper Filter4-Cycle Foam Filter4-Cycle Two Stage FilterWing NutCoverFoam FilterPaper Filter4417
Carburetor Service and RepairPurging the Fuel SystemStep #5: Cleaning the CarburetorWith the main valve removed, once again spray largeamounts of carburetor cleaner directly into the throat ofthe carburetor.Cleaner should easily flow through the carburetor, intothe bowl, and drain through the main valve assemblyhole or through the hole in the retaining nut.When cleaner is flowing easily in this manner you can begin to reassemble the carburetor and fuel system.Step #6a: Reassembling the CarburetorIf you have removed the main valve as a completeassembly1. Line up the assembly (center it) over the hole in thebottom of the carburetor bowl2. Carefully thread the assembly back into the bowl byhand, watching to make sure that the head of thevalve turns exactly the same amount as the retainingnut.3. Make finger tight.4. Place wrench over the retaining nut and slowly turnclockwise (tighten) again making sure that valve andnut turn exactly the same amount.5. Tighten until nut is snug but do not over tighten.1843
Carburetor Service and RepairPurging the Fuel System4. Once valve can be turned, hold the retaining nutfirmly in place and gently begin to turn the valveCLOCKWISE (tighten) carefully counting the numberor turns (or fractions of turns) until the valve“SEATS”. The valve is seated when the tip of thevalve contacts the metal. DO NOT OVER TIGHTEN ASTHIS WILL FLATTEN THE TIP OF THE VALVE.5. Write down the number of turns it took to reach theseated position. Example: “one and one-eighth turns”or “two, half turns”, or “one half turn and one eighthturn” etc. When you replace the vale this is the exactamount that you will loosen the valve from the seatedposition to return it to it’s original position.6. With the number of turns recorded, return machine toup-right position. Hold retaining nut firmly in placeand begin to turn the valve counterclockwise (loosen)until it can be removed from the assembly. Thevalve may have more than one part, so be careful when removing the valve so as to “catch” allparts as they come out of the assembly. Lay allparts in an area where they will be undisturbedand place them in the order in which they cameout of the assembly.7. Fuel should now be draining from the machine and itshould not be necessary to remove the retaining nut.CarburetorTroubleshootingNOTE: If your carburetor has a bowl but no nut or bolt onthe bottom, the entire bowl will unscrew from the bottomof the carburetor. Do this carefully, as described.4219
Carburetor Service and RepairNOTE: The next step will remove the entire valve assemblythetoFuelSystemand may Purgingcause the bowlbecomedetached from thecarburetor. It is very important that you do not let thebowl drop from the carburetor as this may dislodge thefloat, needle valve, and retaining wire9. Place a small container under thevalve assembly andcontinue to turn thenut counterclockwise until thevalve assembly is removed from theCORRECTWRONGbowl, and fuel isflowing freely into thecontainer through the hole.10. Go to Step 5Step #4c: Cleaning the CarburetorIf the head of the valve does not move exactly the sameamount as the retaining nut, it will be necessary to removethe main valve assembly part-by-part. This procedure isnot recommended for the novice201. With machine upside-down, and scratches in place forreference, place the correct size wrench on the retainingnut and hold it firmly in place.2. Slowly attempt to turn the head of the valve 1/4 turn inthe CLOCKWISE direction (tightening)3. If valve will not move, hold the head of the valve firmlyin place and loosen the retaining nut by turning it counter-clockwise 1/4 turn at a time until it is loose enoughto allow the valve to turn.41
Carburetor Service and RepairCarburetor TroubleshootingPurging the Fuel SystemIs It The Carburetor?surface of the bowl, on both sides of the slotted headof the valve to indicate it’s exact position. (If head isnot slotted, make scratches on both sides and acrossthe top of the head in one straight line).I can’t begin to tell you how many machines have comeinto my shop with the owner insisting the problem was withthe carburetor, only to find out later that it wasn’t.6. Place the proper size wrench over the retaining nut.Do not use asocket as youRetaining Nutmust be able tosee the head ofthe valve7. While closely watching the head of thevalve, turn the retaining nut 1/4 turncounter-clockwise.NOTE: the head of the valve must turn exactly the sameamount as the retaining nut in order to maintain it’s position when you retighten. If this does not happen, returnthe nut and head to their original positions and jump tostep #4c.8. If valve and nut are turning exactly the same amounton each turn, flip the machine back to the up-right position and continue to next step.There can be many reasons why a small engine poweredmachine won’t start, runs rough, or stalls, that have absolutely nothing to do with the carburetor.Let’s set aside the two most common problems; bad fueland a dirty air filter. did you know that an engine thatstarts, runs fine until it warms up, and then stalls (but willrestart after cooling down) probably has a bad condenser?Or that a machine that backfires (or leaks fuel) through themuffler may have a stuck exhaust valve? And a hairlinecrack in a spark plug is enough to keep your engine fromstarting. In addition, many people don’t even realize thattheir (older model) machines have ignition points, whichcan produce many problems that may be mistaken for abad carburetor.So how do you narrow down the field to identify a real carburetor problem?Well, there are of course the obvious signs: The carburetor is visibly broken Fuel is leaking from it The moving parts don’t moveIf none of these conditions exist then it gets a bit harder.4021
Carburetor TroubleshootingCarburetor Service and RepairIs It The Carburetor?Purging the Fuel SystemYou will recall that a small engine requires four elements inorder to run: Air, Fuel, Compression, and Spark. In orderto narrow it down to the carburetor you must first makesure your engine has all four elements.Step #4b: Cleaning the CarburetorLets start with the air since that is the easiest to test, butmake sure to run all four tests!As mentioned earlier, it will be necessary to drain anyfuel or carburetor cleaner that has collected in the bowl.If you’ve removed the air filter, and no one has shoved asock in the carburetor (don’t laugh. It happened!) then youknow nothing is obstructing the flow of air to the carburetor.This can sometimes be accomplished without removingthe bowl.Now look down into the carburetor throat as you move thechoke and throttle levers to see if the choke and throttleplates are opening.THROTTLE PLATECHOKE PLATE22Now that you are familiar with the internal parts of thebowl- type carburetor it is time to get back to cleaning it.1. Drain the fuel tank and fuel lines completely.2. Drain all oil out of the crankcase. (Very important tolet ALL oil drain as it is now contaminated by carburetor cleaner and because we will be turning the machine upside down which could cause oil to leakeverywhere).3. If you can clearly see,Main ValveRetaining Nutand access, the bottomAssemblyof the carburetor bowl,jump to # 4, otherwiseValve Headcarefully turn the machine upside down. Itmay be necessary to usewooden blocks to bracethe machine solidly.4. Locate the main (mixing)Scratchesvalve assembly.5. Using a scratch awl, nail,or other sharp object,Bowl viewed from bottommake a scratch on the39
Carburetor Service and RepairCarburetor TroubleshootingPurging the Fuel SystemIs It The Carburetor?Float AssemblyThe float assembly consists of a Float (usually made ofbrass or plastic) and a Needle Valve.If the air filter is off, the throat is unobstructed, and thechoke and throttle plates are opening, air is reaching thecombustion chamber.Okay, lets jump to spark.Located inside the bowl, the float is usually a donut shapeddevice that is hinged to allow it to move up and down.The purpose of the floatis to rise and fall on topof a small supply ofgasoline that pools inthe bowl. As the floatrises and falls on thefuel, it moves a needlevalve up and down.WARNING: The electrical system on a small engine candevelop up to 20,000 VOLTS. The following test must beperformed with extreme care. Failure to followinstructions fully may result in electrical shock!Needle ValveRetainingWireFloatThe needle valve controls theamount of fuel allowedTo enter the bowl. As the level of the fuel being used fromthe bowl decreases, the float drops, lowers the needlevalve and allows more fuel to enter the bowl. Conversely,when the bowl is full of fuel, the float rises, raising the needle valve, and shutting of the supply of fuel to the bowl.The needle valve is held in place by a very fine (almosthair-like) retaining wire.Extreme care must be taken if removing the bowl to avoidallowing the float to drop completely. If the float drops toofar, the needle valve can drop completely out of it’s position and the retaining wire may fall off.381. Carefully remove the spark plug and connect it to anapproved spark plug tester (available in most automotivestores).2. Shift gears (if equipped) to neutral,3. Inspect spark plug wire for cracksand look into rubber boot and make surethe connection is not broken,4. Keep hands and body parts awayfrom the spark plug, the tester, and allmoving parts. Pull the starter rope orengage the electric starter, and watch tosee if the plug is sparking (firing).5. If plug fires, reconnect and go to next page.6.If no spark, take machine to a service technician asthis could indicate a problem with the magneto, points,condenser or other areas of the electrical system.23
Carburetor TroubleshootingCarburetor Service and RepairIs It The Carburetor?Purging the Fuel SystemSince you made it to this page we will assume you haveair and spark. Now lets check for compression.The tensioning spring maintains tension on the valve toprevent engine vibrations from turning it out of adjustment.In order to get an accurate measurement of compression inyour engine, a small-engine compression tester should beused. However, this tool would be used so rarely by theaverage small engine owner that it may not justify theexpense.The method I am about to suggest is an old favorite of theback-yard handyman.1. Check to make sure that all parts driven by theengine are securely connected and bolts are tight. This isespecially important on lawnmower blades. A missingor loose blade can imitate a compression problem.Even the slightest adjustment will change the way the engine runs!Not all bowl style carburetors have an exposed main valve,some will have the main valve on the inside of the bowl,and other may employ an automatic type main valve.Do not be concerned if your bowl style carburetor lookssomewhat different from these pictures. If there is a bowl,the following instructions will still apply.If there is no bowl present on your carburetor, you can skippast this chapter.2. Shift gears (if equipped) to neutral.3. Disconnect the ignition wire from the spark plug.4. Pull starter handle slowly. After a few inches youshould feel significant resistance. If little (or no)resistance is felt, repeat step one and try again.If you still feel no resistance, this may indicate acompression problem in the engine. Have the machinechecked by a service technician.2437
Carburetor Service and RepairCarburetor TroubleshootingPurging the Fuel SystemIs It The Carburetor?Before proceeding with the next step it is imperative thatyou understand the inner workings of the bowl typecarburetor.The two internal partsthat we will be concerned with are theMain Valve Assemblyand the Float AssemblyThis is a relatively easy test. Just four steps.1. Disconnect the spark plug wire and remove the sparkplug.2. Go have lunch! By removing the spark plug you haveexposed the combustion chamber to the atmosphere. Thiswill allow any fuel still in the chamber to evaporate, bu
booklet have been tried and tested over the years by small engine repair technicians and back-yard-mechanics alike. I acknowledge that they may not be the ONLY techniques available for small engine carburetor troubleshooting and repair, and they may not be the best possible techniques, but they were chosen for this booklet because they haveFile Size: 1MB