Transcription
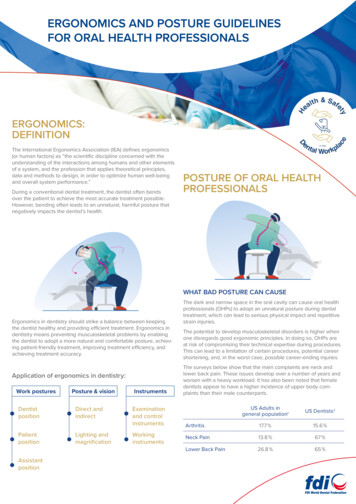
ERGONOMICS AND POSTURE GUIDELINESFOR ORAL HEALTH PROFESSIONALSERGONOMICS:DEFINITIONThe International Ergonomics Association (IEA) defines ergonomics(or human factors) as “the scientific discipline concerned with theunderstanding of the interactions among humans and other elementsof a system, and the profession that applies theoretical principles,data and methods to design, in order to optimize human well-beingand overall system performance.”During a conventional dental treatment, the dentist often bendsover the patient to achieve the most accurate treatment possible.However, bending often leads to an unnatural, harmful posture thatnegatively impacts the dentist’s health.POSTURE OF ORAL HEALTHPROFESSIONALSWHAT BAD POSTURE CAN CAUSEErgonomics in dentistry should strike a balance between keepingthe dentist healthy and providing efficient treatment. Ergonomics indentistry means preventing musculoskeletal problems by enablingthe dentist to adopt a more natural and comfortable posture, achieving patient-friendly treatment, improving treatment efficiency, andachieving treatment accuracy.Application of ergonomics in dentistry:Work itionPosture & visionDirect andindirectLighting andmagnificationInstrumentsExaminationand controlinstrumentsWorkinginstrumentsThe dark and narrow space in the oral cavity can cause oral healthprofessionals (OHPs) to adopt an unnatural posture during dentaltreatment, which can lead to serious physical impact and repetitivestrain injuries.The potential to develop musculoskeletal disorders is higher whenone disregards good ergonomic principles. In doing so, OHPs areat risk of compromising their technical expertise during procedures.This can lead to a limitation of certain procedures, potential careershortening, and, in the worst case, possible career-ending injuries.The surveys below show that the main complaints are neck andlower back pain. These issues develop over a number of years andworsen with a heavy workload. It has also been noted that femaledentists appear to have a higher incidence of upper body complaints than their male counterparts.US Adults ingeneral population1US Dentists2Arthritis17.7 %15.6 %Neck Pain13.8 %67 %Lower Back Pain26.8 %65 %
THE IDEAL POSTUREOF THE ORAL HEALTHPROFESSIONALTHE HEADTo be inclined slightly forward, oriented over the shoulders.The interpupillary line is aligned horizontally not more than 15 to20 degrees.TORSOThe longitudinal axis of the torso is upright. It promotes the naturalcurves of the spine – cervical lordosis, thoracic kyphosis, lumbarlordosis. If needed, the back rest of the chair can be positioned toprovide lumbar support.UPPER ARMS, ELBOWS AND SHOULDERSArms relaxed at one’s side due to the force of gravity. The elbowsdo not stick out and the forearm is in front of the body. Shouldersare oriented over the hips.WRISTSShould be kept in a neutral position with the wrists straight.THE FINGERTIPSShould be held at the treatment point, at a height that is comfortableand affords a clear view of the procedure being performed.SEATED POSTURESeating height at knee height; hips slightly higher than the knees;tilt the operator stool slightly downward.Movement throughout the day is key:staying too long in one position can cause fatigueand increase the risk of musculoskeletal problems.THE FEETTo be flat on the floor. The lower legs are in a vertical position.Consider comfortable shoes and clothing to ease body movement.RHEOSTAT POSITIONINGPlace it close to the operator so that the knee is at about a 90 to100 degree angle. If placed outside this zone, the dentist must shiftweight to one side, leading to asymmetrical stresses on the back,hence low back pain. Consider alternating sides.POSITIONOF THE PATIENTA deliberate patient position should be determined according to thedentist’s natural posture and his or her reference point, which allows theclinician to achieve optimal performance without any physical burden.Exceptional cases:Treating patients in an upright positionA slight bend in theknee alleviatespressure on thelumbar spine. Feetcan be elevated witha tilt of the chair.Occasionally, it may be necessary to treat a patient while in an upright position, for exampleduring certain procedures or when treating elderly patients or those with complex medicalhistories (hypotension, vertigo). In this case theback rest should be vertical to provide lumbarsupport to the patient. OHPs may find it morecomfortable to stand during these appointments.During pregnancy, a patient may experiencepostural hypotension, which can lead to fainting.Pregnant patients can be encouraged to lie ontheir side or be treated in a more upright position.
HARMONIZING POSTUREAND VISIONMAGNIFICATION BY LOUPES AND MICROSCOPE To ensure a more accurate view, loupes or microscopes can also be used. While using either loupes or a microscope, keep an optimal distance from the dentist’seyes to the patient’s mouth to ensure clear vision, good focus and ideal posture.Naked eyeWith loupeWith microscopeThings usedoccasionallyINSTRUMENTATIONPREPARATION AND PLACEMENT OF INSTRUMENTSWITHOUT THE FOUR-HANDED SYSTEMThere is a limit to the forearm’s natural movement. Preparationand strategic placement of the instruments relieves the clinician’sphysical burden and improves concentration during treatment.Ideally, dentists should be able to pick up and return basicinstruments, e.g., mirror, tweezers, explorer and excavator,without having to look away from the treatment area.The basic principle is to differentiate foreseeable andunforeseeable tasks during treatment. Instruments and materials for which the use or timingis uncertain are prepared on the dentist’s side. Instruments and materials that the dentist will needare prepared in the order and timing that they will beused on the assistant’s side.PREPARATION AND PLACEMENT OF INSTRUMENTSWITH THE FOUR-HANDED SYSTEMRecommendation:Place all of the necessary items for the patient and the procedurewithin the area of reach before the patient arrives.Things usedThings usedoccasionallyfrequentlyThings usedfrequentlyThingsno longerneededThingsno longerneeded
POSITION OFTHE DENTAL ASSISTANTThe assistant’s role in a four-hand system is very importantto achieve a more comfortable, less exhausting,stable, more accurate and more efficient treatment.BASIC PRINCIPLESFOR RIGHT-HANDED DENTISTS*1. The assistant sits on the left side, facingthe dentist.2. The working area for the assistant atthe cabinet or mobile cabinet should belocated on the assistant’s right side.3. The dentist uses indirect visualizationwith a dental mirror to allow the assistantto achieve improved direct visualizationto avoid an awkward posture.ADVANTAGES:1. The assistant does not interferewith the dentist moving between the10 o’clock and 12 o’clock position.2. The operating field can be seen clearly.3. The assistant’s hand can easily extendto the oral cavity.4. Necessary instruments can be easilyhanded over to the dentist.Optimal assistant seating allows easieraccess and proximity to the patient.The assistant should be seatedon a stool so that his or her eyes are15-20 cm higher than the dentist’s eyes.The stool should have a foot supportto allow the assistant to work both withinand out of the oral cavity.This position: reduces fatigue and stressful postures; stabilizes the suction; enables the assistant to properly handover instruments to dentists; exerts the least amount of force on thepatient’s soft tissue (lips and tongue).* Left-handed dentists or dental assistants using right-handed dentist facilities may be at a higher risk of developingmusculoskeletal complications. They may want to consider ambidextrous or left-handed dental chair models.
HARMONIZING POSTUREAND VISIONDIRECT AND INDIRECT VISUALIZATIONIn order to maintain a properly balanced,upright posture, it is important to balance directvisualization with indirect visualization using the dental mirror.In order to widen the view without compromising good posture, the dentistshould ask the patient to place the head on the headrest and adjust it accordinglyto allow easier access, depending on which surface they are working. The dentist mayask the patient to open the mouth wider or close it slightly when working buccally.DentistpositionHere are five tips for direct views:Rotating the patientshead left and rightChange the angle of themaxillary occusal planeMIRRORA systematic mirror technique is necessary because practitionerstend to assume unnatural and improper posture when trying tocheck difficult-to-see and impossible-to-see regions. The mirrortechnique should also coincide with adequate illumination of theoral cavity.LIGHTINGEnough light from the overhead dental light is essential to adequately illuminate the inside of the patient’s mouth.The light beam of the operating light must be perpendicular to theworking mandibular plane or to the working maxilla plane to be fullyeffective.Dental handpieces with an integrated light source are ideal forillumination.Mouth openingwidth adjustmentHeight adjustment of theoral cavity
CHOICE OF INSTRUMENTSSensations and perceptions are differentfor everyone. These generalrecommendations can help OHPs find thedental instruments that suit them best.EXAMINATION ANDCONTROL INSTRUMENTSThe dental mirror and probe are lightand thin. Their diameters typically rangefrom 2 to 3 millimeters (mm). They arenaturally held between the thumb andthe index finger and do not usually leadto any muscle strain.WORKING INSTRUMENTSInstruments with a large diameter (10 mm),textured handle, and a light weight(15 grams) require the least amount ofmuscle load and pinch force. Diameterslarger than 10 mm have no additionalbenefit; instruments lighter than 15 g mayrequire even less pinch force. Consideralternating tools with different diametersizes to reduce the duration of prolongedpinch gripping.Silicone instrument handles are furtherfound to improve hand comfort, reducehand fatigue, and improve grip and pinchstrength.Instruments should be held in a light,pen-like grip, using a fulcrum (finger rest)either intra-orally or extra-orally. Thisplays an important role in stabilizing theclinician’s hands during treatment,increasing the precise control neededand reducing muscle load and fatigue.GLOVESFavor gloves of proper size and fit and avoid ambidextrous or onesize-fits-all gloves. If they are too large and get wet, ill-fitting glovesrequire the practitioner to squeeze tighter to maintain the grip onthe instrument. If they are too tight, the gloves may constrict theneurovascular structures of the fingers and hand.PERSONAL PROTECTIVEEQUIPMENTWearing personal protective equipment (PPE) can cause ergonomicproblems if not done optimally. This may be particularly true in thetime of COVID-19 due to increased PPE requirements. Ergonomicproblems related to PPE may include impaired vision, loss of dexterity, increased fatigue and decreased comfort.Recommendation: Try various PPE types when possible to determine the best comfort and fit. Schedule a ‘test’ appointment with acolleague to try wearing your PPE in the clinical setting. Considerhow the new PPE wearing will affect movement in the operatoryand the potential need to move equipment, lighting and seating forimproved access during procedures.www.fdiworlddental.org/hsdwReferences1. Blackwell DL, Lucas JW, Clarke TC. Summary health statistics for U.S. adults: National HealthInterview Survey, 2012. National Center for Health Statistics. Vital Health Stat 10(260). 20142. American Dental Association. 2015 Dentist Well-being and Survey Report. ADA (2017).RecognitionContent developed by Health and Safety Task Team(T. Caruso, D. Ilhan, M. Ishida, J.M. Laffont) 2021 FDI World Dental Federationベーシ ッ ク デザイ ン 要素This publication was supported byAvenue Louis-Casaï 51 1216 Genève Switzerlandinfo@fdiworldental.org www.fdiworlddental.org
2021 FDI World Dental Federation CHOICE OF INSTRUMENTS Sensations and perceptions are different for everyone. These general recommendations can help OHPs find the dental instruments that suit them best. EXAMINATION AND CONTROL INSTRUMENTS The dental mirror and probe are light and thin. Thei