Transcription
Teaching GuideTyping Pal Teaching Guide De Marque 2007. Reproduction is allowed.1
Table of ContentsWhy is it important to learn a good typing technique?3Introduction to the learning process and teaching guide4Introduction to the processIntroduction to the teaching guide44Section 1 – Ergonomics5LearningErgonomic objectivesWorksheets667Section 2 – The basic position8What is the basic position?The two basic positionsThe tactile reference pointsThe objectives of the basic positionWorksheets89101010Section 3 – Accurate typing and starting to learn with Typing Pal11Speed comes with accuracyLower case letters firstStarting to learn with Typing PalTyping Pal session duration11121212Instilling healthy work habits from the word goWhere to beginWhat an exercise consists ofWhy the cartoons under the exercises?The Typing Pal results tab1313131314Spotting signs of discouragementAccuracy objectivesWorksheets151517Section 4 – Improving your speed18A springboard into the futureHow does Typing Pal calculate the speed in words per minute?Target speeds in words per minuteWorksheets18191919Appendix 1: WorksheetsErgonomics WorksheetsBasic Position WorksheetsAccuracy WorksheetsTyping Speed Worksheets21384153Appendix 2: Letter to the parents59Letter to the parents60Typing Pal Teaching Guide De Marque 2007. Reproduction is allowed.2
Why is it important to learn agood typing technique?It is hard not to notice the important role that computers play in thedifferent spheres of our lives, not to mention how quickly it came about. Itis just as easy to deduce that this prominence will continue to grow and thatcomputer skills will be increasingly important. The most widespread meansfor computer communication is still the keyboard. And, although it is not theonly means, it is the most universally used and will continue to be for quitesome time.The problem is that you must have a certain amount of command of thekeyboard for it to be an effective communication tool. You can teachyourself to type using four, three or even two fingers but, at the end of theday, the only way to achieve optimal productivity is with a good typingtechnique that uses all fingers.It is only as an adult that you will note the degree to which a flawedtechnique affects your productivity. So many adults say they regret nothaving learned a proper typing technique when they see how effective theirco-workers are on the keyboard. And, everyone knows how hard it is toteach “an old dog new tricks,” i.e. to unlearn one- or two-finger typing.If learning to type is not initiated at school age, bad habits will quickly set inand will be very hard to undo as an adult. Sure, children or teenagers canteach themselves to type quite quickly, but not providing them with thestructure that will allow them to learn a technique considerably limits themreaching their peak of productivity. And finally, the effort required for achild or teenager to learn a typing technique is much less than that for anadult who is already laden with bad habits and limits.Typing Pal Teacher Guide De Marque 2007. Reproduction is allowed.3
Introduction to the learningprocess and teaching guideIntroduction to the processLearning a typing technique is more than just typing characters andcalculating speed in words/minute.The process proposed in this guide consists firstly in making students awareof good posture and healthy work habits. The next step involves learning thebasic finger position on the keyboard. Teachers will then be invited to gettheir students to focus on accuracy rather than speed, which will graduallylead to the latter.Introduction to the teaching guideEach section of the guide includes worksheets that teachers can photocopy.The worksheets are documents that Typing Pal license holders (for exampleschool teachers) can make copies of and hand out to their students. Eachsection contains a list of worksheets. The worksheets themselves are foundin the Appendix so as to lighten the structure of the guide.These worksheets propose activities that complement those found in TypingPal. Given the monotonous nature of learning to type; it is recommendedthat you diversify the learning methods. Dividing the Typing Pal session intosmaller sections with a variety of typing activities is a good way to keepstudents interested. As a result, they will focus more on accuracy during theTyping Pal exercises.The first worksheet of each section is an illustration—beginning the subjecton a lighter note. Teachers can put it up on the screen during the initialinstructions or, since it can be photocopied, add it to a package theythemselves have put together.Lastly, there is a form letter at the end of the guide that can be used toinform the students’ parents that they have started a typing course. Werecommend that teachers include the school's web address (URL) andinstitution code.Typing Pal Teacher Guide De Marque 2007. Reproduction is allowed.4
Section 1Ergonomics– Are you sure that position is ergonomic?According to the Merriam-Webster Online Dictionary, ergonomics is "an applied scienceconcerned with designing and arranging things people use so that the people and thingsinteract most efficiently and safely." In concrete terms, ergonomics focuses on reducing thenegative impact of sustained use of a technology on man. In the case of a computer keyboard,posture is the first thing that comes to mind.When working on a computer keyboard, it does not take long before you start to feel physicaldiscomfort. It is even highly likely that, as early as the first session, students complain aboutpain in their forearms, neck and elsewhere. It is therefore imperative to discuss ergonomics atthe beginning of the training.Typing Pal Teacher Guide De Marque 2007. Reproduction is allowed.5
LearningTyping Pal proposes texts on this subject that can be found under the Ergonomics tab inTyping Pal Junior (CD-ROM) or Typing Pal School. In Typing Pal 5.0 (CD-ROM), click theLearning tab, followed by the Ergonomics section. Teachers can also refer to the sheetsummarizing the concepts and material to send to students who correspond to their courselevel. Lastly, there are also self-assessment and assessment charts that can be used to helpdetermine how close students are to achieving their goals.Ergonomic objectivesHere are the objectives we suggest you evaluate in relation to ergonomics:For elementary schools1.2.3.4.Never look at the keyboardKnow and apply the rule of aligning your eyes with the top of the screenKnow and apply the staircase ruleKnow and apply lighting rulesFor middle schools, high schools, colleges, professional training centers and businesses (inaddition to the objectives for elementary schools)1.2.3.4.5.Know and apply the proper mouse positionKnow and apply the proper wrist positionKnow and apply the proper neck positionKnow and apply the proper copyholder positionRecognize the importance of taking breaksTyping Pal Teacher Guide De Marque 2007. Reproduction is allowed.6
WorksheetsBelow is a list of the different worksheets available for the section on ergonomics. It is notmandatory to do them in order or to do them all. This is simply a bank of tools from whichteachers can choose.Number123456789101112Worksheet nameErgonomics Introduction CartoonSummary of Ergonomic Conceptsfor Elementary SchoolsSummary of Ergonomic Conceptsfor Middle Schools, High Schools,Colleges and ProfessionalTraining CentersSpot the Errors (Elementary)TypeIntro cartoonConceptsummaryConceptsummarySpot the Errors (Middle Schools,High Schools, Colleges andProfessional Training Centers)The Ergonomic Detective(Elementary)WorksheetThe Ergonomic Detective (MiddleSchools, High Schools, Collegesand Professional TrainingCenters)Play the GameWorksheetErgonomic Habits Self-AssessmentChart for Elementary SchoolsErgonomic Habits Self-AssessmentChart for Middle Schools, HighSchools, Colleges andProfessional Training CentersErgonomic Habits AssessmentChart for Elementary SchoolsErgonomic Habits AssessmentChart for Middle Schools, HighSchools, Colleges andProfessional Training CentersSelf-AssessmentWorksheetSelf-Assessment Also includes the elements in the chart forWorksheetelementary heetAssessmentWorksheetSummarySummary of ergonomic concepts for elementaryschool objectives.Summary of ergonomic concepts for middleschool, high school, college and professionaltraining center objectives.Students must circle the ergonomic don'ts on acartoon. The answer sheet follows.The answer sheet follows.Teachers give all the students in the class anobservation chart containing the name of anotherstudent in the group; they must observe theassigned person and, using the chart, make noteson his or her ergonomics. Obviously, they have totry to not get caught! At the end of theobservation period (it may be spread out overseveral sessions), the students give the chart tothe person they observed and go over the noteswith them. Teachers can also do a recap as agroup.Description of a group ergonomic habitobservation activity that touches on the typingtechnique.Also includes the elements in the chart forelementary schools.Typing Pal Teacher Guide De Marque 2007. Reproduction is allowed.7
Section 2The basic position– Feel free to get into the starting position.– No need. I run very fast on just one leg!What is the basic position?Before diving right into the Typing Pal exercises, it is important to learn the basic fingerposition on a computer keyboard.The basic position is the position your fingers are in when resting on the keyboard, beforehitting a key. After every keystroke, your finger must return to its original position, ready tohit another key. You must be able to put your fingers in the basic position and then return tothat position immediately after hitting a key without looking at the keyboard, and this actionshould become second nature. Your keyboard productivity depends greatly on this skill.Typing Pal Teacher Guide De Marque 2007. Reproduction is allowed.8
The importance of the basic finger position on the keyboard is similar to that of a sprinter atthe start of a race. A runner who does not get in an effective starting position will be at adisadvantage compared to the other runners. By not putting your fingers in the basic position,you will lose half-seconds as you constantly search for keys and hesitate about where to putthem next. All these little time wasters add up and can be highly detrimental to yourproductivity. This is especially true if, on top of it all, you never even use certain fingers.The two basic positionsThere are two main typing methods that determine the basic finger position. The first is themethod currently known as the "home row" method and the second is the "two rows" method.With the "home row" method, all the fingers are placed on the center row of alphabeticalletters:Basic position using the "home row" typing methodWith the "two rows" method, the longer fingers, i.e. the ring and middle fingers, are placed onthe top row:Basic position using the "two rows" typing methodThe method where all the fingers are on one row is probably the most common. All the same,the “two row” method is often considered the more ergonomic of the two. When the ring andmiddle fingers are on the top row of characters, the hand stretches more, which causes thewrist to bend less.Fingers on the "home row." Note that the wrists are more bent.Fingers on "two rows." Note that the wrists are less bent.Currently, Typing Pal School only uses the "home row" method; however, the CD-ROM versionoffers both methods.Typing Pal Teacher Guide De Marque 2007. Reproduction is allowed.9
The tactile reference pointsIt is not easy to place your fingers on the keyboard in the basic position without looking.However, most keyboards have tactile reference points to help you. If you look at the "J" and"F" keys on your keyboard, you will see a small raised area, often in the shape of a bar.These tactile reference points make it easy to find these keys without looking at thekeyboard. Moreover, once your index fingers are in position, the others will naturally fall intoposition on the home row.The objectives of the basic positionNo matter what level you are at, the objective is to develop the automatic reflex of puttingyour fingers in the basic position without looking at the keyboard.WorksheetsThe following sheets propose activities that will help develop a sense for the basic positionusing the tactile reference points.Number12Worksheet nameThe Importance of Learning aTyping Technique and a BasicPosition Introduction CartoonThe Search for Lost TactileReference Points!TypeIntro cartoonSummaryWorksheetThe sheet proposes a series of mini-activitiesstarting with finding the tactile reference pointsand ending with learning the basic position.Typing Pal Teacher Guide De Marque 2007. Reproduction is allowed.10
Section 3Accurate typing and starting to learn with Typing Pal– Now, how does the saying go again? Oh yes, now I remember: slow and. umm.the right basic position wins the race. Is that it? In any case, it goes something like that.Speed comes with accuracyYour typing speed is reflected in words per minute. In other words, the more words you typeper minute, the more effective you are. There are however drawbacks of stressing thismeasurement with beginners. Students who try to type quickly risk making a lot of typos and,as a result, hindering their learning because they develop bad habits.Typing Pal Teacher Guide De Marque 2007. Reproduction is allowed.11
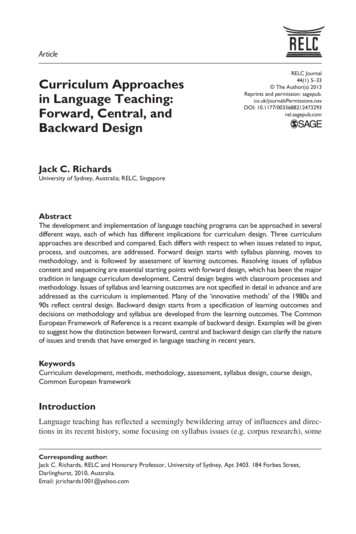
Obviously, a mistake made on a computer keyboard does not have the same impact as itwould back in the day of typewriters, when you had to use corrector fluid to erase themistake, over which you would then re-type the right character. Now, whenever we make amistake, we simply reach for the backspace key, which takes less than a second. However,you have to make sure the students understand that even if it does not take much to fix amistake, it still remains that the less mistakes they make, the faster they will complete theirtext.Accordingly, at the beginning of the course, emphasis should be placed on accuracy and notspeed. The idea is to try to develop a good technique firstly, and to gradually pick up speedthereafter. In fact, speed comes with accuracy.Lower case letters firstTyping is a mechanical and repetitive action. It is therefore in your best interest to make whatyou do most second nature in order to be faster and more efficient. Generally speaking, lowercase letters are used more than any other character.Take this guide for example, which has 62,689 characters. This number can be broken downinto 43,761 (70%) lower case letters, 1,007 (1%) upper case letters and 17,921 (29%) spacesand other forms of punctuation.Lower case letters29 %Upper case letters1%70 %Other characters(punctuation and spaces)Breakdown of lower and upper case letters and other characters in this guideThis is a good example of how the majority (71%) of characters in a regular text are lowercase letters. Teachers are therefore better focusing on the technique used for lower caseletters than working on that used for upper case letters or other characters.Starting to learn with Typing PalTyping Pal session durationIt is generally recommended to divide the course into several short sessions of no more than15-20 minutes each and we have noticed that this is what Typing Pal users prefer. Whensessions are too long, fatigue sets in quickly and students can lose motivation. Fatigue andlack of motivation can also steer students away from the objective of learning a good typingtechnique and cause them rather to develop poor work habits.Typing Pal Teacher Guide De Marque 2007. Reproduction is allowed.12
Instilling healthy work habits from the word goThe Typing Pal learning sessions is not the only opportunity students have to use a computerkeyboard. Obviously, no one can say for sure whether or not they actually apply the basics ofthe typing technique. However, in the worksheets, there is a Basic Rules for a Good TypingTechnique reminder that students can put up these near their desk at home.Where to beginThe typing lesson is under the Typing Pal Exercises tab. In the case of Typing Pal 5.0(CD-ROM), click the Learning tab, followed by the Exercises section. The first icon (Basics)provides a very brief summary of the main ergonomic recommendations. Then, the exercisesare laid out in an orderly fashion. It is best to do them in order as they are organizedaccording to the order of fingers in the basic position.What an exercise consists ofEach exercise has two parts. In the first part, Typing Pal teaches students by showing themthe location of the keys used to type the characters in the exercise and then explains thetechnique to use to type these characters. The second part is the exercise itself, wherestudents are asked to type the characters shown.The exercise as it appears in Typing Pal SchoolThe exercise as it appears in Typing Pal 5.0 (CD-ROM)Why the cartoons under the exercises?During the exercises, there are cartoons at the bottom of the window that react according towhether you hit the right key or not. Once the exercise is completed, the cartoon hasdifferent endings depending on whether students completed the exercise successfully or not.In addition to adding a lighter side to the exercise, these cartoons are meant to get studentsto look at (and keep looking at) the screen and not the keyboard.Typing Pal Teacher Guide De Marque 2007. Reproduction is allowed.13
The Typing Pal results tableAt the end of each exercise, Typing Pal displays the results in a table. Students can consultthe table to see how many "words per minute" they reached for the exercise, as well as thenumber of errors, which is the number they should focus their attention on in the beginning ofthe course.The results window as it appears in Typing PalThe results window as it appears School in Typing Pal 5.0(CD-ROM)Typing Pal Teacher Guide De Marque 2007. Reproduction is allowed.14
Spotting signs of discouragementLearning how to type requires a lot of discipline and can often cause students to becomediscouraged. Here are some previously seen situations during which it is common to see signsof discouragement.Symptoms1 Students who focus on accuracy may type slowly inthe beginning of the learning process and continuallyfail the exercises because they do not reach thetarget speed in words per minute.Proposed approachIt is therefore better to lower the target speed in wordsper minute so they can happily go about working on theirtechnique. This can be done in the Teacher ManagementModule.2 Students have completed the first exercise (jf) andare already excited about their scores. But, in thesecond exercise, they notice that their scores havedropped significantly and they lose motivation.Explain to the students that the second exercise requiresusing four fingers as opposed to two, which is much moredifficult. Encourage them, and tell them they will get itwith time, that this will not be the only time they willrun into this difficulty and, most of all, to keep focusingon their technique.3 The situation described in point 2 could arise anytime the students have to hit a key that is not in thebasic position. This could cause the students to makemore errors. For example, if using the “home row”method, you may see signs of discouragement duringthe “ei” exercise.The brain has to get used to every new movement on thekeyboard. In the case of the previous example, this isthe first time an exercise requires using characters onthe top row. Same thing for the “c” exercise, which usesthe bottom row for the first time.4 Upper case letters and other characters that requirea combination of two keys are always likely todiscourage students.5 Students often have to redo an exercise more thanonce. For example, it is not uncommon to see somestudents redo an exercise as many as ten times. It'seasy to understand how they can get discouraged.Explain this to the students and offer themencouragement.In this case, explain to them that their speed is morelikely to increase when typing lower case letters. It mayhelp to show them the example that gives the proportionof lower case letters to other characters in Section 3.We suggest, after three to five tries, authorizingstudents to move on to the next exercise even if theyhave not successfully completed the current one. Theycan come back and redo it later. If this does not work,lower the target speed in words per minute.Accuracy objectivesWhen it comes to calculating the number of errors, you will soon notice that there are twostandpoints. The first, the more classic, involves seeing an error as a loss of time. In thiscontext, teachers calculate the speed by subtracting a certain number of words (3-10) perminute for every error. The second considers that, on a computer, the speed in words perminute already takes errors into account because the backspace key is hit every time a typo ismade and it is therefore pointless to add an additional penalty.Typing Pal takes two things into consideration when determining accuracy.1. First, it depends on the motivation for learning a typing technique. The requirementswill be different for students for whom typing is required for their work than for thosewho are satisfied with functional typing skills.2. However, regardless of why students are learning to type, they will be more effectiveif, during their training, they concentrate on learning a good typing technique whilemaking as few errors as possible.Typing Pal Teacher Guide De Marque 2007. Reproduction is allowed.15
It is more realistic, when assessing how well you type—and notably the number of errors youmake—to look at how well you do with an actual text rather than random letter and worddrills. A text is closer to reality.During the exercises, it is better to simply ask students to always make sure the number oferrors is less than or equal to the number tolerated for the exercise. This number is providedin the results table at the end of the exercise. You may want to suggest that students redo theexercise if they exceed the number of errors tolerated.If using Typing Pal CD-ROM, it is best to use an existing text as the exam, or to create oneusing the text editor. With Typing Pal Junior, the texts are under the Practice tab, where as,for Typing Pal 5.0, click the Training tab, followed by the Practice section.For Typing Pal School, we recommend using the Entry Level Test and Final Test found underthe Exercises tab to determine improvement in terms of the number of errors. You can alsouse the Teacher Management Module to add customized texts.The following Target Table is based on the results from the Entry Level Test and the Final Test(approx. 60 words) in Typing Pal School. Use it as a guideline to help you to evaluate yourstudents.Children around ages 9 to1112 years of age and olderand functionalStudents from professionaltraining centersTargetAverage, but needsimprovementLess than 15 errorsBetween 25 and 30 errorsUh oh! You need to reallywork hard at making fewererrors!More than 40 errorsLess than 10 errorsBetween 20 and 25 errorsMore than 35 errorsAlways strive forperfection!Typing Pal Teacher Guide De Marque 2007. Reproduction is allowed.16
WorksheetsThe following worksheets propose activities that focus on improving accuracy.Number1TypeIntro cartoonSummary2Worksheet nameThe Importance of PrioritizingAccuracy From the BeginningIntroduction CartoonKeyboard in OneWorksheet34Dream TeamForget the smik BallWorksheet7All for One and One for All!Worksheet8Basic Rules ReminderReminderStudents who manage to complete anexercise without making any errors get to addtheir names to a table.Keyboard in One in teamsImprove your accuracy without looking at thekeyboard.The worksheet explains how to use theimprovement activities to improve youraccuracy.A team activity that uses the Cosmik Ballgame (Game tab) to encourage students tofocus on accuracy. It is best to wait untilstudents have practiced all the lower caseletters before proposing this activity.Another team activity that aims at encouragingstudents to focus on accuracy. This time,errors are compiled in the review exercises.Reminder outlining the basic rules of a goodtyping technique.Typing Pal Teacher Guide De Marque 2007. Reproduction is allowed.17
Section 4Improving your speed– Yes, yes, yes, I know you type quickly. But, I’m begging you, just focus on your accuracyfor the next couple of minutes A springboard into the futureThe speed in words per minute at the end of the course should never be seen as the finalscore. It is highly likely that students will continue using a computer keyboard after theirTyping Pal course. In this case, their improvement will be directly related to how much of thetyping technique they assimilated. If students developed the habit of always going back to thebasic position and always using the proper keystroke techniques, their improvement after thecourse will be greater than students who pays no heed to these aspects.This is why teachers, even at the end of the learning process, should focus more on the basicposition, technique and accuracy than on speed in words per minute. They should think of theFinal Test as a springboard into the future and remind their students that speed comes withaccuracy.Typing Pal Teacher Guide De Marque 2007. Reproduction is allowed.18
In the worksheets, there is a self-assessment questionnaire that you can use during the FinalTest. This questionnaire, which touches on the basic position and the typing technique, is agood way to go over these notions with the students.How does Typing Pal calculate the speed in words per minute?Most Typing Pal activities stop when an error is made. In other words, if students makemistakes, they cannot continue until they correct it. Accordingly, all completed texts orexercises are error free. Thus, Typing Pal does not subtract words for errors made.Typing Pal considers any group of five characters to be a word. So, the speed in words perminute is simply calculated by dividing the total number of characters typed by five.Target speeds in words per minuteTargetChildren around ages 9 to1112 years of age and olderStudents at professionaltraining centersAverage, but needsimprovement1520 (errors tolerated)30 (errors tolerated)30 (no errors tolerated)24WorksheetsThe following sheets propose activities that may help acquire a good typing speed.Number13Worksheet nameAccuracy is Essential to SpeedCartoonSelf-Assessment Questionnairefor the Final TestSlow Down, Hare!4Improvement2TypeIntro cartoonSummarySelf-assessment Self-assessment questionnaire to use during theworksheetfinal testWorksheetA simple way to make students realize that toomany errors can really slow you down.WorksheetHow to use the exercises in the Improvement tabto improve speed.Typing Pal Teacher Guide De Marque 2007. Reproduction is allowed.19
Appendix 1 : WorksheetsTyping Pal Teacher Guide De Marque 2007. Reproduction is allowed.20
Ergonomics WorksheetsTable of Contents1. Cartoon222. Summary of Ergonomic Concepts23for Elementary Schools3. Summary of Ergonomic Concepts24for Middle Schools, High Schools, Colleges and Professional Training Centers4. Spot the Errors26(Elementary)5. Spot the Errors28(Middle Schools, High Schools, Colleges and Professional Training Centers)6. The Ergonomic Detective30(Elementary)7. The Ergonomic Detective31(Middle Schools, High Schools, Colleges and Professional Training Centers)8. Play the Game329. Ergonomic Habits Self-Assessment Chart33for Elementary Schools10. Ergonomic Habits Self-Assessment Chart34for Middle Schools, High Schools, Colleges and Professional Training Centers11. Ergonomic Habits Assessment Chart36for Elementary Schools12. Ergonomic Habits Assessment Chart37for Middle Schools, High Schools, Colleges and Professional Training CentersTyping Pal Teacher Guide De Marque 2007. Reproduction is allowed.21
ErgonomicsWorksheet 11section– Are you sure that position is ergonomic?Typing Pal Teacher Guide De Marque 2007. Reproduction is allowed.22
ErgonomicsWorksheet 2Summary of Ergonomic Conceptsfor Elementary SchoolsThis sheet summarizes the ergonomic concepts covered by the objectives of the elementaryschool guide.1 – Never look at the keyboard1sectionYou have to learn from the onset to look at the screen and not the keyboard when you type. Ifyou let your eyes move from keyboard to screen too often, you could lose a lot of time.Moreover, looking at the screen, if it is positioned properly, keeps your head straight, whichcomplies with the staircase rule described below.2 – Align your eyes with the top of the screenIn the case of a desktop computer, your eyes should be at the same height as the top of yourscreen. Feel free to prop up the screen if this is not the case. Long hours in front of thescreen can cause neck pain if the screen is not in a good position.3 – The staircase ruleThe staircase position is the properposture when working on a keyboard.Sit with your back straight, leaningslightly against the backrest at a 90 angle with the seat.Your thighs and legs should form a 90 angle.It is important to have your feet flat onthe floor. If necessary, use a footrest.Most children require footrests.Your forearm should form an angle ofapproximately 90 with your arm.4 – LightingPoor lighting can cause headaches or even dizziness. Your computer screen does not give offenough light to read without straining your eyes. It is therefore recommended that you workwith the lights on.Never put your screen in front of something that creates a glare such as a brightly coloredwall or a sunny window.Never strain your eyes to see; blink your
7 Worksheets Below is a list of the different worksheets available for the section on ergonomics. It is not mandatory to do them in order or to do them all. This is simply a bank of tools from which teachers can choose. Number Worksheet name Type Summary 1 Ergonomics Introduction Cartoon Intro