Transcription
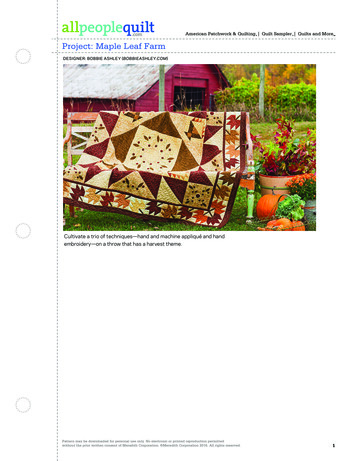
American Patchwork & Quilting Quilt Sampler Quilts and MoreProject: Maple Leaf FarmDESIGNER: BOBBIE ASHLEY (BOBBIEASHLEY.COM)Cultivate a trio of techniques—hand and machine appliqué and handembroidery—on a throw that has a harvest theme.Pattern may be downloaded for personal use only. No electronic or printed reproduction permittedwithout the prior written consent of Meredith Corporation. Meredith Corporation 2016. All rights reserved.1
American Patchwork & Quilting Quilt Sampler Quilts and MoreProject: Maple Leaf FarmMaterials 1 yards dark red print (circle1 8appliqués, quilt center, MapleLeaf blocks)1 yard light gold print (appliquéfoundation, basket blocks,Maple Leaf blocks)1 4 yard each gold, orange, darkorange, rust, and light brownprints (basket blocks, MapleLeaf blocks)2— 1 4-yard pieces assortedbrown prints (Maple Leaf blocks)1 5 8 yards mottled tan (appliquéfoundations, wreath appliqué,quilt center, Maple Leaf blocks)1 2 yard light tan print (circleappliqués, quilt center, MapleLeaf blocks)5— 1 4-yard pieces assorted lightprints (Maple Leaf blocks)5 8 yard brown tone-on-tone (leafappliqués, quilt center)11 2 yards burgundy print (circleappliqués, inner and outerborders, binding)1 4 yard dark brown print (basketblocks, stem appliqués)41 4 yards backing fabric76" square battingFreezer paperSpray starchErasable or water-solublefabric penClear monofilament threadEmbroidery floss: greenFinished quilt: 671 2" squareFinished blocks: embroideredcenter, 161 2" square; embroideredcorner and basket, 81 4" square;Maple Leaf, 51 4" squareQuantities are for 44/45"-wide,100% cotton fabrics.Measurements include 1 4" seamallowances. Sew with right sidestogether unless otherwise stated.Cut FabricsCut pieces in the following order.Patterns are on pages 9–10. Tomake a template of Pattern H, seeMake and Use Templates, page 12.Appliqué foundation squares arecut larger than necessary; you willtrim them to the correct sizes aftercompleting the appliqué andembroidery.Designer Bobbie Ashley used afreezer-paper method to prepareappliqué pieces. To use thismethod, complete thefollowing steps.1. Lay freezer paper, shiny sidedown, over patterns A–G. Usea pencil to trace each patternthe number of times indicatedin cutting instructions. Cut outfreezer-paper shapes on drawnlines to make templates.2. Using a hot dry iron, press eachfreezer-paper template, shinyside down, onto wrong side ofdesignated fabric; let cool. Cutout each fabric shape, adding ascant 1 4" seam allowance to alledges, to make appliqué pieces.Clip into inner seam allowance ofthe A wreath appliqué just up toedge of template.3. Spray a small amount of starchin a dish. Place template-toppedA wreath appliqué facedownon a pressing surface coveredwith a tea towel or muslin. Dipa cotton swab in starch andmoisten outer seam allowanceof wreath appliqué (Diagram 1).Using tip of a hot dry iron, turnseam allowance over edge offreezer-paper template andpress until fabric is dry. Pressentire outer and inner seamPattern may be downloaded for personal use only. No electronic or printed reproduction permittedwithout the prior written consent of Meredith Corporation. Meredith Corporation 2016. All rights reserved.allowances in the same manner,adding starch as necessary andensuring fabric is pressed tautagainst template. Carefully peeloff template.4. Repeat Step 3 with outeredges of B and F leaf appliqués(Diagram 2).5. To turn under seam allowancesof C, D, E, and G circle appliqués,sew long basting stitches aroundeach fabric circle, 1 16" from rawedge (Diagram 3). End stitchingnear starting point. Gently pullthread ends to gather bastingstitches and fabric snuglyaround freezer-paper templates.Spray with starch, press, and letdry. Clip gathering threads andgently remove templates.From dark red print, cut: 8—91 8" squares, cutting eachin half diagonally for 16 largetriangles total 22 of Pattern C 4 of Pattern E 24 of Pattern GFrom light gold print, cut: 1—18" square 2—63 8" squares, cutting eachin half diagonally for 4 mediumtriangles total 8—17 8 6" rectangles 2—35 8" squares, cutting eachin half diagonally for 4 smalltriangles total 16—21 4" squares, cutting eachin half diagonally for 32 extrasmall triangles total 4—17 8" squaresFrom each gold, orange,dark orange, and rust print, cut: 4—21 4" squares, cutting each inhalf diagonally for 8 extra-smalltriangles total2
American Patchwork & Quilting Quilt Sampler Quilts and MoreProject: Maple Leaf FarmFrom light brown print, cut: 2—35 8" squares, cutting eachin half diagonally for 4 smalltriangles total 4—17 8" squaresFrom assorted brown prints andscraps of all previously cutfabrics, cut 44 matching sets of: 2—25 8" squares, cutting each inhalf diagonally for 4 extra-smalltriangles total 3—21 4" squaresFrom mottled tan, cut: 1—173 4" square, cutting itdiagonally twice in an for 4extra-large triangles total 4—10" squares 4—91 8" squares, cutting eachin half diagonally for 8 largetriangles total 1 of Pattern AFrom light tan print, cut: 4—91 8" squares, cutting eachin half diagonally for 8 largetriangles total 4 of Pattern DFrom assorted light prints andscraps of mottled tan and light tanprint, cut 44 matching sets of: 2—25 8" squares, cutting each inhalf diagonally for 4 extra-smalltriangles total 2—21 4" squaresFrom brown tone-on-tone, cut: 1—173 4" square, cutting itdiagonally twice in an for 4extra-large triangles total 17 of Pattern B 16 of Pattern FFrom burgundy print, cut: 7—21 2 42" binding strips 7—21 2 42" strips for outerborder 6—2 42" strips for inner border 16 of Pattern C 24 of Pattern GFrom dark brown print, cut: 4 each of patterns H andH reversed 44—1 21 2" strips 4—2 1 4" squares, cutting each inhalf diagonally for 8 extra-smalltriangles totalAssemble Large FlyingGeese Units1. Referring to Diagram 4, sewtogether a dark red print largetriangle and a mottled tan extralarge triangle; tip of red trianglewill extend past corner of tantriangle. Press seam towarddark red print triangle. In samemanner, join a dark red printlarge triangle to remaining shortedge of mottled tan triangle tomake a red-and-tan Flying Geeseunit. The unit should be 17 83 4"including seam allowances.Repeat to make four red-and-tanFlying Geese units total.2. Using mottled tan large trianglesand brown tone-on-tone extralarge triangles, repeat Step 1 tomake four tan-and-brown FlyingGeese units.Appliqué and EmbroiderBlocks and Flying GeeseUnitsEmbroidery designs A–C are onpages 10–11.1. Tape Pattern A to a light box orsunny window. Center light goldprint 18" square atop Pattern Aand tape in place. Using afabric pen, trace solid circlesand dashed placement lines ofPattern A. Remove light goldprint square and Pattern A.2. Tape Embroidery Design A tolight box. Replace light goldprint square, positioning onedashed placement line at endof embroidery design (dashedline indicates the angle theembroidery design shouldPattern may be downloaded for personal use only. No electronic or printed reproduction permittedwithout the prior written consent of Meredith Corporation. Meredith Corporation 2016. All rights reserved.take). Trace embroidery design.Referring to EmbroideredCenter Block Diagram,repeat to trace a total of nineA embroidery designs—one ateach dashed placement line.3. Referring to EmbroideredCorner Block Diagram, repeatsteps 1 and 2 using Pattern D,mottled tan 10" square, andEmbroidery Design B.4. Position and trace EmbroideryDesigns C and C reversed oneach red-and-tan Flying Geeseunit (Embroidered Flying GeeseDiagram).5. Arrange mottled tan A wreath,nine brown tone-on-tone Bleaves, 10 dark red print Ccircles, and eight burgundyprint C circles on marked lightgold print square (EmbroideredCenter Block Diagram). Pin orbaste pieces in place. Usingmonofilament thread and a blindhem stitch, machine-appliquéaround each shape. (DesignerBobbie Ashley hand-appliquédaround the circle appliqués.)6. Using four strands of greenembroidery floss, backstitchalong traced lines to makeembroidered center block.To backstitch, pull needle up atA (Backstitch Diagram). Push itdown at B, and bring it up againat C. Push it down at D andcontinue in same manner.Center and trim block to17" square including seamallowances.7. Arrange one light tan printD circle, one dark red print Ecircle, four brown tone-on-toneF leaves, six dark red print Gcircles, and six burgundy print Gcircles on a marked mottled tan3
American Patchwork & Quilting Quilt Sampler Quilts and MoreProject: Maple Leaf Farmsquare (Embroidered CornerBlock Diagram). Pin or bastepieces in place. Appliqué aroundeach piece and embroider alongtraced lines as in Step 6 tomake an embroidered cornerblock. Center and trim blockto 83 4" square including seamallowances. Repeat to make fourembroidered corner blocks total.8. Arrange two brown tone-on-toneB leaves, three dark red print Ccircles, and two burgundy printC circles on a marked FlyingGeese unit (Embroidered FlyingGeese Diagram). Pin or bastepieces in place. Appliqué aroundeach piece and embroider alongtraced lines as in Step 6 tomake an embroidered FlyingGeese unit. Repeat to makefour embroidered Flying Geeseunits total.Assemble Basket Blocks1. Sew together a light gold printextra-small triangle and agold print extra-small triangleto make a triangle-square(Diagram 5). Press seamaway from light gold print.The triangle-square should be17 8" square including seamallowances. Repeat to makeeight triangle-squares total.2. Using remaining light gold printextra-small triangles and orangeprint, dark orange print, and rustprint triangles, repeat Step 1 tomake eight triangle-squares ineach colorway.3. Referring to Diagram 6, sewtogether a light brown printsmall triangle, a light brown print17 8" square, a dark brown printH piece, and a dark brown printH reversed piece in two verticalrows. Press seams toward darkbrown pieces. Join rows; pressseam in one direction. Add lightgold print medium triangle tomake basket unit (Diagram 7).Press seam toward light goldtriangle. Repeat to make fourbasket units total.4. Sew together a light gold printsquare (Diagram 11). Pressseam toward dark red print.The triangle-square shouldbe 83 4" square includingseam allowances. Repeat tomake eight large trianglesquares total.2. Referring to top left-hand cornerof quilt center in Quilt AssemblyDiagram, sew together oneembroidered corner block, onebasket block, and two largetriangle-squares in pairs. Pressseams toward triangle-squares.Join pairs to make a cornersegment. Press seam towardtop row. The segment shouldbe 17" square including seamallowances. Repeat to make fourcorner segments total.17 8 6" rectangle and a darkbrown print extra-small triangleto make Unit A (Diagram 8).Press seam toward rectangle.Reversing placement of triangle,repeat to make Unit B. Repeat tomake four each of units A and B.5. Referring to Diagram 9, sewtogether one triangle-square ineach colorway in a vertical row.Press seams in one direction.Join a light gold print 17 8"square and one triangle-squarein each colorway in a horizontalrow. Press as before. Sewvertical then horizontal rows tolight gold print edges of basketunit. Press seams toward basketunit.6. Referring to Diagram 10, sewside units A and B to remainingedges of Step 5 unit. Pressseams away from side units. Adda light gold print small triangleto bottom right-hand corner tomake a basket block. Press seamtoward small triangle. The blockshould be 83 4" square includingseam allowances.7. Repeat steps 5 and 6 to makefour basket blocks total.Assemble Quilt Center1. Sew together a dark redprint large triangle and alight tan print large triangleto make a large triangle-Pattern may be downloaded for personal use only. No electronic or printed reproduction permittedwithout the prior written consent of Meredith Corporation. Meredith Corporation 2016. All rights reserved.3.Referring to middle unit intop row of quilt center in QuiltAssembly Diagram, join a tanand-brown Flying Geese unit andan embroidered Flying Geeseunit to make a side segment.Press seam toward tan-andbrown Flying Geese unit. Thesegment should be 17" squareincluding seam allowances.Repeat to make four sidesegments total.4. Referring to Quilt AssemblyDiagram, sew together cornersegments, side segments, andembroidered center block inthree rows. Press seams towardside segments. Join rows tomake quilt center. Press seamstoward middle row. The quiltcenter should be 50" squareincluding seam allowances.Assemble MapleLeaf BlocksWherever instructions specifymedium/dark prints, use dark red,light gold, gold, orange, dark4
American Patchwork & Quilting Quilt Sampler Quilts and MoreProject: Maple Leaf Farmorange, rust, light brown, andbrown print pieces.1. For one Maple Leaf block,gather a set of matchingmedium/dark pieces (four extrasmall triangles and three 21 4"squares), a set of matching lightpieces (four extra-small trianglesand two 21 4" squares), and onedark brown print 1 21 2" strip.2. Referring to Diagram 12, sewtogether a medium/dark anda light extra-small triangle tomake a triangle-square. Pressseam away from light triangle.The triangle-square should be21 4" square including seamallowances. Repeat to make fourtriangle-squares total.3. Fold under 1 4" along eachlong edge of dark brown print1 21 2" strip; press to makea stem appliqué. Referringto Diagram 13, center stemappliqué diagonally across alight square; pin or baste inplace. Using monofilamentthread and a blind-hem stitch,machine-appliqué long edgesof stem. Trim stem ends evenwith corners of square to makestem unit.4. Referring to Diagram 14, layout remaining light 21 4" square,triangle-squares, medium/dark21 4" squares, and stem unit inthree rows. Sew together piecesin each row. Press seams open.Join rows to make a Maple Leafblock; press seams open. Theblock should be 53 4" squareincluding seam allowances.5. Repeat steps 1–4 to make 44Maple Leaf blocks total.Assemble andAdd Borders1. Cut and piece burgundy print2 42" strips to make: 2—2 53" inner border strips 2—2 50" inner border strips2. Sew short inner border strips toopposite edges of quilt center.Add long inner border stripsto remaining edges. Press allseams toward inner border.The quilt center now shouldbe 53" square including seamallowances.3. Sew together 10 Maple Leafblocks to make a short middleborder strip (Quilt AssemblyDiagram; note rotation of eachblock). Press seams in onedirection. The strip shouldbe 53 4 53" including seamallowances. Repeat to makea second short middle borderstrip. Sew short middle borderstrips to opposite edges of quiltcenter. Press seams towardinner border.6. Sew short outer border strips toopposite edges of quilt center.Add long outer border strips toremaining edges to completequilt top. Press all seams towardouter border.Finish Quilt1. Layer quilt top, batting, andbacking; baste.2. Quilt as desired. Machine-quilter Bernie Farris combinedecho quilting, feather patterns,and dense wave designs in theappliquéd units. She stitched inthe ditch around the trianglesquares in the basket blocksand added two narrow leaves ineach basket unit. She filled theremaining portions of the quiltcenter with a variety of featherdesigns and featured a three- orfour-leaf pattern in each MapleLeaf block.3. Bind with burgundy print bindingstrips.4. Join 12 Maple Leaf blocks tomake a long middle border strip(Quilt Assembly Diagram). Pressseams in one direction. The stripshould be 53 4 631 2" includingseam allowances. Repeat tomake a second long middleborder strip. Add long middleborder strips to remainingedges of quilt center. Pressseams toward inner border.The quilt center now should be631 2" square including seamallowances.5. Cut and piece burgundy print21 2 42" strips to make: 2—21 2 671 2" outer borderstrips 2—21 2 631 2" outer borderstripsPattern may be downloaded for personal use only. No electronic or printed reproduction permittedwithout the prior written consent of Meredith Corporation. Meredith Corporation 2016. All rights reserved.5
American Patchwork & Quilting Quilt Sampler Quilts and MoreProject: Maple Leaf FarmPattern may be downloaded for personal use only. No electronic or printed reproduction permittedwithout the prior written consent of Meredith Corporation. Meredith Corporation 2016. All rights reserved.6
AmericanAPQ OCTOBER 2012CMR 4766305Autumn SplendorDiagram 1C. Neubauer6-9-12 QuiltPatchwork& Quilting100680956Sampler Quilts and MoreProject: Maple Leaf FarmAPQ OCTOBER 2012CMR 4766305Autumn SplendorDiagram 2C. Neubauer 6-9-12100680957APQ OCTOBER 2012CMR 4766305Autumn SplendorDiagram 5C. Neubauer 6-9-12100680964APQ OCTOBER 2012CMR 4766305Autumn SplendorDiagram 4C. Neubauer 6-9-12100680959DIAGRAM 1DIAGRAM 2DIAGRAM 3APQ OCTOBER 2012CMR 4766305Autumn SplendorDiagram 6C. Neubauer 6-9-1210068096517 8 6"17 8 6"DIAGRAM 5Unit AUnit BAPQ OCTOBER 2012CMR 4766305Autumn SplendorDiagram 7C. Neubauer 6-9-12100680966DIAGRAM 8HHr17 8"sq.DIAGRAM 617 8"sq.DIAGRAM 4DIAGRAM 7Pattern may be downloaded for personal use only. No electronic or printed reproduction permittedwithout the prior written consent of Meredith Corporation. Meredith Corporation 2016. All rights reserved.DIAGRAM 97
APQ OCTOBER 2012CMR 4766305Autumn SplendorDiagram 11C. Neubauer 6-9-12100680970APQ OCTOBER 2012CMR 4766305Autumn SplendorDiagram 10C. Neubauer 6-9-12100680969American Patchwork & Quilting Quilt Sampler Quilts and MoreProject: Maple Leaf FarmBAPQ OCTOBER 2012CMR 4766305Autumn SplendorDiagram 14C. Neubauer 6-9-12100680973ADIAGRAM 10DIAGRAM 11DIAGRAM 12APQ OCTOBER 2012CMR 4766305Autumn SplendorDiagram 13C. Neubauer 6-9-12100680972FGDDIAGRAM 13EAPQ OCTOBER 2012CMR 4766305EMBROIDERED CORNERAutumn SplendorBLOCK DIAGRAMCenter Block Embroidery DiagramC. Neubauer 6-9-12100680960DIAGRAM 14BADCBCBCABACKSTITCH DIAGRAMACEMBROIDERED CENTER BLOCK DIAGRAMBEMBROIDERED FLYING GEESE DIAGRAMPattern may be downloaded for personal use only. No electronic or printed reproduction permittedwithout the prior written consent of Meredith Corporation. Meredith Corporation 2016. All rights reserved.8
American Patchwork & Quilting Quilt Sampler Quilts and MoreProject: Maple Leaf FarmMaple Leaf FarmPattern AMaple Leaf FarmPattern BMaple LeafFarmPattern CPatternGMaple LeafFarmPattern FMaple Leaf FarmPattern EMaple Leaf FarmPattern DThis box shouldmeasure 1".When printing adownloadable pdf, set PageScaling preference to NONEto print patterns at 100%.Do NOT "Shrink to Fit"or "Fit to Printable Area."CPattern may be downloaded for personal use only. No electronic or printed reproduction permittedwithout the prior written consent of Meredith Corporation. Meredith Corporation 2016. All rights reserved.9
Maple Leaf FarmPattern DMaple Leaf FarmPattern EAmerican Patchwork & Quilting Quilt Sampler Quilts and MoreProject: Maple Leaf FarmMaple Leaf FarmPattern DMaple Leaf FarmPattern HCaple Leaf Farmbroidery Design ABMaple Leaf FarmEmbroidery Design ACCCThis box shouldBmeasure 1".Pattern may be downloaded for personal use only. No electronic or printed reproduction permittedwithout the prior written consent of Meredith Corporation. Meredith Corporation 2016. All rights reserved.CWhen printing adownloadable pdf, set PageScaling preference to NONEto print patterns at 100%.Do NOT "Shrink to Fit"or "Fit to Printable Area."10
American Patchwork & Quilting Quilt Sampler Quilts and MoreProject: Maple Leaf FarmCGFMaple Leaf FarmEmbroidery Design AMaple Leaf FarmEmbroidery Design BGCCBCGGGMaple Leaf FarmEmbroidery Design BMaple Leaf FarmEmbroidery Design CCGThis box shouldmeasure 1".When printing adownloadable pdf, set PageScaling preference to NONEto print patterns at 100%.Do NOT "Shrink to Fit"or "Fit to Printable Area."Pattern may be downloaded for personal use only. No electronic or printed reproduction permittedwithout the prior written consent of Meredith Corporation. Meredith Corporation 2016. All rights reserved.11
American Patchwork & Quilting Quilt Sampler Quilts and MoreMake and Use TemplatesMake TemplatesA template is a pattern made fromextra-sturdy material so you cantrace around it many times withoutwearing away the edges. Acrylictemplates for many commonshapes are available at quilt shops.Or you can make your own byduplicating printed patterns ontemplate plastic.To make permanent templates,purchase easy-to-cut templateplastic, available at quilt shops andcrafts supply stores. Lay theplastic over a printed pattern.Trace the pattern onto the plasticusing a ruler and a permanentmarker to ensure straight lines,accurate corners, and permanency.For hand piecing and appliqué,make templates the exact sizefinished pieces will be (withoutseam allowances). For piecing, thismeans tracing the patterns’ dashedlines.For machine piecing, maketemplates that include seamallowances by tracing the patterns’solid and dashed lines onto thetemplate plastic.For easy reference, mark eachtemplate with its letterdesignation, grain line (if noted onthe pattern), and block name. Cutout the traced shapes on theiroutside lines. Verify eachtemplate’s shape and size byplacing it over its printed pattern.Templates must be accurate;errors, however small, willcompound many times as youassemble a quilt. To checktemplates’ accuracy, make a testblock before cutting the fabricpieces for an entire quilt.Use TemplatesTo mark on fabric, use a pencil,white dressmaker’s pencil, chalk,or a special fabric marker thatmakes a thin, accurate line. Do notuse a ballpoint or ink pen; it maybleed if washed. Test all markingtools on a fabric scrap beforeusing them.To make pieces for hand piecingor appliqué, place a templatefacedown on the wrong side of thefabric and trace. Then repositionthe template at least 1 2" away fromthe previous tracing (Diagram 1),trace again, and repeat. The linesyou trace on the fabric are sewinglines. Mark cutting lines 1 4" awayfrom the sewing lines, or estimatethe distance by eye when cuttingout the pieces with scissors. Forhand piecing, add a 1 4" seamallowance; for hand appliqué, add a3 16" seam allowance.Because templates used to makepieces for machine piecing haveseam allowances included, you canuse common tracing lines forefficient cutting. Place a templatefacedown on the wrong side of thefabric and trace. Then repositionthe template without a spacebetween it and the previous tracing(Diagram 2); trace again andrepeat. Using a rotary cutter andruler, cut pieces out, cuttingprecisely on the drawn lines.Pattern may be downloaded for personal use only. No electronic or printed reproduction permittedwithout the prior written consent of Meredith Corporation. Meredith Corporation 2016. All rights reserved.ADIAGRAM 1BDIAGRAM 212
fabric pen, trace solid circles and dashed placement lines of Pattern A. Remove light gold print square and Pattern A. 2. Tape Embroidery Design A to light box. Replace light gold print square, positioning one dashed placement line at end of embroidery design (dashed line indicates the a