Transcription
BREAD SCIENCEThe Chemistry and Craft of Making BreadEmily BuehlerTwo Blue Books Ï Carrboro, North Carolina
ContentsNote to the reader on the organization of this AKING BASICS .15The basic bread recipe .16The four main ingredients —flour, yeast, water, salt .18Weight versus volume . 23Baker ’s percent .25Four characteristics of dough.27Overview of the bread-making process . 31Get ready to make bread!.322BREAD SCIENCE BASICS . 33Starch and sugar.34Yeast and bacteria.39Fermentation .48Flavor and color.51Water and protein .54Gluten structure .59Gas retention.80Proteases .87Salt and fermentation.93Salt and gluten .94Miscellaneous .1013PREFERMENTS .105What is a preferment? Why use one? . 106Poolishes & sponges:what they are, how to mix them.108
The lifespan of a poolish and how to control it . 109What if a poolish is used too soon/late? . 112Adding a poolish to a straight dough recipe . 113Starters: what they are and how to mix them . 114The lifecycle of starter. 116Notes on creating a sourdough starter . 119Recipe for creating and feedinga sourdough starter . 122How much neglect can starter take? . 128Working with starter using volumemeasurements . 1294MIXING THE DOUGH . 131Overview of mixing the dough. 132Mixing dough by hand. 134How to tell when dough is “done ” . 139Adding special ingredients to your dough. 141What to do with dough after it is mixed . 142Mixing dough with a machine. 143Bread production data sheet . 1455FERMENTATION . 147Overview of fermentation. 148When is dough fully risen and how to control it . 150Approximating fermentation timewith dough temperature . 152Punching and folding dough —why and how . 154How many times can dough bepunched and folded?. 1566DOUGH SHAPING . 157Overview of shaping the dough. 158Things to watch for when shaping. 159The basic motions of shaping . 160The pre-shape . 162
The steps of shaping —boules, batards, and baguettes .165Common baguette problems .177The effect of your attitude .180What to do with your shaped dough .1817PROOFING AND BAKING .183Overview of the proofing and baking steps .184When is dough ready to go into the oven? .185What happens to dough in the oven.186Modifications to improve your oven for baking.189The purpose of scoring (cutting) dough.190Scoring patterns .195Steaming dough: why and how.198Getting your dough into the oven .200When is bread done baking?.2018RECIPES, STORAGE, AND TROUBLESHOOTING.203RecipesFrench .204Ciabatta .206Sourdough.209100% Whole Wheat.211Lazy Baker ’s Bread .213Make-your-own-recipe .214Storing dough. 216Storing bread.217Trouble-shooting.219Conclusion . 223Bibliography .225Appendix: Units and conversion factors.235Glossary .237Index .247
Note to the reader on the organizationof this bookI have set up Bread Science to be as much like areference book as possible, enabling readers to open to asection of interest without needing to read the whole book.Chapters three through seven, which describe the process ofbread-making, go in chronological order, to aid beginners.Bread Science focuses on learning about the process ofbread-making instead of individual recipes. In that sense it isnot a traditional cookbook —it contains only basic recipesintended to illustrate the concepts discussed.I dedicated a separate chapter to bread science so asnot to confuse readers trying to focus on the practical aspectsof bread-making in later chapters. Thus, chapter twocontains a more complete description of the different aspectsof science occurring in dough. This science is referred to inrelevant places throughout the book, but with less detail. Ihave included all scientific terms in the glossary.In chapter two, references are given to researchpapers. Wherever possible, I have referenced the sourcedocumenting the original research, not just a paper that refersto it. This was not always possible: some papers wereunavailable or not written in English. The bibliography liststhe major papers on each aspect of bread science and is agood place to begin if you would like to read more.Some readers may find chapter two daunting or a bitoverwhelming. If you are eager to get to bread-making, skipchapter two for now and dive right in to the practicalchapters. You can return to the science later, perhaps whileyou are munching on a freshly-baked slice of bread.
IntroductionThe obvious way to make bread is to find a recipe ina book and follow it. Chances are it will work well enough,but making bread this way confines the baker to one recipe,gives him or her no understanding of how to fix problemsthat arise, and perpetuates the myth that he or she needs a “good recipe ” to begin with. In short, following a recipe isnot an empowering way to make bread.The alternative method explored in this book is moreakin to what our ancestors might have done, working withbasic recipes to learn about the process of bread-making,with the added benefit of decades of scientific researchenabling us to understand the inner workings of the process.Think of the method as starting from the beginning —eachtime you make dough you see what happens to it and learnsomething new about the process. The information providedin this book will help you learn faster and understand howand why bread “works. ” From there, any recipe will beconquerable.Reading about bread will not be enough though; theonly way to get to know dough and bread is to have yourhands in it —practice. Do not be intimidated —mistakes and “failures ” are just opportunities to learn. (Besides, messedup bread often still tastes good!) Take data when mixingyour dough —use the data sheet on page 145. Rememberwhat the dough feels like. Write notes for next time in orderto remember what to do the same way or differently.Good bread is not the result of one brilliant mind; itcame about by trial-and-error, over the centuries. And it wasdone by ordinary people; it does not require special talents oran advanced degree. Re-learning the process from thebeginning is surprisingly simple. In this day, making bread “by hand ” might seem like a lost art, but it remainsaccessible to anyone who wishes to try it.
Tabouli with a baguette, Snow Camp, NC, 2003
Chapter 1Bread-making BasicsThis chapter contains information on some basicconcepts in bread-making that will help you get off to a goodstart.The basic bread recipe .16The four main ingredientsFlour.18Yeast .19Water.22Salt . 22Weight versus volume . 23Baker ’s percent .25Four characteristics of dough.27Overview of the bread-making process . 31Get ready to make bread!.32
The basic bread recipeThe basic bread recipe is the “lowest commondenominator ” of bread recipes —the simplest one possible. Itgives new bread makers a simple recipe to use and illustratesthat all recipes are derived from the same place. There is nosecret to them —they all have basically the same percentagesof water, yeast, and salt, adjusted to account for the otheringredients. (The percentages, which may seem odd, aredescribed in the following section “Baker ’s percent. ”)What makes good bread is the attention given to thedough, not the recipe. This is especially true for bakersworking in distinct climates. A world-famous recipe from aCalifornia bakery might need adjustment when used in thehumid eastern Carolina summer with a different brand offlour and different water. Bakers make adjustments bypaying attention to the dough ’s characteristics.The basic bread recipe for a one kilogram (about twopound) loaf of bread isWhite flourWaterInstant yeast*SaltPercentWeight100%70%0.7%2%0.580 kg0.406 kg0.004 kg0.012 kgTotal172.7%1 kgThis recipe is converted to cup and teaspoon measures in thefollowing section “Weight versus volume. ”*If fresh yeast is used, the amount of yeast is about 2% or 0.012 kg.
If you slap together this recipe, do not knead itenough, stick it in the refrigerator overnight because you aretoo tired to bake it, and then put it in a conventional ovenwithout knowing if it is ready to bake, you will still producebread that tastes good! From there, you can use yourknowledge of bread-making to improve the result —to getmore volume (i.e., bigger bread) or a nicer-looking crust, forexample. The important thing is just to get started!Of course, you may want to use a fancier recipe. Thescores of great recipes in cookbooks are a bit more excitingthan the basic bread recipe. The rules of bread-making stillapply —fancier recipes all evolved from a basic recipe likethis one.Pataha Flour Mill, Pataha, WA, 2003
Chapter 2Bread Science BasicsThis chapter is about the science of bread-making,organized by subject. References to specific research studiesare located at the end of each section.Starch and sugar . 34Yeast and bacteria. 39Fermentation. 48Flavor and color. 51Water and protein . 54Gluten structure . 59Gas retention. 80Proteases . 87Salt and fermentation. 93Salt and gluten . 94Miscellaneous . 101
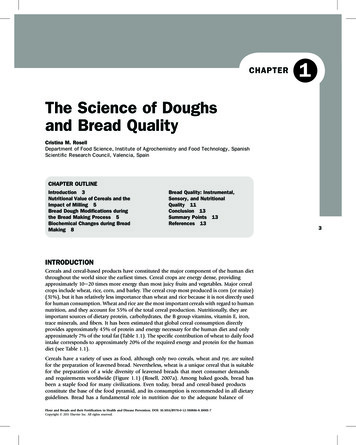
Gas retentionThe commonly held view of gas retention in dough isthat gluten, like a balloon, traps carbon dioxide gas producedby fermentation. Recently, however, this idea has beenreconsidered and challenged. The emerging picture is one inwhich lipids and protein work together to hold gas in dough.Early researchSeveral studies by a research group in the 1940 ’slooked at gas production and retention in dough. In onestudy, they examined how gas bubbles originate in dough.They could exist in the wheat kernel or flour, the yeast couldcreate them, they could be added during mixing, or theycould be added during punching, folding, and shaping. Theresearchers mixed dough under different conditions —forexample in a vacuum versus in air, or while under a highpressure that squeezed out all gas bubbles. They concludedthat gas bubbles are only added to dough during mixing.The pre-existing bubbles are negligible, and the yeast do notmake new ones. Punching, folding, and shaping doughsubdivide existing bubbles but do not create new ones.1Mixing in air (left) versus mixing in vacuum (right). Lacking the air bubbles added todough during mixing, the dough mixed in vacuum did not rise properly. Picture reproducedfrom J.C. Baker and M.D. Mize, Cereal Chemistry 18 (1941) 19-34 with permission of theAmerican Association of Cereal Chemists.
Later, the physics of bubbles provided anexplanation. The equation relating the gas pressure inside abubble (P) to the bubble ’s radius (r) is P 2Ȗ/r, where Ȗ isthe tension on the outside of the bubble. Thus to produce anew bubble, which would begin with a radius of zero, thepressure inside would have to be infinite. This is why yeastcannot produce new bubbles of carbon dioxide. Instead, theCO2 they produce goes into solution in the dough, comingout as a gas when it encounters a bubble that already exists.Another early study, which perhaps led to the “glutenballoon ” picture, looked at the structure of the gas bubble.Dough was centrifuged and a layer of bubbles separated out.These bubbles were removed, analyzed, and found to containa good amount of protein. Analysis of baked dough showedthat the films around bubbles contained protein but notstarch —picric acid, which stains protein yellow, produced achange in the film color, but iodine, which stains starch blue,did not.They looked at an undeveloped dough and comparedit to a properly developed one. The undeveloped dough hada dull color and doughy gas bubble walls that stained bluewith iodine. It did not hold gas well. The developed dough,with bubble walls of protein, had a shine to it and couldexpand during baking to contain the gas in the bubbles. Thisled to the conclusion that as the dough developed, it drewprotein to the bubble walls. Thus when the dough expanded,as it rose and in the oven, there was enough protein availableto allow the bubbles to expand without breaking.2Another study looked at the role of fat during baking.Solid fats (like shortening) helped bread —they resulted inbigger volume, better flavor, and better texture —while liquidfats (like oil) did not. It was the state of the fat that mattered,because one fat was tested in both solid and liquid forms (bydoing the experiment at different temperatures) and had goodor bad effects depending on its form.3
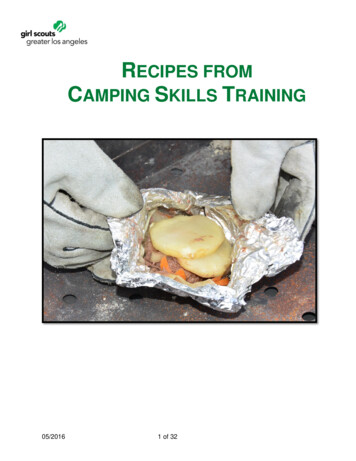
Questioning the “gluten bubble” modelIn 1984, R.C. Hoseney questioned the long-acceptedpicture of gluten acting like a balloon to trap CO2. Glutenthat prevented gas from leaving a bubble would also preventgas from entering the bubble in the first place. He offeredthe explanation that gaseous CO2 stays in a bubble becausethe surrounding dough is saturated with dissolved CO2,continually produced by the yeast. The gaseous CO2 stays agas because the dough is already “full ” of dissolved CO2.The gaseous CO2 cannot dissolve into the dough and escape.When the CO2 is produced, it diffuses through thedough until it finds a bubble to enter. Some diffuses to theedge of the dough and escapes to the atmosphere, where gaspressure is relatively low. Due to the distance to the edge,however, most CO2 molecules settle for a nearby, higherpressure gas bubble in the dough.4,5The role of lipids, surface tension, and proteinsIt has long been knownthat the protein content of flourhas a direct effect on the size ofbread produced with it. Plotsof loaf volume versus proteincontent show how volumeincreases with protein. 6 (Keepin mind that these doughs weremade in a science lab.
Processing conditions were much different than those in yourkitchen, and other characteristics, like flavor, were notconsidered. Even though extreme protein contents showhuge results, you would never want to use flour with 18%protein at home!)The role of lipids in producing bigger loaves is alsoof interest. Dough has a small amount of lipid in it naturally.Lipid can also be added in the form of shortening or butter(solid lipid) and oil (liquid lipid). To examine the role of thenatural lipid in dough, flour can be “defatted ” to produce alipid-less dough.Research in the 1970 ’s concluded that natural lipidsdo not affect dough properties while it is mixing but dostabilize the rising dough ’s foam-like structure. Researchersmade dough with defatted flour and then added the lipidback.The plot of loafvolume versus lipid contenthad a minimum —at first thelipid hurt the volume, butwhen enough was added ithelped. This result was amystery. The lipid was alsoseparated into polar and nonpolar parts, comparable to thesolid and liquid lipids of earlier studies, and the polar partwas shown to cause the helpful effects on loaf volume, whilethe non-polar part hurt loaf volume.7Other papers discussed the importance of surfacetension on gas bubbles in dough. These were theoreticaltreatments with lots of big equations relating things like thepressure in a bubble, the bubble size, and the forces on theedge of the bubble. Different models were proposed. Oneconcluded that surface tension, a force resisting bubbleexpansion, had a greater effect on bubble size than thegluten ’s elasticity,8 while the other said the surface tensionmattered little.9
In 1989, Ewart discussed how protein could hold gasin dough with no mention of the flour ’s lipids. Since he hadproposed that glutenin in dough is linear, he suggested thatthe linear molecules overlapped to form sheets. The sheetswere elastic because of the proteins ’ ability to unfold whenstretched. This elasticity resisted the uncontrolled expansionof gas cells. Although this sounds like Ewart is supportingthe “gluten balloon ” picture, he is not necessarily saying thatthe gluten prevents the gas from escaping, just that gluten ’sstrength is important for resisting expansion.The liquid film hypothesisResearch in the 1990 ’s used an electron microscopeto look at slices of bread dough at different stages of thebread-making process. Researchers watched as gas bubblesgot bigger and bigger during proofing. After fifty minutes,they observed breaks in the bubble walls, but gas was stillretained. Something was holding the gas in. They proposedthat gas was retained by some form of liquid film. Uponbaking, the dough solidified and the gas bubble wallsruptured completely, releasing the gas.Ordinarily, the starch and protein network of doughholds gas in; this is adequate at lower gas pressures. Theliquid film stabilized gas bubbles and helped them survivelonger because it was more extensible than the starch andprotein. It also reduced the surface tension of the bubble.Possibilities for the film ’s composition included “surface active lipids, ” with their polar head and non-polar
tails that stabilize them at interfaces, and proteins, which canuse an interface to stabilize their non-polar side chains. Thewater soluble proteins, i.e., the non-gluten proteins of flour,were suggested.10 These possibilities are shown below.They later proposed that lipids and proteins wereboth working as a liquid film at the edge of the gas bubble.The lipids and proteins competed for space at the edge. Thisexplained the mysterious minimum in the plot of loaf volumefrom the 1970 ’s. In the lipid-less dough, gas bubbles werestabilized by a protein film. When some lipid was added, itwas not enough to form a lipid film, but it displaced someprotein, resulting in a weaker, mixed film. This causedworse gas retention, smaller loaves, and thus the dip in theplot. When enough lipid was added to produce a solid lipidfilm, the loaf volume increased. These cases are illustratedbelow.11
1Baker, J.C. and M.D. Mize. “The origin of the gas cell in breaddough. ” Cereal Chemistry 18 (1941) 19-34.2Baker, J.C. “The structure of the gas cell in bread dough. ” CerealChemistry 18 (1941) 34-41.3Baker, J.C. and M.D. Mize. “The relation of fats to texture, crumb, andvolume of bread. ” Cereal Chemistry 19 (1942) 84-94.4Hoseney, R.C. Principles of Cereal Science and Technology. St. Paul,Minnesota: American Association of Cereal Chemists, 1986 226.5Hoseney, R.C. “Gas retention in bread doughs. ” Cereal Foods World29 (1984) 305-308.6Hoseney, R.C. (1986) 228.7MacRitchie, F. and P.W. Gras. “The role of flour lipids in baking. ”Cereal Chemistry 50 (1973) 292-302.8Carlson, T. and L. Bohlin. “Free surface energy in the elasticity ofwheat flour dough. ” Cereal Chemistry 55 (1978) 539-544.9Bloksma, H. “Effect of surface tension in the gas-dough interface onthe rheological behavior of dough. ” Cereal Chemistry 58 (1981) 481-6.10Gan, Z., R.E. Angold, M.R. Williams, P.R. Ellis, J.G. Vaughan, and T.Galliard. “The microstructure and gas retention of bread dough. ”Journal of Cereal Science 12 (1990) 15-24.11Gan, Z., P.R. Ellis, and J.D. Schofield. “Gas cell stabilization and gasretention in wheat bread dough. ” Journal of Cereal Science 21 (1995)215-230.
Chapter 3PrefermentsThis chapter explores preferments, starting with thequestion, what is a preferment? Many people have neverheard this term, but using a preferment improves doughdrastically, both in flavor and in handling. And once youunderstand them, using a preferment is easy!What is a preferment? Why use one? . 106Poolishes & sponges: what they are, how to mix them . 108The lifespan of a poolish and how to control it . 109What if a poolish is used too soon/late? . 112Adding a poolish to a straight dough recipe . 113Starters: what they are and how to mix them . 114The lifecycle of starter. 116Notes on creating a sourdough starter . 119Recipe for creating and feeding a sourdough starter . 122How much neglect can starter take? . 128Working with starter using volume measurements . 129
Poolishes & sponges: what they are, how to mix themA poolish is a mixture of flour, water, and yeast.Equal weights of flour and water are used, giving a pancakebatter consistency. A sponge is a similar mixture with ahigher percentage of flour, giving a dough-like consistency.Both poolishes and sponges work well. Why use apoolish versus a sponge? I have made the same bread witheach preferment and not seen any obvious difference. Somepeople believe a more acidic flavor develops in a sponge.To mix a poolish (or a sponge), use a see-through,covered container. (A see-through container is ideal formonitoring the height and gas content of the poolish.) Makesure the container is big enough —the poolish is going todouble or triple in volume. My preference —cheapo plasticcontainers —is shown in the following pictures. †First add water. Then add the flour. Add the yeaston top of the flour and swirl to disperse it into the flour. Useyour hand or a spoon to mix the poolish, squashing any flourlumps. At first you will feel stringy flour globs throughoutthe mixture. When these are gone, you will find smallerlumps to squash. Mix until there is no dry flour left. Aftermixing, cover the preferment and burp the lid to remove air;otherwise, gas production may cause it to pop off. Mark thestarting height of the poolish on the side of the container. †Are metal containers bad to use? I have not read this, but since metalsoften do react with acid, it is probably best to use a plastic container.
Chapter 4Mixing the DoughMixing the dough is where bread-making getsexciting —once the dough is mixed, all the chemicalreactions begin going full swing. These reactions werediscussed in chapter two. Understanding how they relate tothe mixing process will make you more comfortable withyour dough. You will know what is going on inside, whyyou are kneading, and what to look for as your doughdevelops. Dough chemistry is reviewed in the overview ofthis chapter. Practical aspects of mixing dough follow.Overview of mixing the dough. 132Mixing dough by hand. 134How to tell when dough is “done ” . 139Adding special ingredients to your dough. 141What to do with dough after it is mixed . 142Mixing dough with a machine. 143Bread production data sheet . 145
Chapter 5FermentationChapter five describes the details of fermentation, thetime between mixing and shaping the dough. It may seemlike not much is happening —after all, watching dough rise iscomparable to watching grass grow. But attention to a fewpoints can make a big difference in your final bread.Overview of fermentation. 148When is dough fully risen and how to control it .150Approximating fermentation timewith dough temperature .152Punching and folding dough —why and how .154How many times can dough be punched and folded? .156
Chapter 6Dough ShapingWhen it comes to shaping dough into baguettes andbatards, there is only so much you can learn from pictures.Skill at shaping comes with practice! The techniquesdescribed in chapter six will get you off to a good start,however, describing both what to do and what not to dowhen you are shaping dough.Overview of shaping the dough. 158Things to watch for when shaping. 159The basic motions of shaping . 160The pre-shape . 162The steps of shaping:Boules . 165Batards . 167Baguettes . 172Common baguette problems. 177The effect of your attitude . 180What to do with your shaped dough. 181
The steps of shaping: batards1. Start with a pre-shaped round. Put the smooth side downon a lightly-floured table. This will become the smoothouter surface of your bread. Flatten the dough by smackingit with your flat hand. Stretch it slightly to get an oval shape.2. Position the dough vertically —this is anti-intuitive, sinceyou will be making a horizontal shape. Fold the top third ofthe oval down and in. Use your hands at angles —picture atriangle between your hands. Do not just flop the doughover; push on it to tighten the outside of the fold.The first fold when shaping a batard. Foldthe dough over and in, tightening the outsideof the fold. Note the triangle between thefingers and thumbs of the hands. (above rightand to the left)What not to do (right):pulling the dough outwardinstead of folding over and inwill move dough towards theends of the batard, resultingin the “barbell batard ” withfat ends and a skinny middle.Once the middle is too thin, itis nearly impossible to fix!
3. Press the fold shut with the heel of your hand. (Do notjust poke at it with your fingers.) Use only three or fourstrokes. This step forces any remaining gas to move to theedges of the dough. Place your strokes close enough to theedge to be effective at moving the gas there, without beingso close as to squash the shape that is forming. Do not worryabout sealing the seam shut.Pressing the dough shut with the heel of the hand after making the first fold.4. Without stretching it, rotate the dough 180 degrees andrepeat steps 2 and 3: first, fold the dough. Again, picture atriangle between your hands and fold down and in, not out.The second fold of shaping a batard.Next, press down the middle of the dough with the heel ofyour hand. Avoid squishing the edges where the shape ofthe batard is formi
The basic bread recipe The basic bread recipe is the l owest common denominator of br ead recipesth e simplest one possible. It gives new bread makers a simple recipe to use and illustrates that all recipes are derived from the same place. There is no se