Transcription
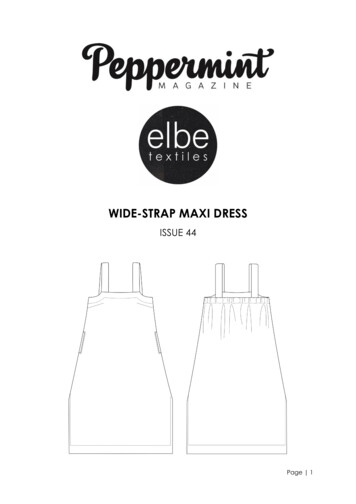
WIDE-STRAP MAXI DRESSISSUE 44Page 1
SIZE CHARTABCDEFGHIJHIGH 6.5cm46in124cm49in131.5cm51.5in139cm54.5inFINISHED GARMENT 5cm61.5in166cm65in171.5cm67.5179cm70.5FITTING NOTESThis pattern has been drafted for a B cup bust and for a heightof 5 ft 7in.This style is fitted around the upper bust/bust area and swingsout to an A line shaped dress with plenty of ease around thewaist and hips. With this in mind, it is recommended toconcentrate on your bust and high bust measurements whenchoosing your size. The elasticated back is there to draw in andgather the fabric at the back, but the elastic should not be tootight. It’s designed to sit flush against the body without beingstretched out too much.Page 2
PATTERN PIECE INVENTORY1: Back2: Front3: Straps4: Front Facing5: Back Facing6: PocketsFABRIC REQUIREMENTSPlease note: If you’re using a patterned fabric with a repeat that you’d like tomatch, you may need more fabric than what is suggested. Use your m270cm320cm320cm320cm320cm320cm320cm320cm2.9 yards 2.9 yards 2.9 yards 3.5 yards 3.5 yards 3.5 yards 3.5 yards 3.5 yards 3.5 yards 3.5 yards185cm2 yards195cm195cm210cm220cm250cm250cm270cm2.1 yards 2.1 yards 2.3 yards 2.4 yards 2.7 yards 2.7 yards 2.9 yards275cm3 yards275cm3 yardsEnsure your fabric is washed and pressed before cutting.Page 3
CUTTING LAYOUTThese layouts are suggestions only. Please feel free to play a bit of pattern tetris orcut pieces on the cross grain to save fabric.SUGGESTED FABRICSMidweight woven fabrics – linen, cotton, hemp, rayonNOTIONSMatching thread38mm / 1.5 inch wide elasticLength of elastic needed per size: A: 40cm, B: 42.5cm, C: 45cm, D: 47.5cm, E: 50cm,F: 52cm, G: 56cm, H: 60cm, I: 64cm, J: 68cmPage 4
PRINTING AND ASSEMBLINGPrinting: Download and save your pattern on a desktop or laptop computer.Open in a PDF reader, such as Adobe Acrobat.Please note: These patterns are designed for A4 and Letter size paper. There are two A0 PDFfile options to take to a printer if you prefer.Before printing, confirm your size option is set to ‘Actual Size’. This is a very important step toensure accuracy in sizing. Do not check the ‘Fit to Page’ option.To check the pattern is printing to scale, there is a test square measuring 1 inch by 1 inch and5cm by 5cm on the first page of every pattern. Print this first page only to check the scale.Once you’ve checked this is correct you can print the rest of the pattern pages.Assembling A4/Letter Home Printout: Cut along the outside edge of the right hand sideborder and bottom border of each page. Overlap your pages so the borders are matchingat the corners and the squares align. Tape or glue in place.Once your pages are all taped/glued together, cut out the pattern pieces as you would witha standard pattern.Assembling A0 Copy Shop PrintoutThese pattern pieces have been arranged on the A0 sized paper so no cutting of borders isrequired. Butt the edges of the paper up together, ensuring the grey diamonds align. Tapethe paper together and cut out the pattern pieces as per usual.Pattern Printout Guide forA4/Letter paperx 41 pagesPage 5
GLOSSARY:Right and wrong side of the fabric: The right side will be the side that shows on theoutside of the garment and the wrong side will be on the inside.Seam allowance: The distance between the line of stitching and the raw edge.Baste: Basting stitches are long stitches done by hand or machine that temporarilyhold fabric in place before the final line of stitching.Finish: To finish a seam, means to neaten the raw edge. This can be done in anumber of ways – overlocking/serging the edges. If you don’t have access to anoverlocker, you can use the zig zag stitch on your machine. You can also use pinkingshears along the raw edge to prevent fraying. This pattern uses French seams androlled hems.Topstitching: A row of visible stitching on the right side of the fabric, running parallelto the seam. Secures the seam allowance in place.Understitching: Stitching the seam allowance to the facing, to prevent the facingfrom rolling towards the right side of the garment.Stay stitching: A row of machine stitching done on a single layer of fabric just insidethe seam line to prevent stretching and distortion of curved or angled pieces.Back tack: Used to secure a line of stitching. Done by sewing backwards overprevious stitches at the beginning and end of the line of stitching.Grade: Grading a seam is a method used to reduce bulk. This is done by trimmingdown the layers of fabric within the seam allowance to different widths (in astepped formation) so the seam allowance isn’t one bulky ridge of fabric. The wideststep of fabric within the seam allowance should be the one closest to the layer offabric that is the outside of the garment.Find us on Instagram @peppermintmagazine and @elbe textiles and tag your photowith #peppermintmaxidressLove your Wide-Strap Maxi Dress? Visit www.peppermintmag.com/sewing-school/ tosee the rest of our free patterns!This pattern is for personal use only. Not to be used for commercial purposes.Copyright Elbe Textileswww.elbetextiles.com.auPage 6
INSTRUCTIONSBefore you begin: The seam allowance varies between steps, please make carefulnote of the seam allowance mentioned.Staystitch around the armholes on the front pieces. This line of stitchingshould be within the 1cm seam allowance – 7mm from the edge will do.Mark the drill hole of the dart on the wrong sides of the front pieces. Youmay like to draw in the stitch line of the dart with chalk or a fabric pen foradded accuracy when sewing. Fold the dart, so the right sides of fabric arefacing together and the notches are lined up. This stitching line will extend1cm past the drill hole, so this mark is hidden within the dart.Stitch the dart in place. Press the dart downwards.Page 7
Take one of the pocket pieces and place it against the corresponding frontpiece, right sides together with notches matching.Starting at one of the notches, stitch in a rectangular formation as shown –2.5cm / 1 inch from the edge and finishing at the remaining notch.Trim some of the excess fabric away as shown and snip into the corners of thestitching.Spread the pocket piece out flat, away from the front piece and press. Understitchalong the longest edge of the pocket opening (between the notches).Page 8
Flip the pocket so the wrong side is laid against the wrong side of the front piece.Press the other two smaller pocket edges flat. Topstitch around all of the pocketopening edges, 0.5cm from the edge.Pull the pocket away from the front piece. Take one of the remainingpocket pieces and line it up against the original pocket with the wrongsides facing together. Sew around the curved edge, 0.7cm from the edge.Page 9
Trim around the seam allowance before turning the pocket inside out. Create aFrench seam on the pocket by sewing around the curved edge again, 0.7cm fromthe edge. Press flat. Baste stitch along the remaining edge to secure the pocket tothe front.Repeat this process on the other front piece/pocket pieces.Page 10
Place the front pieces together, with the wrong sides facing and centreseam lined up. Sew along the centre front edge using a 0.7cm seamallowance. Trim this seam down a few millimetres. Flip the front pieces so theright sides are now facing together and sew along this edge, 0.7cm from theedge, enclosing the trimmed edge and creating a French seam.Page 11
Press this seam towards one side (it doesn’t matter which side) and topstitch inplace. 0.5cm from the edge.On the side seams, fold the splits in towards the wrong side by 0.5cm. Pressflat. Fold the hem up towards the wrong side by 0.5cm and press flat.Repeat this process on the back piece.Page 12
Fold the hem up at the notches, so the right sides are facing together. Use a 1cmseam allowance to stitch the fold of the hem together as pictured. Trim the cornersand grade the seam before turning the hem out to the right side.Fold the splits over again by 1cm so they’re in line with the edge of the hem and theraw edges are enclosed. Press flat.Sew down along the edge of the split, pivoting when you reach the hem turn up,then back up again when you reach the other side split.Give the hems and splits another final press.Page 13
Place the front and back pieces together, with wrong sides facing and theside seams aligned. Sew along the side seams using a 0.7cm seamallowance, until you reach the top of the splits. Trim these seams down afew millimetres. Turn the dress inside out so the right sides of the front andback are now facing together. Sew along the side seams using a 0.7cmseam allowance again, stopping at the split, being careful that the foldededges of the split are butted up together evenly. Press the seam towards theback.Take the strap pieces and fold in half so the right sides are facing together.Sew along the raw edge using a 1cm seam allowance. Turn the strap out tothe right side and press flat.Page 14
Place the straps against the notches marked on the front as shown, with theseamed edge of the strap being on the outside. Baste stitch in place, withinthe 1cm seam allowance.Take the other end of the strap and line it up between the notches marked on theback, making sure the strap isn’t twisted. Baste in place. Now is a good time to popyour dress on and check the length of the straps. The straps have been leftintentionally long, so you may need to take a few inches off, depending on personalpreference. Also keep in mind that the back is yet to be gathered in with elastic, sothis will affect where the straps sit.With the right sides together, line up the side seams of the front facing andback facing. Sew together using a 1cm seam allowance. Press the seamopen.Page 15
Stay stitch around the armholes of the front facing, within the 1cm seamallowance.Stay stitch around the entire bottom edge of the facing, 0.6cm from theedge.Snip into the corners of front facing. Fold the bottom edge of the facing up towardsthe wrong side, using the stay stitching as a guide. The stitching should just behidden from the right side of the fabric once folded up.Place the right side of the facing against the right side of the dress. Sewaround the top with a 1cm seam allowance. Clip into the seamallowance of the curved underarm section.Page 16
Press the seam towards the facing. Understitch along the edge of the facing, gettingas close in to the corners as your machine foot will allow.Press the facing down, so it is not visible from the right side of the dress.Start at the side seam and sew the bottom edge of the back facing inplace, close to the fold. Stop sewing once you reach the other sideseam. Leave the front facing open for now.Take your length of 38mm elastic and thread it through the back facing. Use asafety pin through the edge of the elastic to help guide it through.Length of elastic needed per size: This is a rough guide, you may find you need moreor less depending on the width of your back.A: 40cm, B: 42.5cm, C: 45cm, D: 47.5cm, E: 50cm, F: 52.5cm, G: 56cm, H: 60cm, I:64cm, J: 68cmPage 17
Keep one side of the elastic in place at the side seam by sewing it in place. From theright side of the garment, use the side seam as a guide and stitch in the ditch tosecure the facing, elastic and garment all together. I’d recommend going backover the stitching line two or three times for added strength. Make sure the elasticextends past the side seam by at least 0.5cm to 1cm.Pull the remaining end of the elastic through to the other side seam and pin inplace. Try the dress on again to check the length of elastic and adjust if need be.The elastic should sit flat against the body, without being stretched too much. Onceyou’re happy with the fit, stitch in the ditch of the side seam again to secure thefacing, elastic and garment in place.Page 18
Sew the remainder of the front facing in place, carefully locking over theprevious line of stitching from the back facing to keep things as seamlessas possible.Give everything a final press and you’re done. Huzzah.Find us on Instagram @peppermintmagazine and @elbe textiles and tag your photowith #peppermintmaxidressLove your Wide-Strap Maxi Dress? Visit www.peppermintmag.com/sewing-school/ tosee the rest of our free patterns!Page 19
may like to draw in the stitch line of the dart with chalk or a fabric pen for added accuracy when sewing. Fold the dart, so the right sides of fabric are facing together and the notches are lined up. This stitching line will extend 1cm past the drill hole, so this mark is hidden within the dart. Sti
