Transcription
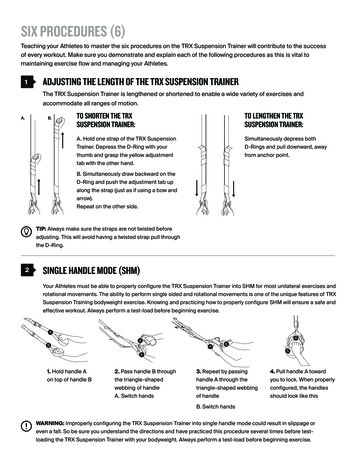
SIX PROCEDURES (6)Teaching your Athletes to master the six procedures on the TRX Suspension Trainer will contribute to the successof every workout. Make sure you demonstrate and explain each of the following procedures as this is vital tomaintaining exercise flow and managing your Athletes.1ADJUSTING THE LENGTH OF THE TRX SUSPENSION TRAINERThe TRX Suspension Trainer is lengthened or shortened to enable a wide variety of exercises andaccommodate all ranges of motion.B.A.TO SHORTEN THE TRXSUSPENSION TRAINER:TO LENGTHEN THE TRXSUSPENSION TRAINER:A. Hold one strap of the TRX SuspensionTrainer. Depress the D-Ring with yourthumb and grasp the yellow adjustmenttab with the other hand.Simultaneously depress bothD-Rings and pull downward, awayfrom anchor point.B. Simultaneously draw backward on theD-Ring and push the adjustment tab upalong the strap (just as if using a bow andarrow).Repeat on the other side.TIP: Always make sure the straps are not twisted beforeadjusting. This will avoid having a twisted strap pull throughthe D-Ring.2SINGLE HANDLE MODE (SHM)Your Athletes must be able to properly configure the TRX Suspension Trainer into SHM for most unilateral exercises androtational movements. The ability to perform single sided and rotational movements is one of the unique features of TRXSuspension Training bodyweight exercise. Knowing and practicing how to properly configure SHM will ensure a safe andeffective workout. Always perform a test-load before beginning exercise.ABBBABA1. Hold handle Aon top of handle B2. Pass handle B throughthe triangle-shapedwebbing of handleA. Switch hands3. Repeat by passinghandle A through thetriangle-shaped webbingof handleA4. Pull handle A towardyou to lock. When properlyconfigured, the handlesshould look like thisB. Switch handsWARNING: Improperly configuring the TRX Suspension Trainer into single handle mode could result in slippage oreven a fall. So be sure you understand the directions and have practiced this procedure several times before testloading the TRX Suspension Trainer with your bodyweight. Always perform a test-load before beginning exercise.
PROCEDURES: LENGTHADJUSTMENTSLength adjustment of the TRX Suspension TrainerTM for thefollowing exercises:1Fully Shortened (FS)2Mid Length (ML)3Mid Calf (MC)4Fully Lengthened (FL)
SIX BODY POSITIONSThe reference point for the six body positions is the anchor point.There are Three Basic Standing Positions1Stand Facing (SF)the anchor point2Ground Facing Away (SFA)the anchor point3Stand Sideways (SSW)from the anchor point5Ground Facing Away (GFA)to the anchor point6Ground Sideways (GSW)to the anchor pointThere are Three Basic Ground Positions4Ground Facing (GF)from the anchor point
3HEELS INThis procedure is used for most ground facing (GF) exercises. Make sure everyone knows how to get theirheels in and out of the foot cradles quickly to ensure smooth transitions between exercises.Adjust the Suspension Trainer so the bottom of each foot cradle is at mid calf length or about eight to 12inches off the ground.1. Sit facing the TRX SuspensionTrainer with the bottom of the footcradles hanging eight to 12 inchesabove the ground. Your kneesshould be about one foot fromthe foot cradles. Hold each footcradle in place with your index andmiddle fingers.42. Roll onto your back, bringingboth knees into your chest, andplace both heels into the footcradles simultaneously. Ensureyour heels are fully supported bythe foot cradles.3. Straighten your legs and preparefor the supine leg exercises. As analternative technique, you can alsoperform the supine exercises withyour toes through the foot cradles andweight resting on the arches of the feet.Experiment to see which way you prefer.TOES INThis procedure is used for many ground facing away (GFA) and ground sideways (GSW) exercises. Make sure everyoneknows how to get their toes in and out of the foot cradles to encourage smooth exercise transitions.Adjust the TRX Suspension Trainer so the bottom of each foot cradle is at mid calf length or about eight to 12 inches offthe ground.1. Sit facing the TRX SuspensionTrainer with the bottom of thefoot cradles hanging eight to 12inches above the ground. Yourknees should be about one footfrom the foot cradles.2. Shift your weight to the right hip.With your right foot in the left footcradle, cross your left foot over theright and place it into the right footcradle. Point your toes.3. Roll your body over to the right intoa plank position, allowing the feet torotate inside the foot cradles. Yourupper body is supported by yourforearms or your hands in a push-upposition. Rest by placing your kneeson the ground and assuminga position on all fours.
5EVEN PRESSUREApplying even pressure into the handles or foot cradles of the TRX Suspension Trainer prevents sawing and alsoencourages core stability.KEEP STRAPS TIGHTThe straps should never hang loose whileperforming an exercise. Remember to apply aneven amount of pressure throughout the entiremovement.NO SAWINGThe straps are NOT a pulley. Avoid sawing motionswith the handles to prevent premature wear to theTRX Suspension Anchor . Keep equal pressure onthe handles throughout all movements.6OFFSET FOOT POSITIONThis procedure is often difficult for new and even more experienced TRX Suspension Trainer users to master. Be sure topay close attention to how well your Athletes learns and practices the offset foot position. This technique allows you tounload an upper body movement (i.e. TRX Chest Press and the shoulder series) into the lower body and to maintain eventension throughout the full range of motion.The position of the forwardfoot influences the difficultyand the range of motion atthe top of the exercise whilethe position of the back footdetermines the difficulty atthe bottom of the movement.A longer offset distance (feet placedfurther apart) generally provides moresupport while a shorter offset distancereduces support and is appropriate formore advanced users.Experiment with foot placementuntil you find the optimal range ofmovement and resistance level.
THREE PRINCIPLES OF PROGRESSION (3)The three principles of progression will allow you to modify intensity for any exercise on the TRX Suspension Trainer.1CHANGE BODY ANGLE TO ADJUST RESISTANCE : VECTOR RESISTANCE PRINCIPLEWhen standing straight up with your base of supportdirectly beneath your center of gravity (shallowest bodyangle), your legs support 100% of your bodyweight.As your body angle steepens (as in a TRX Chest Pressor Row), your center of gravity moves outside yourbase of support and weight transitions onto the TRXSuspension Trainer, which adds resistance to theexercise. The steeper your body angle, the greater theresistance for the exercise.2CHANGE BASE OF SUPPORT TO ADJUST STABILITY : STABILITY PRINCIPLE STANDING POSITIONSDecreasing your base of support (for example, bringingfeet together or just standing on one leg) challengesyour ability to stabilize and requires more coreengagement. The farther your COG moves outsideits base of support, the less stable you become, andthe more your body wants to tip over or rotate. Thesetipping/ rotational forces must be countered by force inorder to stabilize your body position.When your COG is positioned within your base ofsupport (broadly supported between your feet orbetween your hands), the stability of your body positionis increased.As your base of support becomes smaller with a morenarrow stance, lateral stability decreases and greaterdemands are put on your core to control an exercise.PRONE AND SUPINE POSITIONSStability decreases as the COG gets vertically (taller)farther away from the base of support. This is whythe TRX Plank is more challenging when performedfrom the hands versus the forearms. Performing plankposition exercises from the elbow position is morestable and requires less upper body strength and lesscore strength.TIP: When standing on one leg, try differentpositions with your free leg for additionalstability challenges.
3CHANGE STARTING POSITION TO ADJUST RESISTANCE : PENDULUM PRINCIPLEThe TRX Suspension Trainer naturally hangs straight down in a neutral position beneathits anchor point. You can assist or resist an exercise by changing the starting positionrelative to the neutral position.1. Moving your starting position to the far sideof neutral will cause gravity to swing the TRXSuspension Trainer in the direction of yourmovement. This makes the exercise easier toperform with less resistance.2. Positioning your body so that your feet arepositioned on the near side of neutral willcause gravity to work against the movement,making it harder.When adjusting exercise intensity on the TRX Suspension Trainer, keep in mind the following equation:INTENSITY RESISTANCE STABILITY
TRAIN SAFEBelow are common mistakes made when performing exercises on theTRX Suspension Trainer. Good cueing will fix them all.MAINTAIN GOOD POSTUREEngage your core and keep yourhips, shoulders and ears aligned atall times.KEEP TENSION ON THE STRAPSThe straps should never go slack duringexercises. Keep tension on the straps atall times.NO SAWINGThe straps are NOT a pulley. DO NOTperform sawing motions, which will causepremature wear of the TRX SuspensionTrainer. Keep equal pressure on bothhandles at all times.NO RUBBINGDo not allow straps to rub against arms.It is uncomfortable and stabilizing theTRX Suspension Trainer in this waymakes the exercise less effective. Movehands higher to prevent rubbing.
SINGLE HANDLE MODE (SHM) TO SHORTEN THE TRX . SUSPENSION TRAINER: A. Hold one strap of the TRX Suspension Trainer. Depress the D-Ring with your. thumb and grasp the yellow adjustment tab with the other hand. B. Simultaneously draw backward on the D-Ring and push the adjustment tab up. along the strap (just as if using a bow and arrow). Repeat on the other side. 1. Hold handle A