Transcription
LabelWriter Print ServerUser Guide
Copyright 2011 Sanford, L.P. All rights reserved. 04/11No part of this document or the software may be reproduced or transmitted in any form or by anymeans or translated into another language without the prior written consent of Sanford, L.P.TrademarksDYMO and LabelWriter are registered trademarks of Sanford, L.P. All other trademarks are theproperty of their respective holders.
ContentsAbout the LabelWriter Print Server . . . . . . . . . . . . . . . . . . . . . . . . . . . . . . . . . . . . . . . . . . . . . . . . . . . . . 1Print Server Features . . . . . . . . . . . . . . . . . . . . . . . . . . . . . . . . . . . . . . . . . . . . . . . . . . . . . . . . . . . . 1System Requirements. . . . . . . . . . . . . . . . . . . . . . . . . . . . . . . . . . . . . . . . . . . . . . . . . . . . . . . . . . . . 2Using this Guide. . . . . . . . . . . . . . . . . . . . . . . . . . . . . . . . . . . . . . . . . . . . . . . . . . . . . . . . . . . . . . . . 2Installing the LabelWriter Print Server . . . . . . . . . . . . . . . . . . . . . . . . . . . . . . . . . . . . . . . . . . . . . . . . . 3Getting Started . . . . . . . . . . . . . . . . . . . . . . . . . . . . . . . . . . . . . . . . . . . . . . . . . . . . . . . . . . . . . . . . . 3Connecting the Cables . . . . . . . . . . . . . . . . . . . . . . . . . . . . . . . . . . . . . . . . . . . . . . . . . . . . . . . . . . . 4Installing the Software . . . . . . . . . . . . . . . . . . . . . . . . . . . . . . . . . . . . . . . . . . . . . . . . . . . . . . . . . . . 4Installing the Software in Windows . . . . . . . . . . . . . . . . . . . . . . . . . . . . . . . . . . . . . . . . . . . . . . . 4Installing the Software in Mac OS . . . . . . . . . . . . . . . . . . . . . . . . . . . . . . . . . . . . . . . . . . . . . . . . 5Configuring the Print Server . . . . . . . . . . . . . . . . . . . . . . . . . . . . . . . . . . . . . . . . . . . . . . . . . . . . . . 5Adding a Printer . . . . . . . . . . . . . . . . . . . . . . . . . . . . . . . . . . . . . . . . . . . . . . . . . . . . . . . . . . . . . . . . . . . . . . . . . . . 7Adding a Printer in Windows XP . . . . . . . . . . . . . . . . . . . . . . . . . . . . . . . . . . . . . . . . . . . . . . . . . . 7Adding a Printer in Windows Vista . . . . . . . . . . . . . . . . . . . . . . . . . . . . . . . . . . . . . . . . . . . . . . . . 11Adding a Printer in Mac OS. . . . . . . . . . . . . . . . . . . . . . . . . . . . . . . . . . . . . . . . . . . . . . . . . . . . . . 15Adding a Printer in Linux . . . . . . . . . . . . . . . . . . . . . . . . . . . . . . . . . . . . . . . . . . . . . . . . . . . . . . . 16Printing a Test Label . . . . . . . . . . . . . . . . . . . . . . . . . . . . . . . . . . . . . . . . . . . . . . . . . . . . . . . . . 18Managing the LabelWriter Print Server . . . . . . . . . . . . . . . . . . . . . . . . . . . . . . . . . . . . . . . . . . . . . . . . 19About the Control Center. . . . . . . . . . . . . . . . . . . . . . . . . . . . . . . . . . . . . . . . . . . . . . . . . . . . . . . . 19Viewing the Print Server Information (Windows only) . . . . . . . . . . . . . . . . . . . . . . . . . . . . . . . 19Changing the Control Center Language . . . . . . . . . . . . . . . . . . . . . . . . . . . . . . . . . . . . . . . . . . . 20About the Print Server Web Pages. . . . . . . . . . . . . . . . . . . . . . . . . . . . . . . . . . . . . . . . . . . . . . . . . 21Viewing the Print Server Status . . . . . . . . . . . . . . . . . . . . . . . . . . . . . . . . . . . . . . . . . . . . . . . . . 22Configuring the Server. . . . . . . . . . . . . . . . . . . . . . . . . . . . . . . . . . . . . . . . . . . . . . . . . . . . . . . . . .Changing the Server Name and Description . . . . . . . . . . . . . . . . . . . . . . . . . . . . . . . . . . . . . . .Changing the TCP/IP Configuration . . . . . . . . . . . . . . . . . . . . . . . . . . . . . . . . . . . . . . . . . . . . .Changing the Administrator Name and Password . . . . . . . . . . . . . . . . . . . . . . . . . . . . . . . . . . .22222323Upgrading the Firmware . . . . . . . . . . . . . . . . . . . . . . . . . . . . . . . . . . . . . . . . . . . . . . . . . . . . . . . . 24Getting Help . . . . . . . . . . . . . . . . . . . . . . . . . . . . . . . . . . . . . . . . . . . . . . . . . . . . . . . . . . . . . . . . . . . . . . . . . . . . . . . 25Troubleshooting . . . . . . . . . . . . . . . . . . . . . . . . . . . . . . . . . . . . . . . . . . . . . . . . . . . . . . . . . . . . . . . 25Status Lights . . . . . . . . . . . . . . . . . . . . . . . . . . . . . . . . . . . . . . . . . . . . . . . . . . . . . . . . . . . . . . . . 25Restoring the Print Server to the Factory Default Settings . . . . . . . . . . . . . . . . . . . . . . . . . . . . 25Limited Warranty. . . . . . . . . . . . . . . . . . . . . . . . . . . . . . . . . . . . . . . . . . . . . . . . . . . . . . . . . . . . . . 26Obtaining Technical Support . . . . . . . . . . . . . . . . . . . . . . . . . . . . . . . . . . . . . . . . . . . . . . . . . . . . . 27Returning Your Print Server for Repair . . . . . . . . . . . . . . . . . . . . . . . . . . . . . . . . . . . . . . . . . . . . . 28iii
Technical and Certification Information . . . . . . . . . . . . . . . . . . . . . . . . . . . . . . . . . . . . . . . . . . . . . . 29Technical Specifications . . . . . . . . . . . . . . . . . . . . . . . . . . . . . . . . . . . . . . . . . . . . . . . . . . . . . . . . 29Device Certification . . . . . . . . . . . . . . . . . . . . . . . . . . . . . . . . . . . . . . . . . . . . . . . . . . . . . . . . . . . 29Declaration of Conformity . . . . . . . . . . . . . . . . . . . . . . . . . . . . . . . . . . . . . . . . . . . . . . . . . . . . . . 29Documentation Feedback . . . . . . . . . . . . . . . . . . . . . . . . . . . . . . . . . . . . . . . . . . . . . . . . . . . . . . . 30iv
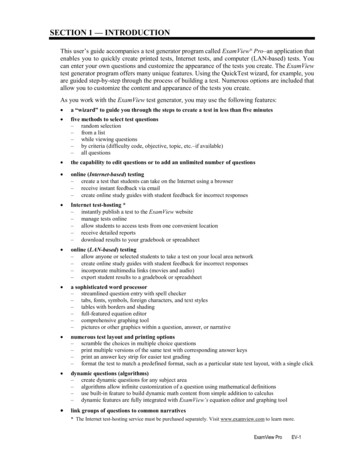
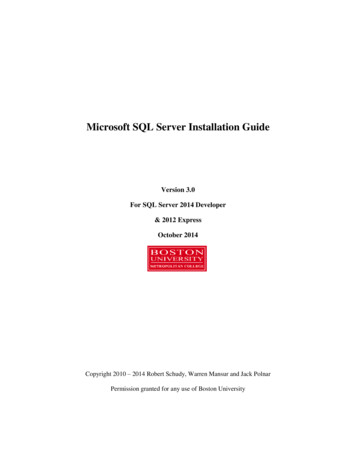
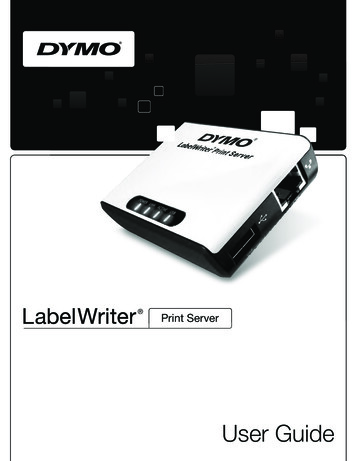
Chapter 1About the LabelWriter Print ServerCongratulations on purchasing a DYMO LabelWriter print server. Your print server will give youyears of reliable service. We encourage you to take a few minutes to review how to use and care foryour print server.Using the print server, you can connect your LabelWriter 400 or later series printer directly to yournetwork, without dedicating a computer to printer sharing. Now everyone connected to yournetwork can print to a single LabelWriter printer. We have no doubt that the LabelWriter printserver will make your job easier and more efficient.Print Server FeaturesYour LabelWriter print server can be used to share any LabelWriter 400 or later series printer,including the LabelWriter Twin Turbo and LabelWriter Duo.The print server connects to your network using a standard Ethernet connection.Become familiar with the major components of the print ctorUSBconnector (to network)(to printer)Init/ResetbuttonPOWERLINKACTIVEUSBStatus lightsThe status lights visually show the current state of the print server. See "Status Lights" on page 25for a description of the status lights.1
About the LabelWriter Print ServerSystem RequirementsThe print server requires a standard Ethernet connection and one of the following: Windows XP 32-bitWindows Vista 32 or 64-bitWindows 7Mac OS X v10.3.9 or later (LabelWriter Duo requires Mac OS X v10.5 or later)Linux (Linux is not officially supported. See "Adding a Printer in Linux" on page 16 formore information)Using this GuideThis User Guide provides instructions for the DYMO LabelWriter print server on the Windows,Macintosh, and Linux platforms. For the most part, the software operates in the same way on allplatforms. Any differences in features, procedures, or commands are noted within the text.This User Guide includes information for installing and using the print server with a DYMOLabelWriter printer. Depending on the model of DYMO printer you are using, some sections of thisUser Guide may not apply to you. The following table provides a summary of the contents.User Guide ChapterDescriptionAbout the LabelWriterPrint ServerThis chapter gives an overview of the print server.Installing theLabelWriter PrintServerThis chapter describes how to install and configure the print server, installthe Print Server Control Center software, and add a LabelWriter printer toyour computer.Managing theLabelWriter PrintServerThis chapter includes information about the Print Server Control Centersoftware. This includes information on changing the server configuration andupgrading the firmware.Getting HelpThis chapter offers suggestions for resolving problems that can occur whenusing the print server. If you are unable to solve a problem, this chapter alsodescribes how to contact DYMO Technical Support.Technical andCertificationInformation2This chapter contains technical and certification information for the print server.
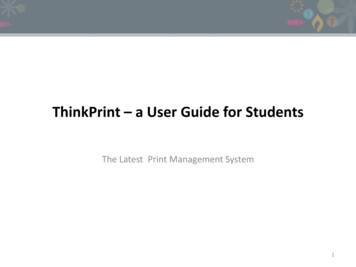
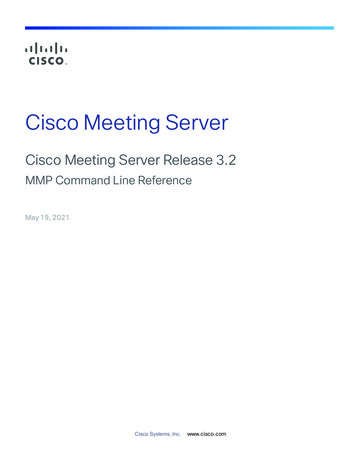
Chapter 2Installing the LabelWriter Print ServerThis chapter describes how to install and configure the print server.To install the print server1Make sure that you have everything you need to get started.2Connect the cables.3Install the LabelWriter Control Center software.4Configure the print server.5Add the printer to your computer.See Chapter 3, Adding a Printer for instructions on adding a printer on your specificoperating system.Getting StartedOnce you have unpacked your print server, make sure that you have all of the items shown here.Power adapterCD-ROMLabelWriter Print ServerPOWERLINKACTIVEUSBIn addition to the items that come with the print server, you will need the following: A LabelWriter 400 or later series printer, with power adapter and USB cableInstalled LabelWriter printer drivers (included in the DYMO Label Software installation)A standard Ethernet cable (available from your local office supply and other retailers)A working Ethernet connection to your Local Area Network3
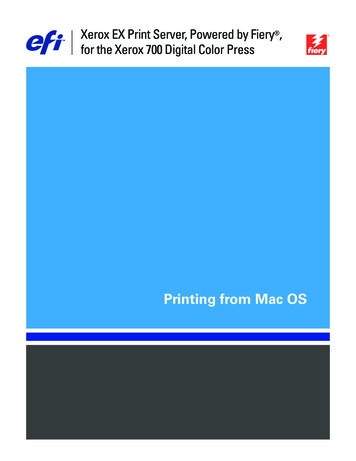
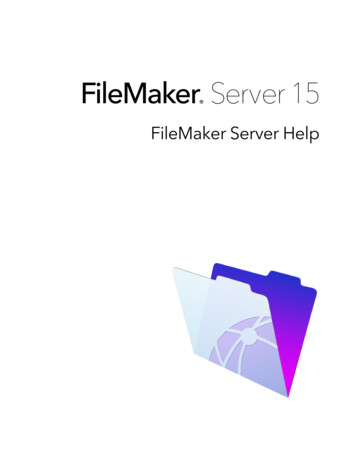
Installing the LabelWriter Print ServerConnecting the CablesThe print server connects directly to your network using a standard Ethernet connection.To connect the cables1Plug the Ethernet cable into theright side of the print server.2Plug the other end of the Ethernetcable into an available Ethernetconnection on your network.POWER3Plug the USB cable from yourLabelWriter printer into the rightside of the print server.Make sure that the USB cable isconnected to your printer and thatyour printer is plugged in.4Plug the print server poweradapter into the left side of the print server.5Plug the other end of the power adapter into a power outlet.LINKACTIVEUSBInstalling the SoftwareThe Control Center software included with your print server gives you quick access to everythingthat you need to configure and manage your print server. You can install the software on anycomputer that is connected to your network.Installing the Software in WindowsYou can install the Control Center software in Windows.To install the software in Windows14Insert the LabelWriter Print Server CD into your CD-ROM drive. After a few seconds, theinstallation screen appears.If the installation screen does not appear:a.Click Start, then Run on the Windows taskbar. The Run dialog box appears.b.Enter D:\install.exe (where D is the letter assigned to the CD-ROM drive) and click OK.2Click Install Application and follow the instructions in the installer.3On the final page of the installer, make sure that the Launch LabelWriter Print ServerControl Center check box is selected, and then click Finish.The LabelWriter Control Center starts.
Configuring the Print ServerInstalling the Software in Mac OSTo install the software in Mac OS1Insert the LabelWriter Print Server CD into your CD-ROM drive.The CD icon appears on your desktop.2Double-click the CD icon, and then double-click the Mac folder.3Double-click Dymo LabelWriter Print Server Control Center.dmg.The DYMO LabelWriter Print Server Control Center folder opens.4Drag the DYMO LabelWriter Print Server Control Center icon into the Applicationsfolder on your computer.5Double-clickDYMO LabelWriter Print Server Control Center in the Applicationsfolder to open the Print Server Control Center.Configuring the Print ServerWhen you first install the print server, the server is automatically assigned an IP address. Everytime the software is launched, the IP address is displayed next to the server name in the ControlCenter window.By default, the server is configured to automatically get an IP address. If you are using the printserver on a small office or home network, we recommend that you configure the server to use astatic IP address. This will ensure that the computers connected to your network will always be ableto locate the print server.By default, the static IP address for the print server is 192.168.1.100. You only need to change thelast three numbers. When assigning a static IP address, check your router to be sure that the IPaddress you choose is not already in use. Refer to your router documentation for information onhow to do this. A good practice when adding a print server or other shared network device to anetwork is to start with a number toward the top of the range, for example 192.168.1.250, and workdown from there.Note If you do not set a static IP address, write down the IP address that appears next to the servername in the Control Center window. You will need this IP address to add the printer to your computer.5
Installing the LabelWriter Print ServerTo set a static IP address1If the Control Center is not already open, double-clickthe Applications folder (Mac OS).on your desktop (Windows) or in2Select a print server from the list, and clickConfigure Server on the toolbar.The Login to LW Print Server dialog box appears.3Enter the following in the Administrator and Password fields.Administrator: adminPassword: adminNote These are the default settings. See "Changing the Administrator Name and Password"on page 23 for information on how to change the administrator name and password.4Click Login.The Set TCP/IP Configuration dialog box appears.5Select Static IP.6Enter the IP address you want to use in the IP Address field, and then click Apply.7Click Yes when prompted to save the TCP/IP configuration8After the server restarts, click Close to close the TCP/IP Configuration dialog box.The IP address is now displayed next to the server name in the Control Center window.Note Write down this IP address; you will need this IP address to add the printer toyour computer.Next, you need to add the printer to your computer. See Chapter 3, Adding a Printer forinformation on adding the printer in your specific operating system.6
Chapter 3Adding a PrinterIn order to print to the LabelWriter printer that is connected to the print server, you must first addthe printer to your computer. You can add the printer to any or all of the computers connected toyour network.You must have the LabelWriter printer drivers installed on your local computer to add a printer. Theprinter drivers are included in the DYMO Label Software installation.Note Because the LabelWriter Duo printer is actually two printers in one, you need to add boththe label printer and the tape printer to your computer. These two printers show up separately in theprinter list.This chapter describes how to add a printer in Windows XP, Windows Vista, Mac, and Linux.Adding a Printer in Windows XPThis section describes how to add a LabelWriter printer in Windows XP.When adding a LabelWriter Duo printer, you will need to create separate ports for the Label printerand the Tape printer. Each port must have a unique name.To add a LabelWriter printer1Click Start, and then click Printers and Faxes.2Click Add a Printer.The Add Printer Wizard starts.3Click Next.4On the Local or Network Printerpage, do the following:a.Select Local printer attachedto this computer.b.Make sure the Automaticallydetect and install my Plugand Play printer check boxis cleared.c.Click Next.7
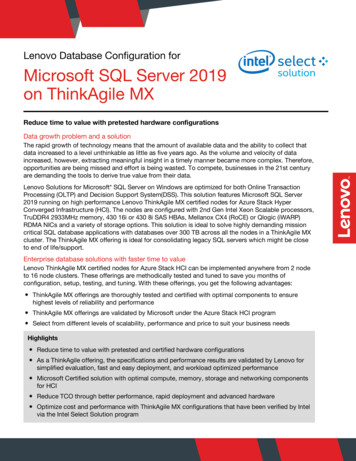
Adding a Printer5On the Select a Printer Port page,do the following:a.Select Create a new port.b.Choose Standard TCP/IPPort from the Type ofport list.Click Next.The Add Standard TCP/IP PrinterPort Wizard starts.c.6Click Next.7On the Add Port page, dothe following:88a.In the Printer Name or IPAddress field, enter the IPaddress that you wrote downwhen configuring theprint server.The port name is filled inautomatically.b.(Optional) Enter a new namefor the port in the PortName field.When adding a LabelWriterDuo printer, you must give theLabel printer port and the Tapeprinter port different names.c.Click Next.On the Additional PortInformation Required page, selectCustom, and then click Settings.
Adding a Printer in Windows XP9In the Configure Standard TCP/IP PortMonitor dialog box, do the following:a.Under Protocol, select Raw.b.Under Raw Settings, make sure the PortNumber is 9100.This is the default value.c.Click OK.10On the Additional Port InformationRequired page, click Next.11On the last page of the Add Standard TCP/IP Printer Port Wizard, click Finish.12On the Install Printer Softwarepage of the Add Printer Wizard,do the following:13a.Choose DYMO from theManufacturer list.b.Choose the LabelWriter printerthat you are adding from thePrinters list.To add the LabelWriter Duo,choose DYMO LabelWriterDUO Label.c.Click Next.On the Name Your Printer page,do the following:a.Enter a name for your printer inthe Printer name field.b.Select whether or not you wantto use this printer as thedefault printer.c.Click Next.14On the Printer Sharing page,select Do not share this printer,and then click Next.15To print a test label, select Yes, andthen click Next.16Click Finish.The printer is now available in the printer list. For the LabelWriter Duo, you now need to addthe tape portion of the printer.9
Adding a PrinterTo add the Tape printer portion of theLabelWriter Duo printer1Repeat steps 1-8 in "To add a LabelWriterprinter" on page 7.2In the Configure Standard TCP/IP PortMonitor dialog box, do the following:Under Protocol, select Raw.b.Under Raw Settings, enter 9102 in thePort Number field.c.Click OK.3On the Additional Port InformationRequired page, click Next.4On the last page of the Add Standard TCP/IP Printer Port Wizard, click Finish.5On the Install Printer Softwarepage of the Add Printer Wizard,do the following:610a.a.Choose DYMO from theManufacturer list.b.Choose DYMO LabelWriterDuo Tape from thePrinters list.c.Click Next.On the Name Your Printer page,do the following:a.Enter a name for your printer inthe Printer name field.This name must be differentthan the LabelWriter DuoLabel printer name.b.Select whether or not you wantto use this printer as thedefault printer.c.Click Next.7On the Printer Sharing page,select Do not share this printer,and then click Next.8To print a test label, select Yes, and then click Next.9Click Finish.The LabelWriter Duo Tape printer is now available in the printer list along with the Label printer.
Adding a Printer in Windows VistaAdding a Printer in Windows VistaThis section describes how to add a LabelWriter printer in Windows Vista.When adding a LabelWriter Duo printer, you will need to create separate ports for the Label printerand the Tape printer. Each port must have a unique name.To add a LabelWriter printer1Click Start, and then click Control Panel.2Under Hardware and Sound, click Printer.3Click Add a Printer.The Add Printer dialog box appears.4Click Add a local printer.5On the Choose a printer portpage, do the following:6a.Select Create a new port.b.Choose Standard TCP/IP Port from the Type ofport list.c.Click Next.On the Type a printerhostname or IP address page,do the following:a.Enter the IP address thatyou obtained whenconfiguring the printserver in the Hostname orIP Address field.The port name is filled inautomatically.b.(Optional) Enter a newname for the port in thePort name field.When adding aLabelWriter Duo printer,you must give the Label printer port and the Tape printer port different names.c.Click Next.11
Adding a Printer127On the Additional PortInformation Required page,select Custom, and thenclick Settings.8In the Configure StandardTCP/IP Port Monitor dialog box, dothe following:a.Under Protocol, select Raw.b.Under Raw Settings, make sure thePort Number is 9100.This is the default value.c.Click OK.9On the Additional Port InformationRequired page, click Next.10On the Install the printerdriver page, do the following:a.Choose DYMO from theManufacturer list.b.Choose the LabelWriterprinter that you are addingfrom the Printers list.To add the LabelWriterDuo, choose DYMOLabelWriter DUOLabel.c.Click Next.
Adding a Printer in Windows Vista11On the Type a printer namepage, do the following:a.Enter a name for yourprinter in the Printername field.b.Select whether or not youwant to use this printer asthe default printer.c.Click Next.12To print a test label, clickPrint a test page.13Click Finish.The printer is now available inthe printer list. For theLabelWriter Duo, you now need to add the tape portion of the printer.To add the Tape printer portion of the LabelWriter Duo printer1Repeat steps 1-7 in "To add a LabelWriterprinter" on page 11.2In the Configure Standard TCP/IP PortMonitor dialog box, do the following:a.Under Protocol, select Raw.b.Under Raw Settings, enter 9102 in thePort Number field.c.Click OK.3On the Additional Port InformationRequired page, click Next.4On the Install the printerdriver page, do the following:a.Choose DYMO from theManufacturer list.b.Choose DYMOLabelWriter Duo Tapefrom the Printers list.c.Click Next.13
Adding a Printer514On the Type a printer namepage, do the following:a.Enter a name for yourprinter in the Printername field.This name must bedifferent than theLabelWriter Duo Labelprinter name.b.Select whether or not youwant to use this printer asthe default printer.c.Click Next.6To print a test label, clickPrint a test page.7Click Finish.The LabelWriter Duo Tape printer is now available in the printer list along with the Label printer.
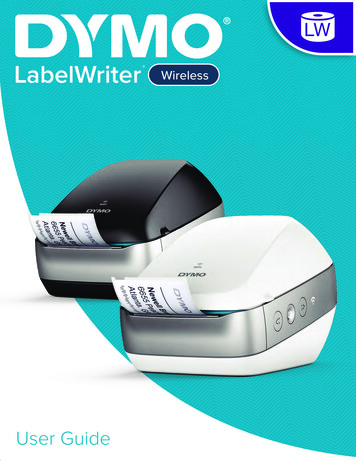
Adding a Printer in Mac OSAdding a Printer in Mac OSWhen adding a printer in Mac OS, the printer appears in the Printer Name list as lw print servernnn-usb1, where nnn represents the last three numbers of the IP address assigned to the print server.Note You must be running Mac OS 10.5 or later to add a LabelWriter Duo printer connected tothe print server.To add a LabelWriter printer1Choose System Preferences from theApple menu.2Click Print & Fax.3Clickat the bottom of thePrinters list.4Click Default on the toolbar.5Select lw print server-nnn-usb1 fromthe Printer Name list.Note If you are adding a LabelWriterDuo printer, you will also see lw printserver-nnn-usb1-2 in the list. You willadd this printer later.The Print Using field is filled inautomatically.6(Optional) Enter a name for the printer.7Click Add.The printer is now available in the Printers list. For the LabelWriter Duo, you now need to addthe tape portion of the printer.To add the Tape printer portion of the LabelWriter Duo printer1Clickat the bottom of thePrinters list.2Click Default on the toolbar.3Select lw print server-nnn-usb1-2from the Printer Name list.The Print Using field is filled inautomatically.4(Optional) Enter a name for the printer.5Click Add.The LabelWriter Tape printer is nowavailable in the Printers list along withthe Label printer.15
Adding a PrinterAdding a Printer in LinuxDYMO does not officially support installing the print server on a Linux system. However, the stepsin this section describe how to add a printer on Ubuntu 8.04 (CUPS version 1.3.7).Note DYMO LabelWriter drivers for CUPS must be installed prior to installing the print server.To add a LabelWriter printer1Open any Web browser and go to the CUPSHome Page, http://localhost:631.2Select the Administration tab, and thenclick Find New Printers.3Locate the DYMO LabelWriter printer thatis connected to the print server in theAvailable Printers list and click AddThis Printer.Note If you are adding the DYMO LabelWriter Duo printer, make sure that you selectDYMO LabelWriter Duo Label from the list. If you see the Tape printer and not the Labelprinter in the Available Printers list, click Reload until the Label printer is displayed in the list.164Make any changes you want to the name,location, or description of the printer andthen click Continue.5Choose the DYMOLabelWriter printer that you areadding from the Model list, andthen click Add Printer.The printer is now available.6Print a test label.See "Printing a Test Label" onpage 18 for information on howto print a test label.For the LabelWriter Duo, younow need to add the tape portion of the printer.
Adding a Printer in LinuxTo add the Tape printer portion of the LabelWriter Duo printer1Select the Printers tab.2Write down the Device URI for theLabelWriter Duo Label printer.3Select the Administration tab, and thenclick Add Printer.4On the Add New Printer page, dothe following:a.Enter a name for the printer, such asDuo Tape, in the Name field.b.(Optional) Enter a location anddescription for the printer.c.Click Continue.5Choose AppSocket/HP Jetdirect from theDevice list, and then click Continue.6On the Device URI page, dothe following:a.Enter the Label printerDevice URI in the DeviceURI field.b.Enter :9102 at the endof the Label printerDevice URI.c.Click Continue.17
Adding a Printer7Select DYMO from the Make list, and thenclick Continue.8Select the DYMO LabelWriterDUO Tape printer that you areadding from the Model list, andthen click Add Printer.The printer is now available.Printing a Test LabelMake sure that the printer is connected and working properly by printing a test label after you haveadded a printer.To print a test label181Select the Printers tab on the CUPS Home Page.2Locate the printer that you want to use to print the test label and click Print Test Page.
Chapter 4Managing the LabelWriter Print ServerWith the Print Server Control Center software, you can quickly view server information andconfigure the IP address. The print server also has an internal set of web pages that can be accessedfrom the Control Center for even more management options.About the Control CenterFrom the Print Server Control Center you can: View server information. (Windows only)Access the server home page.Configure the server.Change the Control Center language.If you have more than one LabelWriter Print Server connected to your network, you can access allof the print servers from the Control Center.Viewing the Print Server Information (Windows only)On Windows systems, you can display all of the information for a print server.To view print server information1Double-clickon your desktop.2Select the server you want to view information for from the servers list.19
Managing the LabelWriter Print Server3Choose Configuration from the Tools menu.4Select the show server information check box, and then click OK.The server information is now displayed in a separate pane under the servers list.Changing the Control Center LanguageYou can change the language for the Control Center. When you change the language setting, itwill take effect the next time you open the Control Center.20
About the Print Server Web PagesTo change the language1Double-clickon your desktop.2Choose Configuration from the Tools menu.3Select your desired language, and then click OK.4Close and restart the Control Center.About the Print Server Web PagesFrom the Print Server Web pages, you can: View server status.Change the configuration.Change the administrator name and password.Upgrade the firmware.Restart the server.Reset the server to factory default settings.Note The Print Server Web pages are only available in English.To access the Print Server Home Page1Open the Print Server Control Center.2Select the print server you want to access from the servers list.21
Managing the LabelWriter Print Server3ClickOpen Print Server Home Page (Windows) oron the toolbar.Go to Home Page (Mac OS)Note You can also access the print server home page by entering the IP address for the printserver in the address bar of your Web browser.Viewing the Print Server StatusThe print server status page displays the print server status and TCP/IP configuration.To view print server status Click Status at the top of the Print Server home page.Configuring the ServerFrom the Print Server Configuration page, you can change the server name and description,configure the IP address, change the administrator name and password, and perform maintenanceon the print server.To access the print server Configuration page1Click Config at the top of the Print Server home page.2Enter the following in the Administrator and Password fields, and then click Login.Administrator: adminPassword: adminNote These are the default settings. See "Changing the Administrator Name and Password"on page 23 for information on how to change the administrator name and password.Changing the Server Name and DescriptionYou can change the name and description of the print server. If you have more that one print serverconnected to your network, giving each server a distinct name or description makes it easy todistinguish between servers.To change the server name and description221Click General Configuration on the left side of the Configuration page.2Enter a new name for the server in the Server Name field.3Enter a new description for the server in the Server Description field.4Click Submit.The print server name and description are updated.
Configuring the ServerChanging the TCP/IP ConfigurationYou can configure the print server to obtain an IP address automatically or assign a static IP addressthat you choose.If you are using the print server on a small office or home network, we recommend that youconfigure the server to use a static IP address. This will ensure that the computers connected toyour network will always be able to locate the print server.By default, the static IP address for the print server is 192.168.1.100. You only need to change thelast three
About the LabelWriter Print Server 2 System Requirements The print server requires a standard Ethernet connection and one of the following: Windows XP 32-bit Windows Vista 32 or 64-bit Windows 7 Mac OS X v10.3.9 or later (LabelWriter Duo requires Mac OS X v10.5 or later) Linux (Linux is not officially