Transcription
DYMO LabelSoftwareUser Guide
DYMO Corporation44 Commerce RoadStamford, CT 06902-4561Phone: (203) 355-9000Fax: (203) 355-9090Copyright 2003 DYMO Corporation. All rights reserved. Revised 4/03.No part of this document or the Software may be reproduced or transmitted in any form or by anymeans or translated into another language without the prior written consent of DYMO Corporation.TrademarksiiLabelWriter is a registered trademark of DYMO Corporation. DYMO is a registered trademark ofEsselte Corporation. All other trademarks are the property of their respective holders.
ContentsIntroduction . . . . . . . . . . . . . . . . . . . . . . . . . . . . . . . . . . . . . . . . . . . . . . . . . . . . . . . . . . . . . . . . . . . . . . . . . . . . . 1Installing the LabelWriter . . . . . . . . . . . . . . . . . . . . . . . . . . . . . . . . . . . . . . . . . . . . . . . . . . . . . 1Registering the Software . . . . . . . . . . . . . . . . . . . . . . . . . . . . . . . . . . . . . . . . . . . . . . . . . . . . . . 2Getting Help. . . . . . . . . . . . . . . . . . . . . . . . . . . . . . . . . . . . . . . . . . . . . . . . . . . . . . . . . . . . . . . . 2Chapter 1Getting Started . . . . . . . . . . . . . . . . . . . . . . . . . . . . . . . . . . . . . . . . . . . . . . . . . . . . . . . . . . . . . . . . . . . . . . . . . 3DYMO Label Window. . . . . . . . . . . . . . . . . . . . . . . . . . . . . . . . . . . . . . . . . . . . . . . . . . . . . . . . 3Creating a New Label . . . . . . . . . . . . . . . . . . . . . . . . . . . . . . . . . . . . . . . . . . . . . . . . . . . . . . . . 4Chapter 2Using the Label Designer . . . . . . . . . . . . . . . . . . . . . . . . . . . . . . . . . . . . . . . . . . . . . . . . . . . . . . . . . . . . . 11Starting the Designer . . . . . . . . . . . . . . . . . . . . . . . . . . . . . . . . . . . . . . . . . . . . . . . . . . . . . . . . 11Design Objects . . . . . . . . . . . . . . . . . . . . . . . . . . . . . . . . . . . . . . . . . . . . . . . . . . . . . . . . . . . . . 11Creating a New Label File . . . . . . . . . . . . . . . . . . . . . . . . . . . . . . . . . . . . . . . . . . . . . . . . . . . . 13Opening an Existing Label File . . . . . . . . . . . . . . . . . . . . . . . . . . . . . . . . . . . . . . . . . . . . . . . . 13Adding an Object . . . . . . . . . . . . . . . . . . . . . . . . . . . . . . . . . . . . . . . . . . . . . . . . . . . . . . . . . . . 14Deleting Objects. . . . . . . . . . . . . . . . . . . . . . . . . . . . . . . . . . . . . . . . . . . . . . . . . . . . . . . . . . . . 14Chapter 3Working with Lists. . . . . . . . . . . . . . . . . . . . . . . . . . . . . . . . . . . . . . . . . . . . . . . . . . . . . . . . . . . . . . . . . . . . . 15Using the Address Book . . . . . . . . . . . . . . . . . . . . . . . . . . . . . . . . . . . . . . . . . . . . . . . . . . . . . 15Creating a New List . . . . . . . . . . . . . . . . . . . . . . . . . . . . . . . . . . . . . . . . . . . . . . . . . . . . . . . . . 17Opening an Existing List . . . . . . . . . . . . . . . . . . . . . . . . . . . . . . . . . . . . . . . . . . . . . . . . . . . . . 18Using Address Fixer (Windows) . . . . . . . . . . . . . . . . . . . . . . . . . . . . . . . . . . . . . . . . . . . . . . . 18Printing Internet Postage (Windows) . . . . . . . . . . . . . . . . . . . . . . . . . . . . . . . . . . . . . . . . . . . . 18Chapter 4Printing Labels Using Smart Paste . . . . . . . . . . . . . . . . . . . . . . . . . . . . . . . . . . . . . . . . . . . . . . . . . . 19About Smart Paste . . . . . . . . . . . . . . . . . . . . . . . . . . . . . . . . . . . . . . . . . . . . . . . . . . . . . . . . . . 19Printing Multiple Labels Using Smart Paste . . . . . . . . . . . . . . . . . . . . . . . . . . . . . . . . . . . . . . 21iii
Chapter 5Using the LabelWriter with Other Applications . . . . . . . . . . . . . . . . . . . . . . . . . . . . . . . . . . . 23Add-In for Microsoft Word. . . . . . . . . . . . . . . . . . . . . . . . . . . . . . . . . . . . . . . . . . . . . . . . . . . 23Additional Windows Application Add-Ins . . . . . . . . . . . . . . . . . . . . . . . . . . . . . . . . . . . . . . . 24About the ACT! and GoldMine Add-Ins . . . . . . . . . . . . . . . . . . . . . . . . . . . . . . . . . . . . . . . . 25Printing Directly from Other Applications . . . . . . . . . . . . . . . . . . . . . . . . . . . . . . . . . . . . . . . 26Chapter 6Maintenance and Troubleshooting . . . . . . . . . . . . . . . . . . . . . . . . . . . . . . . . . . . . . . . . . . . . . . . . . . 27Caring for the LabelWriter Printer . . . . . . . . . . . . . . . . . . . . . . . . . . . . . . . . . . . . . . . . . . . . . 27Performing a Printer Self-Test . . . . . . . . . . . . . . . . . . . . . . . . . . . . . . . . . . . . . . . . . . . . . . . . 27Obtaining Technical Support . . . . . . . . . . . . . . . . . . . . . . . . . . . . . . . . . . . . . . . . . . . . . . . . . 28Appendix APrinter Specifications . . . . . . . . . . . . . . . . . . . . . . . . . . . . . . . . . . . . . . . . . . . . . . . . . . . . . . . . . . . . . . . . . 29Developer and SDK Information . . . . . . . . . . . . . . . . . . . . . . . . . . . . . . . . . . . . . . . . . . . . . . 30iv
IntroductionCongratulations on purchasing the DYMO LabelWriter printer. After just a short time, you willrealize how many of your daily tasks will be simplified by using the LabelWriter printer.Your LabelWriter printer will help you to address letters; label file folders, CD/DVDs, videocassettes, packages, and name tags; and print Internet postage. With a little imagination, you willthink of hundreds of ways to use the LabelWriter printer to make your job easier and more efficient.This User Guide provides instructions for DYMO Label Software on the Windows and Macintoshplatforms. For the most part, the software operates in the same way on both platforms. Anydifferences in features, procedures, or commands are noted within the text.SoftwareDYMO Label Software includes many features that make it flexible and easy to use. In addition,DYMO has integrated the Label Software into Microsoft Word allowing you to print labelsquickly and easily from within Word. For Windows, the software has also been integrated withMicrosoft Outlook , Palm Desktop, GoldMine , and ACT! software.HardwareThe LabelWriter printer uses advanced thermal printing technology to print on specially treatedlabels. This means you will never have to replace toner, ink cartridges, or a ribbon to print labels.Direct thermal printing works by transferring heat from a thermal print head to specially treatedlabels. The thermal print head contains a row of miniature heating elements that press against thetreated label. As a heating element touches the specially treated label, a thermal reaction causes thespecific point on the label to turn black.LabelsThe only supplies you will ever need for this printer are the labels. We recommend you only useDYMO-brand labels. Using labels other than DYMO-brand labels may void your warranty.How long your labels will last depends on how the labels are used. Thermal labels are susceptibleto fading in two ways: Exposure to direct sunlight, to fluorescent light for an extended period of time, or to extremeheat will cause fading. Contact with plasticizers (for example, labels placed on plastic ring binders) will cause fading.In its original packaging, the label shelf life is 18 months. When labels are used for short-termapplications (envelopes, packages, and so on), fading is not a problem. When labels are used tolabel files in a file cabinet, fading is very gradual over many years. Labels applied to the edge of anotebook that is then placed on a shelf in the sun will show signs of fading within a few months.To prolong label life when not in use, keep the labels stored in a cool, dry place and in the black bagin which they were shipped.Installing the LabelWriterYour LabelWriter printer shipped with a Quick Start Guide in addition to this User Guide. Followthe instructions in the Quick Start Guide to install your printer and DYMO Label Software.1
IntroductionRegistering the SoftwareWe highly recommend that you register your DYMO Label Software so that you can receivecustomer support and product updates.Macintosh users can register their software by selecting Register DYMO LabelWriter from theHelp menu.Windows users can also register their software by selecting Register from the Help menu.However, the first time Windows users start DYMO Label Software, you will be asked to register.If you choose not to register the software at this time, you will be prompted the next several timesyou start the program.To register the software1Complete all of the required fields on the registration form.2Choose to register over the Internet or print the registration form for mail or fax registration.If you register over the Internet, wait a few seconds while your information is sent to DYMO.3To register by mail or fax, print the completed registration form, and mail or fax the form to thelocation printed on the form.Getting HelpBefore making labels, you should know about the various help resources available to you. DYMOLabel Software includes extensive online Help. At times in this manual you will be directed to theonline Help for more detail or instructions on various topics.To access the online Help, do one of the following In DYMO Label Software, click Help Contents (Windows) or LabelWriter Help(Macintosh) from the Help menu. (Windows) Click Start, point to Programs DYMO Label, and then click Help withDYMO Label Software. (Windows) Press F1 in most windows and dialog boxes for context-sensitive help.(Windows) The DYMO Label menu also includes Internet Shortcuts that access specific areas ofthe DYMO Web site, including label ordering, support, and more.These shortcuts are also available from the Help menu in DYMO Label Software.2
Chapter 1Getting StartedDYMO Label Software is a general-purpose label printing program that is specifically designed tohelp you get the most benefit from your LabelWriter printer. The program includes: Many pre-designed labels for commonly used tasksA built-in Designer you can use to create your own label designs (see page 11)A built-in Address Book that lets you save addresses or other types of lists (see page 15)Add-ins to print directly from the following programs:Microsoft WordMicrosoft Outlook (Windows only)Palm Desktop (Windows only)ACT! and GoldMine (Windows only)Many of DYMO's partners have also integrated label printing into their software includingCorex CardScan, Sage Software’s TeleMagic, and eGrabber. A Smart Paste function allowing you to automatically print multiple labels by copying textfrom other applications directly into the current label (see page 19) Database connectivity allowing you to print from an Access, Paradox, dBase, or Exceldatabase (see page 26) (Windows only) Integration with Stamps.com for printing Internet postage (Windows only)DYMO Label WindowThis section introduces some basic features available in DYMO Label Software.To start the software in Windows Click Start, point to Programs DYMO Label, and then click DYMO Label.To start the software in Mac OS X Open the DYMO Label folder and double-click.3
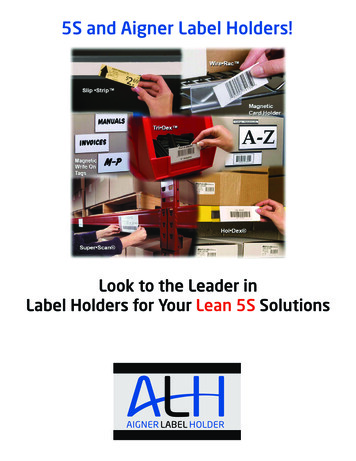
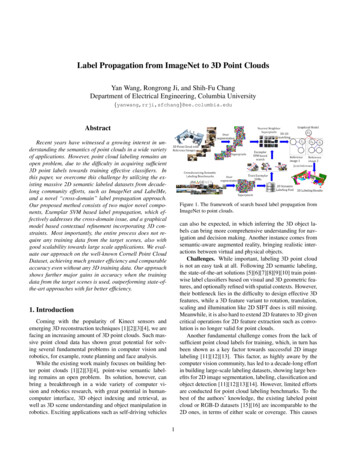
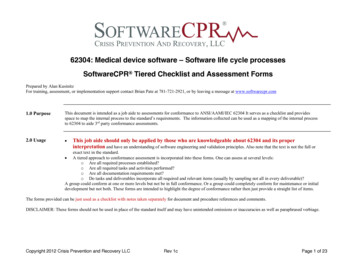
Getting StartedThe DYMO Label Software window appears containing a blank label.NewOpen Save PrintPasteAddress Fixer(Windows)Label Files ListMenu ksAddressBook PanelFor Windows users, the first time you open DYMO Label Software, you are prompted to registerthe software. See "Registering the Software" on page 2. All users are also asked to enter your returnaddress and select a default logo.Creating a New LabelThis tutorial guides you through the steps necessary to create, print, and save a customized label.The best way to start is to learn how to modify one of the pre-designed labels included with thesoftware. In this tutorial, you will customize a shipping label with a graphic.NOTE You can only print the shipping label on the LabelWriter EL60, Turbo, 320, 330, and330 Turbo printers. If you have a LabelWriter EL40, 300, 310, or 315 printer, select this shippinglabel and follow the tutorial anyway. This tutorial will give you valuable information on how toaccess the various text and design objects, and change their attributes.4
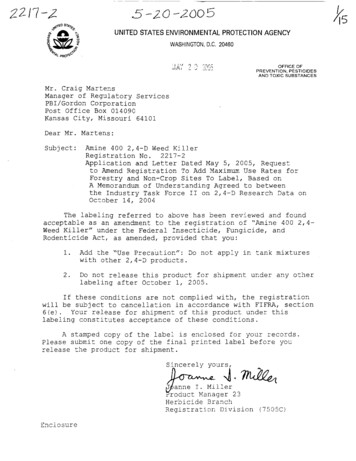
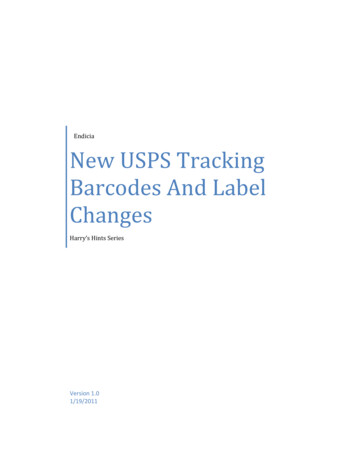
Creating a New LabelChoosing a Label FileThe first step is to choose a label file as the basis for your new label.To choose a label file1Select the arrow next to the Label Files drop-down list.A list of the most recently used label files appears.Click here to display the list ofrecently used labels.If necessary, click More to access all the pre-designed labels. Notice that all label files arelisted with the label type first, then any important objects on the label, and finally the partnumber of the label.2Select the Shipping with graphic (30256) label.The Shipping with graphic label appears in the main window.Changing the GraphicThe next step is to customize the graphic. As you will see in this step, each piece of information ona label is an object (for example, the return address, the recipient address, the line, and so on).When you double-click an object, a Settings dialog box appears where you can change the object’sattributes.5
Getting StartedTo change the graphic61Double-click the graphic that appears on the label.The Graphic Settings dialog box appears.2Select File under Select Graphics Source.The Insert Image button changes to read Select File.3Click Select File.The File open dialog box appears listing the contents of the default Clipart folder.4Select the Miscellaneous folder and click Open. The contents of the Miscellaneous folderappear.5Select Comput1.bmp from the Miscellaneous folder.A preview showing the contents of the Comput1.bmp graphic file appears in the dialog box.6Click Open.The Comput1.bmp graphic appears in the Graphic Settings dialog box.7Click OK.The computer graphic is placed on the label replacing the telephone graphic.
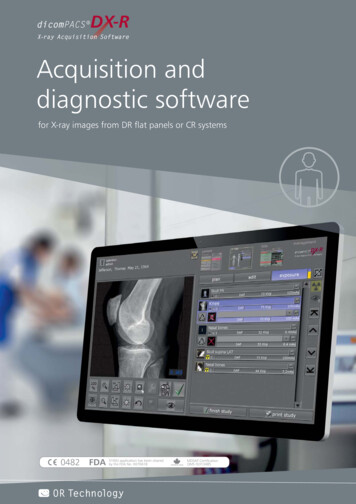
Creating a New LabelChanging the Return AddressNext, you change the return address.To enter a return address1Click the text in the label’s upper-right corner.The flashing cursor appears where the default text had been.Flashingcursor2Enter the following text:CompuDoctor’s Fix It Service1234 Hardware WayLivermore, CA 945503Click anywhere outside the text object.The new return address appears on the label.Changing the Recipient AddressNext, you enter a recipient’s address.To enter the recipient’s address1Click once on the address object in the middle of the label. The flashing cursor appears wherethe default text had been.7
Getting Started(Windows) To help identify objects, a hint appears when you move the pointer over an object.2Enter the following address.DYMO Corporation44 Commerce RoadStamford, CT 06902-45613Double-click the address object.The Address Settings dialog box appears.4Select Below Address under Barcode Position and then click OK.DYMO’s address now appears as the recipient’s address on the label with a postal barcodebeneath the city, state, and ZIP code.Changing the FontYou may want to modify the font used for the recipient address or return address.To change the font81Click the recipient address object. The address text is highlighted.2Select Times New Roman from the Font drop-down list.3Selectfrom the Formatting toolbar.
Creating a New LabelThe recipient address appears in the new font and style.Printing the LabelNow that you have customized the label, you are ready to print.NOTE You can only print this shipping label on EL60, Turbo, 320, 330, and 330 Turbo printers. Ifyou have an EL40, 300, 310, or 315 printer, review this section even though you will not be able toprint the label.Before you print the label, make sure: The LabelWriter printer is connected to your computer and turned on. You have properly loaded shipping labels in the printer. If necessary, see the Quick Start Guidefor information on how to set up your printer and load the labels.To print the label1Enter the number of copies of this label to print in the Copies field on the Main toolbar.2Clickon the Main toolbar.Saving the LabelNow that you have created your shipping label, you can save it as a label file. Saved labels willautomatically appear in the Label Files drop-down list.To save the label1Clickon the Main toolbar. The Save File dialog box appears.2Enter DYMOShip as the new name for the file and click Save.Notice that your new label file, DYMOShip, is added to the top of the Label Files drop-down listas the most recently used label and also alphabetically in the list of labels below.To use a label file you created, choose it from the Label Files drop-down list.9
Getting StartedNOTE To access your label files from the Label Files list, you must store them in the Label Filesfolder. A default Label Files folder is created for you, under the DYMO Label installation folder,when you first install the software.Now that you can open, edit, print, and save a shipping label, you are ready to modify and use mostother label files.10
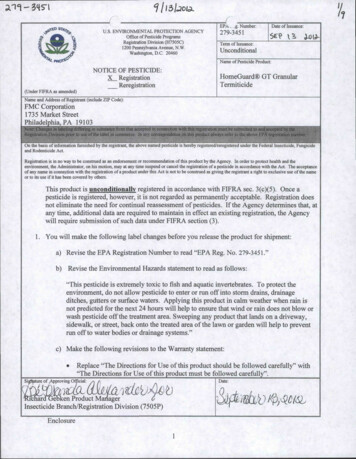
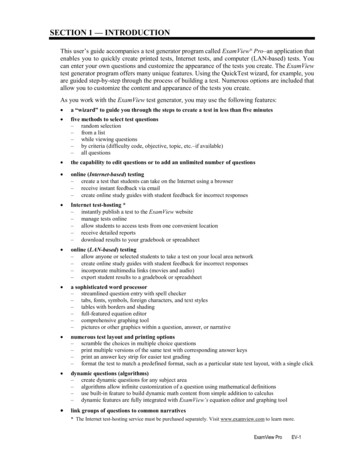
Chapter 2Using the Label DesignerDYMO Label Software allows you to easily design labels for your specific needs using a simple-touse Label Designer. You can also modify any of the pre-designed label files included with thesoftware.The Designer allows you to change the appearance and content of labels. You can add or modifytext (including addresses), barcodes, sequential numbers, date-time stamps, lines, rectangles, andcircles or ellipses (Macintosh). The following figures are examples of custom label designs.Starting the DesignerWhen the Designer is active, the Designer toolbar appears below the Formatting toolbar.To start the Label Designer, do one of the following Create a new label file. See "Creating a New Label" on page 4.The Designer toolbar automatically appears. With a label file open, click.Design ObjectsA label created in DYMO Label Software can contain various text and design objects. Each objecthas certain attributes, such as size, position, font, and so on. You can select the attributes that youwant in the object’s Settings dialog box. For more information on modifying object attributes, seethe online Help.This section describes each of the objects available on the Designer toolbar.TextThe text object is useful for displaying information that remains unchanged every time you print anew label (for example, “Hello my name is” on name badges or your return address on shippinglabels).Text objects can also be used for variable text (text that changes from label to label). This is usefulfor part numbers, book titles, and many other non-address items you might save as a list in theAddress Book. For more information on variable text, see the online Help.11
Using the Label DesignerAddressThe address object is similar to the text object, but is designed to print information that changeswith each label printed, such as names and addresses. Address objects can also display POSTNETbarcodes. You can change the font settings (font, size, style, and so on) for text in address objectsand control the text’s position. You can also apply special effects to the text.Address objects are by default variable text objects. Address objects can also be fixed text objects.Address text is saved as part of the label in fixed text objects. The address is not saved with thelabel in variable text address objects. (See "How the Address Book Works" on page 15 for moreinformation.)GraphicThe graphic object allows you to add your company logo and other favorite graphics to labels. Youcan import many popular graphic formats, position them anywhere on the label, resize them, andeven specify one as the default graphic. You can also copy a graphic from a graphics application(such as Microsoft Paint or CorelDRAW), and then paste it onto a
For the most part, the software operates in the same way on both platforms. Any differences in features, procedures, or commands are noted within the text. Software DYMO Label Software includes many features that ma ke it flexible and easy to use. In addition, DYMO has integrated the Label Software