Transcription
CONTENTSUsage Notice .2Safety Instructions . 2Introduction .5Projector Features . 5Package Overview . 6Projector Overview . 7Using the Product .9Control Panel . 9Connection Ports . 10Remote Control . 12Installing the Batteries . 14Remote Control Operation . 15Connection .16Connecting a computer or monitor . 18Connecting Video source devices . 20Operation .23Powering On/Off the Projector . 23Adjusting the Projector Height . 24Adjusting the Projector Zoom and Focus . 24Adjusting Projection Image Size . 25Menu Operation . 27Appendix .46Replacing the Dust Filter . 46Replacing the Lamp . 47Ceiling mount installation . 49Compatibility Modes . 50IR Code . 53RS232 Commands and Protocol Function List . 54Troubleshooting . 60Optoma Global Offices . 62Regulation & Safety Notices . 65EN-1
Usage NoticeSafety InstructionsRead all of these instructions before you operate your projector and save for future reference.1. Read instructionsAll the safety and operating instructions should be read before theappliance is operated.2. Notes and warningsAll notes and warnings in the operating instructions should be adheredto.3. CleaningUnplug the projector from the wall socket before cleaning. Use a dampcloth for cleaning the projector housing. Do not use liquid or aerosolcleaners.4. AccessoriesDo not place this product on an unstable cart, stand, or table. The productmay fall, causing serious damage to the product.Keep the plastic packing materials (from the projector, accessories andoptional parts) out of the reach of children as these bags may result indeath by suffocation. Be particularly careful around the small children.5. VentilationThe projector is equipped with ventilation holes (intake) and ventilation holes(exhaust). Do not block or place anything near these slots, or internal heatbuild-up may occur, causing picture degradation or damage to theprojector.6. Power sourcesCheck that the operating voltage of your unit is identical with the voltage ofyour local power supply.7. ServicingDo not attempt to service this projector yourself. Refer all servicing toqualified service personnel.8. Replacement partsWhen replacement parts are required, be sure that the replacementparts are specified by the manufacture. Unauthorized substitutions mayresult in fire, electric shock or other hazards.EN-2
9. Moisture CondensationNever operate this projector immediately after moving it from a coldlocation to a warm one. When the projector is exposed to such achange in temperature, moisture may condense on the lens and thecrucial internal parts. To prevent the unit from possible damage, do notuse the projector for at least 2 hours when there is an extreme orsudden change in temperature.EN-3
Notes on the AC Power CordAC Power Cord must meet the requirement of countries where you use this projector. Pleaseconfirm your AC plug type with the graphics below and ensure that the proper AC Power Cord isused. If the supplied AC Power Cord does not match your AC outlet, please contact your salesdealer. This projector is equipped with a grounding type AC line plug. Please ensure that youroutlet fits the plug. Do not defeat the safety purpose of this grounding type plug. We highlyrecommend using a video source device also equipped with a grounding type AC line plug toprevent signal interference due to voltage fluctuations.GroundGroundFor the U.S.A. and CanadaFor Australia andMainland ChinaGroundGroundFor Continental EuropeEN-4For the U.K.
IntroductionProjector FeaturesThe projector integrates high-performance optical engine projection and a user- friendly design to deliver high reliability and ease of use.The projector offers the following features: Single chip 0.65" Texas Instruments DLP technologyFull 3D 1080P (1920 x 1080 pixels)Compatibility with Macintosh computersCompatibility with NTSC, PAL, SECAM and HDTVD-Sub 15-pin terminal for analog video connectivityRS-232 connector for serial controlQuick Resume featureEco mode for more economic usageHDMI compatibilitySupport wireless dongle via internal power of VGA 23D VESA port for 3D glasses emitterUSB type A port for power chargingNote The information in this manual is subject to change without notices. The reproduction, transfer or copy of all or any part of this document is not permittedwithout express written consent.EN-5
Package OverviewUnpack and inspect the box contents to ensure all parts listed below are inthe box. If something is missing, please contact Optoma customer service.Standard Accessories5 User's Manual5 Warranty Card5 Quick Start Card5 WEEE Card(for EMEA only)ProjectorAC Power CordRemote2 x AAA BatteriesDocumentationOptional accessoriesViewSonicCarry BagHDMI cableVGA CableDust filterNote Optional accessories vary depending on model, specification and region.EN-6
Projector OverviewFront View109112345Front adjustment footProjection lensFocus ringFront IR remote control sensorSecurity bar2 384569SpeakerVentilation holesControl panelZoom ring10Top cover6787EN-7
Rear View11234Optional dust filterAC power socketConnection portsKensington lock234556767Rear IR remote control sensorSpeakerVentilation holesBottom View12122Ceiling mount holesRear adjustment feetNote This projector can be used with a ceiling mount for support. The ceiling mount is notincluded in the package. Contact your dealer for information to mount the projector on a ceiling.EN-8
Using the ProductControl Panel123111098415123456789101167Keystone ( / )Manually correct distorted images resulting from an angled projection.SOURCESwitch between input signals.HELPDisplay Help menu.MENUDisplay or exit the on-screen display menus.TEMP (Temp LED indicator)Refer to “LED Indicator Messages” on page 61.LAMP (Lamp LED indicator)Refer to “LED Indicator Messages” on page 61.POWER (Power LED indicator)Refer to “LED Indicator Messages” on page 61.Four directional buttonsUse four directional buttons to select items or make adjustments to yourselection.Re-SYNCAutomatically synchronize the projector to the input source.PowerTurn the projector on or off.ENTERConfirm your item selection.EN-9
Connection Ports123 4 567HDMI 1L (S-VIDEO/VIDEO) RAUDIO3-IN1615 14 13 12 11 10 981RS-232CWhen operating the projector via a computer, connect this to thecontrolling computer's RS-232C port.2VGA-OUTConnect to an external monitor.In Eco mode (Standby), VGA-OUT is disabled.In Active mode (Standby), VGA-OUT is enabled.3S-VIDEOConnect S-Video output from video equipment to this jack.4MOUSE/SERVICEThis connector supports firmware update, remote mouse and page up/down. Remote mouse function is not available in some models.5HDMIConnect HDMI output from video equipment to this jack.6DVI-DConnect DVI-D output from computer to this jack.EN-10
7Power Out (5V DC 1A)Power charging (5V DC 1A). Do not connect devices that require or draw more power than 5v 1A. Overdrawing can cause damage and create safety concerns.891012V OUT12V DC outMICMicrophone input jack.AUDIO OUTConnect to a speaker or other audio input equipment.11AUDIO1-IN (VGA1/DVI-D)/AUDIO2-IN (VGA2)Connect an audio output from a computer to this jack.123D SYNC OUTFor 3D glasses emitter13AUDIO3-IN (L/R) (S-VIDEO/VIDEO)Connect an audio output from a video device to this jack.14VIDEOConnect composite video output from video equipment to this jack.VGA2-IN / YPbPr /Connect image input signal (analog RGB or component) to this jack.Support wireless dongle via internal power of VGA 2.1516VGA1-IN / YPbPrConnect image input signal (analog RGB or component) to this jack.EN-11
Remote 678924ONTurn the projector on.User1User definable key for customized functions including DVI-D/S-VIDEO/Color Settings/Color Temp./Gamma/Test Pattern/AV Mute. Default isColor Settings.BrightnessDisplay the setting bar for adjustment of brightness.Aspect RatioToggle to switch the display aspect ratio.Keystone ( /-)Manually correct distorted images resulting from an angled projection.MuteCut off the sound temporarily.Volume /VolumeAdjust the volume level.EnterConfirmed selections.SourceSwitch between input signals.EN-12
101112131415161718192021222324MenuDisplay or exit the on-screen display menus.HDMI1Switch between HDMI and DVI-D signal.VGA1Display input signal (analog RGB or component) from VGA1-IN / YPbPrport.VGA2Display input signal (analog RGB or component) from VGA2-IN / YPbPrport.OFFTurn the projector off.User2User definable key for customized functions including DVI-D/S-VIDEO/Color Settings/Color Temp./Gamma/Test Pattern/AV Mute. Default isColor Temp.User3User definable key for customized functions including DVI-D/S-VIDEO/Color Settings/Color Temp./Gamma/Test Pattern/AV Mute. Default isGamma.ContrastAdjust the image contrast.ModeToggle to switch display mode.3DTurn on or off 3D function.Sleep TimerTurn on/off the sleep timer.DynamicBlackTurn on/off the dynamicblack.Re-syncAutomatically synchronize the projector to the input source.Four directional buttonsUse four directional buttons to select items or make adjustments to yourselection.VideoToggle between Video and S-VideoNote (*) No function for this model.EN-13
Installing the Batteries1. Open the battery cover in thedirection shown.2. Install batteries as indicated bythe diagram inside thecompartment.3. Close the battery cover intoposition.Caution Risk of explosion if battery is replaced by an incorrect type. Dispose of used batteries according to the instructions. Make sure the plus and minus terminals are correctly aligned when loading abattery.Note Keep the batteries out of the reach of children. There is a danger of death by accidentallyswallowing the batteries. Remove batteries from remote control when not using for extended periods. Do not dispose of the used batteries along with household waste. Dispose of usedbatteries according to local regulations. Danger of explosion may happen if batteries are incorrectly replaced. Replce all thebatteries with new ones. Batteries should not be in or near to fire or water, keep batteries in a dark, cool and dryplace. If suspect battery leakage, wipe out the leakage and then replace new batteries. If theleakage adheres to your body or clothes, rinse well with water immediately.EN-14
Remote Control OperationPoint the remote control at the infrared remote sensor and press a button. Operating the projectorfrom the front60405m m107mOperating the projectorfrom the rear60405mm107mNote The remote control may not operate when there is sunlight or other strong light suchas a fluorescent lamp shining on the remote sensor. Operate the remote control from a position where the remote sensor is visible. Do not drop the remote control or jolt it. Keep the remote control out of locations with excessively high temperature orhumidity. Do not get water on the remote control or place wet objects on it. Do not disassemble the remote control.EN-15
ConnectionWhen connecting a signal source to the projector, be sure to:1. Turn all equipment off before making any connections.2. Use the correct signal cables for each source.3. Ensure the cables are firmly inserted.12 341567891011HDMI 1L (S-VIDEO/VIDEO) RAUDIO3-IN131231. *VGA cable (D-Sub to D-Sub)2.3.4.5.6.7.8. *USB cable (B type to A type).*Audio cable.*DVI-D cable. *VGA to DVI-A cable. *VGA (D-Sub) to HDTV (RCA) cable.*S-Video cable.*HDMI cableEN-16
9.10.11.12.13.*Audio L/R cable. *Composite video cable. USB port for power charging. *Microphone 3.5 mini jack cable. *3D glasses emitterNote Due to the difference in applications for each country, some regions may havedifferent accessories. (*) Optional AccessoryEN-17
Connecting a computer or monitorConnecting a computerThe projector provides two VGA input sockets that allow you to connect themto both IBM compatible and Macintosh computers. A Mac adapter isneeded if you are connecting legacy version Macintosh computers.To connect the projector to a notebook or desktop computer:1. Take the supplied VGA cable and connect one end to the D-Sub outputsocket of the computer.2. Connect the other end of the VGA cable to the VGA1/YPbPr or VGA2/YPbPr signal input socket on the projector.Important Many notebooks do not turn on their external video ports when connected to aprojector. Usually a key combo like FN F3 or CRT/LCD key turns the external displayon/off. Locate a function key labeled CRT/LCD or a function key with a monitorsymbol on the notebook. Press FN and the labeled function key simultaneously. Referto your notebook's documentation to find your notebook's key combination.EN-18
Connecting a monitorIf you want to view your presentation close-up on a monitor as well as on thescreen, you can connect the VGA-OUT signal output socket on the projectorto an external monitor with a VGA cable following the instructions below:To connect the projector to a monitor:1. Connect the projector to a computer as described in “Connecting acomputer” on page 18.2. Take a suitable VGA cable (only one supplied) and connect one end ofthe cable to the D-Sub input socket of the video monitor.Or if your monitor is equipped with a DVI input socket, take a VGA toDVI-A cable and connect the DVI end of the cable to the DVI inputsocket of the video monitor.3. Connect the other end of the cable to the VGA-OUT socket on theprojector.VGA-OUT loop through:During working mode:1. If VGA1 is projecting out, VGA-OUT source will be VGA1.2. If VGA2 is projecting out, VGA-OUT source will be VGA2.3. If VGA1 and VGA2 are all have sources, default VGA-OUT is VGA1.4. If none of VGA1 and VGA2 is projecting out, VGA-OUT is disabled.During Standby1. VGA-OUT will keep the latest display VGA source signal. Default VGAOUT is VGA1.2. If the projector is in Power Mode (Standby) 0.5W, VGA-OUT isdisabled.EN-19
Connecting Video source devicesYou can connect your projector to various Video source devices that provideany one of the following output sockets: HDMI Component Video S-Video Video (composite)You need only connect the projector to a Video source device using just oneof the above connecting methods, however each provides a different level ofvideo quality. The method you choose will most likely depend upon the availability of matching terminals on both the projector and the Video sourcedevice as described below:Terminal nameHDMITerminal appearanceHDMIComponentVideoVGA1/YPbPr Picture qualityBest“Connecting anHDMI sourcedevice” onpage 21Better“Connecting aComponent Videosource device” onpage 21Good“Connecting anS-Video sourcedevice” onpage 22Normal“Connecting acomposite Videosource device” onpage 22
Connecting an HDMI source deviceExamine your Video source device to determine if it has a set of unusedHDMI output jacks available: If so, you can continue with this procedure. If not, you will need to reassess which method you can use to connect tothe device.To connect the projector to an HDMI source device:1. Take an HDMI cable and connect one end to the HDMI output of theHDMI source device.2. Connect the other end of the HDMI cable to the HDMI input on theprojector.Connecting a Component Video source deviceExamine your Video source device to determine if it has a set of unusedComponent Video output sockets available: If so, you can continue with this procedure. If not, you will need to reassess which method you can use to connect tothe device.To connect the projector to a Component Video source device:1. Take a VGA (D-Sub) to HDTV (RCA) cable and connect the end with 3RCA type connectors to the Component Video output sockets of theVideo source device. Match the color of the plugs to the color of thesockets; green to green, blue to blue, and red to red.2. Connect the other end of the cable (with a D-Sub type connector) to theVGA1/YPbPr or VGA2/YPbPr socket on the projector.Important If the selected video image is not displayed after the projector is turned on and thecorrect video source has been selected, check that the Video source device is turnedon and operating correctly. Also check that the signal cables have been connectedcorrectly.EN-21
Connecting an S-Video source deviceExamine your Video source device to determine if it has an unused S-Videooutput socket available: If so, you can continue with this procedure. If not, you will need to reassess which method you can use to connect tothe device.To connect the projector to an S-Video source device:1. Take an S-Video cable and connect one end to the S-Video outputsocket of the Video source device.2. Connect the other end of the S-Video cable to the S-VIDEO socket onthe projector.Important If the selected video image is not displayed after the projector is turned on and thecorrect video source has been selected, check that the Video source device is turnedon and operating correctly. Also check that the signal cables have been connectedcorrectly. If you have already made a Component Video connection between the projector andthis S-Video source device using Component Video connections, you need notconnect to this device using an S-Video connection as this makes an unnecessarysecond connection of poorer picture quality. See “Connecting Video source devices”on page 20 for details.Connecting a composite Video source deviceExamine your Video source device to determine if it has a set of unusedcomposite Video output sockets available: If so, you can continue with this procedure. If not, you will need to reassess which method you can use to connect tothe device.To connect the projector to a composite Video source device:1. Take a Video cable and connect one end to the composite Video outputsocket of the Video source device.2. Connect the other end of the Video cable to the VIDEO socket on theprojector.Important If the selected video image is not displayed after the projector is turned on and thecorrect video source has been selected, check that the Video source device is turnedon and operating correctly. Also check that the signal cables have been connectedcorrectly. You need only connect to this device using a composite Video connection ifComponent Video and S-Video inputs are unavailable for use. See “Connecting Videosource devices” on page 20 for details.EN-22
OperationPowering On/Off the ProjectorPowering On the Projector:1. Connect the AC power cord and relevant peripheral signal cable(s) tothe projector.2. Pressto turn on the projector.The projector takes a minute or so to warm up.3. Turn on your source (computer, notebook, DVD, etc.). The projectorautomatically detects your source. If you are connecting multiple sources to the projectorsimultaneously, press SOURCE on the projector or Source on theremote control to select your desired signal or press your desiredsignal key on the remote control.Warning Never look into the lens when the lamp is on. This can damage your eyes. This focal point concentrates high temperature. Do not place any object near it toavoid possible fire hazard.Powering Off the Projector:1. Pressto turn off the projector lamp. You will see a message "Poweroff? Press Power again" appear on the screen.2. Pressagain to confirm. The cooling fans continue to operate for cooling cycle. When the Power LED becomes steady red, the projector has enteredstand-by mode. If you want to turn the projector back on, you must wait until theprojector has completed the cooling cycle and has entered stand-bymode. Once in stand-by mode, simply pressto restart theprojector.3. Disconnect the AC power cord from the electrical outlet and theprojector.4. Do not turn on the projector right after power off.Warning When Quick Resume is on, if turning off the projector accidentally and QuickResume selected within a period of 100 seconds, the projector will instantly power onagain. When Quick Resume is off, if turning off the projector, users need to wait until thecooling process is finished and then restart the projector. It will take a few minutesbecause the fan will keep running until the internal temperature is reduced to certainlevel.EN-23
Adjusting the Projector HeightAdjustment feetThe projector is equipped with three adjustment feet to adjust the imageheight.1. To raise or lower the image, turn the front adjustment foot.2. To level the image on the screen, turn the rear adjustment feet to finetune the height.Note To avoid damaging the projector, make sure that the adjustment feet are fullyretracted before placing the projector in its carrying case.Adjusting the Projector Zoom andFocusZoom ringFocus ring1. Focus the image by rotating the focus ring. A still image is recommendedfor focusing.2. Adjust the image size by rotating the zoom ring.EN-24
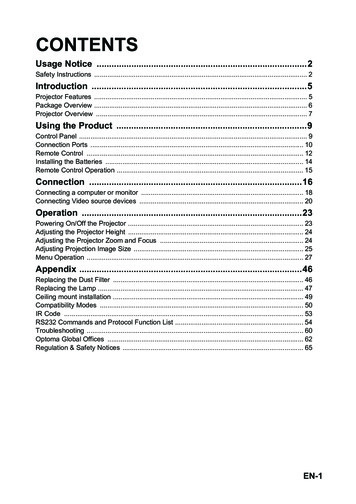
Adjusting Projection Image SizeRefer to the graphic and table below to determine the screen size and projectiondistance.Maximum zoomMinimum zoomScreenCenter of lensVertical offsetScreen sizeDiagonal[inch (cm)]30 (76)40 (102)60 (152)80 (203)100 (254)120 (305)150 (381)200 (508)250 (635)300 (762)Projection distance16:9 ScreenProjection distance [feet (m)]Image height[inch (cm)](min. zoom)(max. zoom)3.0 (0.9)4.0 (1.2)6.0 (1.8)8.0 (2.4)10.0 (3.1)12.0 (3.7)15.0 (4.6)20.0 (6.125.0 (7.6)30.0 (9.2)4.6 (1.4)6.0 (1.8)9.0 (2.7)12.0 (3.715.0 (4.6)18.0 (5.5)22.5 (6.9)30.0 (9.2)37.5 (11.4)45.0 (13.7)15 (37)20 (50)29 (75)39 (100)49 (125)59 (149)74 (187)98 (249)123 (311)147 (374)Vertical offset[inch (cm)]2.2 (6)2.9 (7)4.4 (11)5.9 (15)7.4 (19)8.8 (22)11 (28)14.7 (37)18.4 (47)22.1 (56)Note Position the projector in a horizontal position; other positions can cause heat buildup and damage to the projector. Keep a space of 30 cm or more between the sides of the projector. Do not use the projector in a smoky environment. Smoke residue may build-up oncritical parts and damage the projector or its performance. Consult with your dealer for special installation such as suspending from a ceiling.EN-25
Adjusting the position using the vertical lens shiftfunctionIf the projector is not positioned right in front of the center of the screen, youcan adjust the vertical position of projected image by moving the vertical lensring within the shift range of the lens.The display position can be shifted upward up to 17% elevation of the display. (When turn the vertical lens shift ring to the right (left), the displaymoves up (down)).Lens shift adjustable rangeShift to top17%0.17V1V0.15VShift rangeLens shift center positionVertical lens shift ringAttentionPlease note the following s when using the projector. Do not touch the lens while it is moving as this could cause injury to the fingers. Never allow children to touch the lens.EN-26
Menu OperationThe projector has multilingual on-screen display menus that allow you tomake image adjustments and change a variety of settings.How to operate1. To open the OSD menu, press “Menu” on the Remote Control orProjector Keypad.2. When OSD is displayed, use / key to select to select any item in themain menu. While making a selection on a particular page, pressor“Enter key to enter sub menu.3. Use / key to select the desired item and press / /”Enter” key toenter the Single-Item-Menu.4. Use the/key to adjust the value. Use “Enter” to confirm theselection.5. Select the next item to be adjusted in the sub menu and adjust asdescribed above.6. Press ”Menu” to go back to Sub-Menu.7. To exit, press “Menu” again. The OSD menu will close and the projectorwill automatically save the new settings.Main MenuSub-MenuSettingsSingle-ItemMenuEN-27
Menu treeMain MenuSingle-ItemMenuCinema /Reference /Vivid / Bright /Game / 3D /User /ISF Day /ISF NightSub-MenuDisplay ModeBrightnessContrastSharpnessColorTintNoise Reduction0 10Film / Video /Graphics / 2.2 /1.8 / 2.0 / 2.6GammaBrilliantColor DynamicBlackColor Temp.RedIMAGEGreenBlueAdvancedCyanColor SettingsMagentaYellowWhiteOn / OffWarm /Standard / Cool/ColdHue / Saturation/ GainHue / Saturation/ GainHue / Saturation/ GainHue / Saturation/ GainHue / Saturation/ GainHue / Saturation/ GainRed / Green /BlueResetExitNot HDMIInput: Auto /RGB / YUVColor SpaceEN-28HDMI Input:Auto/RGB(0 255) /RGB(16 235)/YUV
IMAGEAdvancedSignalAutomaticPhase (VGA)Frequency(VGA)H. Position(VGA)V. Position(VGA)ExitOn / OffExitResetYes / No4:3 / 16 :9 / LBX/ Native / Auto /SuperwideFormatEdge MaskZoomImage ShiftDISPLAYHVV KeystoneAuto Keystone3D Mode3D--- 2D3D3D Format3D Sync InvertOn / OffOff / DLP-Link /VESA 3D3D / L / RAuto / SBS / Topand Bottom /FrameSequentialOn / OffEN-29
LanguageProjectionMenu LocationSecuritySETUPSecurityOn / OffMonth / Day /HourSecurity TimerChange PasswordExitProjector IDInternal SpeakerMuteAudio SettingsVolumeAudio InputLogoAdvancedEN-30Logo CaptureClosed CaptioningExitOn / OffOn / OffAudioMicDefault / Audio1 / Audio 2 /Audio 3Default / Neutral/ UserOff / CC1 / CC2
Input SourceSource LockHigh AltitudeInformation HideKeypad LockTest Pattern12V TriggerIR FunctionBackground ColorOPTIONSUser1Remote SettingsUser2User3VGA1 / VGA2 /Video / S-video /HDMI / DVIOn / OffOn / OffOn / OffOn / OffNone / Grid /WhiteOn / Off / Auto3DOn / Front /Back / OffBlack / Red /Blue / Green Test ./Gamma/Test ./Gamma/Test Pattern/AVMuteEN-31
AdvancedOPTIONSLamp SettingsOptional FilterSettingsDirect Power OnSignal Power OnAuto Power Off(min.)Sleep Timer (min.)Quick ResumePower Mode(Standby)Lamp HourLamp ReminderLamp ModeLamp ResetExitOptional FilterInstalledFilter Usage HoursFilter ReminderFilter ResetExitResetEN-32On / OffOn / OffOn / OffActive / EcoOn / OffBright / EcoYes / NoYes / NoOff / 300hr /500hr / 800hr /1000hrYes / NoYes / No
IMAGEDisplay ModeThere are many factory presets optimized for various types of images. Cinema: For home theater. Reference: This mode is intended to reproduce, as close as possible,th
the box. If something is missing, please contact Optoma customer service. Standard Accessories Optional accessories Note Optional accessories vary depending on model, specification and region. 5 User's Manual 5 Warranty Card 5 Quick Start Card 5 WEEE Card (for EMEA only) Projector AC Power