Transcription
Computer Basics: Step-by-Step Guide (Session 2)Table of ContentsABOUT PROGRAMS AND OPERATING SYSTEMS . 2THE DIALOGUE BOX . 18THE WINDOWS 10 DESKTOP . 4EXPLORING TASKBAR BUTTONS . 18OPENING PROGRAMS . 6STACKED TASKBAR BUTTONS . 18DESKTOP ICON . 6SKILLS REVIEW . 20START MENU . 6MORE MULTITASKING PRACTICE . 21Sections of the Start Menu . 7PRACTICE 1 . 21THE WINDOWS SEARCH BOX . 9PRACTICE 2 . 21EXAMINING A WINDOW . 11PRACTICE 3 . 22SEARCHING FOR AND OPENING WORDPAD . 11CLOSING A WINDOW USING THE TASKBAR(SUPPLEMENTAL) . 23LOOKING AT THE WORDPAD WINDOW . 12A CLOSER LOOK AT THE TASKBAR . 13THE WINDOW CONTROL BUTTONS . 14OPENING MULTIPLE WINDOWS . 15ACTIVE WINDOW. 16SNAP ASSIST (SUPPLEMENTAL). 23SAVING A FILE (SUPPLEMENTAL) . 24CREATING A DOCUMENT. 24SAVING THE FILE . 24MULTITASKING PRACTICE . 17Created by:The MC-NPL Computer LabMONTGOMERY COUNTY-NORRISTOWN PUBLIC LIBRARYNORRISTOWN, PENNSYLVANIAWWW.MC-NPL.ORGNote to Home Students:If you are taking this course from home, you can download handoutsand other materials for this class from our Class Resources page:www.mc-npl.org/class-resources
COMPUTER BASICS: STEP-BY-STEP GUIDE (SESSION 2)Revised: 11/25/2019About Programs and Operating SystemsTeacher’s note:Explain to the students that we will be giving them a skills test at the end of class. There is no time limit. Reassure them that if they don’t pass, they can come back and retake it.Now that we have become familiar with how to interact with our computer using a mouse andkeyboard, we will begin to learn how to access programs on the computer.Tasks performed on a computer are always done through a program. For theShow Slide 11user, the program is an application – a tool – for accomplishing a task. Forthe computer, it is a set of instructions on knowing how to perform this task. During today’s class, wewill show you how to open a basic word processing program (WordPad), an advanced word processingprogram (Word 2016), and a program used to access the Internet (Internet Explorer).Sometimes programs can be called “apps”, and vice versa, particularly in the Windows 10environment. The difference between true programs and apps is that apps are obtained through the“Microsoft Store”, which is itself an app, whereas programs are obtained in other ways such asdownloading from the Internet or installing from a disc. In class we will use the terms programs andapps interchangeably.MC-NPL Computer Lab 1001 Powell St Norristown, PA 19401(610) 278-5100 x141 mcnplcomputerlab@gmail.com www.mc-npl.orgPage 2 of 27
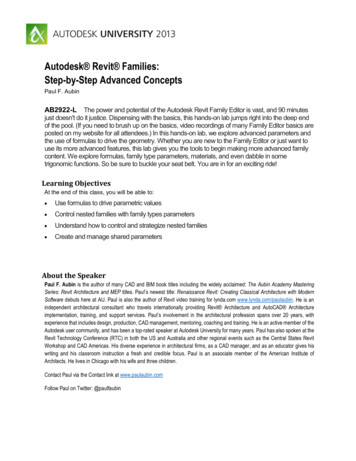
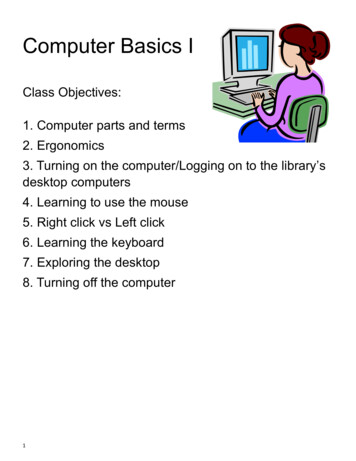
COMPUTER BASICS: STEP-BY-STEP GUIDE (SESSION 2)Revised: 11/25/2019The most important program on the computer overall is the operatingShow Slide 12system (OS), which manages all of the computer’s resources and decides howto treat input from the user. The OS is the brains that turn your computerinto an effective tool. The operating system “opens” when the computer is powered on.There are several different computer operating systems in circulation:macOS: Apple desktop computers and laptops.Linux: Free, but requires more technicalknowledge to use. Some libraries that are on abudget use Linux in their computers.iOS: Apple iPhones and iPads.Android: Used in smart phones and tablets.Made by Google.Windows: The most commonly used operatingsystem. It is what we will be using in class.Microsoft is the name of the company that makes Windows. There have been several differentversions of Windows. In 2017 the computers in the lab were updated to a version of Windows called“Windows 10”. If you have some experience with the older versions of Windows, you will notice thatthings look and act a bit different on Windows 10. While older versions of Windows mainly ran ondesktop and laptop computers, Windows 10 is also designed to run equally well on tablets.Close PowerPointMC-NPL Computer Lab 1001 Powell St Norristown, PA 19401(610) 278-5100 x141 mcnplcomputerlab@gmail.com www.mc-npl.orgPage 3 of 27
COMPUTER BASICS: STEP-BY-STEP GUIDE (SESSION 2)Revised: 11/25/2019The Windows 10 DesktopThe first thing you see when you log on to the computer is the Desktop. The Desktop is the displayarea you see when Windows opens. The following items are the most common items on the Desktop:Mention Handout 6 Mouse pointer or Cursor: The indicator on the screen that you use to select and move objects. Itmoves as you move the mouse and changes appearance depending on what program you are usingand what tool you have selected. Icon: A picture representing a program or app, a file, or folder (a place to store files).MC-NPL Computer Lab 1001 Powell St Norristown, PA 19401(610) 278-5100 x141 mcnplcomputerlab@gmail.com www.mc-npl.orgPage 4 of 27
COMPUTER BASICS: STEP-BY-STEP GUIDE (SESSION 2) Revised: 11/25/2019ScreenTip (not shown): When dwelling on a Windows element on the screen, a small descriptivemessage called a ScreenTip may displayo Hover (hold the mouse pointer over but do not click) your mouse pointer over the brightorange icon located at the top of the desktop.Teacher’s note:If no ScreenTip appears, click on the Desktop and try again. If that doesn’t work,try pointing to a different icon, then back to the first icon.o Note the descriptive message. Taskbar: The black bar at the bottom of the computer screen. A program running on yourcomputer is represented by a button on the taskbar. Important sections of the taskbar include:o Start Button – A single left click on this button opens a menu that includes many options.You can start programs, shutdown your computer, switch users, log off, lock, restart, or putyour computer to sleep. We will explore this section more closely later in the lesson.o Search Windows Box – Enter keywords to search for Apps/Programs, Files or Settings onthe computer.o Pinned and Open Programs – This section of the taskbar contains buttons for frequentlyused programs (pinned) and programs that you open and run on the computer.o Notification Area – The bottom right corner next to the time and date. It contains miniatureicons for easy access to system functions that are always running in the background, such asantivirus settings, printer status, network connection, sound volume, and battery status.Sometimes referred to as Notification Tray or System Tray. Hover over or click an icon to view and access details and controlso Clock – Displays the current date and time.MC-NPL Computer Lab 1001 Powell St Norristown, PA 19401(610) 278-5100 x141 mcnplcomputerlab@gmail.com www.mc-npl.orgPage 5 of 27
COMPUTER BASICS: STEP-BY-STEP GUIDE (SESSION 2)Revised: 11/25/2019Opening ProgramsOne way to open a program on a computer is to double-click on the desktop icon for the program.Desktop IconIcons are either placed on the desktop by the computer user or appear automatically when a newprogram is installed. Icons can also be removed by the computer user.We’re going to open Word 2016 using the desktop icon.1. Move your cursor over the icon for Word 2016.2. Notice what the ScreenTip says. This is a program that lets you create documents.3. Double-click the icon to open the program.Tip: If double-clicking is difficult for you, try one of these alternatives: Single click on the icon and tap the Enter key on your keyboard.OR Right-click on the icon and select Open from the context menu.4. The window that opens fills the entire desktop except for the taskbar.5. Look at the upper right hand corner of your computer screen and locate the button with the X onit.6. Point to the X. Notice how it turns red when we point to it. This is the Close button.7. Click on the X to close the program.Start MenuAnother way to open a program involves first browsing for it using the Start menu. Then, once aprogram is located on the menu, a single click of the mouse will open it. Browsing takes time, ofcourse, and is valuable only when you do not know the name of the program you want to open.1. To open the Start menu, tap the Windows logo key on the keyboard. On most newerkeyboards, the Windows logo key looks just like the Start button on the screen.2. Note that some black panels display.MC-NPL Computer Lab 1001 Powell St Norristown, PA 19401(610) 278-5100 x141 mcnplcomputerlab@gmail.com www.mc-npl.orgPage 6 of 27
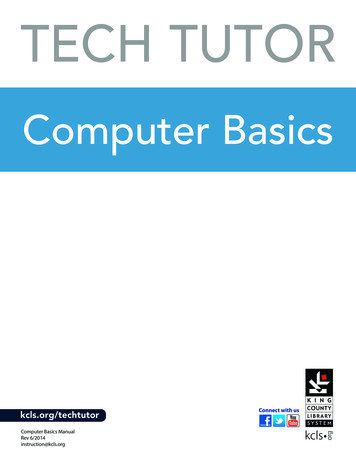
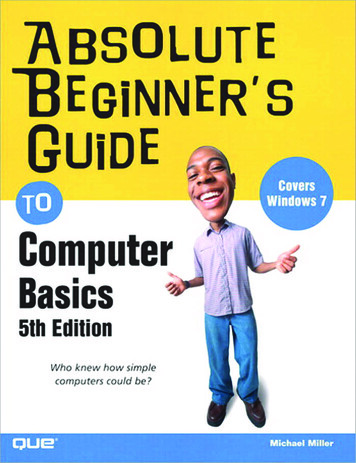
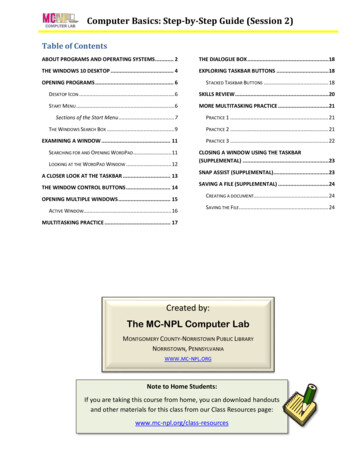
COMPUTER BASICS: STEP-BY-STEP GUIDE (SESSION 2)Revised: 11/25/20193. Note also that a cursor is blinking in the Search Windows Box. This box is not part of the Startmenu but it does aid in locating and opening programs. We will look at this functionality in moredetail later in the lesson. (The blinking may stop after a while, but the line remains and typing canbe entered)4. To dismiss the menu simply tap the Windows logo key on the keyboard again.5. Tap the Windows logo key or click the Start button to open the Start menu again.Sections of the Start MenuLet’s examine the menu.There are three sections in the Windows 10 Start menu.Mention Handout 7ExpandbuttonApplistTilesWindows Search Box –search for appsby nameLeft paneThe narrow pane on the left has icons that go to the user account and to power options. (Tip: thesetwo options are defeated in the Computer Lab.)1. In order to see the text labels for the icons click the Expand button at the top of the pane.2. Click the Expand button again to collapse the section.Center pane – App ListThe center pane or App List contains all the Programs a.k.a. Apps on the computer. It purports to bean alphabetical list. That claim is misleading. Some apps are not listed alphabetically because they arenested inside of “folders” in the App List. The App List is good for browsing or exploring for programs,but it has little value when you are looking for a specific program.MC-NPL Computer Lab 1001 Powell St Norristown, PA 19401(610) 278-5100 x141 mcnplcomputerlab@gmail.com www.mc-npl.orgPage 7 of 27
COMPUTER BASICS: STEP-BY-STEP GUIDE (SESSION 2)Revised: 11/25/2019Let’s take a closer look at the App list.1. Note Calculator app in the list and click on it to open it. Note the Start menu disappears as soon asan app opens.2. Close Calculator using its Close button.3. Open the Start menu again. (Tap the Windows logo key)4. Note that when you point to the App list a scroll bar appears.a. Note that the scroll bar is very narrow, but it becomes bigger when you point to it.b. Use the scroll bar to browse the App list.5. Note that menu items on the list have icons and a corresponding name. Most of the iconsrepresent programs. However, the items with an icon that looks like a yellow manila folder are notprograms but rather containers for programs.6. Scroll down until you see Windows Accessories. This is not a program. This is a container forprograms. Along with the folder icon, the arrow to the right of the name also indicates this menuitem is not a program. When the arrow points downwards that means the programs inside thisfolder are hidden from view.7. To reveal the programs inside the Windows Accessories folder, click anywhere on the WindowsAccessories menu item to expand the menu.8. Note the list of programs that displays. Scroll this list to see the programs Mouse Tutorial,Mousercise, and WordPad. These three programs are used extensively in our Computer Basicsclasses.Teacher’s note:Remind students not to confuse “Mouse Tutorial”with “Mousercise” to prepare them for the test.9. Click the Window Accessories menu item again to collapse the menu.MC-NPL Computer Lab 1001 Powell St Norristown, PA 19401(610) 278-5100 x141 mcnplcomputerlab@gmail.com www.mc-npl.orgPage 8 of 27
COMPUTER BASICS: STEP-BY-STEP GUIDE (SESSION 2)Revised: 11/25/2019Right pane – TilesThe Tiles pane is a good place to store programs you frequently use for quick and easy access to them.The tiles are graphical representations, much like a desktop icons, of programs on the computer.Focusing your cursor on a tile will produce a ScreenTip with the name of the program. A single click ona tile will open the program.Your favorite programs can be dragged from the App list to the Tiles pane. This is called Pinning. Youcan create groups of Tiles, naming the groups anything you want. We have pinned some frequentlyused programs in the Computer Lab to the Tiles pane.Unfortunately, we cannot demonstrate naming groups of tiles because of our security measures in theComputer Lab. In fact we can’t actually pin a tile either but we can show you how it is done.Pinning a tile is as easy as dragging an icon from the App list and dropping it in the Tiles pane.1. Click and hold the Weather app and drag it to the Tiles pane.2. Normally, when you let go of the mouse, the program is pinned. In the Computer Lab this does notwork. That is what that little red circle symbol is trying to show us.3. Tap the Windows logo key to collapse the Start menu.The Windows Search BoxUsing the Windows Search Box is the best way to quickly find and open a program that you have notpinned to your Tiles pane. You need only type the first letter or first few letters of the program name.Based on what you type a suggested search results list will populate above the search box. When yousee the program you want, a single click on the program name will open it.Windows Search can also search for files, computer settings and even the Internet, but for securityreasons, we have disabled that functionality in the Computer Lab.Teacher’s note:On your Windows 10 computer, a digital assistant may launch when you click the searchbox, asking you what you want to do. The digital assistant is disabled on Computer Labcomputers.MC-NPL Computer Lab 1001 Powell St Norristown, PA 19401(610) 278-5100 x141 mcnplcomputerlab@gmail.com www.mc-npl.orgPage 9 of 27
COMPUTER BASICS: STEP-BY-STEP GUIDE (SESSION 2)Revised: 11/25/2019Let’s try using the Windows Search Box to search for Mouse Tutorial app.1. Click into the Windows Search Box where it says “Type here to search”.2. Start the search by typing an m(capitalization doesn’t matter). As soon as we start typing a searchterm, note that a search results panel appears above.3. Typically, at the top of the search results list is a Best Match section. Note that the Best Match itemis highlighted (blue). A highlighted item can be opened by tapping Enter on the keyboard or byclicking once on it.4. You may have noticed that you have a different Best Match than what is on the classroom screen.The search results list can offer up varying results based on what you type into the search box.Typically, the more letters of your search term that you type, the faster the results list will populatewith the program you are looking for. In addition, if you have searched for or opened a particularprogram recently, that program may be offered up on the search results more readily.5. Typically, the results list is divided into different categories of results.a. Locate the Apps section to see if it lists Mouse Tutorial.b. If you don’t see your result in the Apps results list, clicking on the Apps subheading will takeyou to more apps that contain the letter “m” somewhere in the name of the app.c. Click on the Apps subheading and more apps will display. You may need to scroll, but youshould see Mouse Tutorial in the list.6. A better search strategy is to add letters to the search if you don’t see what you want in the mainresults panel. Add the letter o after the m in the Windows Search Box. (You don’t have to click, justtype.) You should now be able to see Mouse Tutorial in the main results list.7. Dismiss the Start menu by tapping the Windows logo key twice on the keyboard.MC-NPL Computer Lab 1001 Powell St Norristown, PA 19401(610) 278-5100 x141 mcnplcomputerlab@gmail.com www.mc-npl.orgPage 10 of 27
COMPUTER BASICS: STEP-BY-STEP GUIDE (SESSION 2)Revised: 11/25/2019Examining a WindowFirst, what exactly is a Window? Older computers could only manage one program at a time, whichtook up the entire screen. Until you exited that program, you could not do anything new. Theadvantage of current operating systems such as Windows is that we can do more than one thing at atime, and each program is put in its own little compartment called a Window.The window can take up the entire screen or just part of it, or it can even be (temporarily) hidden fromview altogether. However, it is an essential concept to understand that even if you don’t specificallyintend to, at some points, the computer will be Multi-Tasking. Multi-tasking is the act of having two ormore on-going processes at the same time, such as typing a document and then pausing to look atsomething on the Internet.We are going to use the Windows Search Box again to find and open a program called WordPad.WordPad is a Microsoft Windows program that you can use to create documents such as letters, notesand posters. It is less complicated than a full word processing program such as Microsoft Word but itstill lets you perform a considerable range of tasks.Searching for and Opening WordPad1. Click into the Windows Search Box and type a w (capitalization doesn’t matter)2. Look for WordPad in the search results.o If you see WordPad in the Best match section of the search results, it will be highlighted,and you can open it by tapping the Enter key on the keyboard.o Alternatively, you can use the up and down arrow keys on the keyboard to navigate to anitem in the search results list. Once highlighted, the program can be opened by tapping theEnter key on the keyboard.o If you can see WordPad elsewhere in the search results, you can point to it and click to openit.MC-NPL Computer Lab 1001 Powell St Norristown, PA 19401(610) 278-5100 x141 mcnplcomputerlab@gmail.com www.mc-npl.orgPage 11 of 27
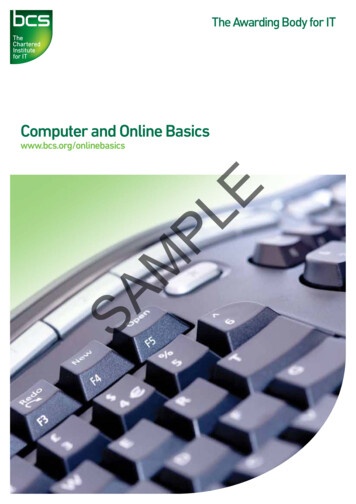
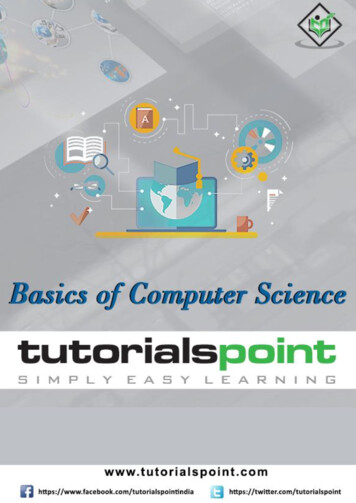
COMPUTER BASICS: STEP-BY-STEP GUIDE (SESSION 2)Looking at the WordPad WindowRevised: 11/25/2019Mention Handout 8This program opens in a window that is filling the desktop, except for the Taskbar. Every programopens in a separate window. All windows have some common elements.Quick AccessToolbarTitle BarMinimizebuttonWINDOWCONTROLSMaximize /Restore downbuttonClosebuttonRibbonThis vertical line will be blinking inthe actual window and is the startingpoint for typing your text. Title Bar: Top most bar with title of file and name of program. Ribbon: In WordPad and in Microsoft Office 2016 programs, the ribbon is a set of tools placed onseveral tabs. This makes the tools used in a program more visible. Not all programs have a ribbon,but most programs have tools in some form. Window Controls: This is a group of three buttons common to all windows. We will talk moreabout these buttons shortly.Click the Close button to close WordPad.MC-NPL Computer Lab 1001 Powell St Norristown, PA 19401(610) 278-5100 x141 mcnplcomputerlab@gmail.com www.mc-npl.orgPage 12 of 27
COMPUTER BASICS: STEP-BY-STEP GUIDE (SESSION 2)Revised: 11/25/2019A Closer Look at the TaskbarAt the very bottom of the screen is the Taskbar. The left end of the taskbar contains the Start button and the Windows Search box. The right end contains the Notification Area and the Clock. The center section of the taskbar can contain two types of buttons.o One is a shortcut to a program you use frequently. The icon you see on the taskbar nowis one of these. Shortcuts to programs can be “pinned” to the taskbar by the user.o Another is a button that represents a program that is open and running on thecomputer. Any time a new window opens, it will be represented on the taskbar.Let’s open a program so we can see the difference between a pinned program and an open program.1. Click into the Windows Search box, and search for and open WordPad.2. Note there is now another icon in the center section of the taskbar. This icon represents theWordPad program.3. Note how the WordPad icon has a blue line underneath it. This blue line is how you tell thedifference between a pinned program (a program that is not currently open and an open program.Note: a pinned program can also be opened and will then have a blue line under it as well.4. Point to the icon for the pinned program (the one without the blue line). Note the ScreenTip thatappears, giving the name of the program, File Explorer.MC-NPL Computer Lab 1001 Powell St Norristown, PA 19401(610) 278-5100 x141 mcnplcomputerlab@gmail.com www.mc-npl.orgPage 13 of 27
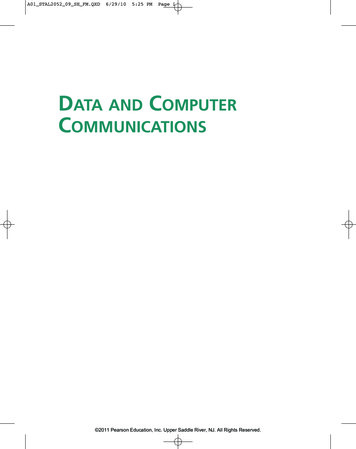
COMPUTER BASICS: STEP-BY-STEP GUIDE (SESSION 2)Revised: 11/25/20195. Point to the icon for WordPad. Note that instead of a ScreenTip, a preview window displays. Youwill not get a preview window unless a program is open.6. Now point somewhere else and note the preview window disappears. This preview window isactually an important tool we will be using going forward in the lesson.The Window Control ButtonsThere are three buttons in the upper right corner of the WordPad screen and we’ve only looked at theone on the right, the Close button.1. Notice the left-most button. Point to it and notice the screen tip. This isthe Minimize button.a. Click the Minimize button. When you do, the WordPad windowshould disappear. However, is the program truly gone?b. Look at your taskbar; there is still a button representing WordPad there, and it has a blueunderline.c. Point to the taskbar button. Note the preview window. This means the program is still openand running. We have only hidden it out of view. Just as we might shove a paper off to the sideon a real desktop, the advantage of doing this is to put something else in your workspace,which we will do later. For now, let us worry about how to get the WordPad window back so wecan work in it.2. To get the full screen window back, point to the WordPad taskbar button and click on the previewwindow. Your WordPad window returns!3. Notice to the middle window control button. This is the Restore Down button. That’s a kind offunny term, but it essentially means to de-maximize a window.a. Note the symbol on the button. It looks like two boxes or squares,one slightly behind the other. This is what the button looks like whenthe window is in full screen mode or, in other terminology, itsmaximized state.MC-NPL Computer Lab 1001 Powell St Norristown, PA 19401(610) 278-5100 x141 mcnplcomputerlab@gmail.com www.mc-npl.orgPage 14 of 27
COMPUTER BASICS: STEP-BY-STEP GUIDE (SESSION 2)Revised: 11/25/2019b. Click the Restore Down button and notice what happens – the window will shift from fullscreen mode to using just part of the screen.Why would I ever want to click Restore Down?Making the window smaller seems like an inconvenience. Butit’s actually very useful for multi-tasking because it allows youto view two or more windows side-by-side.c. Notice how the middle button now looks different. It looks like a singlebox or square. This means that if you click the button it will return thewindow to a maximized state.d. Click the Maximuze button and note the window is using the full screen.Opening Multiple WindowsTime check: 6:00pm / 11:00amWe now have one program currently running in a full screen window. Let’s open another program.1. Click into the Windows Search Box, and search for and open Internet Explorer.2. Look at the taskbar and note that there is a button representing both programs.MC-NPL Computer Lab 1001 Powell St Norristown, PA 19401(610) 278-5100 x141 mcnplcomputerlab@gmail.com www.mc-npl.orgPage 15 of 27
COMPUTER BASICS: STEP-BY-STEP GUIDE (SESSION 2)Revised: 11/25/2019Active WindowThe Internet Explorer (IE) window is filling the desktop. Even though there are two programs running,the computer can only focus its attention on one program at a time. That is called the active windowand it is always the window that is on “top”. Where is the WordPad window? It is actually right behindthe IE window. How can we make our WordPad window the active window? Let’s take a closer lookat the taskbar.1. Point to the taskbar button representing WordPad. We saw earlier that a small preview windowappears.2. Point to the preview window and look at the computer screen.3. Notice how the WordPad window appears to be in full screen mode again, but it really isn’t. Notethat there are no visible window control buttons. This is a clear sign you are looking only at a fullscreen preview, not an active window.4. Move your cursor away and the WordPad window disappears. This was just a full size preview.We still haven’t made the WordPad window the active window yet, but we will use the previewwindow to do so.5. Point to the WordPad preview window again and, this time, click on the preview window. TheWordPad window is now in the forefront and the Internet Explorer window is behind.6. Click on the preview window for Internet Explorer. Now the Internet Explorer window is in theforefront. Clicking on a program’s preview window is how to switch between open programs inorder to place them in Active mode.7. Close the Internet Explorer window.8. Close the WordPad window.MC-NPL Computer Lab 1001 Powell St Norristown, PA 19401(610) 278-5100 x141 mcnplcomputerlab@gmail.com www.mc-npl.orgPage 16 of 27
COMPUTER BASICS: STEP-BY-STEP GUIDE (SESSION 2)Revised: 11/25/2019Multitasking PracticeNow that we know how to find and open programs and switch between them, let’s do an exercise thatreinforces those skills as well as reviews skills we learned in Computer Basics 1, highlighting text andcopying and pasting.1. Click into the Windows Search Box, and search for and open Mouse Tutorial.2. Note, by the appearance of the taskbar button, that the Mouse Tutorial webpage has opened inInternet Explorer.3. Click into the Windows Search Box, and search for and open WordPad.a. Note that the WordPad window is now “in front of” the Internet Explorer window and istherefore the active window.b. Look at the WordPad window and notice that there is an insertion point (blinking cursor).When you start typing; your words will start there.c. Type your name.d. Tap the Enter key on the keyboard to get to a new line.4. We now want to go back to the open Internet Explorer window,so point to the taskbar button and click on the preview window.The Internet Explorer window is now in front and is the activewindow.Copy and Paste stepsare on Handout 9a. Highlight a few words of the black text.b. Use your keyboard combination Ctrl C to copy the words to the computer’s memory.5. Make WordPad the active window again. In other words, go back to the WordPad window byclicking on its preview window.6. Use your keyboard combination Ctrl V to paste the words into the WordPad document.MC-NPL Computer Lab 1001 Powell St Norristown, PA 19401(610) 278-5100 x141 mcnplcomputerlab@gmail.com www.mc-npl.orgPage 17 of 27
COMPUTER BASICS: STEP-BY-STEP GUIDE (SESSION 2)Revised: 11/25/2019The Dialogue BoxA dialogue box appears when a program requires more information from the user. We have enteredcontent into our WordPad document and we are now going to close the document. WordPad willrecognize that we have created content and will prompt us about saving the document.1. Close WordPad.2. Notice the dialogue box that pops up. This dialogue box must be dealt with before we can doanything else.3. Watch what happens if you try to click in the body of the document or on the close button again.The dialogue box flashes to get your attention.4. Since we are not going to be saving this document, click Don’t Save. The WordPad program willclose.Exploring Taskbar ButtonsStacked Taskbar ButtonsFor purposes of multi-tasking it is possible to have two instances of the same program open at onetime.In older versions of Windows, every open program was represented by a separate button on thetaskbar. In newer versions, however, when you have more than one instance of a program open, thebuttons will “stack”.We currently have one Internet Explorer window open. We are going to open another InternetExplorer window.1. Click into the Windows Search Box, and search for and open Internet Explorer.2. The Google website has opened in it.MC-NPL Computer Lab 1001 Powell St Norristown, PA 19401(610) 278-5100 x141 mcnplcomputerlab@gmail.com www.mc-npl.orgPage 18 of 27
COMPUTER BASICS: STEP-BY-STEP GUIDE (SESSION 2)Revised: 11/25/20193. Look at the taskbar and note you don’t see two separate buttons but instead one button stackedbehind the other.4. Point to the Internet Explorer button on the taskbar and you will see previews for both InternetExplorer windows side by side. You see previews for both IE windows, but the screen of yourcomputer is displaying the IE page showing the Google website.5. Point to the preview window showing the Mouse Tutorial webpage and see what happens to thescreen. The screen fills with the Mouse Tutorial webpage, but again, it is only displaying a fullscreen preview.6. Move your cursor away and the Google screen comes back i
COMPUTER BASICS: STEP-BY-STEP GUIDE (SESSION 2) Revised: 11/25/2019 MC-NPL Computer Lab 1001 Powell St Norristown, PA 19401 (610) 278-5100 x141 mcnplcomputerlab@gmail.com www.mc-npl.org Page 3 of 27 The most important program on the computer overall is the operating system (OS