Transcription
Microsoft Office Word 2013An Introduction to Word 2013University Information Technology ServicesTraining, Outreach & Learning Technologies
Copyright 2014 KSU Department of University Information Technology ServicesThis document may be downloaded, printed, or copied for educational use without further permission of theUniversity Information Technology Services Department (UITS), provided the content is not modified and thisstatement is not removed. Any use not stated above requires the written consent of the UITS Department.The distribution of a copy of this document via the Internet or other electronic medium without the writtenpermission of the KSU - UITS Department is expressly prohibited.Published by Kennesaw State University – UITS 2014The publisher makes no warranties as to the accuracy of the material contained in this document andtherefore is not responsible for any damages or liabilities incurred from UITS use.
University Information Technology ServicesMicrosoft Office Word 2013An Introduction to Word 2013Table of ContentsIntroduction . 5Learning Objectives. 5The Office 2013 Interface . 6The Backstage View . 6The Ribbon . 8Customizing the Ribbon . 9The Quick Access Toolbar . 11The Mini Toolbar . 13The Status Bar . 14Creating a New Document . 15Setting up your Document . 16Setting Margins . 16Setting the Default Font . 17Setting Default Paragraph Alignment . 19Adding Styles . 21Adding a style to your document. 21Adding Themes . 22Editing a Document. 24Entering Text . 24Formatting Text. 24Character Formatting . 24Paragraph Formatting . 25Enabling the Ruler . 25Setting Tab Stops . 26
Adding a Leader to Tab Stops . 27Selecting Different Tab Stops. 28Headers and Footers . 28Editing Headers & Footers . 30Removing Headers & Footers . 31Adding Page Numbers to your Document . 32Cut, Copy, and Paste Text . 33Cutting and Pasting Text . 34Copying and Pasting Text . 34Navigating the Document . 35Using Find. 35Using Go To . 36Navigation Pane . 37Proofing and AutoCorrect Options . 39Spelling & Grammar Check . 41Thesaurus . 43Saving a Document . 45Compatibility Mode . 47Printing a Document . 48Using Help . 50Additional Help . 51
IntroductionThis booklet is the companion document to the Intro to Word 2013 workshop. It includes an introduction tothe Microsoft Office 2013 interface, and covers the various aspects of creating, formatting, editing, saving, andprinting a document in Word 2013.Learning ObjectivesAfter completing the instructions in this booklet, you will be able to: Identify the components of the Office 2013 interfaceCreate a new documentSet document marginsSet paragraph alignment, indentation, and spacingSet tabsAdd headers and footers to a documentApply a Theme to a documentFormat textCheck the document for spelling and grammarRevised 8/14/2014Page 5 of 51
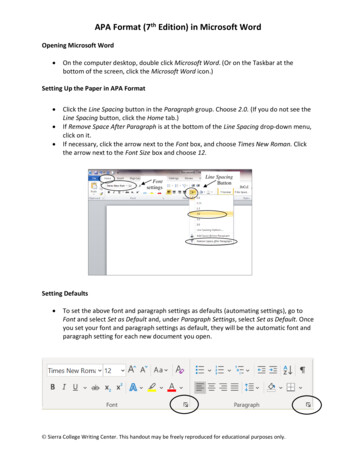
The Office 2013 InterfaceThe Office 2013 interface is very similar to the Office 2010 interface, with a few minor changes. The followingdescribes the Office 2013 interface.The Backstage ViewThe Backstage view is more prominent in Word 2013. When first opening the program, the user will bepresented with options to open recent documents, start a new blank document, or select from a number oftemplates (See Figure 1).Figure 1 - Backstage View (First opening Word 2013)To enter the Backstage view after creating your document:1) Click the File tab (See Figure 2).Figure 2 - Access Backstage via File TabPage 6 of 51
2) The Backstage view will open (See Figure 3).Figure 3 - Backstage View3) From the Backstage View, you can perform the following actions: Obtain information about your documents Create new documents and templates Open existing documents Save and close documents Print documents and see a preview of your document Access your Microsoft Office 2013 account information Obtain help Close Word 20134) To leave the Backstage View and return to your document, click on the arrow button above Info(See Figure 4).Figure 4 - Leave Backstage ViewPage 7 of 51
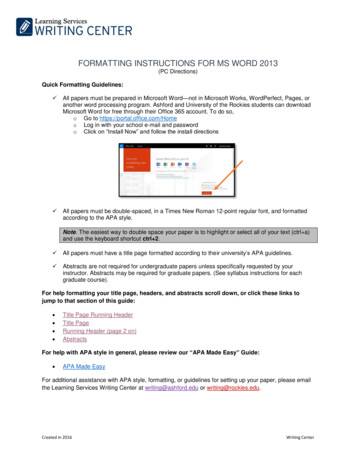
The RibbonThe Ribbon (See Figure 5) is a panel that contains functional groupings of buttons and dropdown listsorganized by tabs. Each product in the Office Suite has a set of tabs that pertain to the functionality of thatapplication. Each tab is further divided into groups such as the Font and Paragraph groups shown in Figure 5.Figure 5 - The RibbonAt the bottom right-hand corner of some groups, there is a diagonal arrow called a Dialog Box Launcher(See Figure 6). Clicking this button opens a dialog box for that group containing further option selections forthe group.Figure 6 - Dialog Box LauncherContextual tabs will appear depending on what you are working on. For example, if you’ve inserted pictures,the tab appears whenever a picture is selected (See Figure 7).Figure 7 - Contextual TabPage 8 of 51
Customizing the RibbonYou can hide/unhide tabs that you do not use, or create your own tab of favorite tools. The following explainshow to customize the Ribbon to build your own tabs and groups.1) Right-click in an empty section within the ribbon.2) A dialog box will appear. Select Customize the Ribbon (See Figure 8).Figure 8 - Customize the Ribbon3) The Customize Ribbon window will appear. Click the New Tab button (See Figure 9).Figure 9 – Creating a New Tab4) A New Tab has been added in the list of Main Tabs. Under New Tab, you will see New Group is alreadyselected for you (See Figure 10).Figure 10 - New Tab & New GroupPage 9 of 51
5) From the column on the left, select a command from the list under Choose commands from: to add tothe New Group (See Figure 11).Figure 11 - Select Command to Add6) Click the Add button.7) The command will be added to your new group (See Figure 12).Figure 12 - Command Added8) To rename the tab or group, right-click on the New Tab or New Group.9) Select Rename (See Figure 13).Figure 13 - Rename Tab/Group10) To hide a tab, remove the check-mark next to the name of the tab (See Figure 14).Figure 14 - Hide TabPage 10 of 51
The Quick Access ToolbarThe Quick Access Toolbar is located in the upper-left part of the main Word 2013 window, above the File andHome tabs. It provides easy access to commands that you may use often and be customized to yourpreferences.To customize the Quick Access Toolbar:1) Click on the dropdown arrow in the Quick Access Toolbar (See Figure 15).Figure 15 - Quick Access Toolbar Drop Down2) The Customize Quick Access Toolbar menu will appear. Click the command(s) you wish to add orremove from your Quick Access Toolbar (See Figure 16).Figure 16 - Customize Quick Access Toolbar3) To customize the Quick Access Toolbar with more commands, click More Commands (See Figure 17).Figure 17 - More CommandsPage 11 of 51
4) The Customize Quick Access Toolbar window will appear. From the column on the left, select acommand from the list under Choose commands from: to add to your Quick Access Toolbar(See Figure 18).Figure 18 - Adding Commands to the Quick Access Toolbar5) Click the Add button.6) The command will be added to the Quick Access Toolbar (See Figure 19).Figure 19 - Command Added to Quick Access Toolbar7) To add more commands, repeat steps 4 and 5.Page 12 of 51
8) To reorganize commands in your Quick Access Toolbar, select the command underneath CustomizeQuick Access Toolbar and click the arrows to the right to move the command up or down(See Figure 20).Figure 20 - Order Arrows9) When finished customizing the Quick Access Toolbar, click the OK button.The Mini ToolbarThe Mini Toolbar is a toolbar that appears when you select text. The Mini Toolbar provides quick access tosome commonly used formatting tools, such as font, font size, bold, italics, and more (See Figure 21).Figure 21 - Mini ToolbarTo turn off the Mini Toolbar:1) Click the File tab. The Backstage View will appear.2) Click Options. The Word Options window will appear.3) Under General, click the checkbox next to Show Mini Toolbar on selection (See Figure 22).Figure 22 - Turning Mini Toolbar Off4) The Mini Toolbar is now disabled. To enable, follow steps 1-4.Page 13 of 51
The Status BarThe Status Bar is located at the bottom of the Office application window and gives you an “at a glance”snapshot of important information regarding your current document (e.g. number of pages, number of words,proofing errors, etc.). Figure 23 shows the default Status Bar for Word.Figure 23 - Status BarYou can customize the Status Bar to display the specific information that you want to see:1) Right-click on the Status Bar. The Customize Status Bar menu will appear (See Figure 24).Figure 24 - Customize Status Bar2) Click on an option to add it to the Status Bar.3) When finished, click anywhere outside the Customize Status Bar window to close.Page 14 of 51
Creating a New DocumentThe following shows how to create a blank document in Word 2013:1) Click the File tab (See Figure 25).Figure 25 - File Tab2) The Backstage View will appear (See Figure 26).Figure 26 - Creating a Blank Document3) Click New (See Figure 26).4) Select Blank Document from the available options (See Figure 26).5) The Blank Document will open.Page 15 of 51
Setting up your DocumentWhen you begin creating a new Word document, there are certain aspects of the document that you shouldconsider, such as margin settings, fonts and styles, and line spacing. Making these choices before you begintyping could save you time editing your document later on.Setting MarginsPage margins, the blank space around the edges of the page, can contribute to the impression your documentmakes, and even how easy it is to read. A few clicks set the margins for a page or an entire document.The following instructions explain how to change the margin settings:1) Click the Page Layout tab (See Figure 27).Figure 27 - Page Layout2) Click the Margins button. A list of Margin Options will appear (See Figure 28).Figure 28 - Margin Options3) Click one of the preset margin options. The Margins will be applied to your document.Page 16 of 51
Note: Clicking on Custom Margins at the bottom of the Margin Options will open the Page Setup window andallow you to enter the specific margin values that you want (See Figure 29).Figure 29 - Page Setup: MarginsSetting the Default FontYou can change the default font options so your favorite font is always selected in Word. The followingexplains how to change the default font options:1) Click the Home tab (See Figure 30).Figure 30 - Home TabPage 17 of 51
2) In the lower-right corner of the Font group, click on the Font Dialog Box Launcher (See Figure 31).Figure 31 - Font Dialog Box Launcher3) The Font Dialog Box will appear. Under Font, click the Font you want to use (See Figure 32).Figure 32 - Font Dialog Box4) Under Size, click the size you want to use for body text (e.g. in Figure 32, “12” is selected).5) Click Set As Default.Page 18 of 51
6) The Set As Default window will appear. Make a selection based on your preference and click OK(See Figure 33).Figure 33 - Set As Default Window7) The default font settings will now be set to your preference.Setting Default Paragraph AlignmentYou can change the default paragraph alignment options so is always spaced how you want it to be in Word.Alignment, indentation, and line spacing are all set from the Paragraph dialog box. The following explains howto change the default paragraph options:1) Click the Home tab (See Figure 34).Figure 34 - Home Tab2) In the lower-right corner of the Paragraph group, click on the Paragraph Dialog Box Launcher(See Figure 35).Figure 35 - Paragraph Dialog Box LauncherPage 19 of 51
3) The Paragraph Dialog Box will appear. From here you can adjust the alignment, indentation, and linespacing of your paragraphs (See Figure 36).Figure 36 - Paragraph Dialog Box4) Under General, select how your paragraphs will be aligned in your document (Note: the default is setto left).5) Under Indentation, adjust the settings for how your paragraph will be automatically indented.6) Under Spacing, adjust the line spacing within your paragraphs, and the spacing before and after yourparagraphs.7) Click Set As Default.Page 20 of 51
8) The Set As Default window will appear. Make a selection based on your preference and click ok(See Figure 37).Figure 37 - Set As Default Window9) The default paragraph settings will now be set to your preference.Adding StylesThe Styles Gallery is a combination of text formatting options which are saved under a single name. Usingstyles can make formatting text faster and easier than applying individual formatting options. Styles can alsohelp with navigating your document, and marking sections for later use in a table of contents (See Figure 38).Figure 38 - StylesThe choices in the Styles Gallery incorporate a feature called Live Preview. When you hover your mouse over aselection in a Gallery, your document takes on the formatting attributes of that selection in order to give you apreview of how that selection will look when applied to your document.Adding a style to your documentThe following explains how to add a style to your document:1) Select the text you wish to add a style to (See Figure 39).Figure 39 - Selecting TextPage 21 of 51
2) Click on the Home tab (See Figure 40).Figure 40 - Home Tab3) Under the Styles section, click on one of the preset styles (See Figure 41).Figure 41 - Styles4) The style will be added to your selected text (See Figure 42).Figure 42 - Style AddedNote: Only the most recently-used Styles in the Styles Gallery are displayed on the Ribbon; the entire StylesGallery can be displayed by clicking the More buttonat the right of the displayed Styles.Adding ThemesA Theme is a set of formatting options that is applied to an entire document. A Theme includes a set of colors,a set of fonts, and a set of effects. Using Themes shortens formatting time and provides a unified, professionalappearance.Themes can be accessed from the Design tab in Word 2013. From here you can select a Theme from theDocument Formatting group, as well as customize the colors, fonts, and effects of a Theme (See Figure 43).Figure 43 - Accessing Themes through the Design TabPage 22 of 51
The default Theme that is applied to every new document is the Office Theme. The following shows how toapply a different Theme to a document:1) Click the Design tab (See Figure 44).Figure 44 - Design Tab2) Click the Themes button. The Themes Gallery will appear (See Figure 45).Figure 45 – Themes Gallery3) Hover the mouse over the selections in the Themes Gallery to preview how each theme will look whenapplied to your document.4) Click the Theme to apply it to your document.Page 23 of 51
Editing a DocumentEntering TextWord will automatically wrap text when the cursor reaches the right margin. There is no need to press theENTER key unless you want to start a new paragraph or add space between lines of text.Formatting TextCharacter and paragraph formatting commands are found on the Home tab of the Ribbon. To apply any of theformatting options, first select the text and then click the button or check box for the option(s) that you wantto apply.Character FormattingCharacter formatting involves changing the font, size, color, and spacing of characters, as well as applyingbold, italics, and various other effects. Commonly used commands are found in the Font group, under theHome tab, while more commands can be found in the Font Dialog Box. The Font Dialog Box can be accessed byclicking the Font Dialog Box Launcher (See Figure 46).Figure 46 - Options for Character FormattingPage 24 of 51
Paragraph FormattingParagraph formatting involves changing the alignment, line spacing, or indentations of paragraphs. Commonlyused commands are located in the Paragraph group, under the Home tab, while more commands can befound in the Paragraph Dialog Box. The Paragraph Dialog Box can be accessed by clicking the ParagraphDialog Box Launcher (See Figure 47).Figure 47 - Paragraph FormattingEnabling the RulerWord has a ruler that fits along the top and left side of your document and provides a point of reference whenaligning text and images within your document (See Figure 48).Figure 48 - RulerPage 25 of 51
The following explains how to enable the ruler:1) Click on the View tab (See Figure 49).Figure 49 - View Tab2) Under the Show grouping, click the checkbox next to Ruler (See Figure 50).Figure 50 - Showing the Ruler3) The ruler will appear along the top and left side of your document (See Figure 48).Setting Tab StopsTab stops provide a position for placing and aligning text on your document, and are most easily set from theRuler (See Enabling the Ruler). To insert a tab stop:1) Click within the paragraph or text that you want to insert your tab stop.2) Position your mouse pointer over the Ruler at the location you want to add the tab stop.3) Left-click the mouse button. A tab stop will be placed on the ruler (See Figure 51).Figure 51 - Inserting Tab StopsPage 26 of 51
Adding a Leader to Tab StopsAfter adding a tab stop (See Setting Tab Stops), a leader can be added to make text easier to read. Forexample, on a menu the leaders make it easier to read the food and the corresponding price (See Figure 52).Figure 52 - Adding a Leader to Tab StopsThe following explains how to add leaders to your tab stops:1) Double-click on the tab stop in your ruler (See Figure 53).Figure 53 - Double-Click Tab Stop2) The Tab Options menu will appear. Click on one of the leader options (See Figure 54).Figure 54 - Tab Options3) Click OK.4) The leader will appear when you tab to the tab stop.Page 27 of 51
Selecting Different Tab StopsAt the far left of the horizontal ruler is the tab selectorthat lets you choose from different types of tabstops. The most commonly used tab stop is a Left Tab ( ) and more can be selected by clicking the tabselector. Below is an explanation of the tab stops available in Word 2013:Left Tab – Left aligns text to the left of the tab stop.Center Tab – Centers the text on the tab stop.Right Tab – Right aligns the text to the right of the tab stopDecimal Tab – Aligns decimal numbers by their decimal point(Example: 234.00)22331.00Bar Tab – Draws a vertical line on the document.First Line Indent – Inserts the indent marker on the ruler and indents the first line of text in aparagraph.Hanging Indent – Inserts the hanging indent marker and indents all lines other than the first line. (E.g. Hereis an example of the hanging indent).Headers and FootersHeaders and footers are areas containing text that will be displayed on every page. The header is locatedalong the top of every page, while the footer is located at the bottom of every page. The following explainshow to add a header to a document:1) Click the Insert tab on the Ribbon (See Figure 55).Figure 55 - Insert TabPage 28 of 51
2) In the Header & Footer group, click Header (See Figure 56).Figure 56 - Selecting Header3) The Header Gallery will appear as a dropdown menu. Click on a header design (See Figure 57).Figure 57 - Header GalleryPage 29 of 51
4) The header will be applied to your document (See Figure 58), and the Ribbon will change to display theHeader & Footer Design Tools (See Figure 59).Figure 58 - Header Inserted into DocumentFigure 59 - Header & Footer Design Tools5) To edit the header, type the text that you want to appear in the indicated areas.6) When you are finished, click Close Header and Footer in the Header & Footer Design Tools(See Figure 60).Figure 60 - Close Header & FooterEditing Headers & FootersThe following explains how to edit headers and/or footers in your document:1) Click the Insert tab (See Figure 61).Figure 61 - Insert TabPage 30 of 51
2) Click the Header and/or Footer button (See Figure 62).Figure 62 - Selecting Header3) The Header Gallery will appear. Click Edit Header (See Figure 63).Figure 63 - Edit Header4) The Header & Footer Design Tools tab will open. You will be able to make your edits to the headerand/or footer.Removing Headers & FootersThe following explains how to remove headers and/or footers from your document:1) Click the Insert tab (See Figure 64)Figure 64 - Insert Tab2) Click the Header or Footer button (See Figure 65).Figure 65 - Selecting HeaderPage 31 of 51
3) The Header Gallery will appear. Click Remove Header (See Figure 66).Figure 66 - Edit Header4) The header will be removed from your document. To remove footers, repeat steps 1-3 while selectingfooters.Adding Page Numbers to your DocumentThe following explains how to add page numbers to the bottom page of your document:1) Click the Insert tab (See Figure 67)Figure 67 - Insert Tab2) Click on Page Number (See Figure 68).Figure 68 - Selecting Page Number3) A dropdown menu appears. Move your cursor over Bottom of Page (See Figure 69).Figure 69 - Bottom of PagePage 32 of 51
4) The Page Number Gallery appears. Select one of the page number designs (See Figure 70).Figure 70 - Page Number - Gallery Selection5) The selected page number will be applied to your document.Cut, Copy, and Paste TextTo remove text from one place in the document and put it in another you cut and paste the text. You can alsocopy and paste text if you want to add copies of your selection elsewhere in your document.The Cut, Copy, and Paste commands, along with the Format Painter, are located in the Clipboard Group on theHome tab of the Ribbon (See Figure 71).Figure 71 - Clipboard ToolsPage 33 of 51
Cutting and Pasting Text1) Select the text to be cut.2) Under the Home tab, click the Cut button (See Figure 72).Figure 72 - Cutting Tool3) Click within the document where you want to paste the text.4) Click the Paste button (See Figure 73).Figure 73 - Pasting Tool5) Your text will be reinserted into the location you specified within your document.Copying and Pasting Text1) Select the text to be copied.2) Under the Home tab, click the Copy button (See Figure 74).Figure 74 - Copy Tool3) Click within the document where you want to paste the text.Page 34 of 51
4) Click the Paste button (See Figure 75).Figure 75 - Pasting Tool5) Your text will be copied into the location you specified within your document.Note: You can move text from one place to another by selecting the text and then clicking and dragging thetext to the new location.Navigating the DocumentBy using the Find and Go To features, you can search for key words in your document, or move to a specificpage, section, comment, etc. If the heading styles have been added to your document, you can also use theNavigation Pane to move to sections of your document.Using FindThe Find feature is useful for finding one or all instances of a specific word, as well as replacing the word withanother.1) Under the Home tab, click the Find tool (See Figure 76).Figure 76 - Find ToolPage 35 of 51
2) The Navigation Pane will open to the left of the document. In the search document field, type the wordyou wish to search for (See Figure 77).Figure 77 - Search Document3) As you type your word in the search bar, your results will auto-populate below. Click on one of thesearch results to jump to that word in your document (See Figure 78)Figure 78 - Search ResultsUsing Go ToThe Go To feature is helpful for moving to a specific page, section, comment, etc. within your document.1) Under the Home tab, click the dropdown arrow next to the Find tool (See Figure 79).Figure 79 - Access Go To ToolPage 36 of 51
2) A dropdown menu will appear. Click on Go To (See Figure 80).Figure 80 - Go To Tool3) The Go To window will appear. Make a selection under Go to what: and type your search parametersin the search field (See Figure 81).Figure 81 - Go To Search4) Click Go To.Navigation PaneThe Navigation Pane provides an easy way to move throughout your document, without having to scroll. Youcan navigate quickly to areas of your document that have headings, or mov
This booklet is the companion document to the Intro to Word 2013 workshop. It includes an introduction to the Microsoft Office 2013 interface, and covers the various aspects of creating, formatting, editing, saving, and printing a document in Word 2013. Learning Objectives After completi