Transcription
Highly SensitiveSOLUTION GUIDE1 November 2021 3725-87777-001ADRAFTPoly Studio Room Kitsfor Microsoft Teams RoomsGetting HelpFor more information about installing, configuring, andadministering Poly/Polycom products or services, go toPolycom Support.Plantronics, Inc. (Poly — formerly Plantronics and Polycom)345 Encinal StreetSanta Cruz, California95060 2021 Plantronics, Inc. All rights reserved. Poly, the propellerdesign, and the Poly logo are trademarks of Plantronics, Inc.All other trademarks are the property of their respectiveowners.
Highly SensitiveContentsBefore You Begin.3Audience, Purpose, and Required Skills.3Related Poly and Partner Resources.3Privacy Policy.4Getting Started. 5AFTRequired License for Microsoft Teams Rooms . 5Microsoft Teams Rooms Account.5Preparing Your Environment for Microsoft Teams Rooms. 5Poly Focus Room Kit with Poly Studio P15.6Poly Focus Room Kit with Poly P15 Cabling Diagram. 7Connect the Poly GC8 to the Conferencing PC. 8Connect the Poly Studio P15 to the Conferencing PC.10Connect Monitors to the System. 11Connect the Computer to the Network. 11Poly Small-Medium Room Kit with Poly Studio USB.12DRPoly Small-Medium Room Kit with Studio USB Cabling Diagram.13Connect the Poly GC8 to the Conferencing PC. 14Connect the Poly Studio USB Video Bar to the Conferencing PC. 16Connect Monitors to the System. 17Connect the Computer to the Network.17Connect the Optional Icron USB Extension Solution. 17Poly Large Room Kit with Poly Studio E70.19Poly Large Room Kit with Poly Studio E70 Cabling Diagram. 20Connect the Poly GC8 to the Conferencing PC. 21Connect the Poly Studio E70 to the Conferencing PC.23Connect a Poly Sync 40 or Poly Sync 60 to the Conferencing PC. 23Connect Monitors to the System. 24Connect the Optional Icron USB Extension Solution. 24Connect the Computer to the Network.25Power On and Set Up Your Poly Studio Room Kit. 26Power on the Components and Complete Windows Setup. 261
Highly SensitiveContentsAFTComplete the Microsoft Teams Rooms Out-of-Box Setup . 27Access Additional Settings.28Enable Dual Monitor Mode.29Update the Computer.29Install Poly Lens Desktop Camera Controls.29Poly Studio E70 Speaker Tracking Service for Windows.30Set the Microsoft Teams Rooms Default Audio Output Device. 30Set the Windows Default Audio Output Device. 30Download and Install PolyAudioService.30Verify PolyAudioService Is Running. 31Verify PolyAudioService Detected the Correct Audio Output Device. 31Verify Poly Studio E70 Receives Far-End Talk Flags.32System Maintenance and Troubleshooting. 33DRAutomatic Microsoft Teams Rooms Application Updates.33Manually Updating the Microsoft Teams Room Application. 33Access Windows on the Conferencing PC.33Factory Restore the Poly GC8. 34Factory Reset the Poly GC8. 34Troubleshooting Specific Types of Issues. 35The Front of the Room Monitor Doesn’t Wake from Sleep as Expected.352
Highly SensitiveBefore You BeginTopics: Audience, Purpose, and Required Skills Related Poly and Partner Resources Privacy PolicyThis Poly Studio Room Kits Solution Guide contains information for installing and maintaining your PolyStudio Room Kit.This guide contains information for the following Poly products and accessories:Poly Focus Room Kit with Poly Studio P15 Poly Small/Medium Room Kit with Poly Studio USB Poly Large Room Kit with Poly Studio E70AFT Audience, Purpose, and Required SkillsThis guide is intended for beginning users, as well as intermediate and advanced users who want to learnmore about the features available with Poly Studio Room Kit.Related Poly and Partner ResourcesSee the following sites for information related to this product.The Poly Online Support Center is the entry point to online product, service, and solution supportinformation including Video Tutorials, Documents & Software, Knowledge Base, CommunityDiscussions, Poly University, and additional services. The Poly Document Library provides support documentation for active products, services, andsolutions. The documentation displays in responsive HTML5 format so that you can easily accessand view installation, configuration, or administration content from any online device. The Poly Community provides access to the latest developer and support information. Create anaccount to access Poly support personnel and participate in developer and support forums. You canfind the latest information on hardware, software, and partner solutions topics, share ideas, andsolve problems with your colleagues.DR The Poly Partner Network is a program where resellers, distributors, solutions providers, and unifiedcommunications providers deliver high-value business solutions that meet critical customer needs,making it easy for you to communicate face-to-face using the applications and devices you useevery day. The Poly Services help your business succeed and get the most out of your investment through thebenefits of collaboration.3
Highly SensitiveBefore You BeginPrivacy PolicyDRAFTPoly products and services process customer data in a manner consistent with the Poly Privacy Policy.Please direct comments or questions to privacy@poly.com4
Highly SensitiveGetting StartedTopics: Required License for Microsoft Teams Rooms Microsoft Teams Rooms Account Preparing Your Environment for Microsoft Teams RoomsBefore installing your Poly Studio Room Kit, ensure you have the required licenses and components.Note: Before installing the Poly Studio Room Kit, you'll need the following:Required License for Microsoft Teams Rooms on page 5 Microsoft Teams Rooms Account on page 5AFT Required License for Microsoft Teams RoomsYou'll need a Microsoft Teams Rooms license from Microsoft to set up your Poly Studio Room Kit.For information on required licenses and dependencies, see the Microsoft Teams documentation.Teams Meeting Room LicensingMicrosoft Teams Rooms AccountTo set up your Poly Solution for Microsoft Teams Rooms, you'll need a Microsoft Teams Rooms account.RFor information on setting up your Microsoft Teams Rooms account, see the Microsoft Teamsdocumentation.Configure accounts for Microsoft Teams RoomsDPreparing Your Environment for Microsoft TeamsRoomsBefore installing your Poly Studio Room Kit, verify that your network is ready.For information on verifying that your network is ready for Microsoft Teams, see the Microsoft TeamsRooms documentation.Prepare your organization's network for Microsoft Teams.5
Highly SensitivePoly Focus Room Kit with Poly StudioP15Topics: Poly Focus Room Kit with Poly P15 Cabling Diagram Connect the Poly GC8 to the Conferencing PC Connect the Poly Studio P15 to the Conferencing PC Connect Monitors to the System Connect the Computer to the NetworkAFTSetup instructions for the Poly Focus Room Kit.RPoly Focus Room Kit with Poly P15 ComponentsNote: Before installing the Poly Studio Room Kit, you'll need the following: Required License for Microsoft Teams Rooms on page 5 Microsoft Teams Rooms Account on page 5Poly GC8 touch controller Conferencing PC 10m USB-C to USB-A fiber optic cable Poly Studio P15 personal video barD Required Tools Phillips #1 screwdriver Flathead screwdriverAdditional Required Components HDMI cable(s) USB Keyboard and mouse (for installation only)6
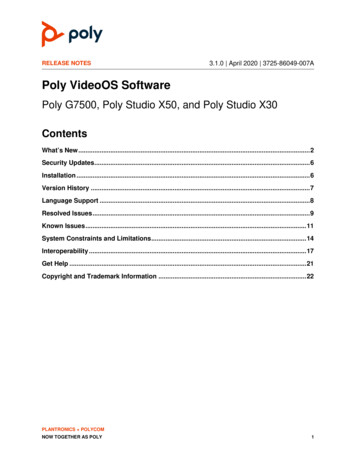
Highly SensitivePoly Focus Room Kit with Poly Studio P15Microsoft Teams Rooms User InformationFor information on using Microsoft Teams Rooms, see Microsoft Teams Rooms help on the Microsoftsupport website.Poly Focus Room Kit with Poly P15 Cabling DiagramThis diagram includes the complete cabling for the Poly Focus Room Kit with Poly Studio P15.DRAFTFor more information on Poly Studio P15 setup, see the Poly Studio P15 Quick Start Guide.7
Highly SensitivePoly Focus Room Kit with Poly Studio P15Connect the Poly GC8 to the Conferencing PCConnect the cables to the Poly GC8 and connect the GC8 to the Conferencing PC.Important:Don’t plug in or power on any components until you’ve connected all cables to the Poly GC8and Conferencing PC.Procedure1. Remove the bottom panel of the Poly GC8.AFTa. Loosen the bottom panel screw using a #1 Phillips-head screwdriver.b. Press the rubber circles located on the left and right side of the bottom pane, l and slide thepanel up to remove it.If the retaining screw causes the cover to seem stuck, try one of the following:Turn the Poly GC8 so the bottom panel is facing down as you slide off the bottompanel. Push up with one hand while using the screwdriver to turn the retaining screwcounterclockwise.DR c. Using a flathead screwdriver, loosen the cable guard screw and remove the cable guard.8
Highly SensitivePoly Focus Room Kit with Poly Studio P152. Connect the cables to the Poly GC8.a. Connect the USB-C connector of the supplied USB-A to USB-C fiber optic cable to the PolyGC8.AFTb. Connect the power cable to the Poly GC8.c. If you want to allow users to share content in a conference, connect the mini-HDMIconnector of the mini-HDMI to HDMI cable to the Poly GC8.DRd. Connect the GC8 3.5 mm audio out connection to an audio output device.3. Reattach the cable guard and the bottom panel.9
Highly SensitivePoly Focus Room Kit with Poly Studio P15AFT4. Connect the USB-A connector of the USB-A to USB-C cable to the Conferencing PC.Connect the Poly Studio P15 to the Conferencing PCConnect the Poly Studio P15 camera to the Conferencing PC to add a video camera and microphones.RNote: The Poly Studio P15 personal video bar ships with a USB-C to USB-C cable. If a USB-Cconnection is not available on the conferencing PC you can use a USB-C to USB-A adaptercompatible with USB 3.1.ProcedureD1. Connect the USB-C to USB-C cable from the Poly Studio P15 to the Conferencing PC.2. Connect the power cable to the Poly Studio P15.10
Highly SensitivePoly Focus Room Kit with Poly Studio P15Connect Monitors to the SystemConnect one or two monitors to the system to display far-side video and content.Important:Don’t plug in or power on any components until you’ve connected all cables to the Poly GC8and Conferencing PC.When using 4K monitors, the meeting room controls screen may appear on the monitor and not on thePoly GC8 controller. When this happens, the Poly GC8 displays a blank screen. To resolve this issue,Poly recommends using a 1080p limited EDID emulator with your 4K monitor. For additional installationand configuration information, see the EDID manufacturer’s instructions.Procedure AFT1. Connect the one end of the HDMI cable to the monitor.2. For 4K monitors, install a 1080p limited EDID emulator to an available HDMI port on theConferencing PC.3. Do one of the following:Connect the other end of the HDMI cable to the Conferencing PC.If you installed an EDMI emulator to the Conferencing PC, connect the other end of theHDMI cable to the EDID emulator.4. To show far-side participants on one monitor and content on another, connect a second monitor.Connect the Computer to the NetworkConnect the Conferencing PC to your network using an Ethernet cable.RNote: Microsoft Teams Room doesn’t support wireless video conferencing.ProcedureD» Using an Ethernet cable, connect the Conferencing PC to an Ethernet port.11
Highly SensitivePoly Small-Medium Room Kit with PolyStudio USBTopics:Poly Small-Medium Room Kit with Studio USB Cabling Diagram Connect the Poly GC8 to the Conferencing PC Connect the Poly Studio USB Video Bar to the Conferencing PC Connect Monitors to the System Connect the Computer to the Network Connect the Optional Icron USB Extension SolutionAFT Setup instructions for your Poly Studio Small/Medium Room Kit.RPoly Small-Medium Room Kit ComponentsNote: Before installing the Poly Studio Room Kit, you'll need the following:Required License for Microsoft Teams Rooms on page 5 Microsoft Teams Rooms Account on page 5D Poly GC8 touch controller Conferencing PC 10m USB-C to USB-A fiber optic cable Poly Studio USB cameraRequired Tools Phillips #1 screwdriver Flathead screwdriverAdditional Required Components HDMI cable(s) USB Keyboard and mouse (for installation only)12
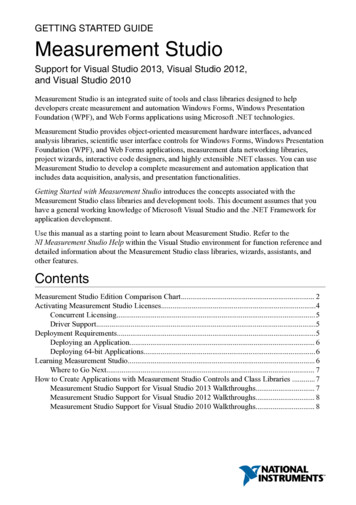
Highly SensitivePoly Small-Medium Room Kit with Poly Studio USBMicrosoft Teams Rooms User InformationFor information on using Microsoft Teams Rooms, see Microsoft Teams Rooms help on the Microsoftsupport website.Poly Small-Medium Room Kit with Studio USB CablingDiagramDRAFTThis diagram includes the complete cabling for the Poly Small-Medium Room Kit with Poly Studio USB.13
Highly SensitivePoly Small-Medium Room Kit with Poly Studio USBConnect the Poly GC8 to the Conferencing PCConnect the cables to the Poly GC8 and connect the GC8 to the Conferencing PC.Important:Don’t plug in or power on any components until you’ve connected all cables to the Poly GC8and Conferencing PC.Procedure1. Remove the bottom panel of the Poly GC8.AFTa. Loosen the bottom panel screw using a #1 Phillips-head screwdriver.b. Press the rubber circles located on the left and right side of the bottom pane, l and slide thepanel up to remove it.If the retaining screw causes the cover to seem stuck, try one of the following:Turn the Poly GC8 so the bottom panel is facing down as you slide off the bottompanel. Push up with one hand while using the screwdriver to turn the retaining screwcounterclockwise.DR c. Using a flathead screwdriver, loosen the cable guard screw and remove the cable guard.14
Highly SensitivePoly Small-Medium Room Kit with Poly Studio USB2. Connect the cables to the Poly GC8.a. Connect the USB-C connector of the supplied USB-A to USB-C fiber optic cable to the PolyGC8.AFTb. Connect the power cable to the Poly GC8.c. If you want to allow users to share content in a conference, connect the mini-HDMIconnector of the mini-HDMI to HDMI cable to the Poly GC8.DRd. Connect the GC8 3.5 mm audio out connection to an audio output device.3. Reattach the cable guard and the bottom panel.15
Highly SensitivePoly Small-Medium Room Kit with Poly Studio USBAFT4. Connect the USB-A connector of the USB-A to USB-C cable to the Conferencing PC.Connect the Poly Studio USB Video Bar to theConferencing PCRConnect the camera to the Conferencing PC to add a video camera, microphones, and speakers forvideo conferencing.Don’t plug in or power on any components until you’ve connected all cables to the GC8 orLenovo device.Important:To avoid changes to the video configuration, do not use the Poly Studio remote control.DImportant:Procedure1. Connect the USB-C connector of the supplied USB-A to USB-C cable to the camera.2. Connect the USB-A connector to the Conferencing PC.3. Connect the power cable.16
Highly SensitivePoly Small-Medium Room Kit with Poly Studio USBConnect Monitors to the SystemConnect one or two monitors to the system to display far-side video and content.Important:Don’t plug in or power on any components until you’ve connected all cables to the Poly GC8and Conferencing PC.When using 4K monitors, the meeting room controls screen may appear on the monitor and not on thePoly GC8 controller. When this happens, the Poly GC8 displays a blank screen. To resolve this issue,Poly recommends using a 1080p limited EDID emulator with your 4K monitor. For additional installationand configuration information, see the EDID manufacturer’s instructions.Procedure AFT1. Connect the one end of the HDMI cable to the monitor.2. For 4K monitors, install a 1080p limited EDID emulator to an available HDMI port on theConferencing PC.3. Do one of the following:Connect the other end of the HDMI cable to the Conferencing PC.If you installed an EDMI emulator to the Conferencing PC, connect the other end of theHDMI cable to the EDID emulator.4. To show far-side participants on one monitor and content on another, connect a second monitor.Connect the Computer to the NetworkConnect the Conferencing PC to your network using an Ethernet cable.RNote: Microsoft Teams Room doesn’t support wireless video conferencing.Procedure» Using an Ethernet cable, connect the Conferencing PC to an Ethernet port.DConnect the Optional Icron USB Extension SolutionConnect the Icron USB Extension Solution to extend USB 3.1 devices over a single CAT cable.Procedure1. Connect the USB-B end of the USB-3.1 cable to the Local Extender (LEX) and connect the otherend to the Conferencing PC.2. Power on the Local Extender (LEX).3. Connect one end of the Ethernet CAT-6a/7 cable to the Local Extender (LEX) and connect theother end to the Remote Extender (REX).4. Power on the Remote Extender (REX).5. Connect the USB-A end of the USB-3.1 cable to the Remote Extender (REX) and connect theUSB-C end to the Poly GC8.17
DRAFTHighly SensitivePoly Small-Medium Room Kit with Poly Studio USB18
Highly SensitivePoly Large Room Kit with Poly StudioE70Topics:Poly Large Room Kit with Poly Studio E70 Cabling Diagram Connect the Poly GC8 to the Conferencing PC Connect the Poly Studio E70 to the Conferencing PC Connect a Poly Sync 40 or Poly Sync 60 to the Conferencing PC Connect Monitors to the System Connect the Optional Icron USB Extension Solution Connect the Computer to the NetworkAFT Setup instructions for your Poly Studio Large Room Kit.RPoly Large Room Kit with Poly E70 ComponentsDNote: Before installing the Poly Studio Room Kit, you'll need the following: Required License for Microsoft Teams Rooms on page 5 Microsoft Teams Rooms Account on page 5 Poly GC8 touch controller Conferencing PC 10m USB-C to USB-A fiber optic cable Poly Studio E70 cameraRequired Tools Phillips #1 screwdriver Flathead screwdriverAdditional Required Components19
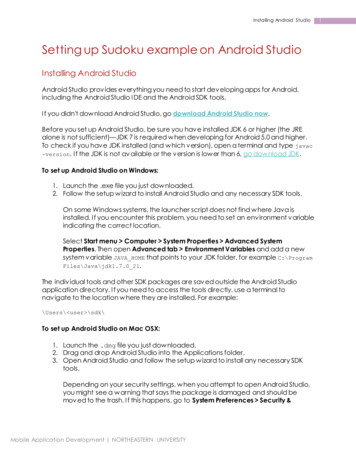
Highly Sensitive HDMI cable(s) USB Keyboard and mouse (for installation only)Poly Large Room Kit with Poly Studio E70Microsoft Teams Rooms User InformationFor information on using Microsoft Teams Rooms, see Microsoft Teams Rooms help on the Microsoftsupport website.Poly Large Room Kit with Poly Studio E70 CablingDiagramDRAFTThis diagram includes the complete cabling for the Poly Large Room Kit with Poly Studio E70.20
Highly SensitivePoly Large Room Kit with Poly Studio E70Connect the Poly GC8 to the Conferencing PCConnect the cables to the Poly GC8 and connect the GC8 to the Conferencing PC.Important:Don’t plug in or power on any components until you’ve connected all cables to the Poly GC8and Conferencing PC.Procedure1. Remove the bottom panel of the Poly GC8.AFTa. Loosen the bottom panel screw using a #1 Phillips-head screwdriver.b. Press the rubber circles located on the left and right side of the bottom pane, l and slide thepanel up to remove it.If the retaining screw causes the cover to seem stuck, try one of the following:Turn the Poly GC8 so the bottom panel is facing down as you slide off the bottompanel. Push up with one hand while using the screwdriver to turn the retaining screwcounterclockwise.DR c. Using a flathead screwdriver, loosen the cable guard screw and remove the cable guard.21
Highly SensitivePoly Large Room Kit with Poly Studio E702. Connect the cables to the Poly GC8.a. Connect the USB-C connector of the supplied USB-A to USB-C fiber optic cable to the PolyGC8.AFTb. Connect the power cable to the Poly GC8.c. If you want to allow users to share content in a conference, connect the mini-HDMIconnector of the mini-HDMI to HDMI cable to the Poly GC8.DRd. Connect the GC8 3.5 mm audio out connection to an audio output device.3. Reattach the cable guard and the bottom panel.22
Highly SensitivePoly Large Room Kit with Poly Studio E70AFT4. Connect the USB-A connector of the USB-A to USB-C cable to the Conferencing PC.Connect the Poly Studio E70 to the Conferencing PCConnect the Poly Studio E70 camera to the Conferencing PC to add a video camera and microphones.RNote: After setting up the Conferencing PC, install the Poly Studio E70 Speaker Tracking Service forWindows on page 30.ProcedureD1. Connect the USB-C connector of the supplied USB-A to USB-C cable to the camera.2. Connect the USB-A connector to the Conferencing PC.3. Connect an Ethernet cable from the Poly Studio E70 to a PoE supported Ethernet port.Connect a Poly Sync 40 or Poly Sync 60 to theConferencing PCUse a Poly Sync 40 or Poly Sync 60 as a microphone and speaker for your Poly Solutions for MicrosoftTeams Rooms.Procedure» Connect the USB-A cable from the Poly Sync 40 or Poly Sync 60 to the Poly GC8.23
Highly SensitivePoly Large Room Kit with Poly Studio E70Connect Monitors to the SystemConnect one or two monitors to the system to display far-side video and content.Don’t plug in or power on any components until you’ve connected all cables to the Poly GC8and Conferencing PC.AFTImportant:When using 4K monitors, the meeting room controls screen may appear on the monitor and not on thePoly GC8 controller. When this happens, the Poly GC8 displays a blank screen. To resolve this issue,Poly recommends using a 1080p limited EDID emulator with your 4K monitor. For additional installationand configuration information, see the EDID manufacturer’s instructions.Procedure1. Connect the one end of the HDMI cable to the monitor.2. For 4K monitors, install a 1080p limited EDID emulator to an available HDMI port on theConferencing PC.3. Do one of the following: If you installed an EDMI emulator to the Conferencing PC, connect the other end of theHDMI cable to the EDID emulator.4. To show far-side participants on one monitor and content on another, connect a second monitor.R Connect the other end of the HDMI cable to the Conferencing PC.DConnect the Optional Icron USB Extension SolutionConnect the Icron USB Extension Solution to extend USB 3.1 devices over a single CAT cable.Procedure1. Connect the USB-B end of the USB-3.1 cable to the Local Extender (LEX) and connect the otherend to the Conferencing PC.2. Power on the Local Extender (LEX).3. Connect one end of the Ethernet CAT-6a/7 cable to the Local Extender (LEX) and connect theother end to the Remote Extender (REX).4. Power on the Remote Extender (REX).5. Connect the USB-A end of the USB-3.1 cable to the Remote Extender (REX) and connect theUSB-C end to the Poly GC8.24
Highly SensitivePoly Large Room Kit with Poly Studio E70Connect the Computer to the NetworkAFTConnect the Conferencing PC to your network using an Ethernet cable.Note: Microsoft Teams Room doesn’t support wireless video conferencing.ProcedureDR» Using an Ethernet cable, connect the Conferencing PC to an Ethernet port.25
Highly SensitivePower On and Set Up Your Poly StudioRoom KitTopics:Power on the Components and Complete Windows Setup Complete the Microsoft Teams Rooms Out-of-Box Setup Access Additional Settings Enable Dual Monitor Mode Update the Computer Install Poly Lens Desktop Camera Controls Poly Studio E70 Speaker Tracking Service for WindowsAFT After cabling the system, power on all the components complete the out-of-box setup.Procedure1.2.3.4.5.Power on the components and complete Windows setup.Complete the Microsoft Teams Rooms out-of-box setup.Access additional settings.Enable Dual Monitor mode.Update the computer.RPower on the Components and Complete WindowsSetupAfter cabling your Poly Studio Room Kit, power on the devices and configure Microsoft Teams Rooms.ProcedureD1. Connect a USB keyboard and mouse to the Conferencing PC.26
Highly SensitivePower On and Set Up Your Poly Studio Room KitAFT2. Plug in and power on the Poly GC8 and then plug in and power on the other components.The Conferencing PC may reboot more than once as it downloads and installs updates.Caution: Don’t shut down the Conferencing PC during this process.3. Complete the initial Windows setup.a. Choose your region.b. Choose your keyboard layout.c. When prompted to add a second keyboard layout, select Skip.The Conferencing PC may reboot more than once as it downloads and installs updates.Caution: Don’t shut down the Conferencing PC during this process.Rd. Change the default administrator password.See Initial set up of the console on the Microsoft website.DComplete the Microsoft Teams Rooms Out-of-BoxSetupWhen you first start the system, the Microsoft Teams Rooms out-of-box screen appears.Note: Before installing the Poly Solution for Microsoft Teams Rooms, you'll need the following: Required License for Microsoft Teams Rooms on page 5 Microsoft Teams Rooms Account on page 5Complete your configuration. For detailed instructions, see Initial Setup for Microsoft Teams Rooms onthe Microsoft website.Procedure1. Accept the Microsoft Software License Terms.27
Highly SensitivePower On and Set Up Your Poly Studio Room Kit2. Enter your Microsoft Teams Rooms account information.See Configure accounts for Microsoft Teams Rooms.3. Select the appropriate Supported Meeting Mode based on your preferred default application. Bydefault, Microsoft Teams only is selected.4.5.6.7. Skype for Business (default) and Microsoft Teams Skype for Business and Microsoft Teams (default) Skype for Business only Microsoft Teams onlyEnable Modern Authentication.If your mailbox has an alternate SMTP, complete Exchange sign-in.Select Next.Select Finish.AFTThe system reboots.The Conferencing PC may reboot more than once as it downloads and installs updates. Do notshut down the Conferencing PC during this process. When complete, the Microsoft Teams RoomsSetup screen appears on the Poly GC8.8. Choose from the following: To configure additional settings, see Access Additional Settings . To configure a dual monitor setup, see Enable Dual Monitor Mode .9. Update the Computer on page 29.Access Additional SettingsAccess the Settings menu to configure additional settings.1.2.3.4.RProcedureOn the Poly GC8, select More Settings.Enter the admin password.Correct or change the email password if necessary.Change the audio device.DSpeaker for Conferencing and Default Speaker are the same.5. Connect a content camera and configure the "magic whiteboard" functionality.When using the "magic whiteboard" functionality, you can configure content cameras.Note: The content camera isn’t the People camera. Microsoft Teams Rooms applicationautomatically sets the people camera.For more information, see Content camera for Microsoft Teams Rooms.28
Highly SensitivePower On and Set Up Your Poly Studio Room KitEnable Dual Monitor ModeIf you connected a second monitor, enable Dual monitor mode in the Microsoft Teams Rooms settings.Procedure1.2.3.4.From the Microsoft Teams Rooms interface on the Poly GC8, select More Settings.Enter the admin password.Select Device.Enable Dual monitor mode.The Conferencing PC reboots.AFTUpdate the ComputerAfter connecting all peripherals to the system, perform a Windows Update.When the Poly GC8 requires updates, the screen turns black while the firmware is updating, which cantake up to 5 minutes. After the firmware updates, the Poly GC8 restarts and returns to regular operationautomatically.Procedure1.2.3.4.5.6.On the Poly GC8, select More Settings.Enter the
Poly Focus Room Kit with Poly Studio P15 Poly Small/Medium Room Kit with Poly Studio USB Poly Large Room Kit with Poly Studio E70 Audience, Purpose, and Required Skills This guide is intended for beginning users, as well as intermediate and advanced users who want to learn more about the featur