Transcription
Xamarin.Android#xamarin.android
Table of ContentsAbout1Chapter 1: Getting started with Xamarin.Android2Remarks2Versions2Examples3Get started in Xamarin Studio3Get Started in Visual Studio5Chapter 2: App lifecycle - ication lifecycle8Activity lifecycle9Fragment lifecycle11Full sample on GitHub13Chapter 3: Barcode scanning using ZXing library in Xamarin Applications15Introduction15Examples15Sample Code15Chapter 4: Bindings16Examples16Removing Types16Implementing Java interfaces16Bindings libraries may rename methods and interfaces17Chapter 5: Custom ListViewExamplesCustom Listview comprises of rows that are designed as per the users needs.Chapter 6: Dialogs18181824Remarks24Examples24
Alert dialogChapter 7: log27Simple Alert Dialog Example27Chapter 8: How to correct the orientation of a picture captured from Android device30Remarks30Examples30How to correct the orientation of a picture captured from Android deviceChapter 9: Publishing your Xamarin.Android APK3038Introduction38Examples38Preparing your APK in the Visual StudioImportantEnabling MultiDex in your Xamarin.Android APK384148How to use MultiDex in your Xamarin.Android app48Enabling ProGuard in your Xamarin.Android APK51How to use ProGuard in your Xamarin.Android app"Mysterious" bugs related to ProGuard and Linker5253Understanding Xamarin.Linker54Understanding ProGuard56Chapter 10: RecyclerView60Examples60RecyclerView Basics60RecyclerView with Click events64Chapter 11: ToastsExamples6767Basic Toast Message67Colored Toast Messages67Change Toast Position68
Chapter 12: Xamarin.Android - Bluetooth 9Send and receive data from and to bluetooth device using socketChapter 13: Xamarin.Android - How to create a toolbar6971Remarks71Examples71Add toolbar to the Xamarin.Android applicationCredits7175
AboutYou can share this PDF with anyone you feel could benefit from it, downloaded the latest versionfrom: xamarin-androidIt is an unofficial and free Xamarin.Android ebook created for educational purposes. All the contentis extracted from Stack Overflow Documentation, which is written by many hardworking individualsat Stack Overflow. It is neither affiliated with Stack Overflow nor official Xamarin.Android.The content is released under Creative Commons BY-SA, and the list of contributors to eachchapter are provided in the credits section at the end of this book. Images may be copyright oftheir respective owners unless otherwise specified. All trademarks and registered trademarks arethe property of their respective company owners.Use the content presented in this book at your own risk; it is not guaranteed to be correct noraccurate, please send your feedback and corrections to info@zzzprojects.comhttps://riptutorial.com/1
Chapter 1: Getting started withXamarin.AndroidRemarksXamarin.Android allows you to create native Android applications using the same UI controls asyou would in Java, except with the flexibility and elegance of a modern language (C#), the powerof the .NET Base Class Library (BCL), and two first-class IDEs - Xamarin Studio and Visual Studio- at their fingertips.For more information on installing Xamarin.Android on your Mac or Windows machine, refer to theGetting Started guides on the Xamarin developer centerVersionsVersionCode NameAPI LevelRelease 0-4.0.4Ice Cream Sandwich14-152011-10-184.1-4.3.1Jelly Bean16-182012-07-094.4-4.4.4, ougat242016-08-22https://riptutorial.com/2
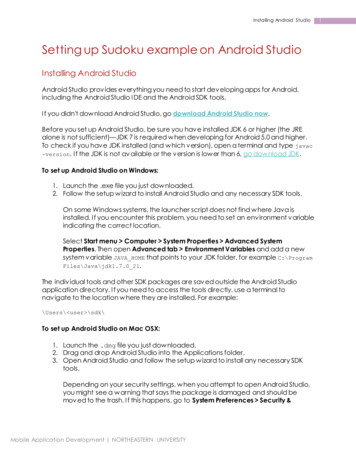
ExamplesGet started in Xamarin Studio1. Browse to File New Solution to bring you up the new project dialog.2. Select Android App and press Next.3. Configure your app by setting your app name and organization ID. Select the TargetPlatform most suited for your needs, or leave it as the default. Press Next:https://riptutorial.com/3
https://riptutorial.com/4
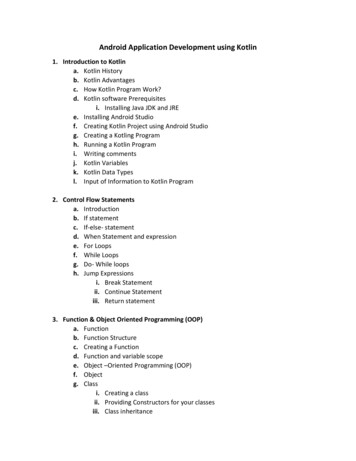
4. Set your Project name and Solution name, or leave as the default name. Click Create tocreate your project.5. Set up your device for deployment, or configure an emulator6. To run your application, select the Debug configuration, and press the Play button:Get Started in Visual Studio1. Browse to File New Project to bring you up the New Project dialog.2. Navigate to Visual C# Android and select Blank App:https://riptutorial.com/5
https://riptutorial.com/6
3. Give your app a Name and press OK to create your project.4. Set up your device for deployment, or configure an emulator5. To run your application, select the Debug configuration, and press the Start button:Read Getting started with Xamarin.Android online: rial.com/7
Chapter 2: App lifecycle - Xamarin.AndoridIntroductionXamarin.Android application lifecycle is the same as normal Android app. When talking aboutlifecycle we need to talk about: Application lifecycle, Activity lifecycle and Fragment lifecycle.In the below I'll try to provide a good description and way of using them. I obtained thisdocumentation from the official Android and Xamarin documentation and many helpful webresources provided in remarks section below.RemarksInteresting links to broad your knowledge about Android application loper.xamarin.com/guides/android/platform features/fragments/part 1 creating a plication lifecycleFirst of all you should know that you can extend Android.Application class so you can access twoimportant methods related with app lifecycle: OnCreate - Called when the application is starting, before any other application objects havebeen created (like MainActivity). OnTerminate - This method is for use in emulated process environments. It will never becalled on a production Android device, where processes are removed by simply killing them;No user code (including this callback) is executed when doing so. From the nce/android/app/Application.html#onTerminate()In Xamarin.Android application you can extend Application class in the way presented below. Addnew class called "MyApplication.cs" to your project:https://riptutorial.com/8
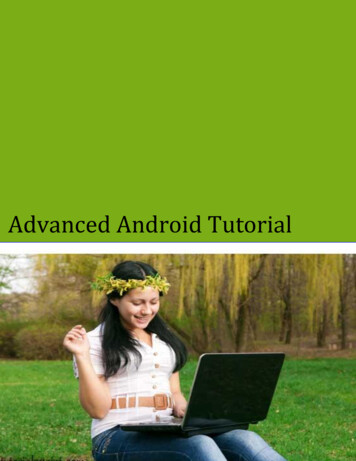
[Application]public class MyApplication : Application{public MyApplication(IntPtr handle, JniHandleOwnership ownerShip) : base(handle,ownerShip){}public override void OnCreate(){base.OnCreate();}public override void OnTerminate(){base.OnTerminate();}}As you wrote above you can use OnCreate method. You can for instance initialize local databasehere or setup some additional configuration.There is also more methods which can be overridden like: OnConfigurationChanged orOnLowMemory.Activity lifecycleActivity lifecycle is quite more complex. As you know Activity is single page in the Android appwhere user can perform interaction with it.On the diagram below you can see how Android Activity lifecycle looks like:https://riptutorial.com/9
As you can see there is specific flow of Activity lifecycle. In the mobile application you have ofcourse methods in each Activity class that handle specific lifecycle fragment:[Activity(Label "LifecycleApp", MainLauncher true, Icon "@mipmap/icon")]public class MainActivity : Activity{protected override void OnCreate(Bundle te);Log.Debug("OnCreate", "OnCreate called, Activity components are being created");// Set our view from the "main" layout y);}protected override void OnStart(){Log.Debug("OnStart", "OnStart called, App is Active");https://riptutorial.com/10
base.OnStart();}protected override void OnResume(){Log.Debug("OnResume", "OnResume called, app is ready to interact with the user");base.OnResume();}protected override void OnPause(){Log.Debug("OnPause", "OnPause called, App is moving to background");base.OnPause();}protected override void OnStop(){Log.Debug("OnStop", "OnStop called, App is in the background");base.OnStop();}protected override void , "OnDestroy called, App is Terminating");}}There is good description in the official Android documentation: The entire lifetime of an activity happens between the first call to onCreate(Bundle) throughto a single final call to onDestroy(). An activity will do all setup of "global" state in onCreate(),and release all remaining resources in onDestroy(). For example, if it has a thread running inthe background to download data from the network, it may create that thread in onCreate()and then stop the thread in onDestroy(). The visible lifetime of an activity happens between a call to onStart() until a correspondingcall to onStop(). During this time the user can see the activity on-screen, though it may notbe in the foreground and interacting with the user. Between these two methods you canmaintain resources that are needed to show the activity to the user. For example, you canregister a BroadcastReceiver in onStart() to monitor for changes that impact your UI, andunregister it in onStop() when the user no longer sees what you are displaying. The onStart()and onStop() methods can be called multiple times, as the activity becomes visible andhidden to the user. The foreground lifetime of an activity happens between a call to onResume() until acorresponding call to onPause(). During this time the activity is in front of all other activitiesand interacting with the user. An activity can frequently go between the resumed and pausedstates -- for example when the device goes to sleep, when an activity result is delivered,when a new intent is delivered -- so the code in these methods should be fairly lightweight.Fragment lifecyclehttps://riptutorial.com/11
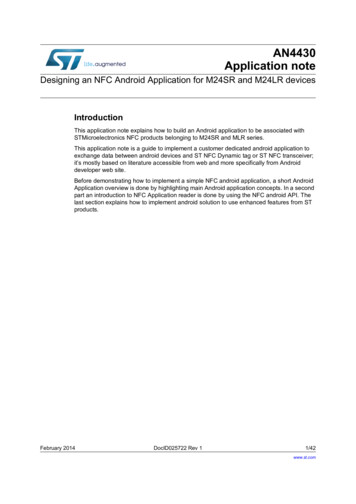
As you know you can have one activity but different fragments embedded in it. That is whyfragment lifecycle is also important for developers.On the diagram below you can see how Android fragment lifecycle looks like:As described in the official Android documentation you should implement at least below threehttps://riptutorial.com/12
methods: OnCreate - the system calls this when creating the fragment. Within your implementation,you should initialize essential components of the fragment that you want to retain when thefragment is paused or stopped, then resumed. OnCreateView - The system calls this when it's time for the fragment to draw its userinterface for the first time. To draw a UI for your fragment, you must return a View from thismethod that is the root of your fragment's layout. You can return null if the fragment does notprovide a UI. OnPause - The system calls this method as the first indication that the user is leaving thefragment (though it does not always mean the fragment is being destroyed). This is usuallywhere you should commit any changes that should be persisted beyond the current usersession (because the user might not come back).Here is sample implementation in Xamarin.Android:public class MainFragment : Fragment{public override void OnCreate(Bundle te);// Create your fragment here// You should initialize essential components of the fragment// that you want to retain when the fragment is paused or stopped, then resumed.}public override View OnCreateView(LayoutInflater inflater, ViewGroup container, BundlesavedInstanceState){// Use this to return your custom view for this Fragment// The system calls this when it's time for the fragment to draw its user interfacefor the first time.var mainView inflater.Inflate(Resource.Layout.MainFragment, container, false);return mainView;}public override void OnPause(){// The system calls this method as the first indication that the user is leaving thefragmentbase.OnPause();}}Of course you can add additional methods here if you want to handle different states.Full sample on GitHubIf you would like to get base project with methods described below you can downloadXamarin.Android application template from my GitHub. You can find examples for:https://riptutorial.com/13
Application lifecycle methods Activity lifecycle methods Fragment lifecycle pRead App lifecycle - Xamarin.Andorid online: .com/14
Chapter 3: Barcode scanning using ZXinglibrary in Xamarin ApplicationsIntroductionZxing library is well known for image processing. Zxing was based on java and .Net module is alsoavailable and it can be used in xamarin applications. click here to check official documentation.http://zxingnet.codeplex.com/I recently used this libarry.Step1: Add ZXing.Net.Mobile component into solution.step2: In whichever activity we need to show barcode scanner, in that activity initialiseMobileBarcodeScanner.Step3: Write below code when tapped on any view to start scanning.ExamplesSample Codebutton.Click async delegate{var MScanner new MobileBarcodeScanner();var Result await MScanner.Scan();if(Result null){return;}//get the bar code text herestring BarcodeText Result.text;}Read Barcode scanning using ZXing library in Xamarin Applications arin-applicationshttps://riptutorial.com/15
Chapter 4: BindingsExamplesRemoving TypesIt is possible to instruct the Xamarin.Android Bindings Generator to ignore a Java type and notbind it. This is done by adding a remove-node XML element to the metadata.xml file: remove-node path "/api/package[@name '{package name}']/class[@name '{name}']" / Implementing Java interfacesIf a java library contains interfaces that should be implemented by the user (e.g. click listeners likeView.IOnClickListener or callbacks), the implementing class has to inherit -- directly or indirectly -from Java.Lang.Object or Java.Lang.Throwable. This is a common error, because the packagingsteps just print a warning that is overlooked easily:Type 'MyListener ' implements Android.Runtime.IJavaObject but does not inherit fromJava.Lang.Object. It is not supported.WrongThe usage of this implementation will result in unexpected behavior.class MyListener : View.IOnClickListener{public IntPtr Handle { get; }public void Dispose(){}public void OnClick(View v){// .}}Correctclass MyListener :Java.Lang.Object, // this is the important partView.IOnClickListener{public void OnClick(View v){// .}https://riptutorial.com/16
}Bindings libraries may rename methods and interfacesNot everything in a bindings library will have the same name in C# as it does in Java.In C#, interface names start with "I", but Java has no such convention. When you import a Javalibrary, an interface named SomeInterface will become ISomeInterface.Similarly, Java doesn't have properties like C# does. When a library is bound, Java getter andsetter methods might be refactored as properties. For example, the following Java codepublic int getX() { return someInt; }public int setX(int someInt) { this.someInt someInt; }may be refactored aspublic int X { get; set; }when it's bound.Read Bindings online: bindingshttps://riptutorial.com/17
Chapter 5: Custom ListViewExamplesCustom Listview comprises of rows that are designed as per the users needs.For the layout above your customrow.axml file is as shown below ?xml version "1.0" encoding "utf-8"? RelativeLayout xmlns:android d:layout width "fill parent"android:layout height "wrap content"android:padding "8dp" ImageViewandroid:id "@ id/Image"android:layout width "80dp"android:layout height "80dp"android:layout alignParentLeft "true"android:layout marginRight "8dp"android:src "@drawable/icon" / TextViewandroid:id "@ id/Text1"android:layout width "wrap content"android:layout height "wrap content"android:layout alignTop "@id/Image"android:layout toRightOf "@id/Image"android:layout marginTop "5dip"android:text "This is Line1"android:textSize "20dip"android:textStyle "bold" / TextViewandroid:id "@ id/Text2"android:layout width "fill parent"android:layout height "wrap content"android:layout below "@id/Text1"android:layout marginTop "1dip"android:text "This is line2"https://riptutorial.com/18
android:textSize "15dip"android:layout toRightOf "@id/Image" / /RelativeLayout Then you can design your main.axml, which contains a textview for the header and a listview.Hope that is easy.Next create your Data.cs class that will represent your row objectspublic class Data{public string Heading;public string SubHeading;public string ImageURI;public Data (){Heading "";SubHeading "";ImageURI "";}}Next you need the DataAdapter.cs class, Adapters link your data with the underlying viewpublic class DataAdapter : BaseAdapter Data {List Data items;https://riptutorial.com/19
Activity context;public DataAdapter(Activity context, List Data items): base(){this.context context;this.items items;}public override long GetItemId(int position){return position;}public override Data this[int position]{get { return items[position]; }}public override int Count{get { return items.Count; }}public override View GetView(int position, View convertView, ViewGroup parent){var item items[position];View view convertView;if (view null) // no view to re-use, create newview tomRow, null);view.FindViewById TextView (Resource.Id.Text1).Text item.Heading;view.FindViewById TextView (Resource.Id.Text2).Text item.SubHeading;var imageBitmap ById ImageView (Resource.Id.Image).SetImageBitmap (imageBitmap);return view;}private Bitmap GetImageBitmapFromUrl(string url){Bitmap imageBitmap null;if(!(url "null"))using (var webClient new WebClient()){var imageBytes webClient.DownloadData(url);if (imageBytes ! null && imageBytes.Length 0){imageBitmap BitmapFactory.DecodeByteArray(imageBytes, 0,imageBytes.Length);}}return imageBitmap;}}The most important part is inside the GetView Function, this is where you link your object to yourcustom row.https://riptutorial.com/20
The GetImageBitmapFromUrl is not part of the dataadapter but I have put this over here forsimplicity.At last we come to the MainActivity.cspublic class MainActivity : Activity{ListView listView;protected override void OnCreate (Bundle bundle){base.OnCreate (bundle);// Set our view from the "main" layout resourceSetContentView (Resource.Layout.Main);listView FindViewById ListView (Resource.Id.List);List Data myList new List Data ();Data obj new Data ();obj.Heading "Apple";obj.SubHeading "An Apple a day keeps the doctor away";obj.ImageURI n/editorials/star s view /2011/10/12/an apple a day nmyList.Add (obj);Data obj1 new Data();https://riptutorial.com/21
obj1.Heading "Banana";obj1.SubHeading "Bananas are an excellent source of vitamin B6 ";obj1.ImageURI ata obj2 new Data();obj2.Heading "Kiwi Fruit";obj2.SubHeading "Kiwifruit is a rich source of vitamin C";obj2.ImageURI g";myList.Add(obj2);Data obj3 new Data();obj3.Heading "Pineapple";obj3.SubHeading "Raw pineapple is an excellent source of manganese";obj3.ImageURI 76/276903/pineapple.jpg";myList.Add(obj3);Data obj4 new Data();obj4.Heading "Strawberries";obj4.SubHeading "One serving (100 g)of strawberries contains approximately 33kilocalories";obj4.ImageURI /18/5088/5088 dd (obj4);listView.Adapter new DataAdapter(this,myList);}Your final project structure is as show below.If everything is fine you should see the output as shownhttps://riptutorial.com/22
Read Custom ListView online: /custom-listviewhttps://riptutorial.com/23
Chapter 6: DialogsRemarksSetting the Context of the dialogWhen creating a Dialog from an Activiy we can use this as the context.AlertDialog.Builder builder new AlertDialog.Builder(this);With Fragments we use the property Context.AlertDialog.Builder builder new AlertDialog.Builder(Context);Button typescan be used for a simple notification and confirmation that the notification isread. SetPositiveButton() can be used for a confirmation for example: "Are you sure you want todelete this item?" SetNegativeButton() is for dismissing the dialog and cancelling it's action.SetNeutralButton()Disable cancel from backbuttonIf we want to make sure that the user can't dismiss the dialog with the back button we can callSetCanceable(false). This only works for the back button.RotationIf the screen is rotated whilst a dialog is visible it will be dismissed and the ok and cancel actionswill not be called. You will need to handle this inside your activity and re-show the dialog after theactivity has been reloaded.To get around this use a DialogFragment instead.ExamplesAlert dialogCreating an alert dialogAlertDialog.Builder builder new tral", (evt, args) {https://riptutorial.com/24
// code here for handling the Neutral tap});builder.SetPositiveButton("Ok", (evt, args) {// code here for handling the OK tap});builder.SetNegativeButton("Cancel", (evt, args) {// code here for handling the Cancel Read Dialogs online: /dialogshttps://riptutorial.com/25
Chapter 7: DialogsParameterscommonly used Public MethodUseSetTitle(String)Sets Title for the dialogSetIcon(Drawable)Set Icon for the alert dialogSetMessage(string)Set the message to display.SetNegativeButton(String, EventHandler)Set a listener to be invokedwhen the negative button of thedialog is pressed.SetPositiveButton(String, EventHandler)Set a listener to be invokedwhen the positive button of thedialog is pressed.SetNeutralButton(String, EventHandler)Set a listener to be invokedwhen the neutral button of thedialog is elListener)Sets the callback that will becalled if the dialog is smissListener)Sets the callback that will becalled when the dialog isdismissed for any reason.Show()Creates a AlertDialog with thearguments supplied to thisbuilder and Dialog.Show's thedialog.RemarksRequirementsNamespace: Android.AppAssembly: Mono.Android (in Mono.Android.dll)Assembly Versions: 0.0.0.0https://riptutorial.com/26
Public ConstructorsAlertDialog.Builder(Context) :Constructor using a context for this builder and the AlertDialog it creates.AlertDialog.Builder(Context, Int32) :Constructor using a context and theme for this builder and the AlertDialog it creates.Using Material Design AlertDialogIn order to use the modern AlertDialog:1. Install Support v7 AppCompat library from the NuGet packages2. Replace AlertDialog with Android.Support.V7.App.AlertDialog or add the following statementat the top to make your dialog shine.using AlertDialog alog// 1. Instantiate an AlertDialog.Builder with its constructor// the parameter this is the context (usually your activity)AlertDialog.Builder builder new AlertDialog.Builder(this);// 2. Chain together various setter methods to set the dialog dialog message).SetTitle(Resource.String.dialog title);// 3. Get the AlertDialog from create()AlertDialog dialog builder.Create();dialog.Show();Simple Alert Dialog ExampleWe shall create a simple Alert Dialog in Xamarin.AndroidNow considering you have gone through the getting started guide from the documentation.You must be having the project structure like this:https://riptutorial.com/27
Your Main Activity must be looking like this:public class MainActivity : Activity{int count 1;protected override void OnCreate(Bundle bundle){base.OnCreate(bundle);// Set our view from the "main" layout resourceSetContentView(Resource.Layout.Main);// Get our button from the layout resource,// and attach an event to itButton button FindViewById Button (Resource.Id.MyButton);button.Click delegate { button.Text string.Format("{0} clicks!", count ); };}}Now What we shall do is, instead of adding one to the counter on button click, we shall ask user ifhe wants to add or substract one in a simple Alert DialogAnd on Click of the Positive or the negative button we will take the action.button.Click delegate {AlertDialog.Builder alert new AlertDialog.Builder(this);alert.SetTitle("Specify Action");alert.SetMessage("Do you want to add or substract?");alert.SetPositiveButton("Add", (senderAlert, args) {count ;button.Text string.Format("{0} clicks!", count);});alert.SetNegativeButton("Substract", (senderAlert, args) {count--;button.Text string.Format("{0} clicks!", count);});Dialog dialog riptutorial.com/28
https://riptutorial.com/29
Chapter 8: How to correct the orientation of apicture captured from Android deviceRemarks1. This app sample is available on my GitHub tureOrientationApp2. Xamarin Mobile component documentation is available mobileExamplesHow to correct the orientation of a picture captured from Android deviceThis example shows how to take image and display it correctly on the Android device.Firstly we have to create sample application with one button and one imageview. Once user clickson the button camera is launched and after user selects picture it will be displayed with the properorientation on the screen.1. Add button named "TakePictureButton" and imageview named "TakenPictureImageView":https://riptutorial.com/30
2. Now open activity code behind:Here firstly get reference to your controls:ImageView takenPictureImageView;Button takePictureButton;protected override void OnCreate(Bundle ureImageView FindViewById ImageView ton FindViewById Button Click delegate{takePicture();};}3. In our application we will use Xamarin Mobile component available in the Components Store:https://riptutorial.com/31
4. Once you add it to the project we can move on. Add below code which is responsible forlaunching camera. This method should be invoked in the button click as you can see in theabove code:void takePicture(){var picker new MediaPicker(this);DateTime now DateTime.Now;var intent picker.GetTakePhotoUI(new StoreCameraMediaOptions{Name "picture " now.Day " " now.Month " " now.Year ".jpg",Directory null});StartActivityForResult(intent, 1);}5. Once user takes picture we should display it in the proper orientation. To do it use belowmethod. It is responsible for retrieveing exif information from the taken image (includingorientation during the moment of taking picture) and than creating bitmap with the properorientation:Bitmap loadAndResizeBitmap(string filePath){BitmapFactory.Options options new BitmapFactory.Options { InJustDecodeBounds true };BitmapFactory.DecodeFile(filePath, options);int REQUIRED SIZE 100;int width tmp options.OutWidth, height tmp options.OutHeight;int scale 4;while (true){if (width tmp / 2 REQUIRED SIZE height tmp / 2 REQUIRED SIZE)break;width tmp / 2;https://riptutorial.com/32
height tmp / 2;scale ;}options.InSampleSize scale;options.InJustDecodeBounds false;Bitmap resizedBitmap BitmapFactory.DecodeFile(filePath, options);ExifInterface exif null;try{exif new ExifInterface(filePath);string orientation trix matrix new Matrix();switch (orientation){case "1": // landscapebreak;case "3":matrix.PreRotate(180);resizedBitmap dth, resizedBitmap.Height, matrix, false);matrix.Dispose();matrix null;break;case "4":matrix.PreRotate(180);resizedBitmap dth, resizedBitmap.Height, matrix, false);matrix.Dispose();matrix null;break;case "5":matrix.PreRotate(90);resizedBitmap dth, resizedBitmap.Height, matrix, false);matrix.Dispose();matrix null;break;case "6": // portraitmatrix.PreRotate(90);resizedBitmap dth, resizedBitmap.Height, matrix, false);matrix.Dispose();matrix null;break;case "7":matrix.PreRotate(-90);resizedBitmap dth, resizedBi
Xamarin.Android allows you to create native Android applications using the same UI controls as you would in Java, except with the flexibility and elegance of a modern language (C#), the power of the .NET Base Class Library (BCL), an