Transcription
Excel Payroll Program InstructionWelcome to Excel PayrollBook!Congratulations! You are choosing a way to process your payroll without paying fees.About the ProgramThis is a DIY Excel payroll program. No payroll fees, no payroll charges, and no monthly fees! It isrunning in Ms Excel. It is easy, simple, accurate, and reliable!This program was originally designed for educational purpose. It was created especially for payrolland Excel classes. Students can use it for their payroll projects or Excel programming courses.After a few quarters using this program in college classrooms, I felt that it might be a good idea toconvert it for small companies or non-profit organizations to process their payrolls. This idea wasencouraged and supported by my colleagues. I cut out some scholar theory modules and tailoredsome academic features and replaced them with some practical functions to cater the needs in thereal business world. This free version of Excel Payroll Program was thus born.This Excel Payroll Program Includes EVERYTHING you need!This Excel Payroll Application does all for you: Keeps payroll records and payroll registers Prints payroll checks and generates payroll accounting entries Generates accrual vacation and used vacation reports 940, 941, and DE-9, tax liabilities, payroll summary and detail reports Prints W-2 Forms with W-3 information reports. Worker’s compensation insurance premium calculation reports Customized selection reports. 401K match and calculation; 125P, HSA or garnishment deductions All reports in Excel format and are usable at your own willFeel free to make copies and give this program to accounting students, Excel learners or whoeverlikes to use this program for his/her small business.1Questions or Comments: DanielChao@hotmail.com or www.ExcelPayroll.Org
Excel Payroll Program InstructionIndexI.What’s in the package . . . (3)II.Start . (3)III.Setup a Company . (3)IV.Update the Tax Rates . . (8)V.Print Payroll Checks . (9)VI.View Employee Records, Register, and Other Reports. (13)VII. Pay Employee in a Batch (14)VIII. Understand and Use the Files (15)IX.Mini Practice Set . (16)X.Advanced Topics (19)2Questions or Comments: DanielChao@hotmail.com or www.ExcelPayroll.Org
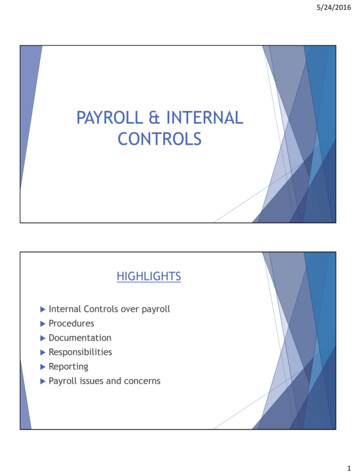
Excel Payroll Program InstructionI.What’s in the package:a. Excel Payroll.zip includes Four (4) Excel files: PayrollBook.xlsm, Payroll Record.xlsm, PRRecord.xlsm,and Payroll Time Card.xlsm. These four files must be in the same folder.b. One (1) PDF file: Excel Payroll Instruction.pdf (this instruction menu)II.StartUnzip the Excel Payroll.zip file and copy all the four Excel files into a folder where you like to store your ExcelPayroll Program in your C: Drive. Example C:\ABC Company\Payroll\You may change the folder name or path, but do not change the names of the files.That’s all you need to do! No installation is needed!III.Setup a companyStep 1. Open the program file from your folder: PayrollBook.xlsm (see figure 1)This is the main page of the program:ProgramMain Page3Questions or Comments: DanielChao@hotmail.com or www.ExcelPayroll.Org
Excel Payroll Program Instruction(Figure 1)Sept 2. Click the [ Setup] buttonCompanySetup Page(Figure 2)Step 3. Enter information in the green areas,Click [Save] or [Cancel] to return to previous page when finish.Please see the sample company information entered in the default setting. You can only enter information in the greenareas. The pink areas (cells) are to be computed by Excel macro.Deduction: There is no need to enter the deduction items if you don’t have any. If a tax item is checked the deductionis not subjected to that tax. The right column shows the maximum amount for each employee can deduct during apayroll year. Please see the sample entered.Vacation accrual: the first green column “Yr of Srv” stands for “Year of Service” from the date of hired. Please see thesample entries. In the “Order” column line 1, the entry 1 for the 1st year of service accruing 40 hours; after one year,starting the 2nd year ( 2 in order line 2), accruing 80 hours per year until the 5th year (after the 4th anniversary); startingthe 5th year of service, 120 hours and so on.4Questions or Comments: DanielChao@hotmail.com or www.ExcelPayroll.Org
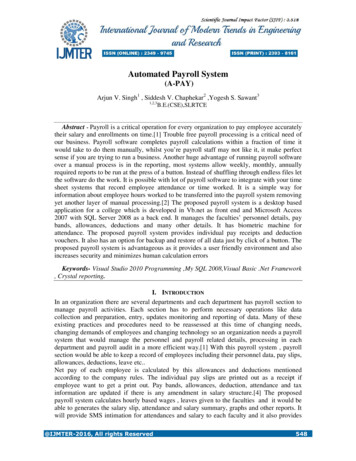
Excel Payroll Program InstructionPayroll Period: You may select different payroll periods from weekly, bi-weekly, monthly quarterly, or annually. This isfor payroll tax computation purpose only. It has nothing to do with when and how often you pay your employees.Standard Check: Check format preset for QuickBook, Quicken, Peachtree, SBT, Great Plains, Platinum, and other selfdesign check formats. You may select one of them to print your check. You may even make adjustments after yourselection if the print-outs do not match the positions on your check.Customize Check: You can design your own brand-new check layout by clicking this button. You can print out yourcheck any way you prefer. To do this, selection “Customize” and click on [Check Setup]:(Figure 3)After you click the [Check Setup] button, (see figure 3) what you need to do is to drag and move theselected information you want to where you want to print on your computer check.After you select, move, or format the information you prefer, please make sure you select and set the PrintArea, under “Page Layout” “Print Area” “Set Print Area”. Also you may use Excel menu to do a few testprint pages to make sure the information printed properly at the right positions on your check.5Questions or Comments: DanielChao@hotmail.com or www.ExcelPayroll.Org
Excel Payroll Program InstructionThe information in red ink is only the description for you to understand as a note. They won’t change duringthe payroll process. The information in black ink will change from check to check (or payee to payee). Incase you forgot the description, make a mistake, or want to reset your check design, you may click the[Restore Default] button to restore the information and the positions back to where they were before. Youchange the width, high or positions of the printing information.You may also rearrange any of the pre-designed checks from standard check formats as well as thecustomized check. The following picture (figure 4) shows the selected QuickBook check and it can be repositioned by moving the information to the wanted positions. Please make sure select an area to be set as“Print Area” for payroll check. (The default setting is the blank area to be printed)You can drag these cellsto wherever you want toprint on the check. Youmay use “cut and paste”method if it’s needed.Click on [Restore Default] torestore the manufacturer’sdefault format if neededSelect the blank area asprint area in Excel.Make test prints toconfirm if the positionsare correct.(Figure 4)Click [Return] when finish your check setting. You may save your settings through Excel when you makechanges. Make a test print and generally you should only set to print one page per check print.6Questions or Comments: DanielChao@hotmail.com or www.ExcelPayroll.Org
Excel Payroll Program InstructionRenewRenew Button (figure 2):This button is for renewing or upgrading your program. You onlyneed to renew the program when it comes to expiration or upgrading is needed. You don’t need to renewor upgrade unless you want.Year Close Button: (figure 2)Year CloseYou only need to use this button once a year. However, you must close the year after December 31st of thepayroll year or after the last payroll check was printed before you can select a new payroll year. It is a goodidea to process some dummy entries, cut some dummy payroll checks, and generate some reports; thenclose the year. Try this a few times to practice before use. Once you close, you may select a new year.If you want to close the year Click “OK” and then “Yes” to continueType the word “close” to confirm the closing.You may do this as many times as you want when you are practicing on this payroll.It is important to know that when you close the payroll year, the program will export your current year datato a year end file “Payroll Data Year YYYY.xlsm”. Your current payroll program will then no longer keep anyof your payroll data (except employee information) and it will be ready for a new payroll year. If you closemore than once, the file for the same year will be replaced and your payroll data from the previous year willbe lost. If you are unsure if you have closed the year, you can check it out by either seeing if the data fileexists in the program folder, or selecting a new year to see if you are allowed (You are not able to select anew payroll year if the program contains payroll data from a different year; if you are able to select a newyear, that means the previous payroll has been closed.)7Questions or Comments: DanielChao@hotmail.com or www.ExcelPayroll.Org
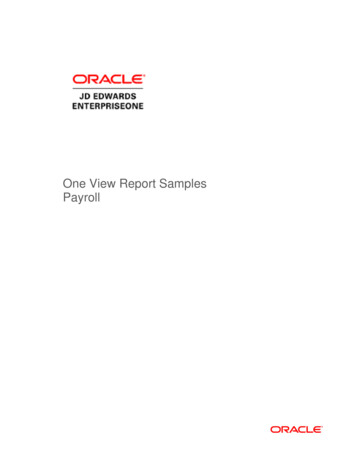
Excel Payroll Program InstructionSelect Payroll Year: (figure 2): You can select a new payroll year after you close the year. You may use thisprogram to redo your previous years of payroll (for keeping record purpose). You can always select up to 7years backward and up to 2 years forward.IV.Update the Tax RatesClick on the “PR Tax Rate” button in main pagePR Tax RateFill out green areas (cells) for the payroll year. You may get the information from IRS web site: www.irs.govTax RateSetup Page(Figure 5)Get these from your state EDD web site, for California: http://www.edd.ca.gov/payroll taxes/You may do this yourself so that you don’t need to pay an annual fee to have someone to do it for you. Click [Save] or[Cancel] when you have finished. Or click import tax table (figure 6) if you have a 20XX Tax Table.xlsx fileYou can get this 20XX Tax Table.xlsx file every year at www.ExcelPayroll.Org at the end of each year to update your taxtable automatically. Make sure you put this file in the same directory of your payroll program. Once you click on this8Questions or Comments: DanielChao@hotmail.com or www.ExcelPayroll.Org
Excel Payroll Program Instructionbutton, the program will search the same year as you selected in the setup page. So make sure you select a new payrollbefore you click this button or your rate will not be updated to the latest year.(Figure 6)V.Print a Payroll CheckClick on [Payroll] button:Payroll(Figure 7)A special feature of this program is that you can cut a payroll check at any time. Unlike ADP or other payroll programthat you have to select a pay period or to define a pay date before you can print a check, there is no payroll period or9Questions or Comments: DanielChao@hotmail.com or www.ExcelPayroll.Org
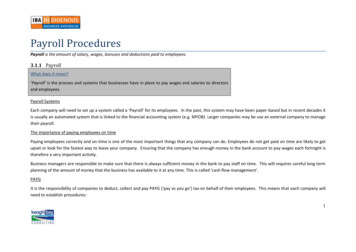
Excel Payroll Program Instructionpayroll date to select. You can enter any date as payroll date on the payroll check. Your payroll liabilities occur as thesame dates as your payroll check dates. You may even reprint or redo your old payroll records in back years.For example, if today is June 23, 2018 you may redo your payroll for January 2011 as if you were paying in 2011 forrecord keeping purpose.Selection Page(Figure 8)Step 1: Select an employee in the selection dialog window and then click the [Pay] button.See yellow arrow (figure 8):PayIf the employee is not in the selection window, click the [Add] button to add an employee. See (figure 9) after you clickon [Pay]:10Questions or Comments: DanielChao@hotmail.com or www.ExcelPayroll.Org
Excel Payroll Program Instruction*Select an item*Enter time*Click ProcessAdjustment AreaPay PeriodTax withholdingsPay rateBlock deductions(Figure 9)Step 2: Payroll data are to be entered in the green areas (cells)Enter the Date (the default is the current date)Enter a Check Number (the default is the next check number from the last print)Step 3: Adjust pay period, taxes withholding or pay rate or deductionsThe pay period (pay frequency) is shown as what you selected in the setup page. You may change it for aparticular purpose for each individual employee during the payroll. For example, if you had selected a weekly payrollbut you are paying a commission on this paycheck that is only happening once a month, you may want to select“monthly” for this particular paycheck so that the amount of payroll taxes can be properly withheld.11Questions or Comments: DanielChao@hotmail.com or www.ExcelPayroll.Org
Excel Payroll Program InstructionIncome tax withholding (FIT and SIT) may also be overwritten if you enter percentages in this adjustment area(see figure 9). You may also block deductions for some checks.The rate is the default rate when you add/edit an employee in the employee record. If you want to change therate for this particular paycheck you may do so.Step 4: Enter hours or Amount:Select the type of pay in the Item column and enter the hours in decimal format in the next Hour column (greenarea section). There is no need to enter a rate in the Rate column if the rate is the same as the default rate in cell“G9”(the default rate is being used if it is blank or zero). You may enter a new rate for a particular type of time for thispay if it is different from the default. The Amount column will be calculated by the new rate if it is entered. If youenter an amount in the Amount column, then no hour or rate should be entered. For example, if you are paying 500commission for the employee you may not enter the hour or rate but just the amount. So you will leave the hour andrate columns blank , and only enter 500 in the Amount column.Step 5: Select “Check Format” and Click [Process] button:ProcessYou may select the “Standard” or the “Customized” format to print your payroll check.[Show Deduction and Net Pay] button: you may click this button to see the calculations and make changes if necessarybefore you process this paycheck. You can cancel it by clicking the [Cancel] button to return to the previous menu. Clickon [Process] button to process the payroll or print payroll check:12Questions or Comments: DanielChao@hotmail.com or www.ExcelPayroll.Org
Excel Payroll Program Instruction(Figure 10)After you click the [Process] button, there will be a pop-up message asking you if you want to print a check:If you have already paid the employee with a manual check or if this is an old payroll record to redo the process, thenyou may want to choose “No” without printing an actual check while the payroll is recorded in this payroll program.It will always ask you again if you want to reprint a check in case the check is jammed or damaged during the printingprocess or you may change your mind after the payroll processed:13Questions or Comments: DanielChao@hotmail.com or www.ExcelPayroll.Org
Excel Payroll Program InstructionClick on [No] if do not wish to reprint the check again.Step 6: Reprint a check after processed:Click on [Pay in Batch] Select a check number to reprintVI.To view an employee Record, Employee List, View Entry, Payroll Register, or print940 and 941 Report.Click on the following four (4) folders to view the frequent reports:EmployeeRecordEntryRegisterYou also get a customized report by select a period (between the check dates) and generate a report on a separated(export) Excel workbook:(Figure 11)14Questions or Comments: DanielChao@hotmail.com or www.ExcelPayroll.Org
Excel Payroll Program InstructionVII.Pay employees in a batch:Click the [Pay in Batch] button:Pay in BatchEnter the hours in the green areas (cells), You may want to click “Pre-process Report” : Pre-process Reportto review the payroll report before you click [Process Batch PR] Process Batch PRPayroll inBatch Page(Figure 12)VIII. Understand the files:There are two types of files: Macro Programming files and Data files15Questions or Comments: DanielChao@hotmail.com or www.ExcelPayroll.Org
Excel Payroll Program Instruction(a) Macro Programming files:There are four Excel files working together to make this program work:PayrollBook.xlsm – Main programming file (Major file, most of the macros stores in this file)Payroll Record.xlsm – Supporting file (Supports the main file, the current payroll data store in this file)PRRecord.xlsm – supporting file (supports the main file, it’s a setup file when you start or close a year)Payroll Time Card.xlsm – supporting file (supports the main file, time card and costing data store here)These four files must be stored in the same folder. You may use any folder name at your own preference; but you maynot change file names. Before you start, please copy these files into a folder where you would like to store the programand your payroll data. (Such as in C:\Excel\ABC Company\Payroll\)If you have more than one company, you may make one folder for each company and store all files in each folder. Suchas (C:\Payroll\ABC Co\; C:\Payroll\XYZ Co\; )Open PayrollBook.xlsm to start your payroll process. In fact, you should always open this file to begin your payrollprocess and you will not need to deal with the other three files. The other three files are the working files that supportPayrollBook.xlsm within the macro program.All other files are data files if more files saved either by you or the program. You may open data files for your own use.There are three types of data files:(b) Data files:There are three kinds of data files: Timecard (employee timecard daily hour records), Payroll record and Payroll register,and Job Costing files. You may open these files at any time for your own use.1, time sheet file: its format as “WKYY-MM-DD .xlsx” (example: “WK12-11-16.xlsx” payroll time card data for weekending Nov. 16, 2012). It is saved when you post the weekly time card.2, payroll record and register file: All the current (year) data are kept in the “Payroll Record.xlsm” programming fileuntil you close the year. Once you close the payroll year, payroll records and register are posted into a file “Payroll DataYear YYYY.xlsm” (where YYYY is the year, such as “Payroll Data Year 2012.xlsm”). Please note that a payroll must beclosed after December 31 before you can start/select a new payroll year.3, job costing file: All the current (year) data is kept in the “Payroll Time Card.xlsm” programming file until you extractthe data for your own use. Data is saved in “CostYYMMDD.xlsx” (example “Cost121201.xlsx” containing all data from lastsaved to December 1, 2012). It lists job numbers, direct labor hours used by employees, and by types of equipmentused.16Questions or Comments: DanielChao@hotmail.com or www.ExcelPayroll.Org
Excel Payroll Program InstructionIX.Mini Practice SetIt is highly recommended that you should practice on the program a few times before you starting printing a real payrollcheck.1. Enter the following company in setup:XYZ Company1111 Sample StreetSan Francisco, CA 94106Tax ID: 94-1111111, CA ID: 152-123456Select QuickBook check in the standard format. Leave all other settings as they are.2. Add John Smith as a new employee in the green area:Add RecordPage17Questions or Comments: DanielChao@hotmail.com or www.ExcelPayroll.Org
Excel Payroll Program InstructionClick on [Save] when finish.3. Delete Linda and put Peter as inactive employee.Step 1: Select Linda (highlighted Linda) in the selection window and make sure Linda’s information is shown inthe display window on the upper right corner.Step 2: Click on [Delete] buttonStep 3: Click on “Yes” from the pop-up message to confirm the deletion.4. Pay John Smith:Select the current date as the pay date and don’t change the check number:Enter the following times:RegularOTHour38.751Step 1: Select John Smith in the selection windowStep 2: Click on [Pay] buttonStep 3: Click on cell “G4” to select or enter the current date as the pay dateStep 4: Leave check number and the pay rate as they are (You may change them if you would)Step 5: Select “Regular” and enter 38.75; select “overtime” and enter 1Step 6: Click on [Show Deductions and Net Pay] to view the total or detail.Step 7: You may change the date, check number, hours, or rates if they are incorrect in Step 6Step 8: Click on [Process] button to process the payroll and click “Yes” to print a check.Note: Step 6 and 7 are an optional; you may skip them to Step 8 if you are sure the information are correct.5. Pay all employees using the batch methodStep 1: Click on [Pay in Batch] buttonStep 2: Enter 40 regular hours for each employeeStep 3: Don’t make any changes on date, check number and other settings.Step 4: Click on [Run Pre-Process] to view the detail before process the batch (Optional)Step 5: Click on [Process Batch PR] button to process and print checks.6. Void John’s paycheck in 4 aboveStep 1: Select John Smith in the selection windowStep 2: Click the “Record” FolderStep 3: Select (highlight) the first date from the selection window on the upper left cornerStep 4: Click on [Void] button and click “Yes” to confirm the void actionStep 5: Click on [Return] back to selection page7. View Folders and Get Payroll Reports Click on each “Folder” on the left side of the selection page to view reportsAlways click [Return] back to the selection page18Questions or Comments: DanielChao@hotmail.com or www.ExcelPayroll.Org
Excel Payroll Program Instruction X.Select a reporting period or enter dates in cells “D8” and “D9”; then select a report and click on [Get Report]All reports are in Excel format; you may save them for your own use at your option.Advance Topics1. Make accrued vacation adjustmentsThere are two ways to make vacation adjustment at your option: Select an employee from the selection page and click on [Edit] button; change the “Vacation Used” in theblue Cell “E16”. This is accumulative balance of hours used. This program uses a perpetual method to keeptrack the vacation balance. (net balance total vacation accrued – total vacation used). The positive balancein Cell “E16” is the hour used; not the net balance. The second way to do is to adjust the “Length of Service”. You may change the “Date of Hire” in cell “E15” toreflect the total accrued balance.2. Close the payroll year and Select a new payroll yearThis program is on a calendar year base. You must close the current year before you can select a new payrollyear. To do this, from this main page click on [Setup] and then click on [Year Close], you will be prompted forwarming. Click “OK” to continue and type in “Close” to confirm the closing.Once the year is closed; your current year data will be saved as “Payroll Data Year YYYY.xlsm”. If you close morethan once for the same year the new file will replace the old one automatically.3. Manage payroll dataIt is recommended to make backup files. To culitivate a good habit of making back up files, you may need 3-5moveable storage drives and marking them with Monday, Tuesday, Wednesday, Thursday, and Friday. If youmake a payroll on Monday, copy all files onto your Monday drive or if you make a payroll on Thursday, copy allfiles onto your Thursday drive. Make sure you always make copies after you each payroll.You may open and use all data files for your own use. All files are in Excel format.4. Trouble shootingSetup Error: if it is a setup error you may not be able process payroll. These problems are likely to be the setupinformation error:(a) Make sure data are within the parameter and within the program limit:(b) Make sure numeric data are in number value rather than text or strings:(c) Make sure numbers are in sequential order:Selection Error: If the display employee information do not match the selection please click “Selecting by”option: First, Last, Phone, Account a few times to refresh the display window.Other Error: Contact DanielChao@hotmail.com19Questions or Comments: DanielChao@hotmail.com or www.ExcelPayroll.Org
Excel Payroll Program Instruction5. Manage more voluntary deductions:The major concept of this program is to keep the payroll process easy, simple, and brief. The four types ofvoluntary deductions should be classified as:Deduction 1: 401K deduction type – Tax exemption: pre-income taxes (Federal and States)Deduction 2: All tax exemption type – Income taxes, FICA taxes, Local taxes, FUTA, and SUTA.Deduction 3: Partial tax exemption type – Such as Health Saving Account contribution.Deduction 4: Post tax deduction type – Loan Payment, garnishment and other deductions.Based on these 4 types of deductions, you should be able to manage all the needs of your payroll deductions.For example, if you have many insurance co-pays, loans and garnishments, the enclosed supplementaryspreadsheet should be able to help you keep your subsidiary clear:John SmithItemDeduction 1Deduction 1Deduction 2All pre-tax type(Such as 125 PCafeteria FSA)Deduction 2Deduction 3(partial taxable)Deduction3Deduction 4(Post taxDeductions)Deduction t3Loan 1Loan 2Loan 3Loan 4Loan 5TotalBalance/Limit YTD total17,500.00172.0017,500.00172.001,260.00 Enter this 0500.0019,760.00Payroll1 Payroll2 Payroll3 Pay 86.00 86.0086.0086.0048.46Enter this amount as9.239.23as the limit amountthe Deduction .00----Enter the total in red ink as the Maximum limit and the subtotal highlighted in yellow as the deduction amount for eachpayroll. This spreadsheet can be downloaded at www.ExcelPayroll.OrgFile Name: Voluntary Deduction Subsidiary Template.xlsx20Questions or Comments: DanielChao@hotmail.com or www.ExcelPayroll.Org
Excel Payroll Program Instruction6. Pay salary employees:Salary employee payroll: This Excel Payroll program does not limit the ways of paying your employees. Becauseyou can pay your employees anytime at any pay period, you can just simply select {regular} pay type and enter aflat salary amount (without entering the hour). If you are using the batch payroll method, you may either clickthe salary check box or enter the full hours for your salary employees. (40 for weekly, 80 for bi-weekly, or 173.33for monthly or 86.67 for semi-monthly payroll etc. for salary employees)7. Handle Mid-year conversion: If you did a manual payroll or other system showing a record as below (JohnSmith), you may convert it into this Excel Payroll program by entering the quarterly balance in a single process.JohnSmithSSN:500-200-10005005 Mallard Creek Dr, Oakland CA 94607Tax /20131,630.2198.072/15/2013960.533/1/2013DOH:Other DeductionSIT02/26/08PaymentSDI401K125PHSAOtherNet 2.551,287.2213501Q /20132Q TotalEdit the deductions to flat amount as follow:401K 335.26125P 269.5021Questions or Comments: DanielChao@hotmail.com or www.ExcelPayroll.Org
Excel Payroll Program InstructionHSA 70.00Other 87.85Select and Pay:Date 3/31/20XX (Select or enter the last date of the quarter)Check number 1350 (optional to enter the last check number of the quarter)Regular Wage 11175.03 (without entering hours)Withholding overwrite:FIT withhold 5.6168% (627.68/11175.03, enter 4 or more decimal digits with percentage to keep it as accurate aspossible)SIT withhold 4.0000% (447.00/11175.03, you may not see all the digits, but you may still enter them)Click on [Process] button to process the total wages for the quarter and click ‘No’ and ‘No’ to defer printing anactual check.Repeat the same step to enter the 2nd quarter. Please make sure you change/edit the deductions back to normaldeduction rate when you finish entering the quarterly payroll.8. Use Timecard optionBy using the timecard option, you can save employees’ hour history and also keep track of your project (job)cost, records of hours incurred on each job or project, and keep history of your employee’s timecard hours.There are four (4) sheets in the Timecard File if you use the timecard option:a) Timecard: You will enter all time/hours for each employee hereb) JobList: It is optional. Enter your job list here and you can keep record of job costs.c) LaborType: It is optional. Enter your labor type here to keep tracks of what hours on your job costd) EquipmentType: it is optional. Enter your equipment type to keep record of equipment hours.After you enter all employees’ hours for the selected week, click on [Weekly Post] button to post the time.Once t he weekly posting is done, you may click on the [Return] button to the payroll page and do your payrollin batch. You can select the weeks for each payroll to process your payroll without entering hours again.Please note that a seven (7) minute rule is used in this timecard program. If the exact time is 3 hours and 8minutes, it rounds to the nearest quarter as 3.25 hour (3 hour 15 minute) or if the exact time is 3 hours and 7minutes, it rounds to the nearest quarter as 3.00 hour (3 hour 0 minute).22Questions or Comments: DanielChao@hotmail.c
One (1) PDF file: Excel Payroll Instruction.pdf (this instruction menu) II. Start Unzip the Excel Payroll.zip file and copy all the four Excel files into a folder where you like to store your Excel Payroll Program in your C: Drive. Example C:\ABC Company\Payroll\ You may change the folde