Transcription
THE WOODWORKER
THE WOODWORKERThe Charles H. Hayward Years: 1939-1967
First published by Lost Art Press LLC in 201626 Greenbriar Ave., Fort Mitchell, KY 41017, USAWeb: http://lostartpress.comTitle: The Woodworker: The Charles H. Hayward YearsPublisher: Christopher SchwarzEditor: Megan FitzpatrickDesign: Linda Watts, Meghan BatesResearch: Megan Fitzpatrick, Phil Hirz, Christopher SchwarzDigitization: Ty BlackDistribution: John HoffmanText and images are copyright 2016 by The WoodworkerISBN: 978-0-9906230-8-3First printing.ALL RIGHTS RESERVEDNo part of this book may be reproduced in any form or by any electronicor mechanical means including information storage and retrieval systemswithout permission in writing from the publisher, except by a reviewer, whomay quote brief passages in a review.This book was printed and bound in the United States.
Table of ContentsForewordSharpeningSetting Out Tools & ChiselsPlanesSawsBoring ToolsCarvingTurningVeneering & InlayGeneral TechniquesMiscellaneous Tools & Techniquesvi175144251287306377389458814
FOREWORD TO ‘THE WOODWORKER:THE CHARLES H. HAYWARD YEARS’There is little doubt that Charles H. Hayward (1898-1998) was the most important workshop writer and editor of the 20thcentury. Unlike any person before (and perhaps after) him, Hayward was a trained cabinetmaker and extraordinary illustrator, notto mention an excellent designer, writer, editor and photographer.Add to all that the fact that Haywardwas, according to Robert Wearing, a “workaholic,” and you have a good picture as towhy we spent almost eight years laboring tobring this book to life to honor his work.As editor of The Woodworker magazinefrom 1939 to 1967, Hayward oversaw thetransformation of the craft from one thatwas almost entirely hand-tool based to atime where machines were common, inexpensive and had displaced the handplanes,chisels and backsaws of Hayward’s trainingand youth.While Hayward didn’t mind machines(he wrote the book “Light Machines forWoodwork” (Evans Bros. 1952) after all), he never stopped filling the pages of his magazine with information on hand tools,joinery and finishing that is difficult to come by today, evenwith the Internet to help us.The early 20th century was an important time in the historyof handwork because we finally had automated machines thatcould turn out well-made woodworking tools at prices that theworking class could afford. With these machines, firms such asStanley and Record flooded the world with tools that allowedalmost anyone to be a woodworker. (It was, of course, theseautomated machines that almost killed hand-tool woodworking, but let’s set that aside for a moment.)Hayward and his contributors took great pains to teach readers how to use these hand tools, whether it was a jack plane, aStanley 45, a metallic side-rebate plane or a quirk router. Thissort of information was rarely written down, and much of itwas lost in decaying magazines or cemeteries.The book you hold in your hands, the first of several volumes, seeks to reprint a small part of the information Hayward published in The Woodworker during his time as editor inviThe Woodworker: The Charles Hayward Yearschief. We have tried to organize it into sections on tools, techniques and projects that you will find useful. But most of all wesought to capture the spirit of Hayward’s tenure at The Woodworker without excessive editing or watering down of the text.As a result, you will find stylistic inconsistencies throughout.Should a tool we call a “straightedge” be written as “straightedge,” “straight-edge” or “straight edge?” All three appear inthe text, as do a thousand other inconsistencies that we couldhave unified into some homogenous whole.But we didn’t. The English language and the tools it describesare always in flux. And so we reproduced all of the text exactlyas it appeared when published. Yes, some of it might seem sexistin the 21st century. Some of the words are spelled oddly. Andsometimes simple articles are dropped, as was common at thetime (“Take gouge and mark ”).Like it or not, writing is like that. Writing styles, punctuation and even grammar rules change. So we left the text as-isfor you to interpret and enjoy.That is not to say we had an easy time editing this project.The genesis of this book occurred before John Hoffman andI formed Lost Art Press. We were frustrated with the books
available to teach us the details of handwork. We decided tochase after republishing Robert Wearing’s “The EssentialWoodworker” and some of Hayward’s classic writings. GettingWearing’s book revised and republished was easy – Wearing isstill alive and he was happy to help.But Hayward had died in 1998, so things were more difficultthan we could have imagined.In the end, we made a deal with the current owners of TheWoodworker magazine to republish the articles in this volume.That was the easy part. Which articles? And how should wepresent them?A group of us took on the project on nights and weekends. Megan Fitzpatrick, Phil Hirz and I spent weeks combing through the original texts, compiling the articles that wereimportant and organizing them into something you could readwithout buying 27 years of rare magazine issues and boilingthem down for yourself.After a couple years of work, Ty Black took on the monumental task of scanning the text and processing all the classic images from the magazines. This process alone took almosta year.Then we had to double-check all the scanned text and imagesagainst the originals. John spent months of his life at the computer comparing the scanned text to the originals from Hayward’s typewriter.And then it needed to be designed so you could easily digestit. Graphic artists Linda Watts and Meghan Bates both spentmonths puzzling together all of the text and images into whatyou have here.There were many more steps, but I won’t bore you with them.What’s important to know is this: We tried to reproduce faithfully the articles that Hayward wrote and edited. There are stylistic inconsistencies. If you care about these small details, thisbook is not for you. Return it to us for a full refund.We hope that you will enjoy “The Woodworker: The CharlesHayward Years.” But we mostly hope that it will inspire you topick up the tools and get busy. As Hayward said in 1980:“I think that books are useful, but I certainly think that, likeanything else, the skill to do comes from actually doing. Bookscan guide you, explain about techniques, tools, materials, –present ideas, steer you away from pit-falls Books include agreat deal of valuable information but it is up to the reader toapply that information.”We could not agree more. Hayward says his first project wasa coffin-shaped bed he built for the family cat as a young boy.And after his eyes had failed him and he could not write, editor build furniture, he received a visitor in the 1980s who saidHayward was “in his 80s, painting the guttering of his house.”I hope to go to my ultimate reward in the same way.Christopher Schwarz, publisherJanuary 2016Hayward’s Life, In Brief1989: Born Pimlico, London. Apprenticed tothe Victoria Street firm Old Times FurnishingCo. with workshops in Bloomburg Street. Hayward spent four years there and then went intothe army for three years as a driver in the artillery, riding a horse.1923: Began his own cabinetmaking businessbut did not like it. “I was no good at business.”Began creating illustrations for “The WirelessEncyclopedia.”1925: Became a contributor to HandicraftsMagazine in Kentish Town.1930: Named editor of Handicrafts Magazine.1935: Named associate editor at The Woodworker magazine under J.C.S. Brough.1936: Writes “English Period Furniture.”1939: War breaks out. Brough flees for Scotland with his ill wife. Hayward named editor ofthe magazine. He never misses a single issue during the war, despite the lack of raw materials.1946: Writes “Tools for Woodwork.”1947: Writes “Cabinetmaking for Beginners”1949: Writes “Woodworkers’ Pocketbook”1967: Hayward retires from The Woodworkerbut continues to write articles for the magazine.FOREWORDvii
viiiThe Woodworker: The Charles Hayward Years
TOOLS & TECHNIQUES:SHARPENINGA Really Sharp Edge 2Sharpening Your Tools:Obtaining a Keen Edge. 4The Scraper. 40How I Sharpen my Tools. 6Chisels and Gouges. 42Hollow-ground Cutting Edges. 8Bits. 43Sharpening Your Tools:Can You Produce a Keen Edge?. 10Planes. 44When Your Plane Needs Sharpening. 13Sharpening the Chisel. 15Getting the Best out of Your Work:Your Tools. 15Sharpening Your Tools:Wood Carving. 18How to Sharpen Moulding Plane Cutters. 20Sharpening the Tools. 21Wood Carving:Sharpening the Tools. 24Sharpening Your Saws. 28Keep Your Saws Sharp. 29Setting Your Saws in Wartime. 32Sharpening your Saws. 33Sharpening a Lightning Cross-cut Saw. 35The Scraper:Sharpening. 36How to Sharpen the Scraper. 38Simple Home-made Saw Vice. 39How I Sharpen my Tools:The Scraper. 39Sharpening the Scraper 41Spokeshaves and Drawknives. 45Axe and Adze. 46Carving Tools. 46Turning Tools. 47Scratch-stock. 47Hand and Machine Tool Sharpening:Hand and Back Saws. 48 Setting and ReconditioningHand and Backsaws. 51Boring Bits. 54 Cutting Gauge, Wood Spokeshave,Screw Box. 56Scraper Plane Blades. 58Axe and Drawknife. 59Moulding Plane Cutters. 61In the Workshop:Sharpening Equipment. 62Workshop Hints:The Essential Things to Know about Oilstones. 65Points to Know about Oilstones. 66Keep the Oilstone Flat. 68Cleaning an Oilstone. 68Your Oilstone Case. 69Hints on Tool Grinding. 69Grindstones and Oilstones. 70Chart titles are in italic.
A REALLY SHARP EDGEIts advantages, how to obtain it, telling when you have itTO make a quibble, what is a sharpedge? The answer seems obvious,but consider the matter a little. The fineedge you put on a paring chisel; would itbe of any use for shaving? Or your razor;would it be successful at chopping wood?Each may be sharp in its way, but neitherwould be of much use if put to a purposefor which it was not intended. However,here we are concerned only with cuttingwood, and we may put down straightwaythe things that chiefly affect the edge.These are:1. The steel itself; whether of goodquality and correctly tempered.2. The angle at which it is sharpened.3. The quality of the edge.Steel. It is fairly obvious that steel ofpoor quality is useless. No matter howfine an edge you may put on it, it willquickly become blunt, and all your workwill be wasted. With steel like this youcan do nothing, and it is better to scrapit straightaway. But even good steel is ofno use if not properly tempered, and,although you can do little about correcting badly treated steel, you can alwaysavoid spoiling the temper (drawing it, asit is called) by taking precautions to seethat it is ground properly.Grinding. The enemy of tool steelis heat, and tools for woodwork shouldalways be ground on a wet stone. Thewater keeps the steel cool. The man whois used to it can generally manage tothin down an edge on a dry grindstonein an emergency, but it is not advisableas a general practice, and in inexperienced hands the steel may be spoilt. Ifyou have to use a dry stone, keep a canof cold water handy and dip the toolinto it frequently. Equally important,never grind away the steel right up to theextreme edge. Stop well short of it.Consider what happens. The frictionbetween the steel and the revolving stone2causes heat to be generated, and the thinpart of the steel (the edge) rapidly heatsup. (There is, of course, just as much friction when the wet stone is used, but theheat is absorbed by the water and immediately carried away.) You know howwhen you put a flame beneath a taperedpiece of metal the thin end heats up andbecomes red hot first. In the thicker partthe heat is absorbed into the body of themetal and thus remains comparativelycool. The same thing happens when thetool is put on the grinding wheel. Thethin edge quickly becomes hot—mayindeed become red hot—and the temper is drawn. A fine edge lasts longerthan a coarse one The immediate sign of this is that thesteel turns blue as in Fig. 1, but it is thentoo late. The damage has been done.The moral is to dip the steel often intowater and to cease grinding well beforethe edge is reached. Better still, use awet grindstone, and you can then grindright up to the edge with safety. Incidentally, when you take tools to a grinderinsist that they are wet ground. A goodgrinder will do this automatically, but ithas been known for a man to put toolson a dry stone.Most good class tools are made of reliable steel and are properly tempered.Occasionally, however, one comes acrossa tool which is soft in patches. It may bea fault in the mixture of the steel at oneparticular point, or it may be due to badgrinding on a dry stone. Often it can becorrected by grinding on a wet stone.The drawing of the temper is generallyquite local and caused by the heat generated at the thin edge. If this is groundThe Woodworker: The Charles Hayward Yearsaway— say 1 16 in. or more—it may easily happen that the faulty steel is groundaway, bringing good hard steel to theedge. If the whole body of the tool issoft, however, little can be done about it.Angle. Now comes the angle at whichthe tool is sharpened, and its shape. Intheory the lower the angle the keenerthe tool, because there is less displacement of the wood being cut. CompareA and B, Fig. 2. At A, as the tool entersthe wood after the initial severing of thefibres, the waste has only to be forcedslightly out of the way. At B it has to belifted bodily—in fact it would not dealwith a thick shaving at all. You knowhow much easier it is to knock in a thin,slowly tapered wedge than one which isobtuse. Somewhat of the same applies. Infact, if a thick chip is being removed, thechisel ground at a high angle does not cutin the ordinary sense at all once it hasentered the wood. It just lifts the layerspurely by wedge action, the wood splitting away ahead of the cutting edge (B).At the same time it would not do tomake the angle too low because the material of the steel would crumble as in Fig.3. It is therefore a matter of compromisebetween the two. The angle must be lowenough to give a keen edge, yet not solow that it is liable to crumble. To anextent it depends on the work the toolhas to do and the wood it has to cut. Aparing chisel used to remove fine shavings can be ground at a lower angle than,say, a mortise chisel which comes in forheavy chopping. In the same way, theman who normally works in tough hardwood would find it necessary to sharpenhis chisels at a rather higher angle thanthe worker who reckons normally to usesoftwood.Experience has shown that the general angle for paring chisels is about30 degrees, and 35 degrees for mortise
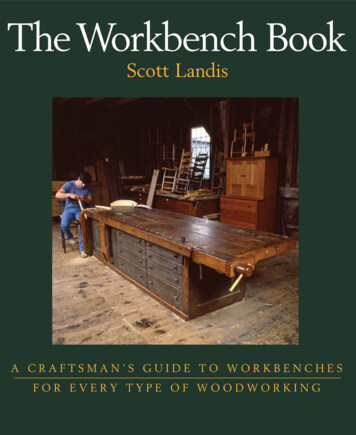
FIG. 1. EDGE WHICHHAS BEEN “BLUED” BYDRY GRINDINGFIG. 2. EXAGGERATED EXAMPLES OF SHARPENINGANGLESThe thin edge at A continues to cut, whilst at B the wood ismerely forced up, the edge not cutting after the preliminaryentry into the woodFIG. 4. VARIOUS ANGLES USED IN SHARPENINGA is the grinding angle, B the honing angle for paring chisels,and C the honing angle for chisels for choppingFIG. 3. LIABILITY OFSTEEL TO CRUMBLEAT A THIN EDGEFIG. 6. SHARPENING ACHISEL — ASCERTAININGTHE HONING ANGLEFIG. 5. DIFFERENCE IN QUALITY OF AN EDGEA shows the coarse “teeth” of a ground edge, and B the fine“teeth“ of a honed edgeFIG. 7. REMOVING THE BURR ON ABLOCK OF WOODFIG. 8. STROP OFLEATHER GLUEDAROUND WOOD BASEchisels Both can be ground at a lowerangle (25 degrees) because this leavesonly the extreme edge to be honed Theidea is shown in Fig 4 Quality. By this is meant the finenessof the edge If you look at the edge of atool which has been ground it may besharp in the sense that the grinding hasbeen continued right to the edge, but itis scored with a series of scratches easily visible to the eye, these being causedby the granules of the grindstone whichcut their way into the steel The result sofar as the edge is concerned is a jaggedline rather like the teeth of an irregularlysharpened saw as at A, Fig 5 It is to get rid of these “teeth” that thetool is rubbed on an oilstone, the granules of which are considerably finer thanthose of the grindstone This producesthe edge shown at B The “teeth” arevery much finer, though they are stillthere By rubbing the tool on a still finerstone they are reduced still more, beingin fact invisible to the naked eye, thougheasily discernible under a powerful magnifying glass It is therefore a matter ofusing an even finer stone in order to produce a really keen edge, finally passingto a strop dressed with a fine abrasive Even so the ‘‘teeth” will still be present, but they are so small that for all practical purposes they can be regarded asnon-existent Of course much dependson the use to which the tool is to be put So fine an edge would be largely wastedon a chisel used for chopping There is more in it than just sharpness,however A tool which has been finishedSharpening3
on a really fine stone and then on astrop will keep its edge longer than onewhich has been sharpened on a coarsestone. The reason is that the points of theteeth crumble under the cutting strain.As there are clearly many more pointsin the edge sharpened on the fine stone(B) than in that sharpened on the coarsestone (A), they are able to stand up to thework longer.Burr. All this, however, is complicated by another detail not yet discussed, that of the burr set up when atool is sharpened. As the tool is rubbedback and forth on the stone the steel atthe extreme end becomes forced up, andcan in fact be detected easily by drawing the ball of the thumb across the edgeat the back. If the tool is reversed flat onthe stone the burr will be bent back butwill not be detached. Unless it is got ridof it will prevent a sharp edge being produced—even if it could be produced itwould soon be ruined by the burr beingforced back on to the edge as the toolwas used. This, however, is a practicalmatter and is dealt with under the actualsharpening.The Practical Sharpening. Thechisel, having been ground at 25degrees, is now rubbed on the oilstone.The exact angle is not critical and youcan tell when it is approximately right byholding it so that the ground bevel liesflat on the stone, then raising the handle slightly as shown by the dotted linesin Fig. 6. This will bring just the edgein contact with the stone, leaving lesssteel to be rubbed away and so lessening the work. A fine grade stone of theIndia, Carborundum, or Unirundumtype will give a good edge for most purposes, though for really fine work a stillfiner stone should be used to finish off.Use a fairly thin lubricating oil, and rubthe tool back and forth until you canfeel that a burr has been turned up. Bydrawing the ball of the thumb across theedge on the flat side you should be ableto detect it.This is an indication that the edge issharp, but it does not show the quality ofthe edge or whether there are any gashes.The best way of testing this is to hold theedge to the light. A sharp edge cannotbe seen, whilst a dull one shows up light.If there are gashes the sharpening willhave to be continued. When satisfactoryhold the back of the tool flat on the stoneand rub back and forth. This will pushthe burr back but will not remove it. Toensure the latter draw the edge once ortwice across a piece of hardwood as inFig. 7. This will force the burr away—somewhat to the detriment of the edge,but the subsequent treatment puts thisright.Now rub the bevel once or twice ona really fine oilstone—an Arkansas isideal—and again reverse flat on thestone. If you have only the one stone youwill have to use this. For most purposesit is quite satisfactory, but for a piece offine paring a fine stone gives a beautifuledge. Finally, to finish off, use a strop.A convenient kind is shown in Fig. 8. Itis simply a piece of 3 8 in. wood shapedas shown, with a piece of soft leatherstretched around the front and glued atthe back. This is dressed with the finest emery powder (such as was used onthe old-fashioned knife boards beforestainless steel came in) and oil. Alternatively for a medium grade strop use thefine paste for finishing when grindingthe valves of a car engine. For a reallyfine finish use crocus powder. Draw thehoned bevel flat along the strop twice,then flat on the back. A few rubs in thisway will get rid of all traces of burr, andgive a superfine edge. It is the method ofthe wood carver to whom really sharptools are essential.To sum up, the attainment of a fineedge involves the following stages:1. Grinding, in which the unwantedthick part of the bevel is removed onthe grindstone.2. Honing on a medium or fine stoneto get rid of the coarseness made by thegrindstone.3. Removing the burr.4. Honing to a fine edge.5. Stropping.It is not necessary to grind (1) everytime, or even to carry out (2), (3) and (4).The wood carver, for instance, keeps histools in order almost entirely by stropping. Only occasionally is it necessary touse the stone. General woodworkers canquite well copy the idea for their paringtools, never letting them become reallydull, but giving a few rubs every nowand again on the strop.OBTAINING A KEEN EDGEAbility to give a keen edge to tools is half the battle in turning out good woodwork—or, to put it more logically, it is practically impossible to do good work with blunt toolsLIKE most things, sharpening edgetools is a matter of compromise.A chisel, say, sharpened at a really lowangle would have a fine, keen edge, but4it would crumble rapidly in use becauseit would have little strength. A highangle, although producing a strongedge, would be impossibly laborious toThe Woodworker: The Charles Hayward Yearsuse because of the resistance. The idea isshown in Fig. 2. If only the thin bevel at(A) would retain its edge it would sliceits way through the wood. Note how the
FIG. 1. TESTING AN EDGE FOR SHARPNESSThe thumb is drawn lightly across the edge which if keenwill tend to grip the flesh. A blunt edge is smooth andlifelessactual edge maintains contact with thepoint of severance. On the other hand,the chisel at (C) has its bevel at a highangle, and, although having a strongedge, it would be practically impossible to use. When used with the grainthe chip is forced up steeply and a splitdevelops in front of the actual edge, sothat it splits the wood as a wedge ratherthan cuts it (C). If used across the grainas at (D) the wood is crushed by pressurefrom the bevel. Softwood would merelycollapse beneath it.Sharpening Angle. Theoretically, chisels used for paring soft timbers could besharpened at a lower bevel than those forparing hard woods, because the resistanceis less, and the man normally working inFIG. 2. HOW SHARPENING ANGLE AFFECTS PERFORMANCEIn all cases the angles are shown in exaggeration to make the point clearsuch wood could take advantage of theeasy working the low bevel gives. Generally, however, only one chisel is available for all woods, and it works out thata honing angle of about 30 deg. gives thebest compromise for bench chisels. Mortise chisels and those for chopping generally need an angle nearer 35 deg.To reduce the labour of sharpening,the main bevel is ground at about 25deg. so that only the extreme edge needsto be rubbed on the oilstone. Once thehoned bevel becomes so wide that sharpening becomes laborious, the tool shouldbe ground afresh.Fine and Coarse Edges. As the toolis rubbed on the stone a burr is formedat the back, and this can be detectedby drawing the thumb across the back.Although the presence of this is an indication of sharpness, it does not reveal thequality of the edge or whether it is freefrom gashes. This question of quality isimportant because it not only affects thesurface of the wood being worked, butalso the time that edge lasts. A superfine edge lasts longer than one which iscoarse.If you look at an edge under a powerful magnifying-glass you will see that,far from being a straight line, it consistsof a saw-like edge with “teeth” large orsmall according to its quality. An edgesharpened on a coarse stone has deep,large serrations, and as the tool is usedthe “points” either crumble or are rapidlyFIG. 3. EDGESUNDER AMAGNIFYINGGLASSBoth have the mainground bevel, butA is sharpened on acoarse stone, and Bon a fine oneABFIG. 4. HOW PLANE IRON LOSES ITS EDGEWear is in two main ways: the metal is wornaway roughly parallel with the wood surface,and the extreme point is rounded over, bothby frictionSharpening5
worn down level with the hollows and sopresent a series of flats which fail to cut.The same thing happens to an extent, ofcourse, to a fine edge, one finished on,say, an Arkansas oilstone, for this stillhas serrations, though on a small scale.The “teeth”, however, are much smaller,and they are much more numerous. Fig.3 shows the idea. It is obvious that (B)would give a much finer finish than (A).Furthermore the wear is spread overtheir greater number.Gashes (generally due to fouling nails)can be detected by sight. They appearas spots of light on the edge. Much thesame thing applies to a dull edge. Itshows up as a white line, whereas a sharpedge cannot be seen. Another test is todraw the thumb across the edge, which,if sharp, will grip the flesh. A dull edgeappears smooth and lifeless.Getting rid of the burr is necessary.Rubbing the back turns it in the otherdirection without removing it. Mostcraftsmen strop the tool across the palmof the left hand, first one side of the toolthen the other. This bends the burr backand forth so that it finally drops off.Another way is to draw the edgeacross the edge of a piece of hardwood.For a really fine edge, however, it shouldafterwards be stropped. An excellentstrop can be made from a piece of supple leather, dressed with the finest gradeemery powder and lubricating oil. Alternatively, fine grade grinding-in paste,such as is used for motor car valves, canbe used. For extra fine edges, such as arerequired for carving tools, use crocuspowder and oil rather than emery.Many grades of oilstone are available,but the general tendency is to use manufactured rather than natural stones.These have the advantage of constantquality. For cabinet making tools usea fine grade stone, though a medium orcoarse grade is handy for quick rubbingdown when the edge has been gashed.The finest of stones is the naturalArkansas which gives a splendid edge. Itis, however, expensive and is somewhatslow cutting.When grinding is necessary a wetgrindstone should be used if possible,the reason being that the water keepsthe tool cold and prevents the temperfrom being drawn. A dry grinding wheelis convenient, but unless great care istaken there is risk of burning the steelso that it becomes so soft as to be useless. If it is used, a precaution is to have acan of cold water handy and dip the toolinto it frequently, especially as the edgeof the tool is approached. Large tools arenot specially difficult because the heat isconducted away by the thickness of themetal, but small ones are easy burnt. Inaddition to the constant dipping in watera good plan is to cease grinding beforethe actual edge is reached, and finish offon the oilstone. In any case, leaving anarrow unground portion does not matter since normal oil-stoning starts a newbevel in any case. The only exception isin turning tools in which there are noseparate honing and sharpening bevels.HOW I SHARPEN MY TOOLSThis article is by a reader who has spent many years in the trade as a practical cabinet maker.What he has to say, therefore, is not a mere theory unbacked by practice, but is the resultof experience gained in everyday application in the workshop. The sharpening of tools is clearlya most important part of woodworking, and we gladly pass on an idea whichour contributor has proved to be soundBEFORE modern synthetic oilstonesand the fast-cutting natural stonessuch as Washita were available the honing of a cutter was a slow business. Natural stones were of the Charnley Forest type, and, although they gave a goodquality edge, they were very slow cutting. It was because of this that toolswere always ground before being sharpened on the oilstone. A grinding angle ofap
“I think that books are useful, but I certainly think that, like anything else, the skill to do comes from actually doing. Books can guide you, explain about techniques, tools, materials, – present ideas, steer you away from pit-falls Books include a great deal of valuable informati