Transcription
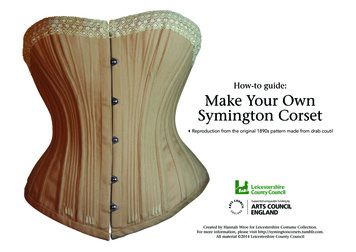
How-to guide:Make Your OwnSymington Corset3Reproduction from the original 1890s pattern made from drab coutilCreated by Hannah Wroe for Leicestershire Costume Collection.For more information, please visit http://symingtoncorsets.tumblr.com.All material 2014 Leicestershire County Council
How-To Guide: 1890’s Symington Corset 2IntroductionThe Symington Archive covers the period 1960-1990 and isone of the most comprehensive surveys of fashionable corsetry,foundation wear and swimwear in the world.R.& W.H. Symington & Co. Ltd were corset manufacturers basedin Market Harborough and this pattern is from the archive anddates from c1890s.About the how toThis guide will help you make the original 1890s Symingtoncorset.It is a double layered coutil corset with internal boning andadditional casings. The pattern is for a 22” corseted waist andthese instructions do not include fitting to the individual orgrading for alternative sizes. It is recommended that you toile thispattern first to endure a good fit.This pattern did not come with any written instructions. Somealternations have been made to the pattern such as centralisingthe internal boning channels to enable a 12mm bias maker to beused for the casings. You can add a waist tape if required to addstability to the corset.Required SkillsGood accurate sewing machine skills are required to completethis corset.Created by Hannah Wroe for Leicestershire Costume Collection.For more information, please visit http://symingtoncorsets.tumblr.com.All material 2014 Leicestershire County Council
How-To Guide: 1890’s Symington Corset 3Tools and materials will you 6789101112131415161718192021222324252627Created by Hannah Wroe for Leicestershire Costume Collection.For more information, please visit http://symingtoncorsets.tumblr.com.All material 2014 Leicestershire County Council0.75m cotton coutil for top fabric, 0.5m cottoncoutil or suitable cotton fabric to use as lining28cm (11”) split metal busk4 x 28cm (11”) cm Flat Steel bonesBoning- 5mm spiral steel and end caps OR canecut to casing length0.5m Pattern paperEmbroidery scissorsDressmaking scissorsPaper scissorsEyelet hole set tool for 4mm eyeletsAwlRotary cutter and mat (optional)PinsPencilSewing needlesTailors chalkBias binder maker 12mmBias binder maker 25mmSewing machine edge footSewing machine narrow machine zip foot4 metre long, approximately 7mm wide, flatcorset lace2x100m reel of Thread to match your fabrics24 x 4mm eyelets with washersRulerPressing HamIf using plastic boning for internal casing 5mmplastic boning cut down to fit. You could usecane.Sewing machineIron
How-To Guide: 1890’s Symington Corset 4The Pattern123456Trace off your pattern pieces andmark 1cm seam allowance aroundall pattern pieces. It is really helpfulat this stage to number yourpattern pieces 1-6.Please note that you may need tocentralise the internal casings linesdepending on what size casingsyou use and width of boning.1. Centre Front2. Side front3. Body Front4. Side5. Side Back6. BackCreated by Hannah Wroe for Leicestershire Costume Collection.For more information, please visit http://symingtoncorsets.tumblr.com.All material 2014 Leicestershire County Council
How-To Guide: 1890’s Symington Corset 5Step 1: Cutting outAll seam allowances are 1cm throughout.This is a double layered corset so you will need to cut out thefollowing pairs:Top layer coutil: 1 (x2), 2, 3, 4, 5, 6 (x2) - Note that pattern pieces 1and 6 are lined with the same top layer fabric.Lining layer: 2,3,4,5Casings strips top fabric: 18 x 2.5cm bias cut strips approximately38cm long (see step number 2)Binding Top fabric: 4x 4.5cm bias cut strips approximately 48 longAnd later .When you have cut everything make paper labels so you knowwhich each panel is or chalk mark on the inside the numbers. It isvery easy to get them upside down so make sure you can identifyeach pattern piece.Top tip: The coutil has a herringbone pattern on the right sideand if you pin all your labels near the top on the right side youwill know which way up they are sewn togetherCreated by Hannah Wroe for Leicestershire Costume Collection.For more information, please visit http://symingtoncorsets.tumblr.com.All material 2014 Leicestershire County Council
How-To Guide: 1890’s Symington Corset 6Step 2: Make your casingsFold the fabric along the bias and cut9 x 2.5cm strips approximately 38cm longfrom each side. This means the herringbonepattern will mirror each side.Place each bias strip with the right sidefacing down through the bias binder andiron the folds in place.Created by Hannah Wroe for Leicestershire Costume Collection.For more information, please visit http://symingtoncorsets.tumblr.com.All material 2014 Leicestershire County Council
How-To Guide: 1890’s Symington Corset 7Step 3: Mounting the two layers togetherLay the main fabric and lining coutiltogether on pattern pieces 3,4,5, and treatthem now as one fabric.Stitch the casings in position shown onpattern, laying the casings about 1.5cmoverhanging the panel and carefully edgestitch either side of the casing using anedge foot if you have one.Created by Hannah Wroe for Leicestershire Costume Collection.For more information, please visit http://symingtoncorsets.tumblr.com.All material 2014 Leicestershire County Council
How-To Guide: 1890’s Symington Corset 8Step 4: Sewing the internal casingsPattern pieces 2-5 need to be sewntogether and treated as one fabric bystitching 0.5cm inside the seam allowanceon each side. There might be some issueswith the turn of the cloth having two layersworking together so it is best to roll pinthem over a ham to reduce wrinkling andcreate a shaped piece when it is made up.Sew within the seam allowances where youpinned so they become one pattern piece.Created by Hannah Wroe for Leicestershire Costume Collection.For more information, please visit http://symingtoncorsets.tumblr.com.All material 2014 Leicestershire County Council
How-To Guide: 1890’s Symington Corset 9Step 5: Sewing in the busk (stud side)Stitch centre front and lining centre front with right sidestogether along the centre front seam.Press open and then over to get a crisp edge.Now edge stitch the centre front.Top tip: Use an edge foot to help you and always stitchtop stitching from the topside as it will be the neateststitch.Created by Hannah Wroe for Leicestershire Costume Collection.For more information, please visit http://symingtoncorsets.tumblr.com.All material 2014 Leicestershire County Council
How-To Guide: 1890’s Symington Corset 10Step 5: Sewing in the busk (stud side) - continuedPlace studs side of busk between the twolayers pushing it up against the centrefront laying the busk on top of both seamallowances.Mark with a pencil or chalk where the studsare placed ensuring you leave about 2cmfrom the top.Top tip: The two studs closest togethermark the bottom of the busk.Created by Hannah Wroe for Leicestershire Costume Collection.For more information, please visit http://symingtoncorsets.tumblr.com.All material 2014 Leicestershire County Council
How-To Guide: 1890’s Symington Corset 11Step 5: Sewing in the busk (stud side) - continuedWith an awl make the holes by pushingthrough the top layer front to back.Now slide the studs into the holes.Change to a zipper foot so you can getreally close and stitch around the busk. Donot reverse stitch at the ends, leave a tail ofthread and secure it by hand later on. Youmay want to tac this in first for ease.Top tip: Use your ‘Needle In’ position ifyou have it. This way when you pause youwon’t loose your place.Created by Hannah Wroe for Leicestershire Costume Collection.For more information, please visit http://symingtoncorsets.tumblr.com.All material 2014 Leicestershire County Council
How-To Guide: 1890’s Symington Corset 12Step 6: Sewing in the busk (hook side)Lay the top fabric and lining right sidetogether and lay it next to the stitched studsside.Mark with chalk where the openings needto be to line up with the other side.Stitch down the centre front main coutiland lining right sides together leaving theopenings.Remember to fasten off each time you stopand start so that the seam is secure.Created by Hannah Wroe for Leicestershire Costume Collection.For more information, please visit http://symingtoncorsets.tumblr.com.All material 2014 Leicestershire County Council
How-To Guide: 1890’s Symington Corset 13Step 6: Sewing in the busk (hook side) - continuedPress the seam open and then press itfolded over. Mark the opening with pins asshown and top stitch along the centre frontedge.Created by Hannah Wroe for Leicestershire Costume Collection.For more information, please visit http://symingtoncorsets.tumblr.com.All material 2014 Leicestershire County Council
How-To Guide: 1890’s Symington Corset 14Step 6: Sewing in the busk (hook side) - continuedRemember to stop and start each side ofthe openings.Tie off the threads inside to create a neatfinish.Created by Hannah Wroe for Leicestershire Costume Collection.For more information, please visit http://symingtoncorsets.tumblr.com.All material 2014 Leicestershire County Council
How-To Guide: 1890’s Symington Corset 15Step 6: Sewing in the busk (hook side) - continuedNow sew around the busk as you did on thestuds side.Top tip: Tack this in place before sewingto save unecessary unpicking!Created by Hannah Wroe for Leicestershire Costume Collection.For more information, please visit http://symingtoncorsets.tumblr.com.All material 2014 Leicestershire County Council
How-To Guide: 1890’s Symington Corset 16Step 7: Internal boning channelsUsing the pattern as a guide, sew in theinternal boning channels onto patternpieces 1 and 2.You may need to centralise these to ensurethere is space for the casings to be applied.Top tip: To mark the initial line you canuse magic tape which you can easily liftoff the coutil without leaving a mark.Created by Hannah Wroe for Leicestershire Costume Collection.For more information, please visit http://symingtoncorsets.tumblr.com.All material 2014 Leicestershire County Council
How-To Guide: 1890’s Symington Corset 17Step 8: Back panelSew the top layer and lining layer alongcentre back seams (pattern 6).Press open, press over and edge stitchalong centre back on each side.Sew internal boning channels as patternindicates for the flat steeles.Now mark the eyelet positions as shown onthe pattern.Created by Hannah Wroe for Leicestershire Costume Collection.For more information, please visit http://symingtoncorsets.tumblr.com.All material 2014 Leicestershire County Council
How-To Guide: 1890’s Symington Corset 18Step 8: Back panel - continuedSew internal casing onto this panel.Insert eyelets along the middle channel.Created by Hannah Wroe for Leicestershire Costume Collection.For more information, please visit http://symingtoncorsets.tumblr.com.All material 2014 Leicestershire County Council
How-To Guide: 1890’s Symington Corset 19Step 9: Making the corset bodyStitch the pattern pieces in order from 1-6each side, wrong sides together, so that theseams are on the outside. Stitch with a 1cmseam allowance.It is at this point you would add a waist tapeif you are adding one.Press seams open over a pressing ham ifyou have one.Created by Hannah Wroe for Leicestershire Costume Collection.For more information, please visit http://symingtoncorsets.tumblr.com.All material 2014 Leicestershire County Council
How-To Guide: 1890’s Symington Corset 20Step 10: Sew casingsTrim all the seams back to about 2-3mm.Created by Hannah Wroe for Leicestershire Costume Collection.For more information, please visit http://symingtoncorsets.tumblr.com.All material 2014 Leicestershire County Council
How-To Guide: 1890’s Symington Corset 21Step 10: Sew casings - continuedPosition the casings centrally over thetrimmed seams and edge stitch either sideas you did on the internal casings.Be sure to make sure each side follows aherringbone line of the coutil so they match.Top tip: Leave about 3cm each endover hanging. This will help you havesomething to hold when you are puttingyour spirals in.Created by Hannah Wroe for Leicestershire Costume Collection.For more information, please visit http://symingtoncorsets.tumblr.com.All material 2014 Leicestershire County Council
How-To Guide: 1890’s Symington Corset 22Step 11: Binding the top edgeThis is the time when you can alter the topedge line if necessary to create a differentshape. Recut the top line making sure itis even and that each side of the corsetmatches.Sew one line of sewing about 0.5cm in fromthe top edge to secure everything.With a pressed 4.5cm bias binding strip sewit right sides together to the top edge tobind it.This is the same process when you come tofinishing the bottom edge.Created by Hannah Wroe for Leicestershire Costume Collection.For more information, please visit http://symingtoncorsets.tumblr.com.All material 2014 Leicestershire County Council
How-To Guide: 1890’s Symington Corset 23Step 11: Binding the top edge - continuedFold over and hand stitch in place.Created by Hannah Wroe for Leicestershire Costume Collection.For more information, please visit http://symingtoncorsets.tumblr.com.All material 2014 Leicestershire County Council
How-To Guide: 1890’s Symington Corset 24Step 12: Insert boningHaving cut the boning to length and addedthe end caps now insert the spirals into thecasings. They need to be about 3cm shorterthan each casing seam.The 5mm plastic boning for the internalchannels will need to be split in two in orderto fit.The flat steel bones need to be insertedeither side of the eyelets.Top tip: If you are struggling to get theboning into the channels try using a flatsteel bone to push it up.Created by Hannah Wroe for Leicestershire Costume Collection.For more information, please visit http://symingtoncorsets.tumblr.com.All material 2014 Leicestershire County Council
How-To Guide: 1890’s Symington Corset 25Step 13: Binding the bottom edgeRecut the bottom edge ensure it matcheson each side. Stitch along the edge 0.5cmin as you did along the top to seal thechannels.Bind with 4.5cm binding as you did for thetop edge (step 11).Created by Hannah Wroe for Leicestershire Costume Collection.For more information, please visit http://symingtoncorsets.tumblr.com.All material 2014 Leicestershire County Council
How-To Guide: 1890’s Symington Corset 26Step 14: Attaching laceHand stitch lace to binding of the top edgeusing prick stitch.Created by Hannah Wroe for Leicestershire Costume Collection.For more information, please visit http://symingtoncorsets.tumblr.com.All material 2014 Leicestershire County Council
How-To Guide: 1890’s Symington Corset 27Step 15: FlossingDecorate with flossing using embroiderythread if desired.Created by Hannah Wroe for Leicestershire Costume Collection.For more information, please visit http://symingtoncorsets.tumblr.com.All material 2014 Leicestershire County Council
How-To Guide: 1890’s Symington Corset 28Step 16: Lacing your corsetLace your corset using double cord lacing.The continuous cord is criss-crossed fromthe top, leaving two long loops (rabbitears) at the middle and is knotted at thebottom. This will make it easier to get intoby yourself.Created by Hannah Wroe for Leicestershire Costume Collection.For more information, please visit http://symingtoncorsets.tumblr.com.All material 2014 Leicestershire County Council
How-To Guide: 1890’s Symington Corset Congratulations!Come visit us on Tumblr and tell us what you’ve created http://symingtoncorsets.tumblr.com/submitCreated by Hannah Wroe for Leicestershire Costume Collection.For more information, please visit http://symingtoncorsets.tumblr.com.All material 2014 Leicestershire County Council
How-To Guide: 1890’s Symington Corset 9 Step 5: Sewing in the busk (stud side) Stitch centre front and lining centre front with right sides together along the centre front seam. Press open and then over to get a crisp edge. Now edge stitch the centre front