Transcription
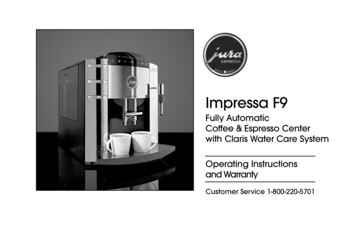
Impressa F9Fully AutomaticCoffee & Espresso Centerwith Claris Water Care SystemOperating Instructionsand WarrantyCustomer Service 1-800-220-5701
NOTICE: Your Impressa F9 has a 3-prong grounded plug. Toreduce the risk of electrical shock this plug will fit in an outletonly one way. If the plug does not fit in the outlet contact aqualified electrician. DO NOT modify the plug in any way.CAUTIONThis appliance is for household use. Any servicing other thancleaning and user maintenance should be performed by anauthorized service representative. Do not immerse base in water or try to disassemble. To reduce the risk of fire or electric shock, do not removethe base. No user serviceable parts inside. Repair shouldbe done by authorized service personnel only. Check voltage to be sure that the voltage indicated on thename plate agrees with your voltage. Never use warm or hot water to fill the water container!Use cold water only! Keep your hands and the cord away from hot parts of theappliance during operation. Never clean with scouring powders or hard implements.JURA-CAPRESSOJura was founded in 1931 in Switzerland.Capresso was founded in 1994 in the USA.Both companies have joined forces in the US tobring you the best Fully Automatic CoffeeCenters available anywhere. With innovative anduser-friendly features, high quality materials,clear instructions and superb customer service,we are sure you will experience the best coffee,espresso, cappuccino or latte you have everhad. We hope you will enjoy your new FullyAutomatic Coffee Center and will recommend itto your friends. For more information about ourproducts visit our website www.capresso.com.Michael Kramm, President3.
Fig. 2.13.14.15.16.17.18.Height-Adjustable Coffee SpoutOperating Buttons (See Fig. 3)Removable Water TankLow Water Flotation Device (See Fig. 8.4)Claris Water Care Cartridge (Not Installed)Connectivity Socket (chapter 22a)Lid for Water TankGround Coffee FunnelLid for Ground Coffee FunnelLid for Bean ContainerTouch-screen control display (See Fig. 5)Steam / Hot Water Buttons (See Fig. 4)Dual Frother PlusStainless Steel Removable GridRemovable DrawerMeasuring ScoopTwo Cleaning Tablets (white)Water Hardness Indicator StripClaris Water Cartridge (unpacked)Fig. 219. Used Coffee Container20. Tray13. Grid154.16171814. Drawer
OperatingButtonsabcdefSELECT PRODUCTa. On/Offb. Rinse(PRESS MAINT.)c. 1-Cupd. 2-Cupaba. Hot Waterb. Steambca. BIG CUPb. COFFEEc. ESPRESSOd. ST@RTe. Programmingf. Pre-Ground CoffeeFig. 3aFig. 4defge. MILDf. NORMALg. STRONGFig. 5Fig. 64Fig. 7Fig. 8Fig. 9Fig. 10Fig. 115.
Fig. 12Fig. 13Fig. 14abcTipMetal CylinderClip-on ConnectorDual Frother PlusFig. 156.Fig. 16
Frothing:downaba. Metal Tubeb. Chrome Sleevec. Steam NozzleSteaming:upcFig. 17Fig. 18Fig. 19Fig. 20IMPRESIA F9Fig. 21Fig. 22Fig. 23Fig. 247.
Table of ContentsPageImportant Safeguards / Jura-Capresso.2Illustrations.4–71. Product Registration.92. Customer Service.93. WELCOME TO THE IMPRESSA F9 .9a. A Word about "Crema Coffee".10b. Pressure Brewing .10c. Different Coffee Drinks.10d. Coffee Facts.104. Please Don't / Please Do .115. Factory Settings .116. PREPARING MACHINE FOR THE FIRST TIME.117. Adding Coffee Beans .128. Adjusting the Grinder .129. DAILY PREPARATION .1310. Grinding and Brewing.13a. Selecting Cup Size and Strength.1311. Using Pre-Ground Coffee.1412. Using Hot Water .1413. FROTHING, STEAMING, HEATING.1414. Heating and Frothing Milk .1415. Cleaning the Dual Frother Plus .1516. CLARIS WATER CARTRIDGE .15a. Installing and Activating the Claris Cartridge .16b. Replacing the Claris Cartridge.1617. Adjusting the Water Hardness.178.Page18. PROGRAMMING .18a. Programming AROMA.18b. Programming Temperature .19c. Programming Water Quantity (Cup Sizes) .19d. Programming the 1-Cup Button .19e. Programming Steam Portion .19f. Programming Hot Water Portion.20g. Setting the Time.20h. Setting Auto-On Time .20i. Setting Auto Shut-Off.21j. Setting Language .21k. Looking Up Cup Counter.2119. CARE AND MAINTENANCE.21a. Fill Water .21b. Empty Tray / Empty Grounds.21c Fill Beans.22d. Stones and Beans.22e. General Cleaning Instructions.22f. Emptying System Before Transport .2220. AUTOMATIC CLEANING CYCLES.22a. Cleaning with Special Tablet.22b. Decalcifying Procedure .2321. Tips for Better Coffee.2422. Supplies.24a. Connectivity Kit .2523. WARRANTY .2524. Troubleshooting .25Address Information .27
1. PRODUCT REGISTRATIONPlease read the enclosed product registration form now. Fill itout and mail or fax it to us within two weeks after purchasingyour machine or register online through our website:www.capresso.com. Important: This registration is part of yourwarranty (chapter 23).2. CUSTOMER SERVICEThank you for choosing this Jura-Capresso product. Pleasestudy these operating instructions carefully before using yournew machine. We highly recommend viewing the enclosedvideo. For further information please call our specialTOLL FREE number: 1-800-220-5701, Mon-Fri 9AM – 9PM &Sat 9AM – 5PM Eastern Standard Time. If you call at any othertime please leave a message with your telephone number andwhen we can call you back. You can also send us a FAX at:201-767-9684 or EMAIL us at contact@capresso.com3. WELCOME TO THE IMPRESSA F9This fully automatic coffee center is completely programmableand extremely user friendly. The Impressa F9 is made of thefinest materials and features a unique sensor touch panel. Thechrome plated metal front with its heavy duty die-cast coffeespout, the stainless steel grid and the elegant cup illuminationmake it the center piece of any contemporary kitchen. TheImpressa F9 can prepare one or two cups of crema coffee at atime. The two-step pressure brewing system – well known incommercial applications – was adapted and refined by Juracoffee specialists and is the trademark of each Jura-Capressocoffee center. This Pre-Brew Aroma-System (chapter 10) ensuresoptimal coffee extraction and will finish every cup with a richlayer of "crema" – proof for perfectly pressure brewed coffee. Bytouching one of three cup symbols and one of three bean symbols you choose the cup size and the coffee strength you want.Touch the ST@RT button and the F9 will grind and brew yourpersonal cup of coffee. The integrated solid steel conical burrgrinder grinds beans to the preferred fineness. A separate funnellets you use pre-ground coffee. All coffee, water and steamfunctions are programmable to your own personal taste. Makeany size cup of coffee between 1 and 16 oz. The Dual FrotherPlus* lets you froth and steam milk for delicious cappuccinosand lattes. The frother can be programmed to produce steam upto 60 seconds. Need more steam? Just push the steam buttonagain for another 60 seconds of steam. The stainless steel linedThermoBlock prevents water from coming in contact with aluminum and allows you to brew coffee immediately after frothing(no purging). The hot water function lets you prepare tea andother beverages in seconds. All important functions such aswater level, bean container, used coffee container and water filterare monitored automatically. You can even program the machineto turn itself on and off. You can change the language and cancheck how many cups of coffee you made. If you love computersyou can buy a special connectivity kit which allows you to download customized messages from your computer into the F9(chapter 22a).Please watch the enclosed video and study this instructionmanual before you use the machine on a daily basis. You will getso much more out of your IMPRESSA F9. Enjoy!* If you prepare many cappuccinos or lattes at a time we recommendthe fast and precise frothXpress PLUS system (separately available).9.
This system replaces the Dual Frother Plus and lets you fill cup aftercup with the desired amount of hot milk and milk froth automatically.For details visit our website www.capresso.com and watch the videosabout the frothXpress Plus system (Super Automatics, Impressa S9).3a. A WORD ABOUT "CREMA COFFEE"According to the majority of coffee experts, grinding, tampingand brewing under high pressure is the ideal extracting processfor maximum flavor and aroma. Your Jura-Capresso automaticcoffee center will always produce espresso and coffee with athick, foamy layer called "crema." The crema traps the fine aromatics and the light gaseous flavors that register on the palate.The high pressure and the short brewing time prevent theextraction of bitter oils and release less caffeine than any otherbrewing methods. You will always make the absolute freshestand most aromatic cup of coffee. This is the reason why manyEuropean restaurants and hotels serve fresh pressured brewedcoffee only. Experiment with your new machine and prepareyourself the best and most enjoyable cup of coffee!3b. PRESSURE BREWINGYou can make any quantity of coffee from 1 to 16 oz. Pleasenote: in order to create the "crema" on top of your coffee, themachine brews coffee at slightly lower temperatures than a dripcoffee maker. Since your coffee is delivered directly into yourcup we recommend to enjoy it immediately (see chapter 21).3c. DIFFERENT COFFEE DRINKSHere are some guidelines for the most popular coffee drinks: Ristretto: 1 2 to 1 oz. of coffee.10. Espresso: 1 to 2 oz. coffee. Double Shot: 3 to 4 oz. of coffee.Sweeten to taste for the above drinks. Crema Coffee: 5 to 71 2 oz. of coffee Cappuccino: Espresso plus 3 to 4 oz. of hot frothed milk. Latte: Espresso plus 3 to 5 oz. of steamed milk with little orno froth. Café Mocha: Make Espresso then add chocolate syrup to themilk before frothing/steaming.Experiment with the size of your milk based drinks. For strongercoffee taste add more coffee, for more milk taste use morefrothed milk.3d. COFFEE FACTS Caffeine is tasteless. A "strong" coffee or espresso is mostlythe result of the amount of coffee in relation to the amount ofwater. The longer a bean is roasted, the less caffeine it has. Arabica and Robusta are two genetically different kinds ofbeans. "Arabica" beans have more flavor and a little less caffeinethan "Robusta" beans which are mostly used in lower pricedcoffees and instant coffees. Espresso is not a bean, it's the way the coffee is roasted andprepared. Typical US espresso roasts result in darker beans withan oily outside. European espresso roasts are medium brownwith no or very little oils showing on the outside.Please note: If you use dark, oily beans, see chapters 7 & 8 forspecial handling.
4. PLEASE, DON’T. (or you void your warranty protection): Never fill instant coffee into the grinder or ground coffee funnel;it can damage the functioning of the brewing chamber. Never fill sugar coated coffee beans into the bean container. Never fill frozen beans into the bean container. If you storebeans in the freezer, let them thaw for 3 to 4 hours beforefilling them into the bean container. Never fill anything other than coffee beans into the bean container (no chocolate, rice, nuts, spices, etc.) Never fill anything but fresh, cold clean water into the watercontainer, except when decalcifying (chapter 20b). Never use mineral or carbonated water. You can use tapwater, spring water, distilled water and reverse osmosis water. Never repair or open the machine yourself. All repairs shouldbe performed only by an authorized service center.PLEASE, DO. Fill water tank with fresh, cold water only. Remove any foreign particles (small stones) from coffee beans. Let frozen beans thaw for 3 to 4 hours before pouring theminto the bean container.All Display Messages Are Shown in GREEN5. FACTORY SETTINGSEach machine leaves the factory with the following settings:Filter: . NOHardness Level: . 2Aroma: . StrongTemperature: . HighBig Cup: . 240 ml (8 oz.)Coffee Cup: .Espresso Cup: .1-Cup: .2-Cup: .Water Portion: .Steam: .Time: .Unit On: .Auto Off: .Language: .150 ml (5 oz.)60 ml (2 oz.)120 ml (4 oz.)240 ml (8 oz.)150 ml (5 oz.)60 secondsnot setnot set2 hours after last useEnglishCUP ILLUMINATION (Fig. 13)The cup illumination adds a dramatic touch to brewing coffee.Providing the machine is plugged in, you can activate the cupillumination for 1 minute by pressing any button.6. PREPARING THE MACHINE FOR THE FIRST TIME Make sure all accessories, literature and any other items areremoved from the machine and the water tank. Make sure the machine sits on an even, flat surface and thedrawer, tray and used coffee container are inserted. Plug-in machine. Do NOT fill water tank now.Important: Do not install the Claris Filter cartridge now. It canblock the machine. Turn the machine on by pressing the ON/OFF button (Fig. 3a).The display shows WWW.IMPRESSA-F-LINE.COM thenFILL WATER. Remove water tank, fill with fresh, cold water and replace.11.
The following procedure is only necessary when setting up themachine for the first time and after the procedure "EmptyingSystem Before Transport" (chapter 19f ).FILL SYSTEM WATER PORTIONThe red light in the Hot Water Button (Fig. 4a) illuminates. Place a cup underneath the frother (Fig. 15) and push the HotWater Button. SYSTEM FILLING The machine will pump somewater through the frother and stop automatically.YOUR MACHINE IS HEATING PRESS MAINT. Move the cup underneath the coffee spout (Fig. 14) and pressthe Rinse Button (Fig. 3b). MACHINE RINSING. The machinewill pump hot water through the coffee spout and stop automatically: SELECT PRODUCT. The display will illuminate thecup and strength selection as shown below:SELECT PRODUCTIn this setting the machine is ready to brew coffee. Open the bean container lid and fill with some beans (Fig. 6). Place an empty cup (at least 8 oz.) under the coffee spouts. Touch and hold your finger on the ST@RT symbol until themachine starts grinding. Initially, the grinding chamber may notfill properly with ground coffee. The machine will start brewing,then interrupt and the display will show FILL BEANS. Touch and hold ST@RT again. This time the machine will grindand brew and stop by itself. Discard this first cup of coffee.Your next cup will be perfect (chapter 10a explains the use ofthe sensor touch symbols).12.Please note: If coffee only comes out of one spout, move thespout up and down a few times to clear the internal flow.You are now ready to make coffee.7. ADDING COFFEE BEANS Open the bean container lid (Fig. 1.9), fill with beans (Fig. 6).The container holds approx. 220 grams (8 oz.). Close the lid.Frozen Beans: Let them thaw for 3 to 4 hours before addinginto the bean container. This will prevent moisture from seepinginto the grinder.Sugar Coated Beans: DO NOT fill sugar coated beans into thegrinding chamber. The sugars will stick to the burrs and clog theflow of ground coffee. Have your local coffee emporium grindthe sugar coated beans for you and use as described in chapter 11.Using Oily Beans:Beans with an oily surface tend to stick together. This mayprevent a continuous flow of beans from the bean container intothe burrs. As a result the grinder does not grind enough coffeeand you might get weak or no coffee at all. Stir the beans in thebean container just before grinding. Alternatively, you can alsopour the beans in an open bowl and let them sit for about 5hours. The oils will evaporate (this will not change the taste ofyour coffee). Then fill the beans into the bean grinder. Nowbeans will feed into the burrs more easily.8. ADJUSTING THE GRINDERYou can adjust the grinder to the roast of your coffee.We recommend the following:Light roast: use a finer adjustment.Dark roast: use a coarser adjustment.
Open the lid of the bean container (Fig. 1.9). To adjust grinding turn the selector switch to the desiredposition (Fig. 7).The smaller the dots, the finer the grind. The bigger the dots, thecoarser the grind.Important: The grinding grade can only be adjusted whilethe grinder is actually grinding.Attention: Oily beans tend to stick together. Stir beans justbefore grinding to ensure a proper flow of beans into the burrs.9. DAILY PREPARATIONWe recommend filling the water container every morning withfresh, cold water. This will enhance the taste of your coffee. Push and hold the On/Off button until the display turns on.After WWW.IMPRESSA-F-LINE.COM the display showsHELLO YOUR MACHINE IS HEATING. After approx. twominutes the display shows PRESS MAINT. and the red light inthe Rinse Button (Fig. 3b) will illuminate. Press the Rinse Button. Hot water will warm up all internalparts and pump through the coffee spouts. The water will becaught in the drawer underneath. The rinse cycle stops byitself and the display reads: SELECT PRODUCT. The cup andbean symbols illuminate. You are now ready to make coffee.10. GRINDING AND BREWINGThe F9 uses a 2-step brewing process (Pre-Brew Aroma System).This process first moistens the ground coffee (pre-brew phase),stops for a few seconds and then starts the brewing process.Please note: After the pre-brew phase you can stop the brewingprocess at any time by simply pushing the 1-Cup button. Thiswill not affect your cup settings.10a. SELECTING CUP SIZE AND STRENGTHWith the machine in the SELECT PRODUCT mode, you canchoose five cup settings and three different strength settings. Adjust the height of the coffee spout to your cup size (Fig. 14)and place one or two cups underneath the coffee spouts.Option One: Touch Screen Controls (Fig. 5)On the touch screen display you can choose from three cupsizes and three strength settings, for total of 9 settings:BIG CUP, COFFEE, ESPRESSO each in MILD, NORMAL orSTRONG. Touch the symbols and watch how the display changes. Once you have selected your preferred combination, justtouch and hold ST@RT until grinding begins.Please see chapter 5 for the amount of coffee brewed for eachof the symbols. To change these cup sizes see chapter 18c.Please note: You need to touch ST@RT for one second toactivate the grinding/brewing process. This delayed actionprevents the machine from making coffee if somebodyaccidentally touches the ST@RT symbol.Option Two: 1-Cup and 2-Cup ButtonsIn addition to the nine selections on the touch screen you canalso use the 1-Cup and 2-Cup button (Fig. 3c, 3d) to grind andbrew coffee.Please see chapter 5 for the amount of coffee brewed for thesebuttons. To change these cup sizes see chapter 18d.Please note: The 2-Cup button will automatically brew twice asmuch coffee (max. 16oz.) as the 1-Cup button.13.
11. USING PRE-GROUND COFFEEYou can also use pre-ground coffee, bypassing the grinder. Thiscomes in handy if someone requests decaf, sugar coated orflavored coffee. Push the Pre-Ground Coffee Button (Fig. 3f). The display shows:FILL POWDER SELECT PRODUCT. Open the lid for the ground coffee funnel (Fig. 1.8) and fill thefunnel with one or two scoops of ground coffee.Important: Do NOT fill this funnel with instant coffee and do notuse more than two level scoops of coffee. Touch one of the three cup symbols to select cup size andthen touch ST@RT. While brewing, the display shows(for example) BIG CUP POWDER.Please note: When using pre-ground coffee, you cannot use the1-Cup or 2-Cup button.Please note: If you push the scoop button accidentally, touchST@RT to clear. The F9 starts the brewing process, and stopsafter a few seconds. The display will return to SELECT PRODUCT.Please note: After use of sugar coated or flavored coffeethrough the pre-ground coffee funnel you may experience someflavor transfer when going back to your regular coffee. Push theRinse Button (Fig. 3b) once or twice to process some waterthrough the coffee spouts.12. USING HOT WATERWith the Hot Water Button (Fig. 4a) you can make a cup of tea, aquick soup or add hot water to your coffee, making it less strong.Caution: Always make sure that you have a container underneath the frother (Fig. 15) when using the hot water function,otherwise hot water might splatter, causing severe injuries.14. Push the Hot Water Button WATER PORTION. Hot water willflow immediately out of the frother. To stop the water flow, push the Hot Water Button again.Please note: The hot water portion is set to approx. 5 oz.It can be programmed from 1 to 16 oz. (chapter 18f).13. FROTHING, STEAMING AND HEATINGThe steam function can be used to heat up any liquid and tosteam and froth milk.Steaming Position:The metal cylinder is in the UP position (Fig. 18). In the steamingposition hot steam is injected into the milk (or any other liquid)without creating a frothy layer on top.Frothing Position:The metal cylinder is in the DOWN position (Fig. 18). In thefrothing position hot steam and air is injected into the milkcreating warm milk and a firm layer of tiny froth bubbles.14. HEATING AND FROTHING MILK Fill a pitcher (10 to 12 oz. capacity) or a large cup with atleast 4 to 5 oz. of cold milk. Push the Steam Button (Fig. 4b). The Steam Button's red lightwill start blinking and the display reads YOUR MACHINE ISHEATING. After a few seconds the red light stays illuminatedand the display reads SELECT PRODUCT. Immerse the tip of the frother into the milk and push theSteam Button again (Fig. 4b). Hot steam will be injected intothe milk. During this time the display shows STEAM PORTION. To stop the steam function, push the Steam Button again.Please note: Steam output will automatically stop after 60seconds. If you need more steam just push the Steam Button
again and you will have another 60 seconds of steam. You canalso change the steam output to a shorter interval (chapter 18e).Tips for frothing (Cappuccino):Start in the steaming position (cylinder "up") for 10 to 20seconds. This way your milk will be warmed up first. Then pushthe cylinder "down". Milk froth will build up. This way the frothon top of your milk is also warm. If the frothed milk is not warmenough, continue in the steaming position.Steaming and frothing directly in your cappuccino cup:With practice, you can steam and froth directly in yourcappuccino cup. First steam and froth the milk, then add yourespresso shot.Skim milk will produce the most froth and will let you taste moreof the coffee. 1% and 2% milk will give you less froth. Regularwhole milk (3% fat) will produce the least amount of froth.15. CLEANING THE DUAL FROTHER PLUSAlways keep the Dual Frother Plus clean and free of milk deposits.Hardened milk particles will make it impossible to create milk froth.Fast cleaning: Immediately after finishing frothing, place a cup underneath thefrother (Fig. 15) and push the Hot Water Button (Fig. 4a).Let hot water run through the frother for about 3 seconds.This will flush out any small milk droplets. Push the Hot Water Button again to stop.Thorough cleaning of the Dual Frother parts: Remove the Dual Frother (Fig.16) from the Steam Nozzle (Fig. 17c).Please note: The Dual Frother is tightly connected to theSteam Nozzle. First loosen the Clip-On Connector part byturning it a few times, then push down to remove. Unscrew the black tip (Fig.16a) from the Clip-On Connector(Fig. 16c). You can use a coin to loosen the black tip. Soak all three parts in hot soapy water.Make sure that the two side holes and the channel of the blacktip (Fig. 16a) are free of any milk deposits.Cleaning the steam nozzle (Fig. 17) Place a cup underneath the Steam Nozzle (the Dual Frother is off)and press the Hot Water Button. Let hot water run for a fewseconds through the Steam Nozzle. Push the Hot Water Button again to stop.Tip: If the steam nozzle is blocked by hardened milk, use a needleand loosen up the milk deposit. Then let some hot water passthrough the Steam Nozzle.Assembly of Frother Parts Make sure the Steam Nozzle (Fig. 17c) is screwed onto theMetal Tube (Fig. 17a) finger tight. Assemble the Dual Frother and make sure that the tip isscrewed onto the Connector (Fig 16a, c) finger tight. Push the black Clip-on Connector (Fig.16c) firmly into thesteam nozzle (the connector should sit flush with the chromesleeve so that the steam nozzle is no longer visible)Please note: If the parts are not put together tightly it will not bepossible to create the frothy foam on top of the milk.16. CLARIS WATER CARTRIDGEThe machine comes with one Claris water cartridge. The Clariswater cartridge is specially made for use with the Impressa15.
machines. The Claris cartridge: Reduces the water hardness up to 75%. Removes (if present) up to 85% chlorine, up to 90% lead, upto 95% copper and up to 67% aluminum. Cleans the water through an upward current principle (Fig. 9)just before the brewing cycle starts, ensuring freshly filteredwater every time you make coffee. Eliminates decalcifying. When using the Claris water cartridge,you never need to decalcify your machine. Is available through your retailer, the enclosed mail order form,or through www.capresso.com, or call 1-800-220-5701.16a. INSTALLING & ACTIVATINGTHE CLARIS WATER CARTRIDGEImportant: Never install the cartridge before or during the firsttime preparation of the machine. Make sure the water tank is empty. Remove cartridge from its bag. Open water container lid and pull up the holder for the Clariscartridge (Fig.10). Insert the cartridge with its tapered end down. Make sure itfits snugly over the white mesh piece inside the watercontainer. Push down gently (Fig.11). Close the holder for the cartridge so that it engages in thewater tank (Fig.12). Fill the water tank with fresh cold water and replace.You must activate the cartridge as follows: Push and hold the P button. The display shows FILTER NO 16. Touch the ST@RT; the word NO starts blinking. Touch either arrow, display shows: FILTER YES. Touch the ST@RT to confirm. The display shows:INSERT FILTER WATER PORTION Place a large container underneath the frother (at least 30 oz.capacity). Push the Hot Water Button. The machine pumps water throughthe frother, activating the filter. This will take about 90seconds. During this time the display reads FILTER RINSING.When the water flow stops the displays readsYOUR MACHINE IS HEATINGThe machine automatically returns to its coffee brewing setting:SELECT PRODUCTPlease note: As long as the filter is activated, the waterhardness setting is automatically turned off.16b. REPLACING THE CLARIS CARTRIDGEThe filter is monitored automatically. After approx. 50 liters ofwater (55 quarts), the filter loses its effect. The display will show:REPLACE FILTER SELECT PRODUCT. You can still makecoffee, but we recommend replacing the filter within one week!Attention: The filter should be changed every 2 months if youuse less than 50 liters of water. In this case, no message willappear in the display.Important: Once the filter has lost its calcium suppressingabilities, calcium will build-up inside the machine. Since theWater Hardness Selector is off, the machine will not remind youwhen to decalcify. This could clog and ruin your machine. Remove the old filter. The cartridge is environmentally friendly.
Dispose it with your regular household trash. Make sure the water tank is empty. Remove cartridge from its bag. Open water container lid and pull up the holder for theClaris cartridge (Fig.10). Insert the cartridge with its tapered end down. Make sure itfits snugly over the white mesh piece inside the watercontainer. Push down gently (Fig.11). Close the holder for the cartridge so that it engages in thewater tank (Fig.12). Fill the water tank with fresh cold water and replace. Turn the machine off. Push and hold the Rinse Button.The machine beeps and the display shows:WATER PORTION INSERT FI
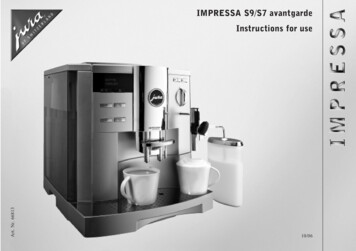
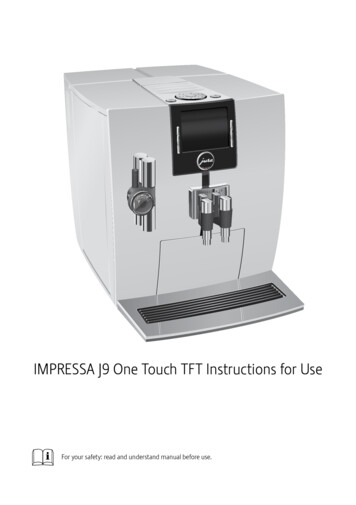
The Impressa F9 is made of the finest materials and features a unique sensor touch panel. The chrome plated metal front with its heavy duty die-cast coffee spout, the stainless steel grid and the elegant cup illumination make it the center piece of any contemporary kitchen. The Impressa F9 can prepare