Transcription
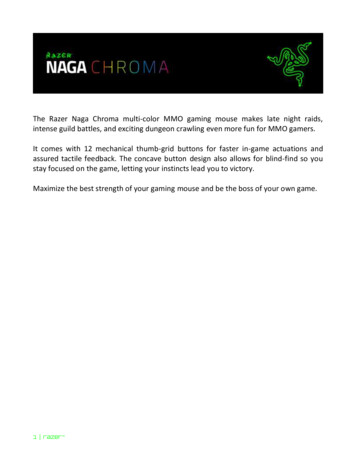
The Razer Naga Chroma multi-color MMO gaming mouse makes late night raids,intense guild battles, and exciting dungeon crawling even more fun for MMO gamers.It comes with 12 mechanical thumb-grid buttons for faster in-game actuations andassured tactile feedback. The concave button design also allows for blind-find so youstay focused on the game, letting your instincts lead you to victory.Maximize the best strength of your gaming mouse and be the boss of your own game.1 razer
TABLE OF CONTENTS1. PACKAGE CONTENTS / SYSTEM REQUIREMENTS . 32. REGISTRATION / TECHNICAL SUPPORT . 43. TECHNICAL SPECIFICATIONS . 54. DEVICE LAYOUT . 65. USING YOUR RAZER NAGA CHROMA . 76. INSTALLING YOUR RAZER NAGA CHROMA . 87. CONFIGURING YOUR RAZER NAGA CHROMA . 98. USING THE IN-GAME CONFIGURATOR . 429. SAFETY AND MAINTENANCE . 5910. LEGALESE . 612 For gamers by gamers
1. PACKAGE CONTENTS / SYSTEM REQUIREMENTSPACKAGE CONTENTS Razer Naga Chroma wireless MMO gaming mouse Important Product Information GuideSYSTEM REQUIREMENTS PC or Mac with a free USB port Windows 10 / Windows 8 / Windows 7 / Mac OS X (10.8 - 10.10) Internet connection 100MB of free hard disk space3 razer
2. REGISTRATION / TECHNICAL SUPPORTREGISTRATIONSign up now for a Razer Synapse account to get real-time information on yourproduct’s warranty status. To learn more about Razer Synapse and all its features, visitwww.razerzone.com/synapse.If you are already a Razer Synapse user, register your product by clicking on your emailaddress at the Razer Synapse application and select Warranty Status from thedropdown list.To register your product online, visit www.razerzone.com/registration. Please note thatyou will not be able to view your warranty status if you register via the website.Your product’s serialnumber can be found here.TECHNICAL SUPPORTWhat you’ll get: 2 years limited manufacturer’s warranty. Free online technical support at www.razersupport.com.4 For gamers by gamers
3. TECHNICAL SPECIFICATIONSTECHNICAL SPECIFICATIONS Total of 19 MMO optimized programmable buttons 12 button mechanical thumb grid Tilt click scroll wheel 16000 DPI 5G Laser Sensor Up to 210 inches per second / 50 G acceleration 1000 Hz Ultrapolling / 1 ms response time Chroma lighting with 16.8 million customizable color options Inter-device color synchronization Razer Synapse enabled Zero-acoustic Ultraslick mouse feet 2.1 m / 7 ft braided fiber USB cableAPPROXIMATE SIZE & WEIGHT: Length119mm/4.68” Width75mm/2.95” Height43mm/1.69” Weight150g/0.33lbs5 razer
4. DEVICE LAYOUTA.B.C.D.E.F.G.H.I.J.Left mouse buttonRight mouse buttonScroll wheelDPI stage upDPI stage downLeft tilt-click – repeat scroll downRight tilt-click – repeat scroll up12 Programmable mechanical thumb grid buttons16000 DPI 5G laser sensorUltraslick mouse feet6 For gamers by gamers
5. USING YOUR RAZER NAGA CHROMAThe 12-button thumb grid works the same as a keyboard’s numerical keys. Thesebuttons allow you to replicate the action bar of most games onto the thumb gridbuttons.7 razer
6. INSTALLING YOUR RAZER NAGA CHROMAStep 1: Connect your Razer device to the USB port of your computer.Step 2: Install Razer Synapse when prompted* or download the installer fromwww.razerzone.com/synapse.Step 3: Register for a Razer ID or log in to Synapse with an existing account.*Applicable for Windows 8 or later.8 For gamers by gamers
7. CONFIGURING YOUR RAZER NAGA CHROMADisclaimer: The features listed here require you to log in to Razer Synapse. These features are also subject tochange based on the current software version and your Operating System.MOUSE TABThe Mouse Tab is your default tab when you first install Razer Synapse. This tab allowsyou to customize your device’s profiles, button assignments, performance, and lighting.9 razer
ProfileA profile is a convenient way of organizing all your custom settings and you can have aninfinite number of profiles at your disposal. Any changes made within each tab areautomatically saved to the current profile and stored into the cloud servers.You can create a new profile by clicking thebutton or delete the currentprofile by clicking thebutton. Thebutton allows you to copy, import,and export profiles. Your current profile by default is named “Profile” however; you canrename it by typing on the text field below PROFILE NAME. Each profile can also be setto automatically activate when you run a program or application through the use of theLINK PROGRAM option.10 For gamers by gamers
Customize TabThe Customize Tab is where you can modify the basic functionalities of your devicesuch as button assignments to suit your gaming needs. The changes made in this tabare automatically saved to your current profile.Top ViewThe Top View is where you can customize the mouse buttons and the scroll wheel.11 razer
Side ViewThe Side View is where you can customize the 12-button thumb grid.You can save up to 8 sets of KEYMAP configurations, allowing you to easily set up andswitch between customized key mappings for different games.12 For gamers by gamers
Button Assignment MenuInitially, each of the mouse buttons is set to DEFAULT. However, you may change thefunction of these buttons by clicking the desired button to access the ButtonAssignment Menu.Listed below are the customization options and their description.DefaultThis option enables you to return the key to its original function. To choose theDEFAULT, simple select it from the Button Assignment Menu.Keyboard FunctionThis option enables you to change the mouse buttons into keyboard functions. Tochoose a keyboard function, select KEYBOARD FUNCTION from the Button AssignmentMenu and enter the key you wish to use on the given field below. You may also includemodifier keys such as Ctrl, Shift, Alt or any of those combinations.13 razer
Mouse FunctionThis option allows you to change the mouse buttons into other mouse functions. Tochoose a mouse function, select MOUSE FUNCTION from the Button Assignment Menuand an ASSIGN BUTTON submenu will appear.Listed below are the functions which you can choose from the Assign Button submenu:Left Click- Performs a left mouse click using the assigned button.Right Click- Performs a right mouse click using the assigned button.Scroll Click- Activates the universal scrolling function.Double Click- Performs a double left click using the assigned button.Mouse Button 4- Performs a “Backward” command for most internet browsers.Mouse Button 5- Performs a “Forward” command for most internet browsers.Scroll Up- Performs a “Scroll Up” command using the assigned button.Scroll Down- Performs a “Scroll Down” command using the assigned button.Scroll Left- Performs a “Scroll Left” command using the assigned button.Scroll Right- Performs a “Scroll Right” command using the assigned button.SensitivitySensitivity refers to how fast the mouse pointer can travel across the screen. When youselect the Sensitivity function from the dropdown menu, a sub-menu will appear whichgives you access to the following options:Sensitivity ClutchSensitivity Stage UpSensitivity Stage DownOn-The-Fly Sensitivity14 For gamers by gamers - Change to a predefined sensitivity as long as thedesignated button is pressed. Releasing the buttonwill return it to the previous sensitivity.- Increase the current sensitivity by one stage. Seethe PERFORMANCE TAB to learn more aboutsensitivity stages.- Decrease the current sensitivity by one stage. Seethe PERFORMANCE TAB to learn more aboutsensitivity stages.- Readily adjust the current sensitivity using theassigned button. If On‐The‐Fly Sensitivity has beenset, pressing the designated button and moving thescroll wheel will produce a bar on your screen whichwould indicate your current sensitivity level.
Cycle Up Sensitivity StagesCycle Down Sensitivity Stages- Increase the current sensitivity stage by one andonce it reaches the highest sensitivity stage, it willreturn to stage 1 when the button is pressed again.See the PERFORMANCE TAB to learn more aboutsensitivity stages.- Decrease the current sensitivity stage by one andonce it reaches stage 1, it will return to the highestsensitivity stage when the button is pressed again.See the PERFORMANCE TAB to learn more aboutsensitivity stages.Inter-deviceInter-device allows you to change the functionality of other Razer Synapse-enableddevices. Some of these functionalities are device-specific such as using your Razergaming keyboard to change the Sensitivity Stage of your Razer gaming mouse. Whenyou select Inter-device from the Button Assignment Menu, a sub-menu will appear.DEVICE TO LINK allows you to choose which currently connected Razer device can belinked while FUNCTION allows you to choose which functionality you want to use forthe linked device.Switch KeymapThe Switch Keymap allows you to easily swap key assignments with a press of a key.When you select Switch Keymap from the Key Assignment Menu, a submenu willappear wherein you can choose which keymap to use. The LED on the thumb modulewill automatically change color to correspond with the keymap.MacroA Macro is a pre-recorded sequence of keystrokes and button presses that is executedwith precise timing. By assigning a Macro to a button, you can execute complexcombinations with ease. The ASSIGN MACRO allows you to choose which recordedMacro to use while the PLAYBACK OPTION enables you to choose the behavior of theMacro. See the MACROS TAB to learn more about creating Macro commands.15 razer
Switch ProfileThe Switch Profile enables you to change profiles on the fly and immediately load allyour pre-configured settings. When you select Switch Profile from the ButtonAssignment Menu, a sub-menu will appear that will allow you to choose which profileto use. An on-screen display will automatically appear whenever you switch profiles.Launch ProgramThe Launch Program allows you to run a program or application using the assignedbutton. When you select Launch Program from the dropdown menu, abutton willappear which allows you to search for the specific program or application you want touse.In-game ConfiguratorThe In-Game Configurator enables you to assign the button to launch the configuratorwhile gaming. See USING THE IN-GAME CONFIGURATOR to learn more.Multimedia FunctionThis option allows you to bind multimedia playback controls to your device. Afterselecting Multimedia Function, a submenu will appear. Listed below are the multimediaplayback controls you can choose from the submenu:Volume DownVolume UpMute VolumeMic Volume UpMic Volume DownMute MicMute AllPlay / PausePrevious TrackNext Track- Decreases the audio output.- Increases the audio output.- Mutes the audio.- Increases the microphone volume.- Decreases the microphone volume.- Mutes the microphone.- Mute both microphone and audio output.- Play, pause, or resume playback of the current media.- Play the previous track.- Play the next track.16 For gamers by gamers
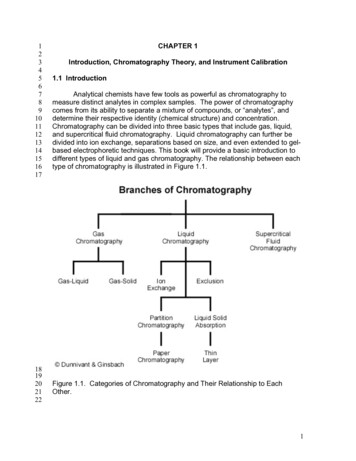
Windows 8 CharmsThis option enables you to assign the button into an Operating System shortcutcommand. For more information please visit: g-around-tutorial.Windows ShortcutsThis option enables you to assign the button into an Operating System ://support.microsoft.com/kb/126449.ShortcutsThis option enables you to assign the button into an Operating System shortcutcommand. For more information please visit: http://support.apple.com/kb/ht1343.DisableThis option renders the assigned button unusable. Use Disable when you have no needfor a button or if a particular button interferes with your gaming.17 razer
Performance TabThe Performance Tab allows you to enhance the speed and precision of your mousepointer. Similar to the Customize Tab, the changes made here are automatically savedto your current profile.Listed below are the performance options and their descriptions.SensitivitySensitivity pertains to how much effort is needed to move the mouse pointer in anydirection. The higher the sensitivity, the more responsive the mouse will be.(Recommended setting: 1600 – 1800)Enable X-Y SensitivityBy default, the X-axis (horizontal) and Y-axis (vertical) use the same sensitivity values.However, you may set different sensitivity values to each of the axes by selecting the“Enable X-Y Sensitivity” option.18 For gamers by gamers
Configure Sensitivity StagesA sensitivity stage is a preset sensitivity value. You can create up to 5 differentsensitivity stages which you can cycle through using the sensitivity stage up/downbuttons. You may use the “Enable X-Y Sensitivity” concurrently with this option. Notethat whenever you configure a sensitivity stage, your current sensitivity will match thatsetting.AccelerationAcceleration increases the cursor’s movement speed depending on how quickly youmove the mouse. The higher the value, the faster the mouse accelerates.(Recommended settings: Windows 0, Mac 5)Polling RateThe higher the polling rate, the more often the computer receives information aboutthe status of your mouse, thus increasing the mouse pointer’s reaction time. You canswitch between 125Hz (8ms), 500Hz (2ms) and 1000Hz (1ms) by selecting your desiredpolling rate on the dropdown menu. (Recommended setting: 500Hz – 1000Hz)19 razer
Lighting TabEach Chroma enabled device has a Lighting Tab on Razer Synapse. This Lighting Taballows you to customize the look of your Razer Naga Chroma by being able to choosefrom 16.8 million colors for the Razer logo, 12 button thumb grid, and scroll wheel. Thistab also allows you to adjust the intensity of the lighting using the BRIGHTNESSdropdown menu. If you have other Chroma enabled devices, you can synchronize alllighting schemes by clicking thebutton. Note that this synchronization functionwill only apply on devices that support the selected scheme.20 For gamers by gamers
Calibration TabThe Calibration Tab allows you to optimize your Razer Precision Sensor to any mousingsurface for better tracking. To use this feature, you must select the ON option underSURFACE CALIBRATION.The LIFTOFF RANGE allows you to set the distance in which the sensor stops tracking asit is being lifted away from its mousing surface. To use this feature, you must firstactivate SURFACE CALIBRATION then choose an appropriate mousing surface.21 razer
Razer Mouse MatsThe Razer Naga Chroma is ‘tuned’ or optimized especially for Razer mouse mats. Thismeans that the sensor has been tested extensively to confirm that the Razer NagaChroma reads and tracks best when paired with Razer mouse mats.If you are using a Razer mouse mat, click thebutton to accessthe Razer Mats submenu. This menu showcases an extensive list of Razer-brandedmouse mats. Select the appropriate mouse mat from the list; then choose betweenSPEED or CONTROL if applicable.If you wish to learn more about a particular mouse mat or if you wish to purchase aRazer mouse mat, you may do so by clicking the22 For gamers by gamers button.
Other Mousing SurfacesIf you are using a non-Razer mouse mat or a non-standard mousing surface, selectOTHERS then click thesubmenu.23 razer button to access the manual calibration
This submenu enables you to manually adjust the Razer Precision Sensor to suit anymousing surface.To begin calibrating the sensor, click thebutton. After clicking thebutton, Razer Synapse will begin tuning the sensor. Please avoid moving the RazerNaga Chroma during this time.24 For gamers by gamers
Once the Razer Precision Sensor is ready, click the left mouse button to start theprocess. Move the mouse across your entire mousing surface in a zigzag pattern asshown on the screen guide.When you have moved through your entire mousing surface, click the left mousebutton again. This will bring you back to the manual calibration submenu whichcontains new information regarding your mousing surface.There are also other options available in this section such as adding a new mouse matsetting by clicking thebutton, deleting the currently selected mouse matsetting by clicking thebutton or duplicating the currently selected mouse matsetting by clicking thebutton.25 razer
MACROS TABThe Macros Tab allows you to create a series of precise keystrokes and button presses.This tab also allows you to have numerous macros and extremely long macrocommands at your disposal.The Macro section works similarly to Profile wherein you can rename a macro by typingon the field below MACRO NAME. There are also other options available in the macrosection such as creating a new macro by clicking thecurrent macro by clicking theclicking thebutton, deleting thebutton or duplicating the current macro bybutton.To create a macro command, simply click thebutton and all yourkeystrokes and button presses will automatically register on the macro screen. Whenyou are done recording your macro commands, click on thethe session.26 For gamers by gamers button to end
The Macro section allows you to input the delay in-between commands. In RECORDDELAY the delay in-between commands are registered as how it is entered. TheDEFAULT DELAY uses a predefined time (expressed in seconds) as the delay. And NODELAY omits all the pauses in-between keystrokes and button presses.Note: You may use up to three decimal places when inserting values on the seconds (sec) field.27 razer
Once you have recorded a macro, you may edit the commands you have entered byselecting each command on the macro screen. Each keystroke or button press isarranged sequentially with the first command shown at the top of the screen.Thebutton allows you to edit a particular command and theenables you to delete a command. Theandbuttonbuttons gives you theoption to move the command up or down. Thebutton allows you to put inadditional keystrokes, button presses or time delays either before or after the selectedcommand.28 For gamers by gamers
Once you have pressed the Insert button, a new display window will appear beside thelist of macro commands. The dropdown menu on this window allows you to choose akeystroke or a delay to be added in before or after the highlighted macro command.29 razer
You may add in a new set of macro commands by clicking thebutton on thekeystroke menu; or input time delays on the duration field using the delay menu.30 For gamers by gamers
ADD ON TABThe Add On Tab expands your device’s usability by adding game-specific settings suchas a custom interface. To start using Razer Add Ons first you must enable the USERAZER NAGA ADD ON option.31 razer
Next, search for the game program or game application using thebutton. Finally,select your user account for the game by choosing it on the dropdown menu besideSync Account.32 For gamers by gamers
The Account Information screen will show you all the relevant information regardingyour user account.33 razer
STATS & HEATMAPSNote: The images shown here are for reference only and may differ from the actual device.Stats & Heatmaps help you analyze your gameplay by tracking your in-game mouseclicks, mouse movement and keyboard usage and visualizing it in form of heatmapoverlays. This function is disabled by default. To enable this function, click thenotification icon next to your user name in the Razer Synapse window and select“Enable Stats & Heatmaps”.Confirm to enable the function in the dialog box that appears. Return to Razer Synapseand a new “Stats” tab will be available. Simply click the tab to open the functionwindow.34 For gamers by gamers
Games ListStats & Heatmaps work by tracking the usage of all supported devices for each game.When the feature is enabled, it automatically scans your system for installed gamesand adds them to the Games List located on the left side of the screen. Clicktoshow or hide the Games List.From this list, you can add more games that have not been automatically detected,using thebutton, edit games with thebutton or re-scan your system with thebutton to search for newly installed games.35 razer
Stats TabBy default, the Stats Tab shows you the overall statistics of all your Razer devices for allgames and all time. You can select a specific game via the game list on the left side,change the time period using the SHOWING dropdown menu, or the Razer device usingthe DEVICES dropdown menu.36 For gamers by gamers
Heatmaps TabHeatmaps Tab shows detailed information about your Razer device’s in-game usage.This includes: The Mouse Clicks tab, a heat map showing the frequency of mouse clicks ondifferent spots of your screen.37 razer
The Mouse Movement tab which shows the movement of your mouse cursorduring game play. This tab also displays the locations on screen where yourmouse cursor stops in the form of white dots. The longer your cursor hovers atthat spot, the larger the dot.Mouse heatmaps can be overlayed on game screenshots.38 For gamers by gamers
Editing the Heatmap ImageClickto change the background image and/or transparency of the heatmap overlayHere you can also adjust the transparency of the heatmap overlay on the backgroundimageClickto save the changes or39 razer to exit without saving.
Social MediaYou can share your heatmap image on social media networks such as Facebook orTwitter directly from Razer Synapse.From the Heatmaps tab, click the Share button on the bottom right of the screen. Youwill be prompted to login to the selected social media using an existing account if youhave not already done so.40 For gamers by gamers
You can also login to your social media accounts first from the “SETTINGS” screen.From the Stats & Heatmaps window, click. Select the “ACCOUNTS” tab. ClickCONNECT next to the social media network you wish to sync with. Enter your logindetails and wait for the connection to complete.41 razer
8. USING THE IN-GAME CONFIGURATORDisclaimer: The Razer Naga Chroma In-Game Configurator is a game add-on that can be enabled via RazerSynapse. This add-on will be overlaid on your game screen by default when enabled and will only remain activeif Razer Synapse is active. These features are subject to change based on the current software version and yourOperating System. This configurator presents a sub-set of settings available for the device. For the full set ofoptions, please configure your device via Razer Synapse.LAUNCHING THE IN-GAME CONFIGURATORThe in-game configurator can be launched on all supported games by either: Using the short-cut key combination Alt Clicking the left tilt-click (default)You can assign a different mouse button for this action using the Razer Synapse mousebutton assignment function.42 For gamers by gamers
MOUSE TABThe Mouse Tab is your default tab when you first launch the Razer Naga Chroma InGame Configurator. This tab allows you to customize your device’s profiles, buttonassignments and performance.43 razer
PROFILEA Profile is a convenient way of organizing all your custom settings and you can have aninfinite number of profiles at your disposal. Any changes made within each tab areautomatically saved to the current profile and stored into the cloud servers.You can create a new profile by clicking thebutton andselecting “Add New Profile”. Change your active profile by selecting the appropriateprofile from the list.44 For gamers by gamers
KEYMAPA Keymap is a convenient way of organizing all your custom key mappings and you canhave an infinite number of keymaps at your disposal. Any changes made to a keymapping on each of your mouse buttons are automatically saved to the currentkeymap and stored into the cloud servers.You can switch between keymaps by clicking thebutton.Change your active keymap by selecting the appropriate keymap from the list or byusing the button assigned to the SWITCH KEYMAP function if configured. Up to 8Keymaps sets can be saved.45 razer
CUSTOMIZE TABThe Customize Tab is where you can modify the basic functionalities of your devicesuch as button assignments to suit your gaming needs. The changes made in this tabare automatically saved to your current profile.Top ViewThe Top View is where you can customize the basic mouse buttons and the mousewheel.46 For gamers by gamers
Side ViewThe Side View allows you to customize the side buttons of your mouse.47 razer
BUTTON ASSIGNMENT MENUInitially, each of the mouse buttons is set to DEFAULT. However, you may change thefunction of these buttons by clicking the desired button to access the BUTTONASSIGNMENT Menu.Listed below are the customization options and their descriptions.DefaultThis option enables you to return the key to its original function. To choose theDEFAULT, simply select it from the BUTTON ASSIGNMENT Menu.48 For gamers by gamers
Keyboard FunctionThis option enables you to change the mouse buttons into keyboard functions. Tochoose a keyboard function, select KEYBOARD FUNCTION from the BUTTONASSIGNMENT Menu and enter the Key you wish to use on the given field below. Youmay also include modifier keys such as Ctrl, Shift, Alt or any of these combinations.Mouse FunctionThis option allows you to change the mouse buttons into other mouse functions. Tochoose a mouse function, select MOUSE FUNCTION from the BUTTON ASSIGNMENTMenu and an ASSIGN BUTTON submenu will appear.Listed below are the functions which you can choose from the Assign Button submenu:Left ClickRight ClickScroll ClickDouble ClickMouse Button 4Mouse Button 5Scroll UpScroll DownScroll LeftScroll Right49 razer - Performs a left mouse click using the assigned button.- Performs a right mouse click using the assigned button.- Activates the universal scrolling function.- Performs a double left click using the assigned button.- Performs a “Backward” command for most internet browsers.- Performs a “Forward” command for most internet browsers.- Performs a “Scroll Up” command using the assigned button.- Performs a “Scroll Down” command using the assigned button.- Performs a “Scroll Left” command using the assigned button.- Performs a “Scroll Right” command using the assigned button.
SensitivitySensitivity refers to how fast the mouse pointer can travel across the screen. When youselect the Sensitivity function from the BUTTON ASSIGNMENT Menu, a sub-menu willappear which gives you access to the following options:Sensitivity ClutchSensitivity Stage UpSensitivity Stage DownOn-The-Fly SensitivityCycle Up Sensitivity StagesCycle Down Sensitivity Stages50 For gamers by gamers - Change to a predefined sensitivity as long as thedesignated button is pressed. Releasing the buttonwill return it to the previous sensitivity.- Increase the current sensitivity by one stage. Seethe PERFORMANCE TAB to learn more aboutsensitivity stages.- Decrease the current sensitivity by one stage. Seethe PERFORMANCE TAB to learn more aboutsensitivity stages.- Readily adjust the current sensitivity using theassigned button. If On‐The‐Fly Sensitivity has beenset, pressing the designated button and moving thescroll wheel will produce a bar on your screen whichwould indicate your current sensitivity level.- Increase the current sensitivity stage by one andonce it reaches the highest sensitivity stage, it willreturn to stage 1 when the button is pressed again.See the PERFORMANCE TAB to learn more aboutsensitivity stages.- Decrease the current sensitivity stage by one andonce it reaches stage 1, it will return to the highestsensitivity stage when the button is pressed again.See the PERFORMANCE TAB to learn more aboutsensitivity stages.
MacroA Macro is a prerecorded sequence of keystrokes and button presses that is executedwith precise timing. By assigning a Macro to a button, you can execute complexcombinations with ease. The ASSIGN MACRO allows you to choose which recordedMacro to use while the PLAYBACK OPTION enables you to choose the behavior of theMacro. See the MACROS TAB to learn more about creating Macro commands.Switch ProfileThe Switch Profile enables you to change profiles on the fly and immediately load allyour pre-configured settings. When you select Switch Profile from the BUTTONASSIGNMENT Menu, a sub-menu will appear that will allow you to choose which profileto use. An on-screen display will automatically appear whenever you switch profiles.Switch KeymapThe Switch Keymap allows you to easily swap key assignments with a press of a key.When you select Switch Keymap from the Key Assignment Menu, a submenu willappear wherein you can choose which keymap to use.DisableThis option renders the assigned button unusable. Use Disable when you have no needfor a button or if a particular button interferes with your gaming.51 razer
PERFORMANCE TABThe Performance Tab allows you to enhance the speed and precision of your mousepointer. Similar to the Customize Tab, the changes made here are automatically savedto your current profile.Listed below are the performance options and their descriptions.SensitivitySensitivity pertains to how much effort is needed to move the mouse pointer in anydirection. The higher the sensitivity, the more responsive the mouse will be.(Recommended setting: 1600 – 1800)52 For gamers by gamers
Enable X-Y SensitivityBy default, the X-axis (horiz
intense guild battles, and exciting dungeon crawling even more fun for MMO gamers. It comes with 12 mechanical thumb-grid buttons for faster in-game actuations and assured tactile feedback. The concave button design also allows for blind-find so you stay focused