Transcription
Guide to Digimarc for Packaging Extension for Adobe IllustratorIntroductionContentsDigimarc for Packaging is an extension for Adobe Illustrator that enablesproduction designers and premedia professionals to create connected packagingby enhancing packaging artwork with Digimarc Barcode.IntroductionEssential ConceptsDigimarc for Packaging enables you to apply Digimarc Barcode to qualifiedlayers of artwork in an Illustrator file. A qualified layer contains artwork that hasbeen embedded and then rasterized at 300 DPI. For example, if a layer links toan external Photoshop image, you must embed and rasterize the layer beforeenhancing it. If a layer consists of vector artwork such as an area containing aspot color, you only need to rasterize it.When you enhance a layer, Digimarc Barcode is applied to a duplicate of theoriginal layer, leaving the original layer unchanged, enabling you to experimentwith different enhancement techniques and parameters to achieve optimalreadability with minimal visibility of Digimarc Barcode.Related ReadingFor more information on enhancing packaging with Digimarc Barcode, see thefollowing guides: Techniques for Enhancing Packaging with Digimarc Barcode presentstechniques for those enhancing packaging. Enhancing Your Brand with Digimarc Barcode discusses Digimarc Barcodetechnology and its interactions with printing processes, package design,scanners, smartphone cameras, and more.1Essential Concepts1Related Reading1System Requirements1Launch the Extension1View Digimarc for Packaging Help2Sign In to Digimarc Barcode Manager2Barcode Search2Barcode Details2The Dashboard3Enhancement Options4Multi-Channel Enhancement4Single Channel Enhancement6Binary Pattern Enhancement7Applying Enhancement7Additional Notes8Known Limitations8Digimarc Color Advisor9Definitions9System RequirementsDigimarc for Packaging requires: macOS 10.15 (Catalina), macOS 10.14 (Mojave), or macOS 10.13 (High Sierra)Adobe Illustrator 2020 (24.x), CC 2019 (23.x), or CC 2018 (22.x)CAUTION: Adobe Illustrator CC 2019 and earlier will remove data when importing filessaved in the Illustrator 2020 format, including all details of previous enhancement.To avoid re-enhancing files and potentially introducing multiple Digimarc Barcodes,export a copy of the file saved in the Illustrator CC (Legacy) format or update yourversion of Illustrator.Launch the ExtensionOpen Digimarc for Packaging by navigating to Window Digimarc Digimarc for Packaging.Version 1.4191216
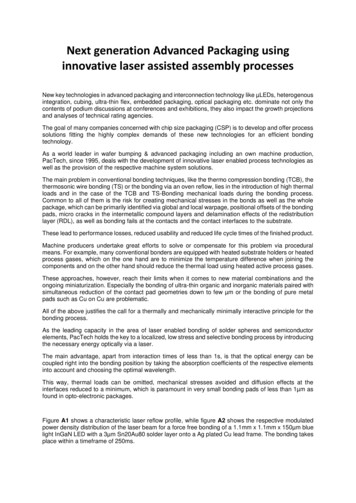
Guide to Digimarc for Packaging Extension for Adobe Illustrator2View Digimarc for Packaging HelpYou can view this document within Illustrator by navigating to Help Digimarc Digimarc for Packaging.Sign In to Digimarc Barcode ManagerWhen you launch Digimarc for Packaging for the firsttime, or if you have previously signed out, you areprompted to Sign In to the packaging module onmy.digimarc.com.To sign in, enter a Username and Password associatedwith the account that has access to the GTIN-14,UPC-E, or GIAI code to be added to the artwork, andthen click Continue.If you have difficulty signing in, click Account Help to open my.digimarc.com in your web browser.Once you sign in, your credentials are stored in the keychain. The next time you open Adobe Illustrator the extensionautomatically signs in to your account using the stored credentials.If you want to sign out of the packaging module, click the Digimarc for Packaging panel menu and select Sign Out. Thisremoves stored credentials and requires you to sign in again.Barcode SearchThe Barcode Search is displayed if you are signed into the packaging module and are working with adocument that does not already have a DigimarcBarcode associated with it.Enter a valid GTIN-14, UPC-E, or GIAI, and then clickContinue. The extension searches through all yourassociated accounts for a matching Digimarc Barcode.If multiple results are found, you are prompted toselect the one you want.Barcode DetailsIf a Digimarc Barcode is found, or if the artworkalready has a Digimarc Barcode associated with it, theBarcode Details view opens.Barcode Resolution: Digimarc Barcode Resolution ismeasured in watermark elements per inch (WPI) andmay be set at 150 WPI (the default) or 75 WPI. ClickChange Resolution and select either 75 or 150. Thisresolution will be preselected the next time you beginenhancing a file.Review the details, and then click Continue.If a Digimarc Barcode is not found, or if there are anyissues, a message displays with more information.NOTE: Once you continue to the Dashboard, the barcode details and resolution cannot be changed.Version 1.4191216
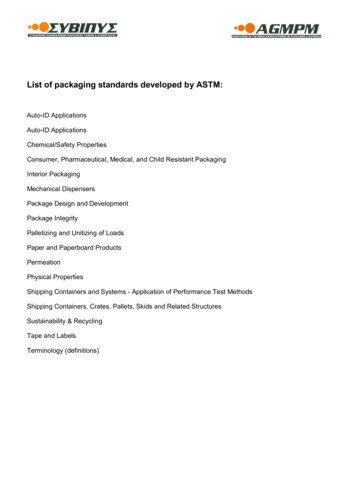
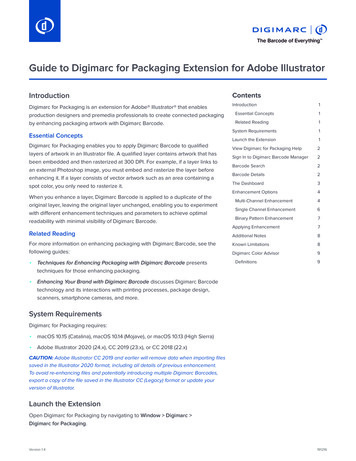
3Guide to Digimarc for Packaging Extension for Adobe IllustratorThe DashboardThe Dashboard is where you manage artwork elements for enhancement.NOTE: Depending on the barcode type (Packaging, GIAI, or Packaging Custom Field) your Dashboard and EnhancementOptions will look slightly different than shown here.1The panel menu allows you to sign out of the Digimarc Barcode Manager.2 The Elements panel lists the selected elements and their enhancement status. Each element may have multipleenhancement techniques to target available separations. A summary of techniques and the enhanced separations isdisplayed under each element’s name, including the multi-channel parameters for each technique (i.e. CMY, CMYK,MYK).Indicates the element or technique is configured and enhanced.Indicates the element or technique contains at least one separation that is configured but unenhanced. This istypically a separation that has been enhanced and then reverted to its unenhanced state. If the main elementicon is gray, this indicates that there is one or more corresponding techniques that are reverted.No icon indicates an unconfigured, unenhanced element.Indicates Channel Mapping is on.The Parameters summary reflects the enhancement settings specified in Enhancement Options:-S indicates the enhancement strength.MD indicates the minimum dot percentage.(Below), (Low), (Med), and (High) indicate the setting selected for Minimum Dot Blend Mode.Zero Ink indicates Protect Zero Ink is selected.HL indicates Reduce in Highlights is selected.DD indicates the dot density of a binary pattern.DS indicates the dot size of a binary pattern.Color chips indicate the separations involved in a given technique. Hover over the icons to see a tool-tip with theseparation names.3 The Elements field displays the number of elements in the Dashboard.Version 1.4191216
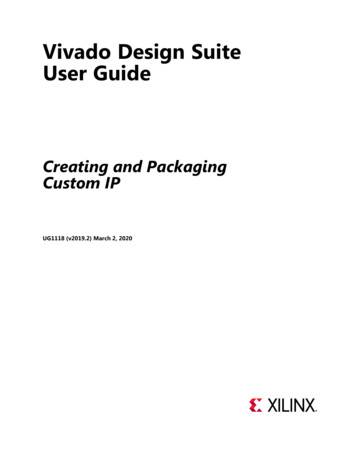
4Guide to Digimarc for Packaging Extension for Adobe Illustrator4 The GTIN-14/UPC-E/GIAI field displays the Digimarc Barcode associated with this document. A green check markindicates a valid GTIN-14, UPC-E, or GIAI; a red X indicates an invalid or incomplete value. The Barcode Resolution fielddisplays the Digimarc Barcode Resolution previously selected in the Barcode Details. Click Back to view the BarcodeDetails.5 Buttons are enabled only when applicable:Add Enhancement Technique – Opens the Enhancement Options window to add an enhancement technique tothe selected element. You can also reach this dialog by double-clicking an element.Edit Enhancement Technique – Opens the Enhancement Options window to modify settings of the selectedtechnique. You can also reach this dialog by double-clicking a technique.Delete Enhanced Element – Removes the enhancement from the affected separation(s). The selected techniqueor element’s status changes from blue to gray, but saves the enhancement settings to the dashboard.Go to Element – Selects the layer corresponding to the selected element in the Layers palette and Artboard. Ifthe selected element has been enhanced, the enhanced layer is selected instead.Add Targeted Element – Adds the currently selected qualified layer in the Layers panel to the Elements list.Remove Element from Dashboard – Deletes the selected element or technique from the Dashboard. Enhancedlayers and separations are also removed.Enhancement OptionsThe Enhancement Options window presents a choice of Enhancement Techniques: Multi-Channel, Single Channel, orBinary Pattern. The available Enhancement Parameters change depending on the chosen technique. The multi-channeltechnique is selected by default if process channels are available in the image. If there are no process channels, the singlechannel technique is selected by default.Multi-Channel Enhancement1Select the Multi-Channel technique, and then selectthe color channels to enhance: CMY, CMYK, or MYK. The icon inthe upper-right corner indicates the selected channels. Optionswill be shown as unavailable if any necessary colors have alreadybeen enhanced or are not present.2 The Enhancement Parameters are:-Strength – Controls the strength of Digimarc Barcode. Whenenhancing at 150 WPI, the strength slider displays values inhalf-strength increments from .5 to 10. At 75 WPI, the strengthslider displays whole values from 1 to 10.NOTE: Depending on the barcode type, you may need enhance ata higher or lower strength for Digimarc Barcode to scan effectively.For example, a Packaging Custom Field type may requireenhancing at a higher strength because it includes more data thanthe standard Packaging type. You can experiment with differentstrengths and confirm the results in Digimarc Verify.Version 1.4191216
Guide to Digimarc for Packaging Extension for Adobe Illustrator-5Minimum Dot % – Specifies the minimum dot as supplied by your printer.NOTE: Minimum Dot % and Minimum Dot Blend Mode settings will default to those last used in the document.-Minimum Dot Blend Mode – Compresses a range of pixels based on a preset curve. Based on the settingcompression is applied as pixels approach min dot, creating a blending effect in a specific range using thefollowing formula:Below: Applies positive tweaks to pixels below the Minimum Dot % value.NOTE: Pixel compression is not supported for the Below setting.Off: No compressionLow: (Min dot * 2) 5Medium: (Min dot * 2) 10High: (Min dot * 2) 15-Protect Zero Ink – In channels with no ink, signal is not added. This option is only available for multi-channelenhancement and is selected by default when min dot is above 0.-Reduce in Highlights – Available for CMY enhancement only if Minimum Dot Blend Mode is not set to Below. Thisoption minimizes enhancement in highlight areas. This reduces the need for art elements to go through an additionalstep of highlight reduction in Photoshop after enhancement in Illustrator.-Custom Data – Select the Custom Data for the selected element from the drop-down menu. If there is only onecustom data entry, it is automatically selected.NOTE: The Custom Data drop-down is only visible if the barcode type is Packaging Custom Field.3 Click Enable Mapping to expand the window to reveal thechannel mapping panel. The channel mapping panel allows you toenhance any available non-process colors in the place of Cyan,Magenta, Yellow, or Black in a Multi-Channel technique rather thanusing a Single Channel technique. This can be beneficial assingle-channel enhancements are often stronger and more visiblecompared to multi-channel enhancements, which blend multipleseparations to output a smoother, less visible enhancement.The color chip icons dynamically update to display the separationsinvolved in the output.NOTE: Channel mapping is an advanced setting and is recommendedto be used by experienced enhancers with specific training fromDigimarc. An expert-level understanding is critical to ensuring the readability of the enhanced image. Contact Digimarc toschedule training if you are unfamiliar with this technique.4 Click Apply to enhance the selected element; click Cancel to exit.Version 1.4191216
6Guide to Digimarc for Packaging Extension for Adobe IllustratorSingle Channel Enhancement1Select the Single Channel technique, and then selectthe channel to enhance. Options will be shown as unavailable ifthe color has already been enhanced.2 The Enhancement Parameters are:-Strength – Controls the strength of Digimarc Barcode. Whenenhancing at 150 WPI, the strength slider displays values inhalf-strength increments from .5 to 10. At 75 WPI, the strengthslider displays whole values from 1 to 10.NOTE: Depending on the barcode type, you may need enhance ata higher or lower strength for Digimarc Barcode to scan effectively.For example, a Packaging Custom Field type may requireenhancing at a higher strength because it includes more data thanthe standard Packaging type. You can experiment with differentstrengths and confirm the results in Digimarc Verify.-Minimum Dot % – Specifies the minimum dot as supplied byyour printer.-Minimum Dot Blend Mode – Compresses a range of pixels based on a preset curve. Based on the settingcompression is applied as pixels approach min dot, creating a blending effect in a specific range using the followingformula:Below: Applies positive tweaks to pixels below the Minimum Dot % value.NOTE: Pixel compression is not supported for the Below setting.Off: No compressionLow: (Min dot * 2) 5Medium: (Min dot * 2) 10High: (Min dot * 2) 15-Custom Data – Select the Custom Data for the selected element from the drop-down menu. If there is only onecustom data entry, it is automatically selected.NOTE: The Custom Data drop-down is only visible if the barcode type is Packaging Custom Field.3 Click Apply to enhance the selected element; click Cancel to exit.Version 1.4191216
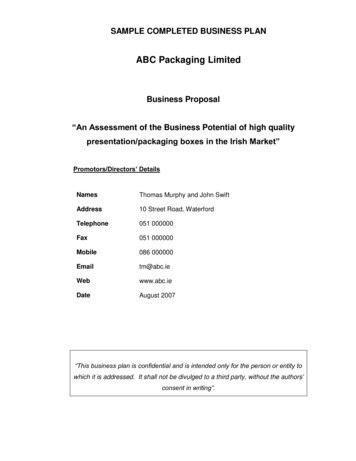
Guide to Digimarc for Packaging Extension for Adobe Illustrator7Binary Pattern Enhancement1Select the Binary Pattern technique, and then selectthe channel to enhance. Options will be shown as unavailable ifthe color has already been enhanced.2 The Enhancement Parameters are:-Positive/Negative – Select either a negative binary pattern(White dots on black) or a positive binary pattern (Black dots onwhite).-Dot Density – Set the density of the dot pattern.NOTE: Dot Density 30 is the default for enhancing at 150 WPI. Forenhancing at 75 WPI. the default is 40.-Dot Size – Set the size of the dot pattern.NOTE: Dot Size 1.5 is the default for enhancing at 150 WPI. Forenhancing at 75 WPI, the default is 2.-Custom Data – Select the Custom Data for the from thedrop-down menu. If there is only one custom data entry, it isautomatically selected.NOTE: The Custom Data drop-down is only visible if the barcode type is Packaging Custom Field.3 Click Apply to enhance the selected element; click Cancel to exit.Applying EnhancementWhen you click Apply in the Enhancement Options dialog: The layer in the Layers palette that corresponds to the selected element is duplicated and the new layer has DMappended to its name. Digimarc Barcode is applied in the duplicate layer.The original layer is unchanged.If enhancement succeeds: The enhanced duplicate layer is retained.Any previously enhanced layer associated with the same original artwork is deleted.The Dashboard is updated with any changes made to the enhancement technique and parameters in the EnhancementOptions dialog.If enhancement fails: An alert appears informing you of the reason.The duplicate layer is deleted.Any previously enhanced layer associated with the same original layer is untouched.The Dashboard is not updated with changes made in the Enhancement Options dialog.Version 1.4191216
Guide to Digimarc for Packaging Extension for Adobe Illustrator8Additional Notes The elements and settings in the Dashboard are retained when the document is closed.The list of elements in the Dashboard is kept up-to-date regarding changes to the Layers palette. For example, if alayer corresponding to an element in the Dashboard is deleted from the Layers palette, the element is deleted from theDashboard.Known LimitationsTo avoid placing the artwork file in a state that exposes known issues, it is critical that designers finalize the artwork design,layout, and layer structure before using the extension. The following post-enhancement workflows should be avoided: PPI adjustments and image scaling. To qualify an element for enhancement, elements must be rasterized at 300ppi andmust not be scaled after enhancement.* Undo (Cmd Z)*Deleting the original layer*Color correctionUnembedding enhanced linksEmbedding outside-enhanced links from other applications such as PhotoshopNOTE: Items marked with * are most relevant to prepress operators.Version 1.4191216
9Guide to Digimarc for Packaging Extension for Adobe IllustratorDigimarc Color AdvisorDigimarc Color Advisor is an additional tool provided by Digimarc for Packaging to assist production designers andprepress specialists in selecting the best spot colors with which to enhance packaging with Digimarc Barcode or how bestto work with a given spot color for readability by barcode scanners. These recommendations do not cover readability onmobile devices.Open Digimarc Color Advisor by navigating to Window Digimarc Digimarc Color AdvisorWhen you select a spot color, Digimarc Color Advisor displays the suggested technique for enhancing that color withDigimarc Barcode. The Digimarc Color Advisor contains data for spot colors from the PANTONE Solid Coated orPANTONE Pastels & Neons Coated swatch libraries (PANTONE GP1501 Plus Series Formula Guide Coated or PANTONEGG1504 Plus Series Pastels and Neons Coated).NOTE: Digimarc Color Advisor is currently optimized for enhancing at 75 WPI and results may vary when enhancing at 150 WPI.Definitions PANTONE Color Name: The PANTONE MATCHINGSYSTEM is a tool allowing for the faithful selection,articulation, and reproduction of consistent, accuratecolor anywhere in the world. The tool organizescolor standards through a numbering system andchip format. Strength: The suggested technique assumesa default strength of 5. Use the slider to viewsuggestions for other enhancement strengths. Somecolors may be enhanced better at certain strengths. Red Light Contrast: Given as a percentage, this isthe difference in reflectivity between paper whiteand solid ink of the light (660 nm wavelength)transmitted by barcode scanners. Contrastsbetween 20% and 80% indicate more easilyenhanced colors. Suggested Technique: This is a suggested startingpoint for working with a particular tint, based on offset printing on white, coated paper, and assumes a GRACoL2006profile. You may want to experiment with what works best for your particular color, substrate, and printing environment.-Spot Direct: Screened: This process varies the percentage of ink applied within areas covered by the spot color.-DeltaE: DeltaE refers to how noticeable the difference is between the overlay and the original spot color, where aDeltaE of 2.3 is just noticeable and higher DeltaE values are more noticeable.Process Overprint: Multi-channel: This process adds low percentages of cyan, magenta, and yellow (CMY) inks overthe spot color. The suggested CMY tints are listed as well as the DeltaE.NOTE: DeltaE is shorthand for the standard CIE ΔE*ab, which is the Euclidean distance between two colors in theperceptually uniform device-independent color space, CIELAB.Version 1.4191216
The Dashboard The Dashboard is where you manage artwork elements for enhancement. NOTE: Depending on the barcode type (Packaging, GIAI, or Packaging Custom Field) your Dashboard and Enhancement Options will look slightly different than shown here. 1 The panel men