Transcription
GETTING STARTED WITHCONTINUOUS GLUCOSEMONITORINGFOR THE MINIMED 630G SYSTEM
WARNING: Do not use the Suspend on low feature until you have read the information inthis Getting Started Guide and received instructions from your healthcare professional. TheSuspend on low feature causes the pump to temporarily suspend insulin delivery for twohours when the sensor glucose reaches a set limit. Under some conditions of use, the pumpcan suspend again, resulting in limited insulin delivery. Prolonged suspension can increase the risk ofserious hyperglycemia, ketosis, and ketoacidosis. 2017 Medtronic. All rights reserved. Medtronic, Medtronic logo and Further, Together are trademarks of Medtronic. * Third party brands are trademarks of their respective owners. Allother brands are trademarks of a Medtronic company.MiniMed , Enlite , SmartGuard , Guardian , and Bolus Wizard are trademarks of Medtronic MiniMed, Inc.Ascensia, the Ascensia Diabetes Care logo, and CONTOUR are trademarks of Ascensia Diabetes Care.
TABLE OF CONTENTSGETTING STARTEDContinuous Glucose MonitoringMiniMed 630G SystemSection 1: Introduction to Continuous Glucose Monitoring. . . . . . . . . . . . . . . . . . . 2Section 2: Sensor Glucose (SG) and Blood Glucose (BG) . . . . . . . . . . . . . . . . . . . . . 3Section 3: Trends. . . . . . . . . . . . . . . . . . . . . . . . . . . . . . . . . . . . . . . . . . . . . . . . . . . . . . . . . . . . . 4Section 4: Personalized Alerts. . . . . . . . . . . . . . . . . . . . . . . . . . . . . . . . . . . . . . . . . . . . . . . . 5Section 5: Connecting Your Pump and Transmitter. . . . . . . . . . . . . . . . . . . . . . . . . . 17Section 6: Inserting and Starting the Sensor. . . . . . . . . . . . . . . . . . . . . . . . . . . . . . . . . 19Section 7: Calibration. . . . . . . . . . . . . . . . . . . . . . . . . . . . . . . . . . . . . . . . . . . . . . . . . . . . . . . . 29Section 8: Reading the Sensor Display. . . . . . . . . . . . . . . . . . . . . . . . . . . . . . . . . . . . . . . 33Section 9: Sensor Alerts and Suspend. . . . . . . . . . . . . . . . . . . . . . . . . . . . . . . . . . . . . . . 35Section 10: Appendix. . . . . . . . . . . . . . . . . . . . . . . . . . . . . . . . . . . . . . . . . . . . . . . . . . . . . . . . 39Training Handouts . . . . . . . . . . . . . . . . . . . . . . . . . . . . . . . . . . . . . . . . . . . . . . . . . . . . . . . . . . 41Quick Reference Guide to Sensor Alerts. . . . . . . . . . . . . . . . . . . . . . . . . . . . . . . . . . . . . . . . 43Quick Reference Guide for Using the Enlite Sensor and One-press Serter. . . . . 451
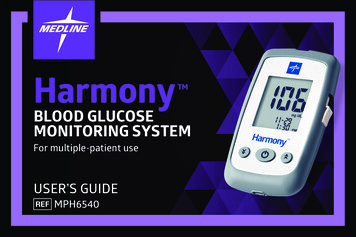
CONTINUOUS GLUCOSE MONITORING SYSTEM COMPONENTSSection 1: Welcome to Continuous Glucose MonitoringCongratulations on your decision to use continuous glucose monitoring (CGM) and taking thisimportant step to better glucose control.Continuous glucose monitoring gives you a more complete picture of your glucose control. Using asensor allows you to receive up to 288 sensor glucose readings every 24 hours, filling the gaps betweenyour BG tests. CGM alerts notify you of high and low glucose values. Graphs and trend arrows show thespeed and direction your glucose levels are moving. This CGM information is displayed on your insulin pumpscreen. Your pump is programmed to deliver the insulin that you need. When using the MiniMed 630G systemwith SmartGuard technology, the pump can also be set to automatically stop delivering insulin when sensorglucose reaches or falls below a low limit that you set.The first step in using CGM is understanding the items included in your CGM system.YOUR CONTINUOUS GLUCOSE MONITORING (CGM) SYSTEM INCLUDES 3 KEY ITEMS:1Transmitter* Guardian Link transmitter connects to the glucose sensor and sendssensor glucose readings to your insulin pump.2Glucose sensorThe Enlite sensor measures glucose levels in the body.3Insulin pumpThe MiniMed 630G insulin pump displays glucose readings.Other items include: One-press serter, Enlite overtape, Guardian Link charger,and watertight testerAlways use the components that were sent with your MiniMed 630G System.1322Drawings throughout this document are only generic representations of the system components.* The transmitter must be within 6 feet (1.8 meters) of the insulin pump in order to communicate sensor readings.
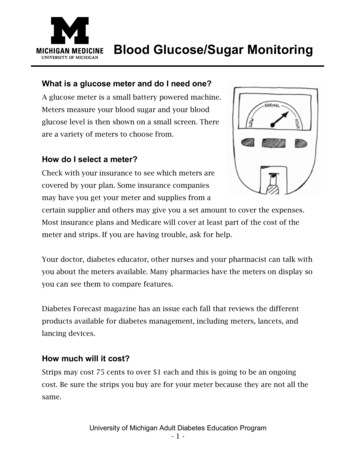
SENSOR GLUCOSE (SG) AND BLOOD GLUCOSE (BG)Section 2: Sensor Glucose (SG) and Blood Glucose (BG)Your BG meter measures glucose levels in your blood. The glucose sensor measures glucose in the fluidsurrounding the cells of your tissue called interstitial fluid.TransmitterSkinGlucose SensorInterstitial FluidCellGlucoseBlood VesselGlucose travels between these two areas (blood and interstitial fluid). Most of the time, it travels to yourblood first, and then to your interstitial fluid. Because of how glucose moves, your BG meter readings (BG)and sensor glucose readings (SG) will be close, but will rarely match exactly. This difference is normal andshould be expected.When glucose levels are rising or falling quickly, you should expect to see an even larger difference betweenyour BG meter readings and the sensor glucose readings.Examples of times when this larger difference may occur include:After meals or taking a bolus of insulinDuring exerciseWhen arrows appear on your pump screen as explained in the next sectionWARNING: Do not make therapy treatment decisions based on sensor glucose values becausesensor glucose and blood glucose values may differ. If your sensor glucose reading is low or high, orif you feel symptoms of low or high glucose, confirm your sensor glucose with your BG meter priorto making therapy decisions to avoid severe low or high glucose conditions.3
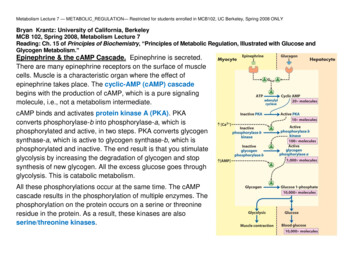
TRENDSSection 3: TrendsWhen using CGM, you will want to focus on sensor glucose trends. These trends give insight into thedirection and the speed that your glucose is changing. The sensor graph and trend arrows are used to showyour trend information.IMPORTANT: When using CGM, focus less on each individual glucose number and more on thedirection and speed that your glucose is changing.EXAMPLE OF SENSOR INFORMATION ON THE HOME SCREENTrend ArrowsSensor Glucose GraphSensor Glucose ReadingBy looking at the sensor information above, you can see that your current sensor glucose reading is 100 mg/dL. When you look at the graph, you can see that you are trending downward.Furthermore, you see arrows above the number. These arrows indicate the rate that your glucose values aremoving up or down:or- SG has been rising or falling by at least 1 but less than 2 mg/dL per minute overthe last 20 minutesor- SG has been rising or falling by at least 2 but less than 3 mg/dL per minute overthe last 20 minutesor- SG has been rising or falling by at least 3 or more mg/dL per minute overthe last 20 minutesNOTE: You may be likely to notice your glucose trending up or down after eating, giving a bolus, orwhen exercising.4
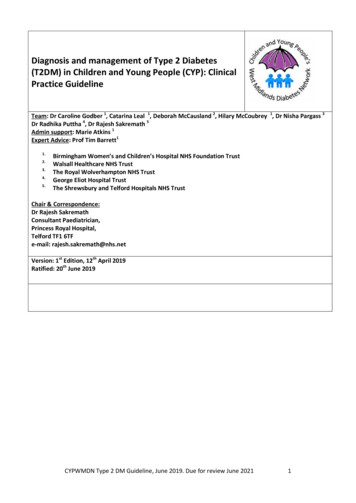
PERSONALIZED ALERTSSection 4: Personalized AlertsYour CGM alert and suspend settings are most beneficial if they are personalized for your needs. Settings willbe entered into your pump during your CGM training. They can then be adjusted as you learn more from theinformation that wearing the sensor provides. Your healthcare professional will work with you to determineyour initial settings and help with adjustments that need to be made.NOTE: It is recommended to use values prescribed by your healthcare professional. Please makesure these are available at the time of your in-person training.The graph below shows the different settings that can be personalized for both High and Low sensorglucose readings.Personalized Alerts250Alert on HighAlert before HighRise Rate(60High Snooze)Sensor GlucoseReadings(Low Snooze)Alert before LowSuspend on LowAlert on LowCGM Alert SettingTurning Sensor Feature OnBefore setting any of these sensor alerts, you must first turn the sensor feature on.To turn on Glucose Alerts:1) Press .2) Select Sensor Settings.3) Select Sensor to turn feature On.You can now see the Sensor Settings menu options.5
PERSONALIZED ALERTSHigh SettingsLet’s now look at the High Settings. These settings allow you to be alerted if your sensor glucose:is rising rapidly (Rise Alert)is approaching your high limit (Alert before high)has reached your high limit (Alert on high)Personalized Alerts400 mg/dLHigh LimitAlertAert on High(Low Snooze)Alert Before HighSensor GlucoseReadingsSuspend before LowAlert before LowRise Alert(High Snooze)Suspend on LowAlert on Low40 mg/dLCGM Alert SettingHigh LimitThe first step is to set the high (Hi) limit. The high limit can be set from 100 to 400 mg/dL. This is the valueon which other high settings are based. You can set up to eight high limits for different time segmentsthroughout the day or night.NOTE: Your high limit is not the same as your glucose target. Your healthcare professional will helpyou determine the best setting so that you are alerted when needed while preventing unnecessaryor inconvenient alerts.Alert before HighWhen Alert before high is on, you will receive an alert any time the sensor glucose is predicted to reachyour high limit, making you aware of a potential high before it occurs. This can help you to evaluate whathas occurred and take any necessary action as directed by your healthcare professional.Time before HighTime before high determines how many minutes before reaching the high limit that you will receive anAlert before high. This can be set from 5 to 30 minutes.6
PERSONALIZED ALERTSAlert on highWhen the Alert on high is on, you will receive an alert any time your SG reading reaches or exceedsyour high limit. This allows you to evaluate and treat if necessary as instructed by your healthcareprofessional.ALERT ON HIGH.Sara has been working hard to keep her glucose levels under control. Her healthcareprofessional has set her high limit at 225 mg/dL and instructed her to use the Alert onhigh. Now if her glucose reaches this limit, she tests her BG and takes insulin if necessary to help make sure her glucose levels return to her normal range.Rise AlertThe Rise Alert will notify you when your glucose is rising rapidly. This alert can help you understand howmuch your glucose levels are affected by meals or, for example, when forgetting to give a bolus.The Rise Alert can be set to alert if glucose is rising as follows:- SG is rising at a rate of 1 mg/dL per minute or more- SG is rising at a rate of 2 mg/dL per minute or more- SG is rising at a rate of 3 mg/dL per minute or moreCustom - SG is rising at the rate that you set. This can be set from 1.0 to 5.0 mg/dL per minuteSnoozeThe high Snooze is set for the amount of time that you want to wait to be reminded that an alertcondition still exists. Once a high alert is received and cleared, you will be alerted again only if the high alertcondition still exists after the snooze time you have set. The high snooze time can be set from 5 minutesto 3 hours.SNOOZE.Robert’s healthcare professional instructed him to turn Alert on high on with a Snoozeof 2 hours. If his sensor glucose reaches his high limit, he checks his BG and gives a bolusif he needs it. His pump will check again in 2 hours and alert him if he is still at or above hishigh limit.7
PERSONALIZED ALERTSREMEMBER: You can set up to 8 different time segments throughout the day and night. Eachtime segment can have different high limits and high alerts that work best for you during thattime of day or night.Setting up your High Settings:1)Press.2)Pressto Sensor Settings and press3)Pressto High Settings and press4)Select High Settings to turn On.If you are changing settings that are already entered, pressto Setup and press .85)Press on the time segment.If you are setting multiple time segments with different highlimits and alerts, press to set the first End time and press .In this example, only one time segment is set.6)Press or to set Hi limit and press .In this example, the limit is set to 250 mg/dL.7)Pressto continue onto the next screen.
PERSONALIZED ALERTS8) Select each feature you wish to turn on. If a feature is on, selectit again to turn it back off.9) Once settings are selected, select Next.In this example, the Alert on high has been turned on.10) Select Done.11) Verify that settings are correct and select Save.12) If snooze time needs to be changed, pressand press .13) Pressorto the correct time and pressto Snooze.Your High Settings setup is now complete.REMEMBER: Confirm your sensor glucose reading with a BG meter reading beforemaking any treatment decision.9
PERSONALIZED ALERTSLow SettingsLet’s now look at the Low Settings. You can choose to be alerted before and/or when you have reachedyour low limit. By using the SmartGuard suspend feature, you can also have insulin stopped when youreach the low limit that you have set. The low settings that can be chosen are shown here:400 mg/dL(Alert on HighAlert Before HighAlert before LowRise Alert(High Snooze)SnoozeSuspend on LowAlertAon LowLow Snooze)SensorGlucoseReadings40 mg/dLLow LimitThe first step is to set the low (Lo) limit. This can be set from 60 to 90 mg/dL. This is the value on whichthe other low settings are based. You can set up to eight low limits for different periods of the day ornight.Alert before LowWhen Alert before low is turned on, you will be notified when your sensor glucose is predicted to reachyour low limit in 30 minutes. The Alert before low can make you aware of potential low glucose levels evenbefore they occur.ALERT BEFORE LOW.Alicia gets very busy at work and sometimes has low glucose readings. Her doctor hasinstructed her to turn her Alert before low on so she is notified 30 minutes before hersensor glucose reaches the low limit of 60 mg/dL that she has set.10
PERSONALIZED ALERTSSuspend on LowWhen Suspend on low is turned on, your pump will temporarily stop delivering insulin if your sensorglucose has reached or fallen below your low limit. This keeps additional insulin from being delivered.WARNING: Do not use the Suspend on low feature to prevent or treat low glucose. The Suspendon low feature is designed to suspend insulin delivery when you are unable to respond to theSuspend on low alarm. Always confirm your sensor glucose using your BG meter, and follow theinstructions of your healthcare professional. Using Suspend on low to prevent or treat lowglucose may result in prolonged hypoglycemia.Additional information on the Suspend on low feature can be found in the Sensor Alerts and Suspendsection on page 35 of this guide.Alert on LowWhen Alert on low is on, you will receive an alert any time your SG reading reaches or falls below your lowlimit. This allows you to test your BG and treat if necessary as instructed by your healthcare professional.NOTE: If Suspend on low is turned on, Alert on low will automatically be set to on so you knowthat your glucose is at or below your low limit and insulin is being suspended.SUSPEND ON LOW.Sam has turned the Suspend on low feature on during the night. He knows that if his lowlimit is reached, he will be alerted and can check his glucose with his BG meter. If his BG isconfirmed to be low, he can treat as directed by his healthcare professional. Sam knowsthat if he is ever unable to respond to the Suspend on low, that the pump will begin to sirenand insulin delivery will be suspended for 2 hours.SnoozeThe low Snooze is set for the amount of time that you want to wait to be reminded that an alert conditionstill exists. Once a low alert is received and cleared, you will be alerted again only if the low alert conditionstill exists after the snooze time you have set. The low snooze time can be set from 5 minutes to 1 hour.11
PERSONALIZED ALERTSSetting up your Low Settings:In this example, we will set up multiple time segments withdifferent alert and suspend settings.1) Press.2) Pressto Sensor Settings and press3) Pressto Low Settings and press.4) Select Low Settings to turn On.If you are changing settings that are already entered,press to Setup and press .5) Press on the time segment. If you are setting only onetime segment, press . If setting multiple time segments,press to end of first segment, and press .In this example, multiple times segments are set.12to set Lo limit and press6) Pressor.7) Pressto continue onto the next screen.
PERSONALIZED ALERTS8)Select each feature you wish to turn on. If a feature is on, you canselect it again to turn it back off. In this example, Suspend on lowhas been turned on.9)Once settings are selected, select Next.REMEMBER: When Suspend on low is turned on, Alert onlow is automatically turned on.10) Presson the time segment.11) Pressto the End time of the second segment and press12) Pressor13) Pressto continue onto the next screen.to set Lo limit and press.14) Select each feature you wish to turn on. If a feature is on, you canselect it again to turn it back off. In this example, Alert before lowand Suspend on low have been turned on.15) Select Next.16) Select Done.13
PERSONALIZED ALERTS17) Verify that settings are correct and select Save.18) If snooze time needs to be changed, pressand press .19) Pressorto the correct time and pressto Snooze.Your Low Settings setup is now complete.Changing High or Low SettingsAs you use CGM, you and your healthcare professional may find that changes need to be made to theexisting settings. To make these changes:1)2)3)4)5)6)Press .Press to Sensor Settings and press .Press to either High Settings or Low Settings, and press .Press to Setup and press .Select Edit.Select time segment you wish to change.a. Change End time if necessary and press .b. Change Hi or Lo limit if necessary and press .c. Press when the arrow is highlighted to continue onto the next screen.7) Select any feature that is off if you wish to turn it on. Select any feature that is on ifyou wish to turn it off.8) Select Next.9) When finished, select Done.10) Verify settings are correct and select Save.14
PERSONALIZED ALERTSAlert SilenceThe Alert Silence feature allows you to silence sensor alerts for a set period of time. If a sensor alertoccurs when Alert Silence is on, a Sensor alert occurred message is displayed and the notification lightflashes, but there is no beep or vibration. You can go to Alarm History in the History menu to see whichsensor alert or alerts occurred. If you have not cleared the message when the Alert Silence period ends,the pump will beep and/or vibrate until cleared.To set Alert Silence1) Press.2) Select Sensor Settings.3) Select Alert Silence.4) Select the alerts that you want to be silenced.5) Pressto Duration and press.6) Press to set the time that you want alerts to be silencedand press .7) Select Begin.Alerts will automatically return to audio and/or vibrate at the end of the duration that you set.SILENCING ALERTS.Sandra uses the Alert Silence feature when she is in class so that she does not disrupther classmates if an alert occurs. She routinely looks at her pump to check for alerts, andcan take action if necessary.15
NOTESNOTES16
CONNECTING YOUR PUMP AND TRANSMITTERSection 5: Connecting your Pump and TransmitterBefore using the sensor for the first time, you will need to wirelessly connect the pump and transmitterso that they can communicate with each other. This allows the sensor information to be displayed on thepump screen.To wirelessly connect your pump and transmitter:1) Attach your transmitter to the charger and make sure it isfully charged.*chargertransmitter2) Press.3) Select Utilities.4) Select Device Options.5) Select Connect Device.Only one transmitter can be connected to the pump at onetime. When you need to connect a new transmitter, you mustfirst select Manage Devices, select the transmitter numberand select Delete.6) Select Auto Connect.Steps for Manual Connect can be found in theMiniMed 630G User Guide.7) Press.8) Select Continue.*See page 39 for more information on charging the transmitter.17
CONNECTING YOUR PUMP AND TRANSMITTERMake sure the transmitter is on the charger beforeproceeding. Now start the search processes onboth devices:!9)a. Remove transmitter from chargerIf green light on transmitter does not flash,reconnect to charger until fully charged.b. Immediately select Search on the pumpThe search can take up to 2 minutes.10) Once device is found, confirm thatthe serial number (SN) shown onthe pump is the serial number onthe back of your transmitter.If you receive the No devicesfound message, place thetransmitter back onto thecharger. Then remove thetransmitter from the chargerand immediately selectRetry on the pump.11) If SN matches, select Confirm.12) Connection is now complete. The transmitter serial number will be displayed on thepump screen.NOTE: These steps only need to be done as a first time set-up. You will not have to repeatwith each new sensor you start.18
INSERTING AND STARTING THE SENSORSection 6: Inserting and Starting the SensorBefore you insert your sensor, gather all of your supplies:ENLITE SYSTEM COMPONENTS*Thumb printABBump on buttonOne-press SerterCADEnlite Sensor & PedestalSensor OvertapeA – PedestalA – Pre-cut HoleGuardian 2 LinkB – Needle HousingC – SensorD – Clear Liner*For more details, consult the individual User Guides sent within the box of each Enlite system component.One-press serter is required in order to insert the sensor properlyEnlite sensor is individually packaged and comes attached to a plastic pedestal which is necessary forproper loading into the serterSensor overtape is required to keep the sensor securely in placeGuardian Link transmitter is connected after the sensor is inserted and covered with the overtapeSelecting Your SiteYour sensor can be inserted in the abdomen.** The sensor insertion site should be at least: 2 inches from your navel 1 inch from your insulin pump infusion site 1 inch from any manual insulin injection site**Clinical trials for glucose sensors were performed on sensors inserted in the gray shaded area shown inthe image above.19
INSERTING AND STARTING THE SENSORFor best sensor glucose performance, avoid sites:Where clothing may rub or constrict (for example, your beltline)Where your body naturally bends a great deal which may cause the sensor to pull outThat are scarred or have hardened tissue or stretch marksWhere there is a great deal of motion or frictionPreparing Your SiteWash your hands with soap and water.Clean the selected site with an alcohol swab and allow the alcohol to dry. Do not use IV prep.Inserting Your SensorXuuCorrect1. Open the sensorpackage.Pull the corner of thepaper covering to openthe sensor package.202a. Hold sensor byplastic pedestal.Remove the sensorwith attached pedestal by holding thepedestal only. Placethe sensor/pedestalon a clean, flat surface(such as a table).Incorrect2b. Tuck adhesive tab.Make sure that the sensor’sadhesive tab is tucked under thesensor connector and snaps.
INSERTING AND STARTING THE SENSORFingers are NOT holding the side buttons.XuCorrectIncorrect3. Load sensor into serter. Grip theserter exactly as shown with yourthumb placed on the thumb printon the serter. Do not hold the sidebuttons. Push the serter down ontothe pedestal until the base of theserter sits flat on the table.4. Detach serter from pedestal.To detach the serter from thepedestal, grip the serter as shownwith thumb placed on thumb printon the serter. With the other hand,place two fingers on the pedestalarms, and slowly pull the serterstraight up. Note: Make sure thatthe pedestal is firmly on the tablebefore pulling the serter away.Warning: Do not detach thepedestal from the serter inmid-air as this may damagethe sensor.NOTE: The thumb print on the serter can be used for either left-handed or right-handed insertion.NOTE: The sensor remains inside the serter after removing the pedestal.The arrow on both sides of serter indicate location of the sensor needle.21
INSERTING AND STARTING THE SENSORu5a. Placeserter on body.Hold the sertersteadily againstyour cleanedinsertion site,without pushingthe serter toodeeply into theskin.5b. Insert sensor. Press and 5c. Holdrelease the bump on bothbuttons at the same time. Donot pull the serter away fromyour body just yet.serter againstbody. Continueto hold theserter againstyour bodyto allow theadhesive timeto stick to yourskin.5d. Removeserter from body.Slowly pull theserter away fromthe skin, makingsure the buttonsare notpressed.NOTE: Failing to hold the serter securely flat against the body may allow the serter to springback after pressing the buttons and result in improper insertion of the sensor.u6. Remove needle housing.Gently hold the base of the sensor against the skinwith one hand. With other hand, hold the needlehousing at the top and slowly pull it straight awayfrom the sensor.Dispose of the needle housing in a sharps container.22
INSERTING AND STARTING THE SENSORu7a. Remove adhesivepad liner. Hold thesensor in place andgently remove theadhesive liner fromunder the adhesivepad. Do not remove theliner on the rectangularadhesive tab yet.8a. Untuckadhesive tab.Untuck theadhesive tab fromunder the sensorconnector.u7b. Press entireadhesive pad to skin.Firmly press the adhesiveagainst the skin andsmooth the entireadhesive pad so that itsticks to your skin.NOTE: The Enlite adhesive ispressure-sensitive. Continueapplying pressure on the adhesiveto ensure that the sensor remainsinserted in the skin for the whole 6days of wear.8b. Straightenadhesive tab. Straightenthe adhesive tab so thatit lies flat against yourskin, but do not removethe adhesive liner yet.23
INSERTING AND STARTING THE SENSORTaping Your SensorBefore you connect the transmitter to your Enlite sensor it is very important that you properlysecure the sensor against your skin using the sensor overtape.Sensor connectoris uncoveredu1. Removeadhesive liner 1.Remove the linermarked 1 from theovertape. Do notremove the twosmaller liners marked2 from the sides ofthe overtape.Sensor snapsare uncoveredu2. Apply overtapeon sensor and skin.Important: Attachthe overtape toboth the sensor andthe skin next to thesensor.3. Apply overtape onadhesive pad. Stretchthe remaining part ofthe overtape around thesensor connector so thatthe tape sticks to thecurved adhesive pad anddoes not block the sensorconnector or sensorsnaps. Continue to pressthe overtape to your skinto help ensure that itsticks securely.u4. Remove liners 2.Remove the two linersmarked 2 from the sidesof the overtape andpress the adhesiveagainst the skin.245. This image is an ex-ample of the overtapeapplied correctly. Thesensor base and skinnext to it are covered,but the sensor connector and snaps areuncovered and appearin the opening in thecenter of the overtape.IMPORTANT: All Enlite tapes andadhesives stick best when you continueto apply pressure after putting themon your skin. Doing so helps the Enlitesensor stay securely placed and fullyinserted.
INSERTING AND STARTING THE SENSORChecking Proper Tape ApplicationProperly applying the overtape is key to ensuring your success with the Enlite sensor. Due to the sensor’ssmall size and flexible nature, the overtape helps to secure it from body motion or physical activity thatcan cause it to be pulled out.The images below show both proper tape application and overtape placement that is not correct.TAPE APPLICATIONCorrectOvertape coveringboth the roundedpart of the sensorand the skin in frontof the sensor.Not CorrectThere is no overtapecovering the sensor.The overtape iscovering the sensorconnectors and is notcovering the skin infront of the sensor.It is important to check your sensor site periodically to make sure the sensor is still secure and has notbeen pulled out. If the sensor has been pulled out, do not try to push it back into place as this will damagethe sensor and it may no longer work properly. If this has occurred, remove the sensor and insert a newone.25
INSERTING AND STARTING THE SENSORConnecting your transmitter to your sensorBefore connecting the transmitter, make sure the Sensor feature is On. See page 5 if you need helpwith these steps.u1.With one hand,hold the sensor inplace. With the otherhand, connect thetransmitter to thesensor.u2.You mayhear a faint “click”indicating that thetransmitter andsensor areconnected. Checkfor the green lighton the transmitterto flash to confirmtransmitterand sensor areconnected andsensor is ready to bestarted.u3.Remove thepaper on theadhesive tab.4.Fold the adhesivetab over and ontothe transmitter.Be careful not topull the adhesivetab too tightly orit may cause thetransmitter to pullfrom the sensorconnection.5. Press theadhesive onto thetransmitter.IMPORTANT: If you do not see a green light flashing on the transmitter after it is connected tothe sensor, then disconnect the transmitter and place it back on the charger to ensure that it isfully charged. Then reconnect the transmitter to the sensor.If for any reason you disconnect the transmitter from the sensor, wait 5 seconds before reconnectingit to the sensor.26
INSERTING AND STARTING THE SENSORApplying a second overtapeAfter connecting your transmitter to your sensor, apply a second piece of overtape usingOption 1 or Option 2.If you have skin irritation due to moisture buildup, follow Option 1. If the transmitter catches on yourclothes, follow Option 2.OPTION 2OPTION 1End oftransmitteris exposedPlace the overtape so that theend of the transmitter is exposed through the hole in thetape.End oftransmitteris tapedPlace the hole of the overtapeover the center of the transmitter.Make sure the end of the transmitter is securely covered by theovertape.It is very helpful to remember the order of these three steps when changing your sensor:1. Insert the sensor.2. Tape the sensor in place.3. Connect the transmitter.4. Apply second tape to secure transmitter.NOTE: When your transmitter is connected to your sensor they form a water-tight seal to a depthof 8 feet (2.4 meters) for up to
Congratulations on your decision to use continuous glucose monitoring (CGM) and taking this important step to better glucose control. Continuous glucose monitoring gives you a more complete picture of your glucose control. Using a sensor allows you to receive up to 288 sensor glucose readings every 24 hours, filling the gaps between your BG tests.