Transcription
Understandingand using filtersin photographyby Adam Jacobs
ebookunderstanding and using filters in photography[ Introduction ][ What are filters? ]“Filter” has become a buzzword in photography thanks to fast,easy to use and popular photo-editing apps like Instagram andSnapchat where a myriad of effects can quickly be applied toa raw image to enhance and change it to achieve a desiredeffect. In fact, many argue that tools like Lightroom, Photoshopand other proprietary computer software, can now simulate thebehavior of a lens filter, making them redundant in the digital age.THE EFFECTS PRODUCED BY LENSFILTERS ARE NEARLY IMPOSSIBLETO REPLICATE OR REPRODUCEUSING DIGITAL MANIPULATIONHowever, this could not be further from the truth. Camera lensfilters, in their many forms, have been around for a lot longerthan an increasing over-reliance on computer software. They areable to produce creative and corrective effects to photographsand still have an important place in modern photography. Bymodifying the type or intensity of light entering a lens, the effectsproduced by lens filters are nearly impossible to replicate orreproduce using digital manipulation. In fact, many filters actuallyhelp achieve even better results that can then be enhanced onceyou work on an image on the computer. Subsequently, filters arestill extremely popular in photography as well as in the fields ofcinematography and video making. Further, unlike some otherpieces of gear, filters are small, light and portable so they don’ttake up too much valuable space in a camera bag consideringthe enormous effects that they can produce on photographs.They are also equally useful whether you are shooting usinga film or digital camera; users of a DSLR, mirrorless, drone orother camera system can all take advantage of what filters haveto offer. Moreover, given the variety of creative and correctionaleffects that filters produce, they are also extremely popularamongst all genres of photography - they are frequently used bylandscape, portrait, macro, architectural, wedding and fine-artphotographers to name a few.2
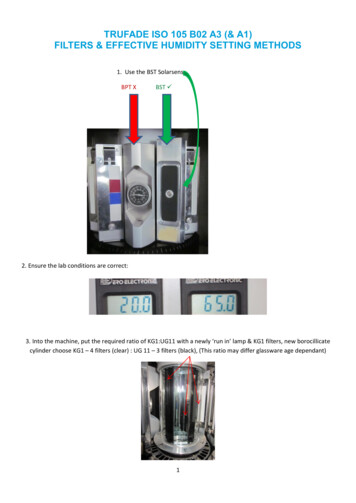
ebookunderstanding and using filters in photographyWhilst all filters protect the valuable glass of a lens, their primary purpose isto improve the quality of photographs and allow photographers to be morecreative and artistic. Depending on the filter you choose to use, this will bein subtle or more obvious ways. Regardless, filters allow you to be moreexperimental with your photography, have more fun and achieve effectsthat are usually incredibly difficult to replicate in post- production.This book will help you understand what different types of filters exist, whenand how to use them and their various benefits. It is my hope that afterreading it, you will have the knowledge and confidence to experiment andexplore these much overlooked, widely misunderstood but, in my opinion,indispensable photographic tools. Given their ease of use and remarkableimpact on your imagery, filters should become an essential component ofevery photographer’s camera bag. Once reading this book, I think you willfind it hard to disagree.As this book is being produced in conjunction with Manfrotto, I am goingto mainly focus on the Manfrotto Lens Filter Suite and the incorporatedrevolutionary Xume System. Manfrotto’s selection of lens filters covers abroad array of different types and sizes of filters. The main filter types thatthe suite contains are UV, Circular Polarizing and Neutral Density filters. Iwill be looking at the unique advantages of each one of these filters in turnthroughout the book. Each individual filter comes ready to use with a neat,lightweight and easily accessible plastic carrying case to keep them safe andmore importantly, dust and scratch free. However, firstly let’s take a look atthe innovative Xume system and what makes it so advantageous comparedto traditional filter attachments.A photo showing the artisticeffects that a filter is ableto produce.3
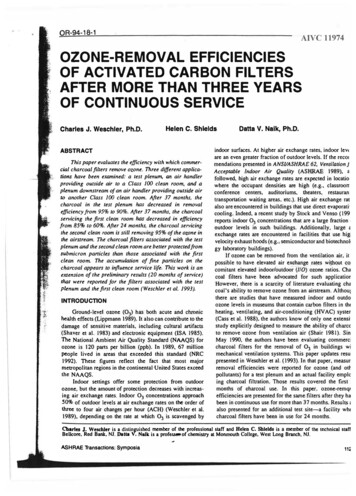
ebookunderstanding and using filters in photography[ The Xume System ]What is the Xume system?What does it consist of?There are different ways to attach a filter to a lens. Thisensures that you don’t miss that essential shot whenout in the field. Conventional filter systems involve afilter being screwed onto the front of a lens. However,they can be fiddly, time consuming and frustratingto use. I am often in situations when I am in trickyshooting conditions whether in a snowstorm, pouringrain, out in the middle of deserts, in a mountain rangeor near splashing water. These are all environmentswhere high winds, lots of dust and other damagingweather elements can wreak havoc - definitely notconditions where I want to be spending precious timefumbling around changing a filter. The quicker a filtercan therefore be applied the better to avoid potentiallydamaging valuable glass on my lens and ruining thepicture I’m trying to take. The Xume System solves thisby innovatively using magnets to speed up workflowand completely change the way that filters attach to alens. Using the system, filters can be quickly snappedon and off the front of the lens with no hassle ratherthan having to stress about screwing filters on and off,avoiding fumbling around and worrying about whetherthey are properly secured.So let’s take a look at exactly what the system comprisesof and how it works:3It is made up of three main elements:1 A LENS ADPATER2 A FILTER HOLDER3 THE FILTER ITSELF214Manfrotto FILTERFILTER HOLDERTo be appliedon your filterLENS ADAPTERTo be appliedon your lensLENS CAPAttaches on the ManfrottoXume lens adapterto protect your lens(selected sizes only)
ebookunderstanding and using filters in photographyFilterManfrotto XumeFilter HolderManfrotto XumeLens AdapterManfrotto XumeLens Cap(selected sizes only)MagneticattachmentCamera LensCamera LensThe setup is incredibly straightforward and only needs to be done once for each oneof your lenses and filters. For example, lets imagine, you have one lens with multipledifferent types of filters - UV, Circular Polarizers, Neutral Density; more to come onexactly what these are and what they do later. Firstly, you apply the lens adpater thathas an integrated magnet to your lens and then attach a filter holder to each one of thefilters. As the lens adpater is magnetic and the filter holder contains a small but strongmagnet, the two pieces simply snap together. The sturdy and strong magnetic systemensures the filters won’t fall off but still maintains a sleek and unobtrusive profile onyour lens. This helps ensure no damage is done to your equipment while in your bag orwhen applying different filters; wear and tear, cross-threading or jamming is commonwith conventional systems. This is less likely to occur with the Xume system as thereare no additional moving parts and it is simply a magnetic connection. Even better, theinitial set up can be done in the comfort of your home or studio without the need to doit when you‘re out and about in the field where damage is more likely to occur.The Manfrotto Xume system is compatible with filters of any type whether CircularPolarizers (CP), Neutral Density (ND) or Ultraviolet (UV) filters allowing you to quicklychange the type of photograph you want to take without wasting any time; once set up,filters of any type or size quickly snap on or off the lens. The Manfrotto XUME systemalso cleverly allows you to magnetically snap your lens cap onto your lens when teamedup with an adpater or using Xume’s own dedicated cap. For ease of use, I would alsorecommend buying lens adapters and filter holders for all of your lenses and filters soyou have a fully integrated system to help speed up your workflow.5
ebook[ Never miss the shot ]It is also enormously advantageous to speed upapplying filters to a lens as taking time screwing ona filter can mean missing the crucial shot. This couldbe trying to capture gorgeous golden light, a stunningsunset or having a family member, friend, model or petbecome inpatient whilst you struggle to change fromone filter to another - it’s sometimes impossible to goback and photograph that moment again. However,the innovative Manfrotto Xume system means youno longer have to waste time and risk missing that‘perfect’ shot. The magnetic system means that filterssimply snap on and off the front of the lens, Xumefrees you up to focus on capturing moments beforethey disappear, adding speed to your workflow.Whether you are on location in a freezing cold climatewhere hands are cold and gear is difficult to handleor in a dusty desert where damage can easily bedone to equipment, being able to quickly and easilysnap a filter rather than have to screw each one onindividually in a fiddly way is hugely advantageous.This makes the whole process of using filters far morefluid and less tedious and fiddly.understanding and using filters in photographyTHE XUME SYSTEM SAVES YOU TIME“SCREWING AROUND” WHEN APPLYINGLENS FILTERS. BY USING MAGNETSIT STREAMLINES THE PROCESSOF APPLYING A FILTER TO A LENS.Quickly change the type of photo you takeAs filters allow for extra creativity, the Manfrotto Lens Filter Suite and Xume System mean I can quickly changethe effect I want to create on photographs whilst on location. This means rapidly switching filters using thesystem involves no hassle to change the type of photograph I want to take. The advantage of being able toquickly change from one filter type to the other cannot be understated. I can minimize the risk of elementssuch as water droplets or dust getting on my lens whilst being able to rapidly change the creative appearanceof the final photograph by rapidly snapping on different types of filters i.e. UV to Circular Polarizer to NeutralDensity. Later in this book, we will explore what the different filter types in Manfrotto’s Filter Suite actually doto a photograph when applied to a lens. Quite simply, the Xume System saves you time “screwing around”when applying lens filters. By using magnets it streamlines the process of applying a filter to a lens, meaningwhen you are out in the field you can concentrate on making better and more creative photographs ratherthan wasting time fiddling with filters.As mentioned the ultra-thin Manfrotto’s Xume System works with the full Lens Filter Suiteincorporating all the different filter types. However, let’s begin by looking at Ultraviolet (UV) filtersto assess their advantages and why I believe they should be an integral part of a photographer’s kit.6
ebookUVFilters7understanding and using filters in photography
ebookunderstanding and using filters in photography[ UV filters ]Ultraviolet (UV) filters are an extremely common type of camera filter andare relatively inexpensive to purchase. Despite being arguably the mostbasic of camera filters, they are one of the most popular camera accessoriessold. As you can see, they are totally clear to look through to the human eyewith no colouring, tinting or opaqueness.Therefore, although they do have some visual effects on photographs a UVfilters primary use, and the reason they are so popular, is that they protectthe front element of a lens from anything that could cause damage.Manfrotto offers three levels of UV filters within their lens suite: theEssential, Advanced and Professional. The advantages of each are outlinedbelow:[ ESSENTIAL UV FILTER ]Ideal filter for blocking UV light and reducing haziness, blurring and bluecasting with eight anti-reflection and water-repellant coating layers.[ ADVANCED UV FILTER ]A slightly more advanced filter for blocking UV light to reduce haziness,blurring and blue casting with twelve anti-reflection and water-repellantcoating layers.[ PROFESSIONAL PROTECT FILTER ]The professional UV filter with a unique anti-static coating to protect yourlens and reduce haziness, blurring and blue casting.8
ebookunderstanding and using filters in photography[ Protection for your lens ]Having a UV filter permanently on a lens provides an extra layer of protection fromthe elements. This stops dirt, smears, dust, moisture and scratches causing damageto the front element. It is obviously preferable for these to occur and gather onthe filter rather than the actual lens. These smears and damages can also happenif you are photographing a pet or young child close up, who could reach out andtouch your lens leaving fingerprints or smudge marks. All of these can compromisethe quality of your images and leave you spending hours in Photoshop cleaning upthe final photographs. These smudges and marks are especially noticeable whenphotographing backlit subjects where flare and light will make every speck on yourlens extra visible.As the filter can easily be removed with the Xume System, it makes cleaning a breezeand the UV filter extremely easy to maintain. You simply snap the UV filter off andthen remove moisture, dust and these other troublesome elements with a cleaningcloth or lens brush and then snap it back on. As this can be done so quickly when onlocation, you can avoid the otherwise inevitable compromising of the quality of yourphotographs from troublesome elements.Economically, having a UV filter on each one of your lenses also makes a lot of sense.In a worse case scenario, where damage is irreparable whether from deep scratches,a lens being dropped, damage occurring in a bag or a lens being totally shatteredby careless handling, replacing a broken filter is a lot cheaper than having to buy anentirely new expensive lens. It is also far less hassle than filing an insurance claimFrom personal experience, I have had cameras drop off tripods from peopletripping over them both in studio and on location. There is usually a heart stoppingmoment where I’ve heard a horrible smash and presumed that my expensive lenshas shattered beyond repair. In every single case, I have been relieved to pick upthe lens, carefully remove my protective UV filter and see what appeared to be adestroyed front element is in fact just a damaged filter and my lens is perfectly intactunderneath. I can then remove the broken filter and simply replace it with a newone. For me, this is a strong enough reason alone to have a UV filter on every one of mylenses before I even begin explaining the advantageous effects they can have on images.Therefore, I’d advise buying a high quality UV filter for each one of your lenses and keepit permanently attached.As you can see here the filter may havesmashed but the lens underneathis perfectly intact.9
ebook[ What is UV light and howunderstanding and using filters in photographyGamma raysdoes it affect a photograph? ]As a UV filter is completely clear it will have no effect on the amount of visible lightentering your camera and so won’t affect the brightness, overall exposure or contrastof your image. However, despite the fact that a UV filter appears totally transparent, itdoes affect the visible look of photographs in other ways in addition to acting as a lensprotector as previously mentioned.To explain this, I briefly have to delve into a bit of science. As humans, wesee the world around us in a spectrum of light throughout the coloursof the rainbow – red, orange, yellow, green, blue, indigo and violet.This range of light that we can visibly see is measured in nanometers(nm). The colours of the rainbow sit between 390nm to 750nm interms of electromagnetic wavelengths of light. Infrared, which is afamiliar photographic term, sits below the red end of this spectrum(approximately 750nm-1nm). However, what we are interested here isUltraviolet (UV) light. This is invisible to the human eye and resides abovethe blue end of the spectrum (10nm-390nm). Although we cannot see it,this UV light has an impact on the photographs that we take.X-raysALTHOUGH WE CANNOTSEE IT, THIS UV LIGHTHAS AN IMPACT ONTHE PHOTOGRAPHSTHAT WE TAKE.When photographing outside UV light is always around us and visually manifests itselfin the form of haze in our pictures. However, the amount of UV light that is present isamplified in certain situations. For example, when you’re in the mountains the higherthe altitude, the more UV light that will be present. Bodies of water such as a lake, seaor snow reflect UV light. Therefore, the closer you are to these, the more UV light therewill be. Moreover, UV levels are also higher in cities and large, dense urban areas wherereflective glass, metal skyscrapers and buildings work to amplify UV rays. All of theseincreased UV levels lead to higher levels of haze in a photograph. The result of this hazemanifests itself as a loss of detail, blurring and overall damage to image quality. Obviouslyif possible we want to try and avoid this. This is where a UV filter can help.Ultra violetVisible lightInfraredRadio wared10
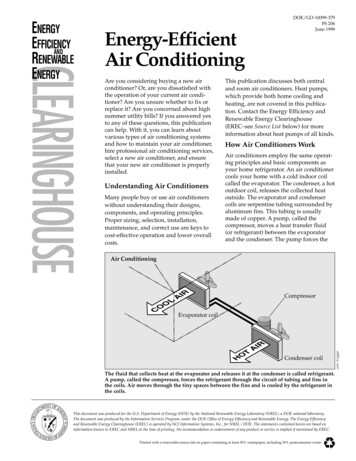
ebookunderstanding and using filters in photography[ How does a UVfilter help an image? ]A UV filter although completely clear, blocks ultraviolet lightfrom entering a lens and reaching a camera’s sensor. Asmentioned, this UV light is invisible to our eyes. But, whatimpact does blocking this UV light from reaching the camerasensor have on a photograph? Firstly, it can filter out unwantedmoisture-related haze caused by UV light therefore preservingdetail and sharpness. This detail can often not be brushed backin using post-production software if it is not originally capturedin the photograph. Therefore, using a UV filter where areas ofUV light are higher can result in sharper photographs.Without UV FilterThese two photographs (the first withouta UV, the second with one applied) mayappear almost identical when placedalongside each other. However, look atthe difference in the sharpness on theclock face with the one taken with theUV filter and without.11With UV Filter
ebookHere you can clearlysee how the UV filterremoves the blue tintin the shadows of thisphotograph.I also often notice theability of a UV filter to fixthis ‘blue casting’ effectin areas with largepatches of snow, whereUV light is strong, asshown in these twoexamples.Without UV filterWith UV filter12understanding and using filters in photographySecondly, as well as helping sharpnessby filtering UV light, a UV filter helpslessen a phenomenon known as ‘bluecasting’. Daylight photos often possessa blue-ish colour cast especially in theshadows. By absorbing a significant partof the Ultraviolet rays, a UV filter helpseliminate this ‘blueishness’, producinga more accurate representation of theactual scene. This saves time correctingthis colour cast in Photoshop. This bluecasting is especially noticeable if you areshooting with a film camera but regularlyappears when shooting with moderndigital cameras.
ebookunderstanding and using filters in photographyTHEREFORE YOU ARE GUARANTEEDTHAT YOU WILL NOT ONLY PROTECTYOUR VALUABLE LENSES, BUTALSO HAVE A POSITIVE EFFECTON YOUR PHOTOGRAPHS.This sunset photograph was taken witha UV filter resulting in the reductionof haze whilst up in the mountainsand a sharper overall image.13
ebookCircularPolarizers14understanding and using filters in photography
ebook[ Circular Polarizers (CPs) ]Another type of filter offered in the Manfrotto Filter Suite that is fullycompatible with the Xume system are Circular Polarizing Filters, alsocommonly known as CP filters, or sometimes simply referred to as“Polarizers”. Unlike a UV filter, a Circular Polarizer is not totally clear tolook through. Instead, it is translucent with a grey-like tone appearanceand blocks certain types of light that are reflected towards your camera atcertain angles from reaching the camera’s sensor. By filtering out a specifictype of light, a CP filter affects the brightness of the exposure and will alwaysdarken the overall photograph. This is usually by a reduction of two to threef stops of light. Therefore, certain camera adjustments need to be made tocompensate for this loss of light to ensure that your photograph will not beunder-exposed. I usually just push up my ISO to offset the slight loss of lightonce the filter is snapped on.As with the UV filters, the Manfrotto Filter Suite provides Circular Polarizerfilters in all of the standard sizes. This ensures that there is a CP filter to fiton any of your lenses and regardless of your camera type. As with all thefilters in the suite, it fits whether you shoot with a Canon, Nikon, Sony, Leica,Panasonic or Fuji camera to name a few. There are three different types ofCP filters in each size depending on your needs. These are outlined below:[ ESSENTIAL CPL ]The Essential Circular Polarizer has two coating layers and is water repellent.[ ADVANCED CPL ]The advanced Circular Polarizer with 68.1% of light transmission and ismulti-coated glass with water, oil and scratch resistant features.[ PROFESSIONAL CPL ]The ultimate Professional Circular Polarizer with 90% of light transmissionand multi-coated glass with a unique anti-static coating for superiorprotection.15understanding and using filters in photography
ebookunderstanding and using filters in photography[ How does a Circular Polarizer work? ]A Circular Polarizer (CP) filter blocks certain light waves reaching the lens which have beendirectly reflected towards the camera at specific angles. Unlike other filters, a CP involves acertain amount of adjustability and has a rotating ring that you can manually control. This ring,when rotated, blocks specific light waves from entering the lens and subsequently reaching thecamera’s sensor. Given that the angle of light being filtered is important, so is your position tothe sun to determine how light will be filtered and the resultant effect on the image. The strengthof the effect of the filter (amount of polarization) varies greatly depending on the position of thesun, time of day and season. For example, you can change the angle that is filtered by movingyour position in relation to the sun. The strongest polarizing effect is always achieved when youare perpendicular, (90 degrees), to the way that the sun is facing.The simplest way to calculate this is to form a pistol shape with your thumb and index fingerand then point your index finger directly at the sun. If you then rotate your thumb clockwise orcounter-clockwise whilst keeping your index finger pointing at the sun, you will be able to figureout which parts of the sky will have the maximum level of polarization - it will always be whereyour thumb is pointing. This is because your thumb will always be at 90 degrees from the sun.This is a good tip to use on location to ensure that you always know where in your photographthe maximum level of polarization will occur. For example, at midday when the sun is directlyabove you, the sky will be polarized horizontally and evenly in all directions. Earlier or later inthe day when the sun is lower, the sky will be polarized more vertically.As previously mentioned, by rotating the ring on a CP filter you can change the amount ofpolarization being achieved. A great way to see the different strength of polarization occurringis to turn the ring whilst your camera is set in “Live View” mode. This will allow you to view thedifference in real time on your camera’s LCD screen. However, this is not always possible as whenout it is sometimes too bright to see the LCD screen clearly. In these instances, you can also seethe different strength of polarization changing by peering directly through the viewfinder asyou rotate the ring on the CP filter. The further you turn the ring, the more polarization willoccur and the greater the effect on your photograph.So, what exactly does a CP filter do to your photos, how is it useful and why should it be such animportant part of your kit?In these three photographs, by looking at the changesin the saturation of the blue in the sky and thedifference in contrast between each image you canclearly see how rotating the ring on the filter changesthe strength of polarization that occurs.16Further, these three photographsalso show the difference in thestrength of polarization that canbe achieved by turning the ring onthe CP filter.
ebook[ What does a Circular Polarizer do? ]Increases SaturationOne of the most obvious benefits of a CP filter is that it creates more colorful and vividimages by cutting out certain light reflections making skies look bluer, richer and deeperwhilst subsequently allowing clouds to appear more pronounced.You can clearly see in these two photographs howadding a CP has boosted the saturation of the skyallowing the booming clouds to stand out a lot more.17understanding and using filters in photography
ebookHowever, a CP filter does so much more than just boost colours in thesky - applying the filter adds more ‘pop’ to the whole image. Trees appeargreener, flowers more vibrant and foliage more lush - all the colours ofthe natural world appear more intense using a CP filter. This is especiallynoticeable on clear, sunny days where levels of polarization are distinct. Thewhole landscape becomes illuminated in a totally different way by cuttingglare. For example, when you achieve an optimal level of polarization byturning the ring on the filter to the right point, you will clearly see colourschange to be stronger, contrast be boosted and the scene in front ofyou ‘pop’ as you peer through your viewfinder. Therefore, by decreasingunwanted reflections, both saturation and vibrancy are increased, allowingnatural colours to show through with a greater depth, boldness and vivacityresulting in more striking and powerful photos.These two photographsclearly show the difference insaturation when using a CPfilter and not. As you can seethe filter makes the landscapedarker but boosts all ofthe colours both in the skyand trees and enhancesthe contrast and clarityof the image.18understanding and using filters in photography
ebookunderstanding and using filters in photographyFurthermore, as well as making colours richer, CP filtersalso enhance contrast and depth within a photograph.This can be clearly seen in these examples below.Without CPLooking Through CPHuge Difference in Contrastand depth when using a CP.19
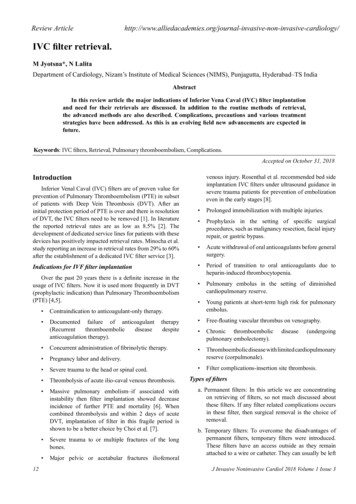
ebookunderstanding and using filters in photographyCP FILTERS ARE ALSO HELPFULIN REDUCING ATMOSPHERIC HAZEIN PHOTOGRAPHS ESPECIALLYWHEN SHOOTING OBJECTS IN THEDISTANCE SUCH AS MOUNTAINS ORCITYSCAPES. MOREOVER, BY REDUCINGGLARE THE FILTER CAN ALSO HELPIMPROVE EXPOSURES BY PREVENTINGPHOTOGRAPHS APPEARING TO LOOKWASHED OUT, FURTHER ENABLINGCOLOURS TO BE BOLDER ANDCONTRAST MORE INTENSE.This photo taken at Glacier Point,one of the highest points in YosemiteNational Park, shows the effect of thefilter when looking at the iconic Half Domemountain face. You can clearly see theadded boldness, deepness and richnessof colour that the filter provides asopposed to the ‘washed out’ look whennot looking through the filter. Also, noticethe effect the CP filter has on reducingthe atmospheric haze on the mountainsmaking the rock face through the filterappear much clearer and sharper.Interestingly, the shapeof the mountainHalf Dome is what inspired the brand“North Face” logo.20
ebookunderstanding and using filters in photographyAs computer software is now so powerful in manipulatingimages, many argue that the colour boost achieved by a CP filtercan be added in post-production. However, I am a firm believer ingetting things right in camera rather than relying on software. Apolarizer is recording the detail of the rich colours that sit behindthe reflections of what the filter cuts out. Therefore, there is noway to go back and re-insert these details in Photoshop - theywould have been invisible without the CP Filter if the camerahad not recorded them in the first place. It is hard to argue thatyou can match the richness in colour achieved using the filteron a computer, not to mention its effect on reducing reflectionsand haze. Subsequently, the more you shoot with a CP filter andunderstand how the polarization works, it becomes increasinglyapparent how, by simply screwing this small, lightweight filteronto your lens, you can add a whole extra dimension to yourshots. Depending on your taste and how much you want the‘polarizing’ effect, the filter can really make images jump offthe screen or page when printed; it almost feels like cheatingwhen looking at the vividness and deepness in colour that thefilter adds and the overall improved aesthetic given to an image.Therefore, the way in which a CP filter can boost saturationand increase contrast by reducing reflections is just one of thereasons why they are so popular with landscape photographerswho want to make their photographs more eye-catching.Once you start using a CP filter you will soon realize thatunwanted reflections are everywhere and are also especiallynoticeable on bright, sunny days. The CP filter does a great jobof removing these and in the process making tones appear farricher. Lets take a look at this in a bit more detailI really enjoy shooting with a polarizer in an overcast environmentsuch as a wood or forest where there are wet rocks, vegetationand water. This is because the filter cuts all of the unwantedreflections off these surfaces. It therefore brings dynamismand vibrancy to my photos and boosts the saturation to suchan extent that I often have to dial back the saturation fromthe photo with the filter when I get back to my computer!21Further, if you look at the green moss on the rocks in these twophotographs, it is another clear example of how the CP filter, byremoving the glare and reflections from the wet rocks, providesbetter depth and clarity whilst helping the natural colours toshine through far more vividly.
ebookRemoving unwantedreflections - Waterunderstanding and using filters in photographyNotice in thesebefore and afterphotographs howthe CP filter hasremoved the glarefrom the wateras well as reducingthe highlights offthe rock whilstboosting thesaturationin the trees.A Circular Polarizing filter is an extremely usefuland powerful photog
understanding and using filters in photography [ Introduction] [ What are filters?] “Filter” has become a buzzword in photography thanks to fast, easy to use and popular photo-editing apps like Instagram and Snapchat where a myriad of effects can quickly be applied to a raw im