Transcription
THESHOPTHE 250 BEST SHOP TRICKS FROM WOODWORKER'S JOURNALFor over 30 years, woodworkersacross the country have beensharing their favorite shortcuts,jigs and fixtures with the editorsof Woodworker’s Journal. Hereare 250 of the best ideas we’vepresented in Woodworker’sJournal magazine!250 BESTTRICKS4365 Willow Drive, Medina, Minnesota 55340-0401Phone: 800-610-0883Web site address: www.woodworkersjournal.comA supplement to
THE 250 BEST SHOP TRICKSOne of the best things that happens when a bunch ofwoodworkers get together is sharing shop secrets. You’vegot a great idea for getting more accurate cuts? I’ll trade youfor some of my hardware storage solutions!Here at Woodworker’s Journal, we’re lucky enough to geta never-ending stream of these hints from our readers. Wecall them Tricks of the Trade, and we share them regularly inour magazine. We know how useful they are to our readers— so we decided to create an even better tool by putting over250 of these tricks in one place!Larry N. StoiakenEditor in ChiefCopyright 2000 Rockler Press.All rights reserved. No part of this publication may bereproduced, stored in electronic retrieval systems, or transmitted inany form or by any means, including electronic, photocopying,mechanical or otherwise, without the prior written permissionof the copyright owner.3
Q&A“How do I stop sawdustfrom sticking to the gearand screw mechanism ofmy table saw?”The answer, according toA Simple Scraper HolderThis simple scraper holder consistsof two dowels joined by a flexiblepiece of 1/8" plywood. A 1/4" slot isrouted into each dowel and thedowels are then glued to theplywood. To achieve maximumflexibility, the plywood is cut so theexterior grain runs parallel to thedowels. The blade fits into the slotsand is held by a binder clip.A. M. BensonHouston, TexasWalter France of LithiaSprings, Georgia, is to givethe mechanism a thoroughBinderclipcleaning, then spray with3/4" x 4"dowelsilicone. This causes thedust to fall off instead ofaccumulating, and it alsoprevents rust.1/4" slot,2 1/ 2" long4
The Half-lid Paint StrikerNext time you begin a paint jobrequiring a whole can of paint,remove the lid and use a hacksaw tocut it in two. Put one half aside forlater, then slightly bend down thecut edge of the other and press itback in place atop the can. This halflid makes a sturdy brush shelf andthe cut edge can be used to strikeexcess paint from the brush.Lane OlinghouseEverett, WashingtonBent downedgeQuick TipProfessional woodworkersgenerally keep theirdrawings and notes ona clipboard, but even thenthey get dog-eared anddirty. A piece of clearPlexiglas , cut to 9" x 11"size, makes a greatprotector, but it also opensup a few other possibilities.By gluing a transparentruler and protractor (bothare available at officesupply stores at very littleTape Measure TipThe bulky case of a tape measuresometimes gets in the way in tightspots, so I kept a one-foot section ofan old tape and ground both ends tomake it accurate. I also made 24"and 36" measures this way — theywork great inside cabinets.Robert GuyanPortland, Oregoncost) to the Plexiglas, you’llhave an instant way tomeasure drawings, smallparts and angles. Usea clear glue.5
Q&A“How do I straightena warped board?”There’s a Hole in the Bucket I put a plastic bag in my Shop-Vac tohold the dust so it would be easierto dump out. But the bag keptgetting sucked up into the filter. SoI found a pail that just fits inside theplastic bag, and I cut the bottom out.Now, I just take the pail out first andthe bag comes out easily — anddust doesn’t fly all over!Arthur DuffieKalamazoo, MichiganIf a board is warped alongits edge, that’s an easy fix.Simply run it acrossa jointer. If it’s cuppedacross its width, you can tryripping it into two or eventhree narrow boards,jointing their edges, thenBottomlessbucketreversing the grain in everyother board when you gluethem back together.Twisted stock is usuallybeyond help: your best betmay be to cut it up and useit where small parts arerequired.6Garbagebag
Carpet rollsBundlewithtwineQuick TipA surface planer doesn’tflatten boards. All it does ismake them the samethickness along theirlength. If you feed a warpedboard through a planer,all you’ll get at the otherend is a uniformly thickSmall Stock StorageHeavy cardboard carpet tubes(usually available FREE from a localcarpet layer or store) can be cut toany length and bundled togetherwith cord. Mine are 18" long, andI use them to separate differentdowel scraps and leftover hardwoodmoldings. I can check my inventoryat a glance: the tubes rest on thefloor under my workbench, set on2x4 scraps to keep them off theconcrete. While tying the cord,use masking tape to temporarilyhold them together (or you’ll looklike Charlie Chaplin chasing themall over!).Barb SiddiquiWenatchee, Washingtonwarped board.To get a flat board, firstdress one face of the boardon a jointer or a wide beltsander. Then lay theflattened (dressed) faceon the planer bed, whilethe knives flatten thesecond face.7
Q&A“What do I do with a wornout cordless drill battery?”Ni-Cad (nickel-cadmium)batteries pose a seriousthreat to our groundwater,Sliding SupportsI use a pair of dining table slidesand a couple of rollers to supportlong boards on my table saw(above). I attached the slides to thebottom of the saw’s tabletop andmounted the rollers on a boardstretched between them. When notin use, the slides can be pushed outof the way (below).Robert FloydHilton, New Yorkso they’re not welcome atthe landfill. Most cities haveRollera system in place fordealing with them: call yourcourthouse or landfill office.Or call 800-8-BATTERY andget the name of a localretailer who will take themoff your hands withouta charge!8Tableslide
Clamp the end of the shade in the bench’s viseAttach shadeto the end ofthe benchBench ProtectorsTo protect my maple workbenchfrom paint or stain splatters,I mounted a white vinyl windowshade roller to one end of theworktop. When I’m ready to finish,I just extend the shade across thebench. After the finish dries, theshade rolls out of the way. And thebest part is that replacement shadesare very inexpensive.Robert O. WendelMarlboro, New JerseyQuick TipTurners often leave a shortlog inside the bag on theirdust collection system. Thecombination of flowing air,sawdust and chips tends todry out the stock in an even,controlled fashion. But try itWood Filler WoesI wanted to avoid the inevitableblemishes that occur when excesswood filler surrounds nail heads intrim and moldings. So I came upwith this idea: place a short piece ofmasking tape over the area aroundthe nail head, then set the nail rightthrough the tape. Apply the woodfiller and, while it is still soft, peel offthe tape. A perfect round spot is left,with no accumulation on thesurrounding area.James VasiWilliamsville, New Yorkon a less favored piece first:results vary widelydepending on how often thedust collector is used, thelog species, the geographiclocation of the shop and thelength of time the log isallowed to stay in the bag.9
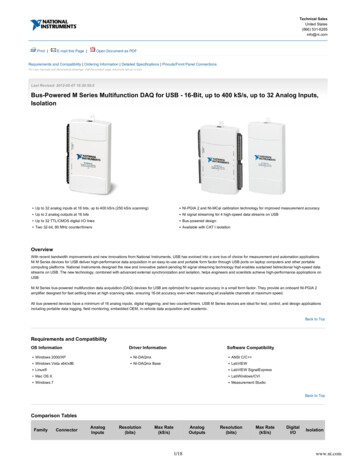
Router tableLines on molding areperpendicular to thecurveMove in or out to centerthe bit for each profileClampRaise or lower the bitto cut various profilesQ&A“I use wood blocks to savethe workpiece whileI tighten clamps, but I runout of fingers trying to holdthem in place. Any ideas?”Kenneth J. Shaw of Holley,New York tells us that heattaches those scraps to thejaws of his clamps with hotmelt glue, so they’reremovable when he’s done.10S-shaped Moldings on a Router TableNone of my woodworking friendscould advise me how to cut a profiledown the middle of an S-shapedmolding, so I came up with thesolution shown here. Afterband-sawing and drum sandingthe piece to shape, I made pencilmarks every inch along the backof the workpiece. These wereperpendicular to the curve (seedrawing). Then I clamped a pointedguide fence to the router table thatcentered the bit where I wanted it,set my bit height, and startedrunning the piece through thecutter. By adjusting the work so thatthe pencil lines were always at 90 to the fence, I kept the cut in line.A little carving and sandingsmoothed out any rough spots.G. R. WilliamsFostoria, Ohio
6 angleQuick Tip2 1/ 2"3/4"Hammering small nails canbe a real challenge,especially if you have largefingers. One way to deal24"with the problem is to stickthe nail through a piece ofpaper, then use the paperto hold it in place while youstart driving it. Once the nailis secure, the paper justpulls away. Craig Kimpston1 1/ 2" x 5 1/ 2"of Grimes, Iowa, hasa more innovative method:he uses the teeth on hisThree-piece Clamp HangerStoring pipe clamps has alwaysbeen a challenge for me. I think I’vecontemplated every system in theworld. Quite by accident, I stumbledon the method shown here. Itrequires only three pieces of woodassembled with drywall screws.Michael BurtonOgden, Utahpocket comb to hold nailswhile he starts them.11
Q&A“How do I know whena saw blade or router bitis dull?”The most obvious sign isthat the bit or blade iscutting more slowly than itwas when first installed. ButAn Extra Vise for your ShopWhile working on a project requiringhand-cut dovetails, I came up withthis simple vise idea. I took a scrapof hardwood 1" thick by 18" longby 8" wide and predrilled andcountersunk holes 1" from the topedge. Then I cut a slot on bothends, 3" deep and wide enough toaccommodate my Bessey barclamps. I took a second piece thesame size and cut the slots in thesame place. Then I fastened the firstpiece to the workbench, slid in theclamps, and put the second piece onwith the screw ends facing out. NowI have an extra wood vise wheneverI need one.Pat PelkeyOswego, New Yorkif you don’t use the toolfrequently, you might notnotice that. So, look forPredrill andcountersink8" x 18" fir3" groovesrough edges, an unevenkerf and signs of burning.Dull bits and blades have towork harder, so they heatup more and that leadsto pitch buildup.1212" BesseybarclampsCreating a CurveTo draw a curve, compress a thinstrip of wood between the jaws ofa bar clamp. The clamp threads allowmicro-adjustments of the curve.William AdsitMilford, Illinois
Squareblock of 3/4"plywoodQuick TipIf you’re getting a littletearout or feathering onboards as you run themacross the jointer, tryKeeping the Bit PerpendicularI’ve seen many great tips on how tohold a hand drill at a right angle toyour work surface — everythingfrom mirrors to specially cut jigs.I just use a piece of 3/4" plywoodcut at a right angle. The 90 anglekeeps the drill bit straight one way,and I use the very visible glue linesin the plywood to keep the bitperpendicular the other way. It’salways worked for me, and it’spretty convenient.Henry R. DillonRiverdale, GeorgiaRouter Skid MarksWhen trimming plastic laminate,avoid black marks left by the routersub-base by occasionally sprayingwith WD40. This will also lubricatethe bearing. (You shouldn’t use oilon wood surfaces, though.)Joe NelsonS. CleElum, Washingtonreversing the direction ofthe feed. Sometimes, grainhits the knives at the wrongangle. By switching the frontof the board to the back,you offer a different grainangle to the cutters. If theknives are nicked, justloosen one and move it leftor right, as far as it will go.Leave the others as theyare and you’ll get clean,sharp cuts.13
Templates workgreat for settingboth mitergauge andblade anglesQ&A“How do I remove waterstains from a table?”One of the most unusualand effective methodswe’ve heard about (butTable Saw AnglesRather than look for a protractoror T-bevel, or trust the arrowindicators, I made a set of the anglesI most commonly use to adjust mytable saw and miter gauge. 1/4"plywood works fine for this. I usethem again and again to set mysaw for cutting angles, pentagons,hexagons, octagons and evensegmented bowls.Richard DornOelwein, Iowanever tried!) is to rub outthe mark with standardmayonnaise! Apparently,mayo has just the right gritand chemical makeup toneutralize the blemish.14Toner TrickWhen I need to transfer a patternor drawing onto a piece of wood,I make a copy on a copy machineand iron it onto the wood. The heatfrom the iron transfers the toneronto the wood.E. FrohnhoeferRiverhead, New York
LeatherPlug holein spoolwith adowelQuick TipIf you frequently cut largeDowel ashandlesheets of plywood forcasework, you know howSpoolhard it is to reach the tablesaw’s switch whensomething goes wrong.Many catalog and retailoutlets sell a foot-operatedswitch that is plugged intothe wall, then the saw isThread Spool: A Shop AidSometimes, when doing lightwoodworking or modelconstruction, a small wooden malletis very handy. I found an emptythread spool made just such amallet. First, I glued a section ofdowel through the center hole of thespool and sanded this flush with thespool faces. Then I glued a leatherdisk to each of the faces. Next,I drilled a hole through the bodyof the spool and glued a short pieceof dowel there to act as a handle.I have found this tool to be mostuseful for model work.Howard E. MoodyUpper Jay, New Yorkplugged into the switch. Byplacing the switch a coupleof feet in front of the saw,but a little to one side, youcan easily reach it in anemergency, yet avoidaccidentally turning off thesaw in the middle of a cut.15
Q&A“What’s the sequence forsanding grits?”Most woodworking projectsare sanded first with a 100or 120 grit paper, thena 150. This is usuallyfollowed by 180 grit paper,then 220. After applyinga first coat of finish (ora sanding seal coat), youcan break it down with 280,320 or 400 grit paper. Thefinest grade of over-thecounter paper is 800 grit,although finer polishingpapers are available. At theother end of the scale,stock removal is done withcoarse grits from 12 to 60.16Table Saw Alignment JigThis little jig (above and below)slides in the miter gauge slot onmy table saw and allows me toalign the blade perfectly with theslot. To use it, I set the head of thebolt so it just barely grazes the sawblade at the front of the blade, asclose to the teeth as possible. ThenI slide it to the back of the blade andcheck again to see if any minorrealignment is required.Sean BreeNew York, New York
Duplicating SpindlesI made a bench with 13 spindlesthat had to be exact duplicates ofeach other, so I built a gauge bydrilling several holes of varyingsizes in a line along a piece of 1/4"hardboard. Then I ripped it downthe middle. By marking thecorresponding thicknesses on myturning blanks, I could simply stopthe lathe, place my gauge on each ofthe marks and check my progress.James A. JohnsonBrunswick, OhioQuick TipKeep a couple of hardbristled toothbrushes handyin your shop and you’ll findhundreds of uses for them.They’re perfect for cleaningout carvings and intricatepatterns when refinishing,or getting rid of dust and oilbuildup on router bitbearings. They can be usedto clean delicate partswhere a wire brush wouldbe too intrusive or coarse.And nothing works likea toothbrush and an air gunto clear dust from an insideA Razor Edge on Turning ToolsUse a felt-tipped pen to coat theentire cutting edge of a tool andsee how you’re progressing whileyou sharpen it.Howard MoodyUpper Jay, New Yorkcorner before finishing.17
Q&A“How do I stop tearoutin the underside ofa veneered plywood sheet,when cross-cutting it on thetable saw?”By cutting it twice!The first time through, setthe blade height at 1/8", thenmake the cut slowly with asharp, multi-tooth(at least 60 teeth) blade.Then raise the blade andmake the second cut all theway through. This methodwill eliminate almost alltearout problems. Puttingmasking tape along the cutline also helps a little.18Roll Your Own Keeping blueprints andnotes handy in the middleof a project is easy whenyou mount a roll-upwindow shade above yourworkbench. Tape thedrawings and plans to theshade. Then, when youneed something behindthe shade, just roll it upand out of the way.R. B. HimesVienna, Ohio
Washer and nut on insideof each disk1/8" lip115/8"1 16"1 15/ 32"Washer and nut onoutside of each disk31 4"Quick TipWhen working withmanufactured panels suchas plywood and particleboard, store them flat orvertically, but never at anBuild a Small Parts BufferMount half a paint roller in your drillpress or lathe to buff small parts.To do so, turn two 3/4" disks for theends, leaving a 1/8" lip as shownabove. Secure these on a length ofthreaded rod with nuts and bolts,spacing them just far enough apartto accept one half of a 9" long paintroller. Leave a couple of inches ofrod for the chuck to bite. Clean theroller by wetting a cloth with paintthinner and holding it against theroller as it turns.William Robidoux Jr.Tiverton, Rhode Islandangle or they’ll warp. Theywill de-laminate in damp ormoist locations. If you needto plane their edges, start atthe ends and work towardthe middle: if your planeruns off the ends, you’ll getsome chipping and tearout.19
Drillbushings4"3/4" x 3/4"guide rails12 4"13 2"Q&A33 4"“How can I flute dowels?”Flutes are cut into dowelsto allow excess glue and15"5 2"pockets of trapped air toescape as the dowel jointis clamped shut. Severalmanufacturers offerpre-fluted dowels, but youcan make your own in apinch. Just drag a length ofdowel sideways across onetooth of a circular sawblade. Make sure the bladeis secured (as in a vise),and keep your handsaway from the teeth. Twoflutes are usually morethan adequate.20Drilling Center HolesHere’s an easy-to-build jig fordrilling centered holes in roundstock. The drill guide is a largeblock made by gluing up threepieces of stock, while the base iscomprised of a glued up bottom, twoends and a pair of guide rails. Makesure the block moves freely in thebase and use a slightly undersizedbit when drilling holes for the 1/4",5/16" and 3/8" ID bushings.Salvatore F. PontecorvoFort Wayne, Indiana
Shop Made Hold-downsHere are two tricks to keeplumber tight to the saw tabletop(or a fence). The first is to cut a 30 kerf in a piece of plywood and inserta flexible putty knife, then clamp theunit to the fence. The second idea isa little more complex, as shown inthe drawings below.Quick TipSpline joints are a greatway to join two long edges.But while mostwoodworkers have noproblem routing the groovesfor the spline, they often letthe ball drop when it comesto making the actual spline.Tack inwith smallbradsThinslatsA ripped piece of hardwoodwon’t work, as it will splitBevel thebottomedgesalong the grain — rightwhere you need the moststrength. Plywood is theThis is a piece of 3/4" plywoodwith kerfs long enough to holdwooden slats like paint stirringpaddles. Glue and tack the slats inplace after beveling the bottoms forbetter contact with the wood. Thehold-down can be made any lengthor width: longer models workwonderfully when you’re rippinglong stock on the table saw.R.B.HimesVienna, Ohioperfect answer: itsalternating grain preventssplitting, and it comes inthicknesses that areperfectly suited to therouter bits you use tomake the grooves.21
When you’re making a few small parts,place a small mesh bag inside the hoseWhen you’re makingseveral small parts,place a large meshbag inside thevacuumQ&A“How do I clean outcorners before I startto stain?Howard Moody of UpperJay, New York, offers thissimple solution: he buysa small whisk broom andreforms its flat bottom edgeinto a point. Howard tellsus that his little custombrooms work great for thosehard-to-reach corners, andthey usually save him fromdragging out the shopvacuum.22It’s In the BagWhen cutting several small pieceson my miter or table saws, I puta mesh bag in the body of my shopvacuum and hold it in place with oneend of the hose. I attach the otherend of the hose close to my sawblade. When I turn on the vacuumand the saw, the vacuum pulls thesawdust into the body and the meshbag traps the small pieces I’mmaking. If I only need a few parts,I put the mesh bag in the other endof the hose, near the saw.Stanley A. PulaskiCedar Springs, Michigan
5 1 2"1 2 1 2"2" x 4" x 6"Sandpaper1 2 1 2"Drill Press SupportWhen using my benchtopdrill press on long pieces ofwood, I often run into troubleholding the stock level as I drill oneend. So I made a simple support jigusing two pieces of 3/4" plywoodjoined at one end with a butt hinge:this covers the full range ofadjustment for my drill press table.A 6" long piece of scrap 2 x 4 servesas the adjusting block. It can beused flat or on edge, depending onthe angle required. I glued a pieceof medium grit sandpaper onto thelower flap of the jig, to keep theblock from slipping when I put theweight of the stock on it.Bob KellandNewfoundland, Canada5 1 2"Quick TipWhen you spray lacquer inhumid weather, a whiteblush reaction sometimesoccurs. Roman Hershbergerof Millersburg, Ohio, solvesthis problem by sprayinga light mist of lacquerthinner on the blushing area.23
HalfwaypointQ&A“How do I avoid nicking thesteel faceplate on my lathewhen turning a bowl?”Glue your turning blank toa disk of 3/4" thick wood theShort Cut to the Center9Problem: find the center of a 5 16"wide board. Solution: Place a squareat an angle on your board, with theinch marks on edge. Rotate thesquare until two numbers that areeasily divided in half are on theedges (in this case, 6 and 10; sothe center of our board is at the8" mark).Walter KellerFritch, Texassame diameter as the blank.(Insert a page of newspaperbetween them before youglue and clamp themtogether: this makesseparation after turninga lot easier.) Then simplyscrew the disk to thesteel faceplate.24Straighten out those CurvesIt’s difficult to cut a curved lineperfectly and, if you have cutaway your marks, it’s almostimpossible to find exactly wherethe irregularities are. Try stretchinga thin piece of band steel (or evenan old band saw blade) along thecurve. The exact position andseverity of any irregularities willbecome immediately apparent.Michael BurtonOgden, Utah
Storing Hand PlanesI wanted my hand planes to bewithin easy reach, but I also wantedto protect the cutting edges of theirblades. So I built a modified traythat stores the planes right on mybenchtop. The bottom is a scrap ofplywood, and the sides are miteredstock left over from another project.Small strips of wood raise the frontsof the planes, keeping the bladeedges clear of the bottom of the box.Angled strips underneath the trayprop up the entire assembly, andcross-strips stop the planes fromsliding around, especially whenI move the tray.Kevin HemmingsenWabasha, MinnesotaQuick TipIf you like the look ofHonduras mahogany, butfeel the price is a littlesteep, consider substitutingclear Spanish cedar. Whenfinished clear, it is verysimilar to mahogany – justas rich and deep, with quitea bit of character, too. Thecedar is available in fairlywide boards (not as wide asmahogany), and it is a littlelighter in weight.Strip props up planesto protect bladesA second stripstops planesfrom slidingAngledstock propsup boxBy liningthe bottomof this traywith siliconpaper beforeinstalling thedivider strips, youcan reduce the riskof your planesbecoming rusty.25
3"6"1"1/2"Oldbladeacts assplitterQ&A“How do I get rid of largequantities of sawdust?”Anyone who owns largeanimals would be delightedto get your sawdust forbedding. Just be sure youlet them know what speciesRunnerNo-Twist Dowel SplittingTo split dowels on my band saw,I use guide blocks with holes drilledfor each size dowel. These blocksare screwed to 1/2" plywood bases.Make a 2" x 2" cutout in the jig, thendraw a line through the dowel guidehole and make a 1/4" deep bandsaw cut. Epoxy part of an old bandsaw blade into the cut, to preventyour dowels from twisting. A runnerattached to the bottom of the baseruns in the miter gauge slot andguides your cut.Don KinnamonMunds Park, Arizonayou’ve been milling, andhave them call their vet tomake sure there are noproblems. For example,horses have been knownto get cholic when exposedto some species like walnut.26Anti-static Dust SweepingSpray a little Static Guard on a softbrush to clean up fine dust whenyou sand between coats of finish.A light coat is all you need: toomuch will interfere with the finish.Roger BergFarmington, Wisconsin
Green Stock DryerToo busy to paint the ends of a pieceof green stock, I just tossed it ina box of shavings and forgot about itfor several days. When I returned toit, there wasn’t a single check in theend. Sawdust seems to draw out themoisture at a fast rate with nochecks and little warpage. Afterinitial drying in the dust, you canremove the stock and let it air dry.Sticks work best with the bark off.Just stir up the shavings every dayor two so the moisture doesn’taccumulate and grow mildew.Jeff RoseMonticello, MinnesotaQuick TipWhen turning a lid fora vessel, it’s a good ideato make it a little too tightto start with, then removeit from the lathe and shavewood a hair at a time witha sander, file or chisel, fora nice, tight fit. Make sureFlat Out FabulousWhen working on carpentry ratherthan furniture projects, there aretwo good reasons to trade in yourstandard #2 pencil for the traditionalcarpenters’ variety. First, the flatones won’t roll off a slanted surfacelike a roof. Second, the chiseled endtends to hold an edge longer thana pared point.John TylerOsceola, Wisconsinboth the lid and the openingare fully dry (about 6%moisture), or one mayshrink at a different ratethan the other: in that case,the lid will either stick or fallout. Watch the graindirection, too. Wood movesacross the grain a lot moreTurners’ Fast FinishNeed a fast satin finish? Applywipe-on polyurethane with a papertowel and immediately wipe it offwhile the piece is still spinning.This creates enough heat to quicklyset the poly and bring out a beautifulsatin finish.Ron HamptonTexarkana, Texasthan it does along the grain,so your lid may fit in onedirection, but turn it 90 andsee if it still does beforeputting your tools away.27
Q&A“How do I space the boardson my picnic table equally?”One of the oldest tricks inthe shop is to drive a 16dEgg-cellent Solution I use egg cartons to support knobsand such as I paint or finish them.Punch a small hole in the base ofeach recess in one half of a carton,then screw the knobs in place. Notonly does this keep you and theworkspace clean, it holds the knobswhile they dry.Margie KellandSt. John’s, Newfoundlandnail through a small blockof pine, then use this tocreate equal spacing ondecks and outdoor furniture.The diameter of the nailproduces roughly a 1/8"Stick AroundI have several stationary tools thatneed different wrenches to changebits or blades. I keep the right toolhandy with large magnets from oldstereo speakers.Richard IrvineGibsons, British Columbiagap, perfect for rain andmelting snow. The scrapof wood straddles bothpieces of lumber as they’rebeing secured, freeing upyour hands.28Stick AroundI had a machine shop transforma 10 garage sale table saw (minusmotor) into a router table with threesteel inserts, and do it for just 85.The saw fence works great withthe router.Paul DachelWisconsin Rapids, Wisconsin
Slick SolutionI polish my table saw’s top with clearshoe polish. It completely eliminatesresistance and doesn’t stick to wood.Roger BergFarmington, WisconsinUseVelcrotoattacha lampQuick TipLarge assemblies withnumerous parts can quicklyget out of hand, so the prosknow the value ofa storyboard to keepeverything organized. Thiscan be as simple as a largesheet of paper or hardboardlaid on the workbench, witha full-size template drawnon it. The template showshow the parts will beoriented to each other afterassembly, and a goodtemplate can even be usedto take measurements whileLet There be LightI equipped my band saw with a little6" flourescent lamp that runs on AAbatteries. I attached it with Velcro and placed strips in other strategicspots around the shop. Now I havelight wherever I need it.Lawrence HeinonenBurlington, Michiganyou cut parts to size. Hotglue small guide blocks tothe template, to help line upthe larger parts.29
Q&A“What’s the differencebetween a dado, a rabbetand a groove?”All three are rectangulargrooves in wood. A dadoruns across the grain, whilea groove runs along thegrain. A rabbet runs alongthe edge of a board.Holder for a Drafting LampHere’s an idea that works on anyworkbench equipped with benchdog holes. Just take a piece of 2 x 4and drill two holes several inchesapart. One should fit the lamp base,while the other should be the samediameter as a bench dog.Glue a dowel into the second holeand you can mount your lampanywhere on the benchtop. Thehinged arm on the lamp allows youto light up just about any project.Harold A. HubbardBerkeley, CaliforniaDrafting lampLamp mountingblockRound benchdog holes30
1/4"hardboardVacuumhosePlastic air divertersecured with magnetsInexpensive Dust CollectionI devised a dust catcher froma plastic register air diverter.These diverters come with magnets,so they can be mounted andremoved in seconds. The hoodattaches to a small box featuring acouple of 20d nails for the magnetsto grab.R. B. HimesVienna, OhioQuick TipThose yellow, self-stickingnotes that adorn everyinch of the wall space inmost office cubicles alsocome in a small size. It fitsperfectly on the side ofLegal-sized ToolsAn old metal file cabinet makesa safe, dust-free storage device forpower tools. And you can evenorganize them alphabetically!Shay ThomasSomerset, Wisconsina 20-ft. tape measure —a real boon when you haveseveral measurementsto remember.31
Q&A“How can I make severalidentical small parts?”The answer is templaterouting. Secure a 1/4"hardboard template to eachblank in turn with two-sidedMagnetic Catches for Small BoxesRecently a friend asked me to makea box for his Irish flute. It needed tobe free of outside projections,including hinges. Setting magnetsinto the box to secure the lidproperly was my solution. I choppedthree opposing mortises in the topand bottom edges of the box, andthen epoxied the magnets in place.A strong and simple solution.William AndersenChapel Hill, North Carolinatape, then
guide fence to the router table that centered the bit where I wanted it, set my bit height, and started running the piece through the cutter. By adjusting the work so that the pencil lines were always at 90 to the fence, I kept the cut in line. A little carving and sanding smoothed out any