Transcription
NetScaler Deployment GuideReplacing Microsoft Forefront TMG with CitrixNetScaler for Website PublishingPrepared by: Abhishek RVRK Sharma, Networking and Cloud
AuthorsThe following authors contributed to the creation of this deliverable.CitrixAbhishek RVRK Sharma#33, Ulsoor RoadBangalore, Karnataka 560042IndiaPhone: 91 80 39541000 Extension 78219Abhishek.sharma@citrix.comRevision HistoryRevisionChange DescriptionUpdated ByDate1Initial DraftAbhishek RVRK Sharma6 May 2015citrix.comth2
Table of contentsIntroduction .4Configuration details . 5Solution description . 7Section 1 – Define IPs and addressing for the load balanced websites . 7Section 2 - Website Switching Policy . 11Section 3 – Security definition . 14Additional information . 19SSL bridging and tunneling . 19Authentication . 24Conclusion .26citrix.com3
IntroductionThis deployment guide defines a solution for replacing Microsoft Forefront Threat Management Gateway (TMG)with Citrix NetScaler , a world-class application delivery controller (ADC) with the proven ability to load balance,accelerate, optimize and secure enterprise applications.Forefront TMG is a network firewall program with attack filtering, VPN and basic application caching and loadbalancing capabilities. It runs on Windows Server 2008 and works by inspecting all network traffic that passesthrough it.Forefront TMG offers several useful network protection features:Routing and remote access features: It can act as a router, an Internet gateway, a virtual private network (VPN)server, a network address translation (NAT) server or a proxy server.Security features: It is a firewall capable of inspecting network traffic (including web content, secure web contentand email) to filter out malware, identify and stop security vulnerability exploit attempts and provide content filteringaccording to predefined security policies. Therefore, Forefront TMG can provide application layer protection,stateful and content filtering and anti-malware protection.Network performance features: Forefront TMG can help improve network performance with web trafficcompression and web caching, which allows frequently accessed web resources to be cached so they can beaccessed faster. Microsoft Forefront TMG 2010 can also cache data received through Background IntelligentTransfer Service (BITS), such as Microsoft Updates.As an enterprise networking product, Forefront TMG is used by a large number of small and medium businessesas well as large enterprises. However, on September 9, 2012, Microsoft announced that no further developmentwould take place, and that the product would no longer be available for purchase as of December 1, 2012.Mainstream support ceased in April 2015 and extended support will end on April 14, 2020. Because Microsoft isretiring the product, enterprises must replace it. This guide presents the capabilities of NetScaler as a robust andenhanced platform to replace Forefront TMG where it has been deployed as a reverse proxy for publishing a singlewebsite or multiple sites in a load balanced setup.The following TMG features are replicated with NetScaler Secure Application PublishingSecure publishing of web and internal serversSingle sign-on (SSO)Delegation of basic authenticationLink translationSSL bridgingSSL tunnelingFirewall ProtectionMulti-layer firewallApplication-layer filteringGranular HTTP controlsDenial of Service (DoS) protectionExtensive protocol supportNetworking and PerformanceNetwork load balancingNetwork-based configurationCachingHTTP compressionQoS (using Diffserv)citrix.com4
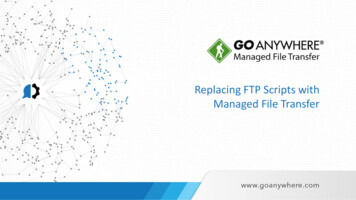
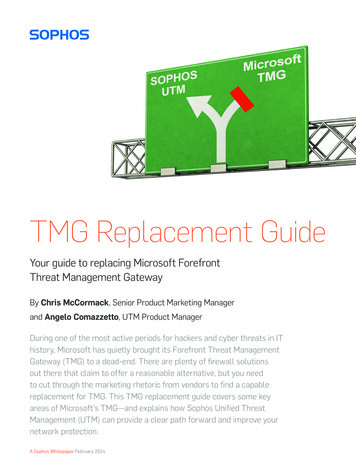
Configuration detailsTo show Forefront TMG administrators the equivalent steps for configuring NetScaler, this guide presents side-byside, step-by-step details for a sample use case involving Microsoft Exchange 2013, depicted in Figure 1.Figure 1. Diagram of test setupProductVersionForefront TMG2010 SP1NetScaler VPX 10.5 (enterprise license)citrix.com5
NetScaler features to be enabledThe following NetScaler features are used in this Exchange 2013 deployment. Please ensure they are enabled inthe NetScaler system. Content switching Load balancing SSL offloadHere is a quick explanation of how these features work.Content switching - The content switching module directs incoming traffic to a matching load balancing virtualserver. This logical switching of incoming traffic based on content type allows configuration of specific optimizationpolicies.Load balancing - NetScaler load balancing evenly distributes requests to backend servers. Multiple algorithms(such as LEASTCONNECTION, ROUNDROBIN, etc.) are supported to provide efficient load balancing logic forevery application server.SSL offload - SSL connections are terminated at the NetScaler appliance, thus allowing NetScaler to conductadvanced traffic monitoring. Additionally, SSL offload can significantly reduce the computational overhead ofoffloading encrypted user connections on backend servers.For enabling additional capabilities, authentication, authorization and auditing (AAA), rewrite, responder, HTTPcompression, DoS protection, clustering, and integrated caching could also be enabled. However, the use casedescribed here can be deployed using the features described above.citrix.com6
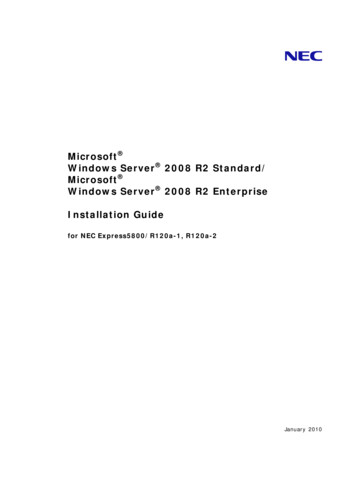
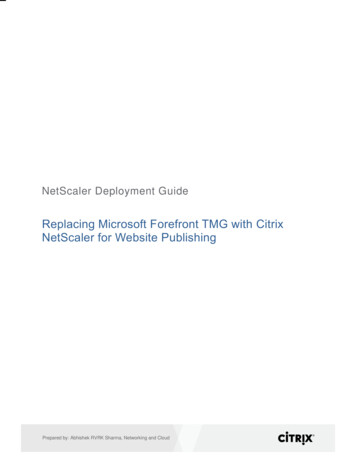
Solution descriptionForefront TMGNetScaler VPXSection 1 – Define IPs and addressing for the loadbalanced websitesStep 1 – Initialize the Web Publishing RuleWizardStep 1- Define the load balancing virtualservers (LB vservers)First, start Forefront TMG and get to the console.Then right-click on the Firewall Policy node in theleft pane of the console. Then, select New Website Publishing Rule.First, log into the NetScaler GUI. On theConfiguration tab, move to TrafficManagement Load Balancing VirtualServers.Alternatively, after clicking on Firewall Policy inthe left pane, you will see new tasks populated inthe Tasks Tab on the Task Pane on the right sideof the TMG firewall console. Here, under FirewallPolicy Tasks, click on the Publish Web Sites linkto start the Web Publishing Rule Wizard.This will bring up the Welcome to the New WebPublishing Rule Wizard page. Enter anappropriate name for the rule in the text boxprovided here. This name will be used in the list offirewall policy rules, so the name should beidentifiable.For this deployment exercise, we have twowebsites, one hosting Lync and the other hostingOutlook Web Access, hence we have defined thetwo load balancing virtual servers asLBVS TMG Lync, and LBVS TMG OWA.(shown in a later screenshot)Alternatively, if you have more than two or only asingle website, you can create the correspondingnumber of LB vservers and bind all of them tothe content switching vserver (along withindividual content switching policies for eachwebsite) that will serve as the reverse proxy forall of these websites.Step 2 - Configure the LB vserversStep 2 – Select the Firewall Rule actionThis leads to the Select Rule Action page, wherethe choice of whether to make this an allow or denyrule will be presented. Here, we choose the Allowoption as we are looking to allow traffic through tothe websites. Deny is a useful option when useraccess to a website needs to be restricted.When defining a new LB vserver, you will bepresented with the settings screen. Here, enterthe settings appropriate for your setup.---Note that the protocol here is presentedas HTTP. You can choose SSL as well,in which case you would be required toprovide a valid certificate for this server.Set the IP address type as NonAddressable. This is because theaddress will be set upon the contentswitching virtual server (CS vserver) thatwe will define later.Leave the other settings as is.Step 3The next page, the Publishing Type page,provides a set of choices: publish a single site,citrix.com7
publish multiple sites or publish a web farm. If youchoose to publish a web farm, the TMG firewall willperform basic, round-robin load balancing for you,which while effective is limiting and not very viablefor high-performance enterprise web applications.After clicking OK, move back to the configurationscreen for the LB vserver. Enable a usefulsession persistence method (such asSSLSESSION) to ensure user sessions aremaintained during load balancing.NetScaler advantageIn this example, we’re going to publish multiplewebsites so we will select the Publish multiplewebsites option. Alternatively, you may choose topublish a single website as well using the Publisha single website or load balancer option. ClickNext.TMG supports only two session persistenceoptions: cookie based and source IP based.However, NetScaler supports 10 differentpersistence methods, including an option tocreate a user -defined rule for persistence, thusmaking it possible to have an unlimited set ofcombinations to identify connections that must bepart of the same persistence session.Step 4 – Server connection securityNow click on the Load Balancing Virtual ServerService Binding tab in the Service and ServiceGroups section as shown above, or alternatively,click on Services in the TrafficManagement Load Balancing subsection andthen, click on the Add button (shown below).On the Server Connection Security page, you arepresented the option to connect securely to thepublished web server. If this option is chosen, anSSL connection will be established between thecitrix.com8
TMG firewall and the published server. Thepublished server must have an SSL certificateinstalled that is trusted by TMG.Step 5 – Website definitionThe steps here will vary depending on whether youchoose to load balance your website or not. Sinceour current use case defines a load balancedwebsite, we will proceed as such.Step 3 – Define LBVS server service bindingEvery LB service is linked to a server; this caneither be a new server or an existing serveralready defined in the Servers subsection underLoad Balancing.Here, define the name for the service(s rproxy 4443 director vip for thisdeployment), the IP address (or choose from alist in the case of an existing server) for the newserver and the protocol it operates on. For thisdeployment, the IPs will correspond to192.168.1.27, 192.168.1.28, 192.168.1.29 for thefirst server and 192.168.1.21, 192.168.1.22 and192.168.1.23 for the second one.citrix.com9
You may enable Health Monitoring if you wouldlike to have NetScaler poll the server periodicallyto verify its health. If Health Monitoring isdisabled, the appliance shows the server UP atall times.Finally, the LB vservers created will be displayedon the configuration screen as shown below.NetScaler advantageTMG does not allow you to run this wizard formultiple websites that can each run as aserver farm, that is, multiple load balancedwebsites. In order to enable this, you willneed to run this rule once each for eachwebsite that needs to be load balanced(using the Publish a server farm of loadbalanced web servers option), and then run itonce again with the Publish multiple websitesrule. When running this rule, you have tospecify the website names that you havedefined in the rules created earlier for eachload balanced website.This process is very simple with NetScaler,however. To enable this use case, all you willneed to do is to add internal server definitionsto the LB vserver. NetScaler also currentlysupports 15 different load balancingtechniques (ROUNDROBIN,LEASTCONNECTION, LEAST RESPONSETIME and hashing based techniques such asURLHASH, DOMAINHASH, etc.), thusallowing great flexibility for load balancingdefinition.citrix.com10
Section 2 - Website Switching PolicyStep 5a – Specify server farm to publishStep 4 – Define content switching virtualserver (CS vserver)You can either choose to select a pre-existingserver farm (If already defined in TMG) or create anew one. Forefront TMG will load balance allrequests using a round robin algorithm. The loadbalance selector here is misleading, as the twooptions (Cookie-based and Source-IP basedLoad Balancing) indicate session persistenceoptions.Step 5b – Create a new server farmClicking New on the earlier prompt brings up theNew Server Farm wizard. Give a name to the newfarm and click on Next.Now, define the CS vserver. To get to the screenabove, move to Traffic Management ContentSwitching Virtual Servers and click on the Addbutton.For this deployment, the SSL protocol has beenused, as the websites will be accessed overHTTPS. You can, alternatively, choose to useHTTP.Note: If you have chosen to define your CSvservers as SSL, then your LB vservers (definedearlier) cannot be SSL. Also, you cannot useSession ID as the persistence method.citrix.com11
Step 5c- Server definitionFor IP address type, you can use either IPAddress or IP Pattern. IP Pattern will link theCS vserver to a pattern-based set of IPaddresses, useful when the virtual server has torespond to requests coming to multiple IPs.Define the IP address for the vserver; the portwill be automatically set to port 443 for SSL, butif you are using an alternate port you may specifythe same.Leave the other settings as is, and click OK.Step 5 – CS policy definitionNext, you can define the servers that make up thisfarm. Essentially, here you may define the IPs ofthe servers that are to be used to load balance thiswebsite.Step 5d – Server farm connectivity monitoringClick on the name of the CS vserver you havejust created in the list on the main panel atTraffic Management ContentSwitching Virtual Servers and click on CSPolicy Binding Content Switching Policies.Here, you can define the method used to monitorthe health of the servers forming the server farm(corresponds to Health Monitoring on NetScaler).Configure the policy as shown in the screenabove. You will need to create two policies, onecitrix.com12
Step 5e –Complete server farm creationfor each website that you need to serve. Here,we have two policies, with the expression:http.req.hostname.contains(“ website domainname ”)For the deployment, the two policies use thefollowing ns.net”)Click on the icons next to the Action header toeither add a new action or edit an existing action.Step 6 – CS action definitionAfter completing the wizard, you may be promptedwith a request to enable a system policy for HTTPconnectivity verification to enable monitoring.Step 6 – Public name/FQDN definitionThis step will present itself after the completion ofStep 6e for load balanced websites, or immediatelyafter Step 5 in the case of multiple websites. Asstated earlier, both these wizards will have to berun independently for multiple load balancedwebsites.For server farms, this is the screen that will bepresented. As you will note, this screen will showthe host header value that will be accepted for thisfarm.citrix.comWhen presented with the screen above, definethe appropriate load balancing virtual server andclick OK.13
And for multiple websites, this is the screenpresented (you will notice that the public names forall individual websites are added here).Section 3 – Security definitionStep 7 – Define web listenerStep 7 – Enable SNIThe next screen will require you either to identifyan existing web listener or to create a new listenerto be used with this website.If you already have a web listener defined, this iswhat is shown:Otherwise, you will need to define a new weblistener. When you click New above, the Definecitrix.com14
New Web Listener wizard is presented. Providean appropriate name for the listener and click Next.After returning to the basic settings screen for theCS vserver, If SSL has been enabled, make surethe SNI Enable option in the SSL Parameterstab is selected. This will allow the CS vserver toserve the right certificate for each website.With SNI enabled, NetScaler will parsecertificates and extract the hostname from them,then pass the certificate corresponding to thehostname requested by the client. Thiseliminates the need to use wildcard or SANcertificates.Step 8 – Adding certificates to the CS vserverAfter Step 7, go back to the basic settings screenfor your CS vserver. Open/move to theCertificates tab, then click on ServerCertificates.Step 8 – Client connection securityYou must now define how the client will connect toTMG.Here, you may choose between making SSLconnections necessary and allowing non-SSLconnections. Note that when publishing over SSL,an appropriate SSL server certificate must beinstalled on the TMG server.In the prompt that follows, add the servercertificates for all the servers that you havedefined as part of your multiple website setups.Make sure you select the Server Certificate forSNI option, so the server certificates can beserved properly.citrix.com15
Step 9 - Define listener IP addressesThis completes the configuration for multiplewebsite publishing with NetScaler.Further, access definitions (selective useraccess, selective network access, etc.) can beconfigured using specific policies on NetScaler.These are defined based upon the specific usecase, and are not wizard based (however, theNetScaler policy definition GUI provides contextsensitive help).The next screen asks you to define the IPaddresses that the listener will listen for. Onlyrequests from the networks specified here will beforwarded to the web servers defined earlier.Step 10 – Link certificates for specified IPsNetScaler advantageTMG only allows use of SAN or wildcardcertificates, as it does not support SNI (subjectname identification). With NetScaler, you canenable SNI or use wildcard or SAN certificates,in which case you do not need to enable SNI inSteps 7 and 8 and one common certificate maybe used across websites. However, for greatersecurity, it is recommended that SNI be used.Now you can link client certificates for SSLconnections; you can choose to use a singlecertificate or assign certificates for individual IPaddresses that will access the server.citrix.com16
Step 11 – Client authentication methoddefinitionOn the next screen, you can define how clients areauthenticated with TMG. TMG supportsLDAP/Active Directory, Radius or RSA SecurIDbased authentication. Note that NetScalersupports several other alternativeauthentication mechanisms as well, asindicated in our note earlier.Since our deployment on TMG currently will notuse any authentication scheme, we will leave it atNo Authentication.Step 12 - SSOSSO is only available for HTML form-basedauthentication.citrix.com17
Step 14 – User set definitionIn this step, you can define the users to whom thisrule will apply. Essentially, these will be the onlyusers who will have access to these websites.Step 15 – Test rule and conclude the wizardThe final step allows you to test the rule you havecreated and concludes the wizard.citrix.com18
Additional informationSSL bridging and tunnelingSSL bridging and tunneling are two Forefront TMG features that are extremely important for most enterprises. InTMG parlance, SSL bridging refers to the termination or initiation of an SSL connection by TMG. As an example,when a client makes an HTTP request, TMG creates a request on the client’s behalf and encrypts it. This requestis then forwarded to the target web server over HTTPS. The web server responds appropriately and sends therequested object to TMG. It is then decrypted and sent to the client that re
Microsoft Forefront TMG 2010 can also cache data received through Background Intelligent Transfer Service (BITS), such as Microsoft Updates. As an enterprise networking product, Forefront TMG is used by a large number of small and medium businesses as well as large enterprises. However, on September 9, 2012, Microsoft announced that no further .File Size: 1MB