Transcription
Chapter 1Introducing QuickBooksTopicsThis chapter covers the following topics: QuickBooks Products Working with QuickBooks Files Creating and Restoring Backup Files Touring the QuickBooks User Interface Introducing QuickBooks Transactions QuickBooks Help A Brief Introduction to AccountingQuickBooks acts as both a bookkeeping/accounting program and a financial management tool.Once you set up your company file and record your financial transactions, the program helps youtrack and manage income, expenses, inventory, job costing, receivables, payables, and much more.With QuickBooks reports, you can evaluate your organization’s performance and make informedbusiness decisions.QuickBooks is designed so you can keep your books even if you haven’t mastered the debits andcredits of double-entry accounting. However, you need to use its features properly to ensure thatyour financial records are correct. To do that, you need to understand how QuickBooks works, howcompany files are set up, how to perform bookkeeping tasks with the program’s features, and finallyhow to retrieve information about your business from your QuickBooks company file.This chapter begins with an introduction to the basics of QuickBooks. You’ll learn about theQuickBooks product line. You’ll also learn how to work with QuickBooks company files. Then, you’llget to know a little bit about the program’s interface, how to record transactions, and how to obtainQuickBooks help. Finally, the chapter concludes with a brief overview of what you need to know aboutaccounting to use QuickBooks properly.Note: For the computer practice in this chapter, restore the sample file, sample product-based business 2015 (Portable).QBM. (Or, if you are using QuickBooks 2014, restoresample product-based business 2014 (Portable).QBM.)Chapter 1: Introducing QuickBooks1
QuickBooks ProductsQuickBooks ProductsThe QuickBooks product line represents a broad set of accounting and bookkeeping tools that areeasy to learn. Financial tools, such as general ledger, accounts receivable, accounts payable, inventory,sales tax, and financial reporting are built into QuickBooks products. In addition, Intuit offers manyoptional, fee-based products and services, such as payroll services, merchant account services, andtime-tracking products that integrate with QuickBooks.QuickBooks EditionsQuickBooks comes in several product editions to satisfy different needs and budgets: QuickBooksOnline, QuickBooks Pro, QuickBooks Premier, QuickBooks Accountant, and QuickBooks EnterpriseSolutions. In addition, QuickBooks Premier and Enterprise Solutions editions offer six industryspecific editions: General Business, Contractor, Manufacturers & Wholesaler, Nonprofit, ProfessionalServices, and Retail.Note: All QuickBooks editions support multiple simultaneous users. However, to accessa company file in multi-user mode, each user must run the same version of QuickBooks.This book covers QuickBooks Pro, non-industry-specific QuickBooks Premier, and QuickBooksAccountant, because these editions are the most commonly used. This book does not coverQuickBooks Enterprise Solutions, although it is easy to learn once you’ve mastered Pro, Premier,or Accountant. Also, the book does not cover QuickBooks Online, which is a web-based productthat looks and works differently than the editions covered in this book. To compare all QuickBookseditions, see www.quickbooks.com.QuickBooks ReleasesInitially, you install a specific version of QuickBooks, such as QuickBooks 2014 or 2015. After aversion is released for sale, users may uncover errors in the software. When that happens, Intuit correctsthe errors and updates the program with patches distributed via the Internet. Each patch represents arelease of the QuickBooks program.To see which software release you have installed, launch QuickBooks, and then press F2 or Ctrl 1. Atthe top of the Product Information window, you’ll see the label “Product” followed by the QuickBooksproduct and release, such as “QuickBooks Accountant 2015 Release R1P”.To install the latest maintenance release, on the Help menu, choose Update QuickBooks. Then, followthe instructions on the Update QuickBooks dialog box’s screens to download and install maintenancereleases into QuickBooks.Note: This book is based on QuickBooks Accountant 2015 release R1P. If your computer is running a newer release (a higher release number, such as R3P), you may see slightdifferences compared to the descriptions and screens in this book.Sample FilesThis book uses the sample files that come with QuickBooks: Rock Castle Construction is set up as aproduct-based business and Larry’s Landscaping represents a service-based business. These sample filesdemonstrate most of QuickBooks features and provide a safe way to experiment with QuickBooks.2Chapter 1: Introducing QuickBooks
QuickBooks ProductsAs you work through the examples and exercises in this book, think about how you can applyQuickBooks’ features to your own organization.The QuickBooks 2014/2015 Learning Guide provides portable files for these sample files for bothQuickBooks 2014 and 2015 on the CD that accompanies this book so you can restore the versionyou want to work with. To learn how to restore portable files, refer to the section, “Restoring PortableCompany Files.”Working with QuickBooks FilesIt’s important to understand the different types of QuickBooks files and the purpose of each one.QuickBooks has three primary types of files, which can be opened by choosing Open or RestoreCompany on the File menu: Working files (company files): These are the files you use for your day-to-day work, suchas recording transactions and running reports. These working files have a file type of QuickBooks Company File and a “.qbw” file extension (for QuickBooks working). Portable company files: These files (file extension “.qbm”) are compact versions of yourworking files, intended for exchanging files between computers. You must restore a portable file (page 7) to a working file before you can use it. Do not use portable files to back upyour data. Backup files: These files (file extension “.qbb” for QuickBooks backup) are compressed datafiles and are used to minimize loss of your financial information. You must restore a backupfile to a working company file before you can use it. See page 8 for more information oncreating and restoring backup files.QuickBooks also offers the Accountant’s Copy feature, which enables an accounting professional toreview and work on a special copy of a client’s company file while the client simultaneously works onthe original company file. The client can then merge the accountant’s changes into the company file.Refer to QuickBooks Help for information on the Accountant’s Copy.Creating a New FileQuickBooks offers four ways to create a new company file: Express Start, Detailed Start, CompanyBased on an Existing Company, and converting from other accounting software. Express Start isa relatively quick method for creating a new company file. However, an organized approach helpsproduce a company file that is set up properly for your needs. Chapter 13 covers file setup indetail. That way, you can apply what you’ve learned in earlier chapters to make decisions during thesetup process.Opening a QuickBooks Sample FileQuickBooks includes sample company files that you can use to experiment with the program’s featureswithout endangering your organization’s QuickBooks data.Note: The CD that accompanies this book includes portable files for the QuickBookssample files used in this material. You can restore these portable files to obtain a samplefile that works with QuickBooks 2014 or QuickBooks 2015, depending on which version you run. If you restore these portable files, you open the sample files using Open orRestore Company, described in the next section.Chapter 1: Introducing QuickBooks3
QuickBooks ProductsComputer PracticeFollow these steps to open a sample file:1. To launch QuickBooks, double-click the program icon on your desktop or select the QuickBooksentry from the Windows Start menu.QuickBooks will either display the No Company Open window (Figure 1-2) or open the lastcompany file you worked on. The No Company Open window appears if you are launchingQuickBooks for the first time or you closed your company file before exiting your last QuickBooks session. If you did not close the last company file you worked on before exiting yourQuickBooks session, the program opens that company file.Previously opened company filesFigure 1-1 No Company Open Window2. If the No Company Open window does not appear, on the File menu, choose Close Company. IfQuickBooks asks if you want to back up your file, click No.3. When the No Company Open window appears, click the “Open a sample file” button, and thenchoose Sample product-based business from the drop-down list.The QuickBooks Information screen (shown in Figure 1-2) appears.4. To open the sample file, click OK.If an Accountant Center or External Accountant message appears, turn off the Show windowwhen opening a company file checkbox, and then click the X at the Accountant Center window’stop right corner.The sample file is open and ready for you to begin exploring.Figure 1-2 Sample File Information Screen4Chapter 1: Introducing QuickBooks
QuickBooks ProductsOpening a QuickBooks Company FileIf you work with more than one company, you’ll have a QuickBooks company file for each one.You can switch from one company file to another at any time. QuickBooks provides easy access tocompany files you’ve worked with before. You can also open any company file with a few more clicks.Here is an easy way to open a company file that you’ve worked on previously:1. On the File menu, choose Open Previous Company.2. On the submenu that appears, choose the company file you want to open.Tip: You can change the number of company files that appear in the Open PreviousCompany submenu. On the File menu, choose Open Previous Company, and then onthe submenu, choose Set number of previous companies. (This entry is grayed out if nocompany file is open.) In the box, type the number of company files you want to see inthe submenu (up to 20), and then click OK.If the company file you want to open doesn’t appear on the Open Previous Company submenu, followthese steps instead:1. On the File menu, choose Open or Restore Company.2. In the Open or Restore Company dialog box, select the Open a company file option, and thenclick Next.3. In the Open a Company dialog box, navigate to the folder that contains the company file youwant to open. In the Name list, click the company file name, and then click Open.Note: If you use QuickBooks Accountant or Enterprise Solutions, you can open twocompany files at the same time (On the File menu, choose Open Second Company.)However, the activities you can perform in the second file are very limited. Unless youwant to open the file to look for information, it’s best to use the Open Previous Companyor Open or Restore Company menu entry to open a company file.Closing a QuickBooks FileYou don’t have to explicitly save a company file. QuickBooks saves the information you enter as youwork. The program also closes the company file that’s open when you open another company fileor close the QuickBooks program. If you want to close a company file, on the File menu, chooseClose Company.Closing the QuickBooks ProgramBecause QuickBooks saves your data as you work, you can simply close the program. To exitQuickBooks, on the File menu, choose Exit (or click the X at the program window’s top-right corner).Chapter 1: Introducing QuickBooks5
Creating and Restoring Portable Company FilesCreating and Restoring Portable Company FilesPortable company files are compressed company data files that are small enough to send to others (viaemail or on a USB flash drive, for example). For example, the exercise files that accompany this bookare portable company files that you restore.Tip: If you send a company file to someone else to work on or transfer it from yourdesktop computer to your laptop, be sure to transfer the file back to your computer, soyou always work on the up-to-date company file. The only exception to this rule is ifyou send your accountant an Accountant’s Copy (see page 3). In that case, when youraccountant sends the updated copy back, you can merge the changes from the Accountant’s Copy into your company file.Creating a Portable Company FileTo create a portable company file, follow these steps:1. On the File menu, choose Create Copy.2. In the Save Copy or Backup dialog box, select the Portable company file option, as shown inFigure 1-3, and then click Next.3. In the Save Portable Company File dialog box, navigate to the folder where you want to save thefile.QuickBooks automatically fills in the File name box with the company file name followed by“(Portable)”. You can edit the name if you wish.Figure 1-3 Create Portable Company File4. Click Save.5. In the Close and reopen message box, click OK.QuickBooks closes all the open windows and creates the portable file.6Chapter 1: Introducing QuickBooks
Creating and Restoring Portable Company Files6. In the message box that tells you where QuickBooks has saved the portable file, click OK.The program reopens its windows and you can resume working on your company file. The fileextension for a portable file is .qbm, such as sample portable file.qbm. That way, you can identifya portable file even if it doesn’t contain the word “portable” in its name.Restoring a Portable Company FileHere are the steps to restoring a portable company file to a regular QuickBooks company file:Computer Practice1. On the File menu, choose Open or Restore Company.2. In the Open or Restore Company dialog box, select the Restore a portable file option, as shownin Figure 1-4, and then click Next.Figure 1-4 Restore a Portable Company File3. In the Open Portable Company File dialog box, navigate to the folder that contains the portablecompany file that you want to restore.If you don’t know where this book’s portable company files are located on your computer, askyour instructor.4. In the file list, click the file you want to restore sample product-based business 2015 (Portable).qbm. Or, if you are using QuickBooks 2014, restore sample product-based business 2014 (Portable).qbm., and then click Open.The next screen tells you that you need to choose where you want to store the company file thatQuickBooks creates from the portable company file. Click Next.5. In the Save Company File as dialog box, shown in Figure 1-5, navigate to the folder where youwant to restore the file.If you don’t know where to restore the file, ask your instructor.Chapter 1: Introducing QuickBooks7
Creating and Restoring Backup FilesFigure 1-5 Choose Location to Restore File6. In the File name box, edit the file name if you want to use a different file name for the restoredfile, such as adding “ Restored” to the name. Then, click Save.If QuickBooks asks you to update your company file, click Yes.While QuickBooks restores the portable company file to a regular company file, the Workingmessage box shows the restoration progress. (If you restore a sample file, you must first click OKin the sample file QuickBooks Information message box.)7. When the process is complete, click OK in the message box that tells you the portable companyfile has been opened successfully.Now, your company file is open and ready for you to begin work.Creating and Restoring Backup FilesYour financial information is important and you don’t want to lose it. To prevent or minimize dataloss, you should regularly back up your company files. Although you may back up all the data on yourcomputer with dedicated backup software, you can also create backup files within QuickBooks as anadded level of security. For example, if you spend several hours on a task, you can create a backup fileimmediately to protect your data until your nightly system backup runs. That way, if your computer’shard drive fails or another disaster occurs, you can restore your backup to another computer andresume your work. You can also set up scheduled backups within QuickBooks.Note: Don’t create portable company files to use as backup files. Backup files containmore information about your company than portable files do.Creating a Backup FileYou can back up a company file immediately or set up a backup schedule so QuickBooks automaticallycreates your backups on the days and times you specify.8Chapter 1: Introducing QuickBooks
Creating and Restoring Backup FilesTo create a backup, follow these steps:1. On the File menu, choose Create Copy.2. In the Save Copy or Backup window (see Figure 1-3), choose Backup copy, and then click Next.3. On the next screen, choose the Local backup option to store the backup file on your computer, anetwork drive, or a removable storage device, such as a DVD or USB flash drive. Click Next.If you subscribe to Intuit’s fee-based online backup service, select the Online backup option.4. In the Backup Options dialog box, shown in Figure 1-6, click Browse.Figure 1-6 Backup Options5. In the Browse for Folder dialog box, select the folder where you want to store your backup file(see Figure 1-7). Click OK.Store backup files in a safe location, ideally on a drive other than the one that contains yourworking company file. That way, if your company file is damaged and your hard drive fails, youcan still recover your data from your backup file.Figure 1-7 Backup LocationChapter 1: Introducing QuickBooks9
Creating and Restoring Backup Files6. In the Backup Options dialog box, click OK.7. In the Create Backup screen, shown in Figure 1-8, you can create an immediate backup or setup a backup schedule. To set up a schedule, select the Only schedule future backups option, andthen click Next.To save a backup immediately, select the Save it now option, and then click Finish. When thebackup is complete, you see the QuickBooks Information message box that tells you the filenameand folder location for the backup.Figure 1-8 Setting up a Backup Schedule8. In the Save Copy or Backup screen, click New below the Back Up on a Schedule table, shown inFigure 1-9.Figure 1-9 Create a Backup Schedule9. In the Schedule Backup dialog box (Figure 1-10), type a name for the backup schedule, such asNightly or Weekly. Click Browse to select the backup folder.10Chapter 1: Introducing QuickBooks
Creating and Restoring Backup Files10. In the Start time boxes, choose the time when you want QuickBooks to create the backup file.Turn on the day checkboxes to specify which days you want the program to create a backup.11. After you specify the schedule settings, click OK to close the Schedule Backup dialog box.Figure 1-10 Defining the Backup Schedule12. In the Store Windows Password window that opens, type your Windows username and password, and then click OK.The new schedule appears in the Back Up on a Schedule table.13. In the Save Copy or Backup dialog box, click Finish. In the message box that tells you the backupshave been scheduled, click OK.Your backup schedule is ready. When the next day and time that you designated arrives, QuickBookscreates a backup file of your company file. The file extension for QuickBooks backup files is .qbb, forexample, sample file backup.qbb.Restoring a Backup FileIf you need to restore a QuickBooks backup file, follow these steps:1. On the File menu, choose Open or Restore Company.2. In the Open or Restore Company dialog box, select the Restore a backup copy option, and thenclick Next.3. On the next Open or Restore Company screen, select the Local backup option, and then clickNext.If you want to restore a backup file created through Intuit’s fee-based online backup service, selectthe Online backup option instead.Chapter 1: Introducing QuickBooks11
Touring the QuickBooks User Interface4. In the Open Backup Copy window, navigate to the folder that contains the backup file you wantto restore. Select the file in the list, and then click Open.The next screen tells you that you have to choose the location where you want to restore the file.Click Next.5. In the Save Company File As dialog box, navigate to the folder where you want to restorethe file.Choose a folder such as the folder for all working company files or a folder for a specific client’scompany file.6. If you don’t want to overwrite your existing company file, in the File name box, be sure to editthe file name.Tip: If you aren’t sure whether you should overwrite a file, edit the restored file’s name.For example if you change the restored file name from sample company file.qbw to sample company file restored.qbw, QuickBooks won’t overwrite your original file.7. Click Save.QuickBooks restores the backup file as a regular company file in the folder you specified. Therestored file has a file extension of .qbw, such as sample company file restored.qbw.8. If a Confirm Save As message box warns you that a file already exists and asks if you want toreplace it, QuickBooks is asking if you want to overwrite the existing company file. If you don’twant to overwrite your working company file, click No. Back in the Save Company File as dialogbox, change the name in the File name box, and then click Save.If your original company file is damaged and you want to replace it, click Yes. In the DeleteEntire File dialog box, type YES in the text box to confirm that you want to delete the file. Then,click OK.After the backup file is restored to a company file, a message box tells you the file has been restoredsuccessfully.Touring the QuickBooks User InterfaceQuickBooks has several features that help you get to the tasks you want to perform or view theinformation you need. The Home Page, QuickBooks Centers, menus, the icon bar, and shortcut keysprovide easy access to bookkeeping tasks, regardless where you are in the program. At the same time,QuickBooks Centers, Snapshots, the Insights page, and the Calendar show financial information invarious ways. As you work, you might end up with several QuickBooks windows open at the sametime. You can manage these windows to make your work easier. This section introduces these features,so you can work productively in QuickBooks.The Home PageThe QuickBooks Home Page (Figure 1-11) shows the overall workflow of your bookkeeping tasks.Tasks related to purchasing appear in the Vendors pane; sales-related tasks are in the Customers pane;and employee tasks show up in the Employees pane. Workflow arrows between task icons show thetypical sequence of performing bookkeeping tasks, but you don’t have to perform the tasks in thatorder or use every icon that appears.12Chapter 1: Introducing QuickBooks
Touring the QuickBooks User InterfaceThe Home Page’s Company and Banking sections include other features you use frequently, such asChart of Accounts in the Company section and Write Checks in the Banking section.The icons that appear on the Home Page depend on the preferences you chose when you createdyour company file. For example, the Employees panel won’t appear if you told QuickBooks you don’thave employees. Other settings determine whether you see icons, such as Purchase Orders or SalesReceipts.Figure 1-11 The Home PageThe Insights TabThe Insights tab (new in QuickBooks 2015) appears to the right of the Home Page tab at the HomePage window’s top-left corner. The Insights tab (Figure 1-12) provides a high-level view of thecompany’s financial activity. Initially, the top panel displays a Profit & Loss graph that shows income,expenses, and profit by month. Click the left or right arrow on either side of the panel to display otherhigh-level graphs, such as Top Customers by Sales.The bottom half of the tab displays information about income and expenses. The colored bars in theIncome section show the totals for unpaid invoices, overdue invoices, and payments received in the past30 days. The Expenses pie chart helps identify your most prevalent expenses.You can look at details by clicking within the Insights graphs. For example, clicking a month’s bar inthe Profit & Loss graph runs a Profit & Loss Detail report for that month. Click a horizontal bar in theIncome section to open Income Tracker to that category of invoice.Chapter 1: Introducing QuickBooks13
Touring the QuickBooks User InterfaceFigure 1-12 The Insights TabUsing the Menu Bar and Icon BarThe menu bar at the top of the QuickBooks main window is always visible and contains everyQuickBooks feature. But the Favorites menu and the icon bar are two methods for keeping your mostfrequently-used features within easy reach.To add your favorite features to the Favorites menu, choose Favorites, and then choose CustomizeFavorites. Select an entry you want to add to the Favorites menu, and then click Add. After you additems to the Favorites menu, you can access them by choosing Favorites on the menu bar, and thenchoosing the entry you want.The icon bar, which appears on the left side of the QuickBooks’ main window, makes it easy to accessthe programs features. Initially, it contains shortcuts to popular windows, such as Income Tracker,QuickBooks Centers (labeled Customers, Vendors, and Employees), Create Invoices (labeled Invoice),and Enter Bills (labeled Bill).You can streamline your work by adding your favorite features to the My Shortcuts section of the iconbar. You can also remove entries or rearrange the order in which the shortcuts appear.To learn how to customize the icon bar, search QuickBooks Help for icon bar, and then choose the Usethe Icon Bar topic.QuickBooks CentersQuickBooks Centers (Customer, Vendor, Employee, and so on) provide quick access to commontasks and information. You can view and create transactions, such as invoices in the Customer Center(Figure 1-13) and bills in the Vendor Center. Each center also displays information, such as names andaddresses, contact, to-do items, notes, and more.14Chapter 1: Introducing QuickBooks
Touring the QuickBooks User InterfaceThe Customer, Vendor, and Employee Centers have two tabs on the left: The first tab (Customers & Jobs, Vendors, or Employees depending on which center youopen) contains the corresponding Name list. You can click an entry in this list to view andedit information about that customer, vendor, or employee. For example, you can look ata customer’s transactions, review notes added to the customer’s record, and then look upcontact information to give the customer a call. (If your company has turned on payroll, theEmployee Center also contains a separate tab for the Payroll Center.) The Transactions tab lists the transaction types related to the center, such as Invoices, SalesReceipts, and Received Payments in the Customer Center, and Bills and Bill Payments inthe Vendor Center. This tab is helpful when you want to view transactions for all customers,vendors, or employees.Note: You can customize the information that appears in centers. For example, you canfilter the customer list on the Customers & Jobs tab to show only customers with openbalances. Or you can filter a customer’s transactions to show only open invoices for thisfiscal year.Filter which customers appear in the Customers and Jobs tabFilter by transaction typeFilter by statusFilter by date rangeFigure 1-13 The Customer CenterIncome TrackerThe Income Tracker window (Figure 1-14) displays a high-level view of income as well as thetransactions that contribute to the totals you see. At the top of the window, horizontal bars displaytotals for unbilled income, open invoices, overdue invoices, and customer payments during the past30 days. The table below the bars lists income transactions. You can filter the list by clicking one of thebars at the top. For example, clicking the Overdue box filters the table to show only overdue invoices.You can also filter by clicking the drop-down lists immediately above the table.Chapter 1: Introducing QuickBooks15
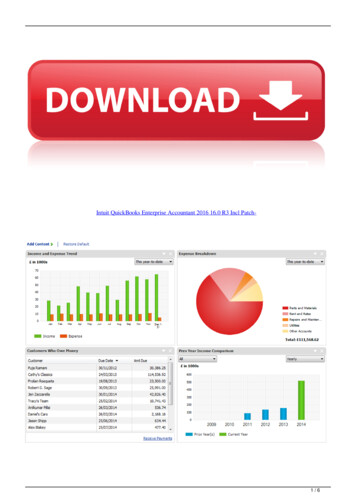
Touring the QuickBooks User InterfaceIn addition, you can take action on transactions in the table. For example, click the down arrow inan open invoices Action cell and you can choose to receive payment on that invoice, print the row, oremail the row.Figure 1-14 Income TrackerComputer Practice1. In the icon bar, click Income Tracker.2. In the Income Tracker window, click the Open Invoices bar at the top of the window.3. Click the Action cell for one of the invoices, and then choose Receive Payment.4. Close the Receive Payment window by clicking the X at the window’s top right.5. Close the Income Tracker window.SnapshotsThe Company Snapshot window (Figure 1-15) summarizes various aspects of your company’s finances,like income and expense trends, account balances, customers who owe you money, best-selling items,expense breakdown, and reminders. To open the Company Snapshot window, on the Company menu,choose Company Snapshot or click the Snapshots entry in the icon bar. Then, click the Company,Payments, or Customer tab to display overall company info, Accounts Receivable and payment info, orcustomer info, respectively.You can choose the views you want to see. To add or remove views on a tab, click the tab, and thenclick Add Content.16Chapter 1: Introducing QuickBooks
Touring the QuickBooks User InterfaceFigure 1-15 The Company Snapshot WindowCalendarThe Calendar window (see Figure 1-16) shows when transactions and to-dos were recorded or are due.(The Entered date is the transaction date entered in the transaction form, not the date that someonecreated the transaction.) You can use the Calendar to see which to-dos are coming up or are past due.You can also view past due or almost due transactions. To open the Calendar, in the icon bar, clickCalendar, or on the Company menu, choose Calendar.Figure 1-16 The Calendar WindowChapter 1: Introducing QuickBooks17
Introducing QuickBooks TransactionsWorking with WindowsYou can set up QuickBooks to display one window a
Books Company File and a “.qbw” file extension (for QuickBooks working). Portable company files: These files (file extension “.qbm”) are compact versions of your working files, intended for exchanging files between computers. You must restore a porta-b