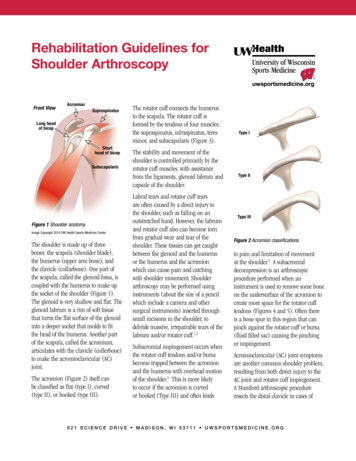
Transcription
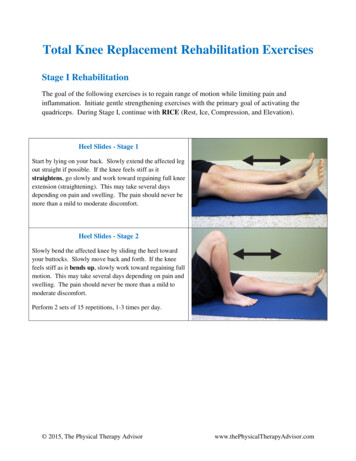
Total Knee Replacement Rehabilitation ExercisesStage I RehabilitationThe goal of the following exercises is to regain range of motion while limiting pain andinflammation. Initiate gentle strengthening exercises with the primary goal of activating thequadriceps. During Stage I, continue with RICE (Rest, Ice, Compression, and Elevation).Heel Slides - Stage 1Start by lying on your back. Slowly extend the affected legout straight if possible. If the knee feels stiff as itstraightens, go slowly and work toward regaining full kneeextension (straightening). This may take several daysdepending on pain and swelling. The pain should never bemore than a mild to moderate discomfort.Heel Slides - Stage 2Slowly bend the affected knee by sliding the heel towardyour buttocks. Slowly move back and forth. If the kneefeels stiff as it bends up, slowly work toward regaining fullmotion. This may take several days depending on pain andswelling. The pain should never be more than a mild tomoderate discomfort.Perform 2 sets of 15 repetitions, 1-3 times per day. 2015, The Physical Therapy Advisorwww.thePhysicalTherapyAdvisor.com
Supine Knee Extension StretchLie on a bed with your affected leg straight and your heelresting on a pillow, towel or foam roller. Do not have anysupport under the knee. The other leg can be bent orstraight. Keep your toes pointed straight up in the air.Hold in this position for at least 5 minutes at a time.Increase the length of time as possible.Perform at least 3 times per day. You may place an ice bagor a phone book over the knee for additional weight.Quadriceps SetLie on your back with your affected leg as straight aspossible. The other leg can be bent or straight. Keep yourtoes pointed straight up in the air. Tighten your thigh(quadriceps) muscle like you are attempting to straightenyour knee.Perform 2 sets of 10 repetitions, 1-3 times per day. 2015, The Physical Therapy Advisorwww.thePhysicalTherapyAdvisor.com
Stage II RehabilitationDuring this stage, many of the initial Stage I exercises are continued although the intensity maybe increased. The goal remains to improve range of motion while working toward full kneeextension and knee flexion. You may be able to begin to use a stationary bike. Continue withquadriceps strengthening and initiate more full leg strengthening (in particular, the gluteusmedius in the hip).Heel Slides - Stage 3Slowly bend the affected knee by sliding the heel towardyour buttocks. Utilize a belt or strap to increase thepressure and to bend the knee further. Slowly move backand forth. If the knee feels stiff as it bends up, slowlywork toward regaining full motion. This may take severaldays depending on pain and swelling. The pain shouldnever be more than a mild to moderate discomfort.Perform 2 sets of 15 repetitions, 1-3 times per day.Straight Leg Raise - Starting PositionLie on your back with your affected leg straight. The otherleg will be bent. Keep your toes pointed straight up in theair.Straight Leg RaiseRaise your leg parallel to the bent leg. Don’t arch yourback. Keep your abdominals engaged. You could also addan ankle weight to increase the difficulty level.Perform 2 sets of 10 repetitions, 3 times per day. 2015, The Physical Therapy Advisorwww.thePhysicalTherapyAdvisor.com
Seated Knee Extension StretchPlace your affected side on a stool or chair of similarheight. Do not have any support under the knee. Hold inthis position for at least 5 minutes at a time. Increase thelength of time as possible.Perform at least 3 times per day. You may place an ice bagor a phone book over the knee for additional weight.Seated Knee Flexion Stretch (Butt Scoot) - Stage 1Sit on a chair. Bend your affected knee and slide your heelbackward. Bend it as far as you can. Hold your foot firmlydown on the ground.Seated Knee Flexion Stretch (Butt Scoot) - Stage 2Keep your knee bent and your foot firmly on the ground.Use your arms to assist while you scoot your buttocksforward (causing your knee to bend further). Hold, andthen return to your original starting position. Repeat.Perform 1 set of 15 repetitions, 3 times per day. 2015, The Physical Therapy Advisorwww.thePhysicalTherapyAdvisor.com
Supine Hamstring Stretch with a StrapUtilize a belt or strap around your foot to help you performa hamstring stretch on your affected side. Try to keep yourknee as straight as possible.Hold for 30 seconds. Perform 3 repetitions. Repeat 1-3times per day.Bridge Exercise - Starting PositionLie on your back with your knees bent to prepare for thebridge exercise.Bridge ExerciseKeep your pelvis level as you lift your hips/pelvis andbuttocks into the air. Pause, and then return back down tothe ground. Do not let your pelvis wobble as you move upand down. Add a weight to your pelvis to increase thedifficulty level.Perform 2 sets of 10 repetitions, 1-2 times per day.Standing Knee Bends (Mini Squats)Stand behind a chair or next to a counter top. Keep yourfeet about hip width apart and perform a mini squat (kneebend). Do not let your knee move forward past your toes.Be sure to extend your buttocks backward as if you weresitting in a chair. As you return to standing, straighten yourknee as much as you can and try to lock it backward.Perform 2 sets of 10 repetitions, 1-2 times per day. 2015, The Physical Therapy Advisorwww.thePhysicalTherapyAdvisor.com
Standing Knee FlexionStand behind a chair or next to a counter top. Keep yourfeet about hip width apart. Try to bend your knee and kickyourself in the buttock. Keep your thighs parallel to eachother.Be sure to perform this exercise on both legs.Perform 2 sets of 10 repetitions, 1-2 times per day. 2015, The Physical Therapy Advisorwww.thePhysicalTherapyAdvisor.com
Stage III RehabilitationExercises in Stage III continue to focus on range of motion. At this point, you’re typically ridinga stationary bike regularly. The following exercise program is designed to improve lowerextremity strength while still focusing on quadriceps and gluteus medius strength. Try toperform the following exercise variations. Balance drills are typically introduced as well asmore advanced gait drills. The goal is return to ambulating without any noticeableabnormalities. In this stage, mobility for basic daily tasks is usually quite good.Bridge Exercise with an Exercise BandAround Your KneesPlace an exercise band around your thighs above yourknees. Keep your pelvis level as you lift your hips/pelvisand buttocks into the air. Pause, return back down to theground. Don’t let your pelvis wobble as you move up anddown. Hold your knees 4-6 inches apart.Perform 2 sets of 10 repetitions, 1-2 times per day.Clamshell for External Hip RotationLie on your side (with your spine in a neutral position) withyour hips flexed and your feet together. Depending onyour strength level, perform the exercise with or without anexercise band tied around your knees. Slowly raise yourknee upward as far as you can without rolling your pelvisbackward. Keep your core engaged. The only movementshould be from your knee lifting up.Perform 3 sets of 15-20 seconds holds once per day. 2015, The Physical Therapy Advisorwww.thePhysicalTherapyAdvisor.com
Wall Squat - Starting PositionStand with your pelvis, back, and head touching a wall.Your feet will be approximately hip width apart and farenough out from the wall. When you slide down, yourknees will make a 90 degree angle. Try to have the kneetrack toward your second toe to insure proper alignment ofthe knees.Wall SquatFrom your starting position, slowly lower your body downand hold for time. As you improve, lengthen the amount oftime you hold the wall squat. Be sure to keep your pelvis,back, and head against the wall. Keep the movement painfree.Perform 3 sets of 15-20 seconds holds once per day.Wall Squat with an Exercise BandPlace an exercise band around your thighs above yourknees. It will help to increase the activation of the hipmuscles. From your starting position, slowly lower yourbody down and hold for time. As you improve, lengthenthe amount of time you hold the wall squat. Be sure tokeep your pelvis, back, and head against the wall. Keep themovement pain free.Perform 3 sets of 15-20 seconds holds once per day. 2015, The Physical Therapy Advisorwww.thePhysicalTherapyAdvisor.com
Step UpsStart with a box height that is comfortable for you to stepup on. Be sure to keep your knee in alignment with yoursecond toe. Step up and keep your pelvis level and yourknee in alignment. Be sure to engage the buttocks musclesand fully lock out the knee.Perform 2 sets of 15-20 repetitions once per day.Side Stepping with an Exercise BandTie the exercise band above your knees. Move into a slightsquat position. Try to side step while keeping your feetfacing forward. Move slowly, and try to keep your head atthe same level.Walk sideways for 20-30 feet. Return back again, butdon’t turn around.Perform 2-3 sets once per day.Balancing on One FootWhile standing near a counter top, stand on one foot. Useyour hands on the counter top as needed to maintain yourbalance. Maintain a proper upright posture. The softer thesurface you stand on, the more difficult the balance will be.(If your balance is very poor initially, please stand near acounter or sink for safety.)Hold for 30 seconds, and 3 repetitions per side. 2015, The Physical Therapy Advisorwww.thePhysicalTherapyAdvisor.com
Balancing on One Foot - Soft SurfaceWork on standing on one foot. Once you have mastered it,increase the difficulty level by adding a pillow or standingon any type of softer surface, such as grass.For normal balance, you should be able to stand on onefoot for 30 seconds with both eyes open and with both eyesclosed.(If your balance is very poor initially, please stand near acounter or sink for safety.) 2015, The Physical Therapy Advisorwww.thePhysicalTherapyAdvisor.com
Stage IV RehabilitationExercises in Stage IV should be designed to help maximize your mobility and desired mobilityoutcome/goal. Exercise intensity continues to increase as you perform balance training. Areturn to full functional mobility is the desired outcome. In this stage, a majority of the exercisesare performed independently. You may intermittently consult with a physical therapist toprogress in rehabilitation to insure that you’re meeting your goal.Disclaimer: The Physical Therapy Advisor blog is for general informational purposes only and does notconstitute the practice of medicine or other professional health care services, including the giving ofmedical advice. No health care provider/patient relationship is formed. The use of information on thisblog or materials linked from this blog is at your own risk. The content of this blog is not intended to be asubstitute for professional medical advice, diagnosis, or treatment. Do not disregard, or delay inobtaining, medical advice for any medical condition you may have. Please seek the assistance of yourhealth care professionals for any such conditions. 2015, The Physical Therapy Advisorwww.thePhysicalTherapyAdvisor.com
Place your affected side on a stool or chair of similar height. Do not have any support under the knee.