Transcription
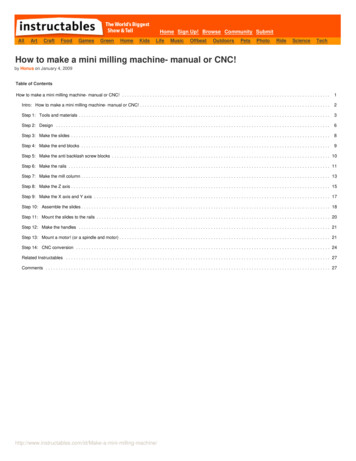
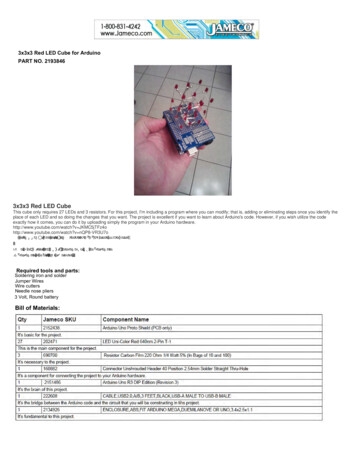
3x3x3 Red LED Cube for ArduinoPART NO. 21938463x3x3 Red LED CubeThis cube only requires 27 LEDs and 3 resistors. For this project, I'm including a program where you can modify; that is, adding or eliminating steps once you identify theplace of each LED and so doing the changes that you want. The project is excellent if you want to learn about Arduino's code. However, if you wish utilize the codeexactly how it comes, you can do it by uploading simply the program in your Arduino hardware.http://www.youtube.com/watch?v JKMC5jTFz4ohttp://www.youtube.com/watch?v nQP8-VR3U7oKWWS ZZZ LQVWUXFWDEOHV FRP LG ', [ [ 5HG /(' &XEH 7LPH 5HTXLUHG KRXUV GHSHQGLQJ RQ H[SHULHQFH([SHULHQFH /HYHO ,QWHUPHGLDWH Required tools and parts:Soldering iron and solderJumper WiresWire cuttersNeedle nose pliers3 Volt, Round batteryBill of Materials:
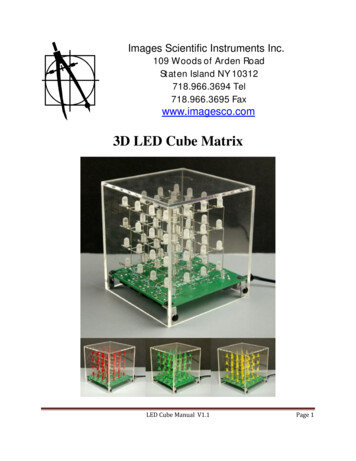
Step 1 - Project's DiagramFollow the diagram of your project so that you can finish it correctly and without problem. Remember that the pins 2, 3, 4, 5, 6, 7, A4, A5, and A0 will be connected to thebase of 9 LEDs of your cube while A1 to bottom layer, A2 to middle layer, and A3 to top layer of this project.
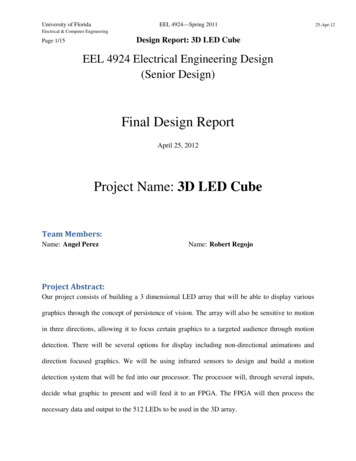
Step 2 - What You Need to Construct the Cube's LayersFor constructing the cube's layers, I utilized a small box by drawing on it a square of 1.25" x 1.25" and then can divide that square in four parts and so obtaining the nineplaces for the nine LEDs that I would want to put and solder them.Step 3 - Testing the LEDsBefore using the LEDs in your project, test them.
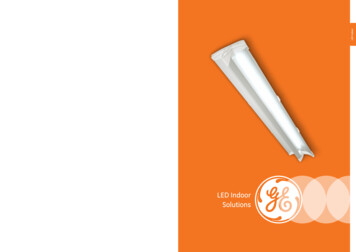
Step 4 - Constructing the Cube's LayersOnce you tested the LEDs, assemble the first layer of the cube by taking in account what you are going to do. That is, you have to connect the cathodes of all the nineLEDs only for forming the first layer by leaving free the anodes of each LED. When finishing the first layer, you can continue with the following until you complete a total ofthree layers.
Step 5 - Constructing the CubeOnce you have finished the three layers of the cube, assemble them by joining anode with anode only and leave free the anode of each LED for next step.Step 6 - Insert the Ends of the Cube in the PCBInsert the terminals of your cube in the PCB for soldering them, but remember the amount of ends: nine.
Step 7 - Prepare the PinsTake the 40-pin male headers pins and cut two parts of 1x6 and reserve for later.Step 8 - Insert the Pins Reserved to Your Arduino PlatformInsert the pins reserved to your arduino hardware; the first 1x6 pins to the outputs 2 to 7 while the other 1x6 pins tp A0 - A5.
Step 9 - Mount the PCB with the Cube on Your ArduinoMount the PCB with your cube on the arduino platform so that you can match the PCB with the pins previously inserted and so you can solder that pins. Besides, youneed to identify each of the ends of your cube so that you can connect them correctly to pins that you are soldering.Step 10 - Dismount the PCBDismount the PCB so that you can continue with the rest of the connections to your project and remember that you should connect from A1 - A3 to your bottom, middle,and top layer of the cube respectively.
Step 11 - Complete your ProjectComplete your project, mounting newly the PCB on your arduino platform so that you can upload thecode in the following link: http://pastebin.com/3trUMh2PFor more images on the build process visit: Cube/?ALLSTEPS
Step 2 - What You Need to Construct the Cube's Layers For constructing the cube's layers, I utilized a small box by drawing on it a square of 1.25" x 1.25" and then can d