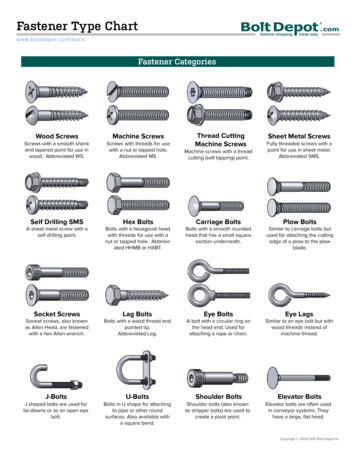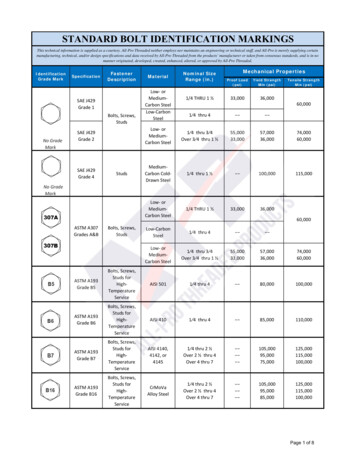
Transcription
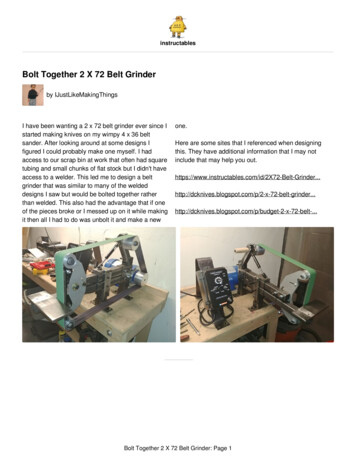
instructablesBolt Together 2 X 72 Belt Grinderby IJustLikeMakingThingsI have been wanting a 2 x 72 belt grinder ever since Istarted making knives on my wimpy 4 x 36 beltsander. After looking around at some designs Ifigured I could probably make one myself. I hadaccess to our scrap bin at work that often had squaretubing and small chunks of flat stock but I didn't haveaccess to a welder. This led me to design a beltgrinder that was similar to many of the weldeddesigns I saw but would be bolted together ratherthan welded. This also had the advantage that if oneof the pieces broke or I messed up on it while makingit then all I had to do was unbolt it and make a newone.Here are some sites that I referenced when designingthis. They have additional information that I may notinclude that may help you -belt-.Bolt Together 2 X 72 Belt Grinder: Page 1
Step 1: Drawings and ModelsBelow I have included some drawings and modelsthat should hopefully help you with the dimensionsand hole layouts. I included the drawings as pdf's andthe .step file for the entire assembly so you can seehow it all fits together. If you do not have a 3Dmodeling software I have also included a 3D pdf thatwill anyone with adobe acrobat (its free) to be able toview the assembly as well.these drawings and models are not 100% the sameas what I show being made. I will address thechanges in each step as they differ from thedrawings.One piece 1.5in x 1.1in x .375in for one half of thehingeNote: While making this I made some changes andOne piece 2in x 2in x .375in for the other half of thehingeMaterial List:Parts list:2in x 2in square tubing in the following lengths:Lots of bolts (each step will show the bolts you need,most are 3/8in bolts but they don't have to be)One 5in long tubeTwo 10in long tubesLots of lock nuts (these are important as this vibratesa lot and you don't want it coming apart)One 11in long tube1.5in x 1.5in square tubing in the following lengths:One 7in long tubeTwo adjustable position handles (I used these 3/8 x 11/4 ones)Flat platen tool (I bought this one but the second link Iprovided has the plans for one if you can make it)One 17in long tubeGuide, tracking, and drive wheels (I bought mine formhere but the third link shows how you can make yourown)One 12in long tubeTwo pieces 2in x 6.5in x .25in (this can be thinner butit is nice if it is thicker because it will be threaded)Two pieces 4in x 4in x .125 (this can be thicker if youwant but not any thinner)A gas spring (I used a 7in 100N/22lb spring fromamazon but it is no longer available)A handle (I turned a 2 x 2 piece of wood into a handlebut you could buy whatever you want)Four 2in long pieces of 2in angle ironOne piece at least 2.5in x 8in x .25in for the tool restA motor (This completely depends on what you haveor the power you want, I have a 1hp motor with a vfdto provide variable speed control)One piece 2in x 2in x .25in (I made mine more around2in x 4in x .25in which you will see static/3dviewer/index.html?svf J98RSSKH/1/belt-grinder-Assy.svfBolt Together 2 X 72 Belt Grinder: Page 2
2X/FB6WVJOJ98RT52X.pdf LA/F3EHDAJJ98RSSLA.pdf NK/FCBABGCJ98RSSNK.pdf NL/FAFSQ9FJ98RSSNL.pdf QE/FTEXTYFJ98RSSQE.pdf QZ/FELQGFJJ98RSSQZ.pdf TM/F5SAXECJ98RSSTM.pdf UT/FA94SQFJ98RSSUT.pdf X3/FCH0PFEJ98RSSX3.pdf XP/FK4WXTRJ98RSSXP.pdf 01/FZ8IJWKJ98RST01.pdf 0X/FHENET3J98RST0X.pdf 3E/F1JNLFUJ98RST3E.pdf 47/F1V2HHKJ98RST47.pdf 6O/FGAQKQUJ98RST6O.pdf Bolt Together 2 X 72 Belt Grinder: Page nloadDownloadDownload
Step 2: Making and Attaching the Front PlateI forgot to take pictures before I drilled all of the holesbut I tried to show them in a way that would explainthe step by step approach that I took when makingthis.holes can be drilled slightly larger than the bolt so thateven if you are a little off then it can still beassembled. when you tighten everything down it willbe tight enough that nothing will move.First you need to cut all 4 of the 2in square tubing tothe required lengths. For the two 10in tubes you willwant to file away the weld seam because this iswhere the 1.5in tubes will be inserted and that seamwill make it difficult. These tubes have a 3/16in wallthickness. It is important to have thicker walls onthese because the 1.5in tubes fit into them and youwant as small of a gap as possible.Then you will want to drill the holes on the two sideplates. One plate will be drilled to have two 3/8 inthreaded holes in it and the other I decided to put two1/4in threaded holes in it even though I didn't havethem on the drawing. These 1/4in bolts were used tokeep these plates fixed to the two 10in tubes. Thenyou will put a 3/8in hole in the bottom that will holdthe front leg in place.The next part that I show was originally designed tobe 2in x 2in but I ended up making it 4in longbecause as you will see later on I needed to room sothat I could have a surface to mount the gas spring to.When making this part you need a drill press becauseyou are drilling all the way through a 2in part andunless you are way better at free hand drilling than Iam it is near impossible to drill through this evenly. Idrilled these to allow a 1/4in bolt to fit all the waythrough this and the two side plates. Many of theseAssemble as shown and then drill the hole in the frontleg, this tube also had a 3/16in wall thickness, andbolt it together. once this is bolted together then youwill want to use the holes on the plates as guides onwhere to drill the holes on the tubes below them.Then you tap the holes and add the bolts andhandles. If you need to learn how to tap a hole it isincluded in the classes they offer on here. Just goslow as I broke a tap while making this.Bolt Together 2 X 72 Belt Grinder: Page 4
111. A drill press is mandatory to be able to drill straight through this part.1. Clearance holes. These can be drilled a littlelarger if needed to make sure the bolt will go throughall three pieces.11. Best to triple check the measurements beforedrilling. I messed up but it still works fine.Bolt Together 2 X 72 Belt Grinder: Page 5
11. Use the hole in the plate to mark where to drill in the tube below it.Bolt Together 2 X 72 Belt Grinder: Page 6
11. File down weld seam111. 1/4 in tap1. These bolts just keep this bracket in placeBolt Together 2 X 72 Belt Grinder: Page 7
11. Grind down the 1/4 in bolts so that they do not protrude into the inside ofthe tube.11. 3/8 in Tap11. 3/8 in adjustable position handlesBolt Together 2 X 72 Belt Grinder: Page 8
11. The handle threads protrude through the larger tube to clamp the smallertube that will fit inside.Step 3: Making and Attaching the Rear PlateNow to work on the back side. For the 11in tube youwill need to cut out the top to allow the top arm to beable to fit into it. This tube only had a 1/8in wallthickness due to the material I had available but it isnot as important as on the two 10in tubes.These hold the back and together. It worked best beme to drill the top hole in the vertical 11in tube andthen put the bolt through and then use the plate tomark the second holes location. I did the same thingfor the next two holes through the other tubes. Thenyou just bolt it all together.Then you will need to create the two 4in x 4in plates.Bolt Together 2 X 72 Belt Grinder: Page 9
11. Drill the top hole first and then use the 4x4 plate tolocate the second hole locationBolt Together 2 X 72 Belt Grinder: Page 10
11. Use the plate to provide hole locations in these two tubes.Bolt Together 2 X 72 Belt Grinder: Page 11
Step 4: Making the Hinge for the Tracking WheelTo be able to adjust the tracking of the belt, the tracking wheel needed to be mounted onto a hinge. I decided tomake my own hinge because I had a small desktop mill available and the steel to make it. This hinge just needs tobe able to attach to the upper arm and the other half of the hinge has to be able to hold the bolt that the trackingwheel spins on.Bolt Together 2 X 72 Belt Grinder: Page 12
11. 1/2 in threaded hole for the bolt that holds the tracking wheel.11. Bolt shortened for convenience.Bolt Together 2 X 72 Belt Grinder: Page 13
Step 5: Making the Upper ArmTo make the upper arm you will need the 7in longpiece of 1.5in tube. The 1.5in tubes I had all had a3/16in wall thickness. This will fit into the back 11intube where the slot was cut out. The holes in the backare where a bolt will go through to allow it to rotate upand down. When fully assembled this arm is pushedup by the gas spring and provides the tension on thebelt. You will then need to drill the holes for the hingeand handle.Because there is a gap when this is inserted into the11in tube I bought some nylon spacers ans sandedthem down so that they would take up the gapbetween these two parts.For my handle I just turned a 4in piece of 2x2 woodthat I had laying around and drilled a hole through itso I could run a 1/4in bolt through to attach it to thetube. You can buy a handle or make one howeveryou want. it is just needed to pull down on the armwhen changing belts.Note: I talk about it in the trouble shooting section butI would recommend making the arm a couple inchedlonger and moving the handle up further allowing forthe addition of a tracking adjustment knob.Bolt Together 2 X 72 Belt Grinder: Page 14
11. Nylon spacersBolt Together 2 X 72 Belt Grinder: Page 15
11. Nylon spacers11. Turned on a wood lathe from a 2x2. You can use any handle you want.Step 6: Making the FeetTo be able to mount this to a surface it needed some feet. I had access to some 2in angle iron so that is what Imade these out of. They are all 2in wide and have a 3/8in hole on each face. one hole to mount to the belt grinderand one to bolt into the table I mount it on.Bolt Together 2 X 72 Belt Grinder: Page 16
Step 7: Making the Tool RestTo make a tool rest for this I needed a long piece of1.5in tubing to insert into the lower of the two 10intubes. I determined this needed to be about 17in inlength to sit in the right location. I then found a goodsized piece of flat stock and drilled and tapped twoholes and then used those holes as guides to drill theholes in the 1.5in tube. I then fed two bolts in throughthe bottom and ground them so that they would notstick up out of the plate.Note: When figuring out where to drill the holes onthe flat stock it is important to note where the belt willbe and center your plate about that point so that youhave that same amount of tool rest to either side ofthe belt. Unless you want it uneven, in that case do ithowever you want.Bolt Together 2 X 72 Belt Grinder: Page 17
Step 8: Making the Flat Platen Tool ArmTo make the other tool arm you will need to knowwhat you plan on mounting to it. I was going to mounta flat platen to it so I used the hole locations from thatto determine where I needed to drill my holes. If youuse a different mount than the one I used you willneed to determine where your holes will need to beaccordingly. You can make multiple arms toaccommodate additional things like a large or smallcontact wheel. I found that 12in was the lengthneeded for the flat plated attachment I used but youmay need something longer or shorter depending onwhat you plan on attaching to it.Bolt Together 2 X 72 Belt Grinder: Page 18
Bolt Together 2 X 72 Belt Grinder: Page 19
Step 9: Attaching the Gas Spring for Belt TensionI determined I needed a 7in long gas spring to keepthe upper arm at the angle I wanted. This is why Iended up making the top of the front plate 4in longinstead of 2. I needed room to mount the gas spring.This was simply just figuring out where I wanted it tobe positioned and then drilling and tapping the holesfor the screws to hold it in place.Note: be careful when drilling the holes in the plate sothat you don't drill into where the other bolts are inthat plate already.Bolt Together 2 X 72 Belt Grinder: Page 20
Bolt Together 2 X 72 Belt Grinder: Page 21
Step 10: Trouble ShootingThere were a couple things that I ran into that I would like to make note of to help you in setting up your grinder.1. Make sure all the wheels are aligned correctly. I had to drill the holes in the top arm bigger for thehinge because it had enough wiggle that the weight of the tracking wheel and tension of the beltbulled it down too much. I just made the holes bigger and twisted the hinge some more beforebolting it down. I also had to do some troubleshooting to make sure the motor was aligned correctlyso that the drive wheel was in the correct alignment with the rest of the wheels.2. The tracking wheel will need to be pushed out some to track correctly. I didn't fully understand thispart of the grinder when designing it but to adjust the tracking of the belt the tracking wheel will needto be pivoted on the hinge either in or out to adjust the belt. I did not add this kind of feature when Idesigned this but I would suggest making the upper arm longer and mounting the handle at the topmaking room for a handle with a threaded rod to be added that can be twisted to push the trackingwheel in or out. For now I just drilled a hole in the hinge and added a threaded stud that can betwisted to push it in or out but it is a pain to adjust.3. There may be clearance between the tool arms and the 10in tubes they go into. I got some 1/16inthick nylon sheets that I cut into strips to fill the space between those parts to prevent the tool armsfrom being able to wiggle due to the clearance between them.111. Hinge is twisted to accommodate the slop in thehinge.1. Something is needed to set the angle of the tracking wheelBolt Together 2 X 72 Belt Grinder: Page 22
Step 11: Fully Armed and Operational Belt GrinderYour grinder is now complete and all you need to do is add a motor, set it all up, and you are ready to grind away.If you want you can get some 1.5in square tube plugs to cap the exposed ends of the 1.5 tubes just to clean it up. Iplan on adding those and painting it next year when it warms up again.Thank you for checking this out. If you have any questions, comments, or improvement suggestions please let meknow.211. Put all the bolt heads in this side so that noting is sticking out that thebelt can catch on when removing or putting on a new belt.2. Nylon spacers to fill the gap between the tubesBolt Together 2 X 72 Belt Grinder: Page 23
Step 12: Updated DesignIt took me long enough but I finally got around to updating the upper arm on my grinder. As you can see from thepictures, I made a new tube that is about 5 inches longer so that I could move the handle to the end and makeroom for a bolt that would allow me to adjust the tracking wheel more easily. I just plan on 3D printing a knob to fiton to the end of the bolt to make it so I can turn it by hand instead of with a wrench.Nice, I use a 12 inch disc sander for grinding knives. If you disconnect the start caps on the oldDeltas they will start by hand either direction. This makes grinding both sides of the knife blankeasy. But, I too have always wanted one of these.It is now on my listThanks for taking the time to write up this project. It was hard to find a bolt up version that i liked. Imade a few changes, but it works great. I'd love to hear what you think.Nice work. I like it. I like your control interface. I'm not that electrically inclined so I just boughtmine. I also like how you moved the handle so you could add the knob to adjust the top pulley. Iactually just got another piece of tubing in my basement so that I can change the upper arm so Ican add a knob like that to adjust the upper pulley. I was actually planning doing this this week andupdating this instructable to show the updated design.Best post ever, awesome.Thank you. I'm glad you like it.I'm not trying to be dramatic, but this changed my life for the better. Thank you to your hard work,but more importantly thank you for sharing your guide.Thank you. I'm just glad I could be of some help to someone.congrats buddy on your winBolt Together 2 X 72 Belt Grinder: Page 24
Thank you. Congratulations to you as well.Thank you all who voted on this. I am now one small step closer to being able to make a weldedversion of this. By that I mean I now will have a welding helmet. Now to get the welder. Eventually.I used the KBAC-24D which is for a 1hp motor but they make the KBAC-27D which is good for a2hp motor. I like this one because of its simplicity and sealed design. They are a bit moreexpensive but they were recommended multiple places when I was searching.Thank you. I tried to give as much detail as possible.As for changes. I only would recommend my second point under Trouble Shooting. It is just makingroom to add a way to more easily adjust the angle of the hinge for belt tracking. One of thecomments below attached a good picture to explain this.I would also reccommend looking through the links I provided if you haven't already as they havesome good info as well.Other than that it has been working wonderful so far.Great Job!Thank you.Nice work :) If I actually manage to clean out my garage and make it a work space, I'll be comingback to this. :)Thank you. Good luck on the buildGreat idea and great jobThank youNice job, but I see no details on wheel size or how you made them?Thank you. In the parts list I stated that I bought the wheels from Oregon Blade Maker. I wantedaluminum wheels but do not have the ability to make them yet so I bought them. Also on the thirdlink at the beginning they show that you can use longboard wheels as a cheaper alternative. theyalso added electrical tape to the tracking wheel to "crown" the wheel.Great Job! I think you could move the hindge a little away from the tube and add bolt near thehandle so you can adjust the middle weel up and down .Yes. I had actually mentioned this in my trouble shooting step. I didn't realize this until I made it butI would recommend making the top arm tube a couple inches longer and mounting the handlefurther up to make room for a through bolt like you show to adjust the tracking wheel. I wish I wouldhave known this before making it. But luckily I can just unbolt it and make another arm toincorporate this change. The gap behind the hinge has allowed for enough adjustment for it to trackproperly so far but with some other belts I may have to move it further away to allow greateradjustment. Thanks for the input.You did not mention the wall thickness of the 2" and 1.5" square. What did you use?I did forget to mention that. I will add those. Thanks for catching that. The 2in tubes had a wallthickness of 3/16in except for the 11in one in back which was 1/8in thick. The 10in tubes are theones that you want to have the thicker walls so that there is less gap when the 1.5in tubes areinserted into them. And the 1.5in tubes had a wall thickness of 3/16 I believe.Bolt Together 2 X 72 Belt Grinder: Page 25
Very nicely constructed. I've seen a few done like this one. I have the steel to make one, but in awelded version for simplicity, just because I have access to one.Thank you. Good luck on the build. I'd like to know how it works out for you.Looks spot on and you obviously have an idea with what you are doing, but my question would bewhy haven’t you used fitted bolts or dowels to keep everything so it’s aligned perfectly, you canuse a mill and lathe, unless you wanted adjustment for the ‘tracking’ of the beltThe tracking always requires adjustment. Between different brands of belt, age, they tend to stretchin different ways.I understand a belt always needs adjustment, but with fitted bolts there would be little to nomovement in the holes and it would be stronger,I suppose you could use fitted bolts for the other bolts in this design but I think this would requirethe need of more precision equipment than I had access to. Even with clearance holes and regularbolts this is very strong. The plate thickness and bolt sizes I used were a little overkill. I was justtrying to keep it as cost effective as possible. If you have the ability to make this with fitted boltsthen I'd like to hear how it goes.Thank you. I'm not sure I completely understand your question. Are you referring to a specific partof the grinder or the assembly as a whole? I also don't have a lathe and the mill I have access to isnot very accurate.my vote too. I wish every post was like this one.Thank you. It's really encouraging to hear that. Espically since I just started writing these.Nice work thanks for sharing you get my voteThank youYou got my vote as well, excellent design, great tutorial !Thank you. I really apreciate the vote.Great job, you got my vote! Which software did you use for drawings and 3D view?Thank you. I used Solidworks to design this. It's what I have access to.Really detailed instructions. Great build & thanks for generously sharing all the details. Plan tobuild one soon. However, I will be welding most of the frame to reduce vibrations.Thank you. Good luck on the build. If I had a welder I wouldn't have needed to make a boltedtogether design.Really well done. Thank you!Thank you. Glad you liked it.Abosolutely beauitiful!thank youWow, very clean build and superb documentation along with basically just using scraps! Definitelyresourceful and this would be a good addition to any shop. Maybe we can make one like it for thelocal maker space.I'm glad you liked it. hopefully you'll have less mess-ups then me if you make it.Bolt Together 2 X 72 Belt Grinder: Page 26
Super blown away by this post. Can't wait to study it more, but from what i've read, and seen, just areally great example of wanting something, and making it happen. Looks amazing. Thanks forsharing.Thank you.Nice build! Thanks for sharing.I'm a newb but I'd be curious why a 2x72 is better than a 4x36? Isn't wider better? Or couldn't youjust put a 2x36 belt on the 4x36 grinder?What is the advantage of length of the belt? It seems to be mostly just wasted?Bolt Together 2 X 72 Belt Grinder: Page 27
instructables Bolt Together 2 X 72 Belt Grinder by IJustLikeMakingThings I have been wanting a 2 x 72 belt grind