Transcription
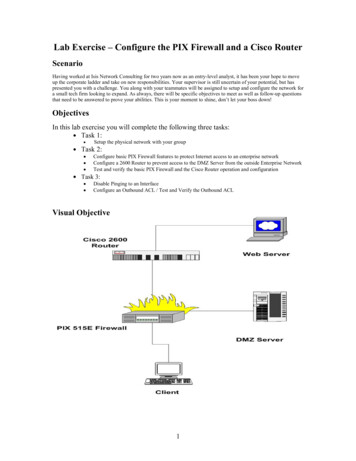
Lab Exercise – Configure the PIX Firewall and a Cisco RouterScenarioHaving worked at Isis Network Consulting for two years now as an entry-level analyst, it has been your hope to moveup the corporate ladder and take on new responsibilities. Your supervisor is still uncertain of your potential, but haspresented you with a challenge. You along with your teammates will be assigned to setup and configure the network fora small tech firm looking to expand. As always, there will be specific objectives to meet as well as follow-up questionsthat need to be answered to prove your abilities. This is your moment to shine, don’t let your boss down!ObjectivesIn this lab exercise you will complete the following three tasks: Task 1: Task 2: Setup the physical network with your groupConfigure basic PIX Firewall features to protect Internet access to an enterprise networkConfigure a 2600 Router to prevent access to the DMZ Server from the outside Enterprise NetworkTest and verify the basic PIX Firewall and the Cisco Router operation and configurationTask 3: Disable Pinging to an InterfaceConfigure an Outbound ACL / Test and Verify the Outbound ACLVisual Objective1
Lab Setup DiagramLab Setup DiagramcontentscommentsPIX/Router PasswordciscoOR no passwordPIX outside interface e0192.168.1.2netmask: 255.255.255.0PIX inside interface e110.0.1.1netmask: 255.255.255.0Router outside interface192.168.1.1netmask: 255.255.255.0Router inside interface10.10.10.1netmask: 255.255.255.0Console promptpix pix initial modeOR pix#pix# enable modeOR pix(config)#pix(config)# configuration modeCtrl Zbackward to previous modePIX/Router console windowhyper-terminal2
Task 1 – Physical Network SetupFor the following task it is you and your group’s duty to physically connect the network that will be used for the lab.Use the Lab Setup Diagram above to assist in the process.Some areas to note: The DMZ server users the 0/0 ports in the pix firewall and router while the client and web servers use 0/1ports The firewall and router consoles are connected to their respective counterparts via serial cables For practicality reasons the client pc and the consoles may be the same machine to reduce equipmentOnce completed, before continuing to task 2, have an instructor or a TA check over the connections for correctness.Task 2 – Configure the PIX Firewall and a Cisco RouterThis task mainly consists of three sub-tasks. First of all, you need to configure basic PIX Firewall featuresto protect Internet access to an enterprise network. Second, you need to configure a Cisco 2600 Router toprevent access to the DMZ Server from the outside Enterprise Network. And last, you must test and verifythe basic PIX Firewall and the Cisco Router operation and configuration, and adjust the configuration ifyou find something wrong.Note: Cisco products are pretty consistent on their configuration interface, not only console/terminalinterface but also graphic user interface (GUI). Through this entire lab exercises, we hope youTask 2.1: Configure the PIX Firewall InterfacesIn this subtask, you will first learn several basic commands to get yourself familiar with Cisco networkequipments. At this step, you are able to know how to initialize PIX firewall and switch between severalworking modes. Second, you will learn how to enable up the network interfaces (inside/outside) of PIXfirewall and assign each an IP address. To letTask overviewInitial ModeCommand set:1. enable2. write erase3. reload4. configure terminal5. hostnameComponent 1:initialize PIX firewallCommand set:1. interface e0/e1 auto2. ip address3. write memoryComponent 2:configure PIX interfacesCommand set:1. global2. nat3. route4. write terminalComponent 3:Advanced Routing/NATconfigurationPIX ready totest3
Command descriptionInitialize PIXcommandcommand usagecommentsenablePix enableSwitch pix to enablemode (pix#)writePix# write eraseErase previousconfiguration todefaultreloadPix# reloadReload basicmanufacture setuproutine.configurePix# configure termSwitch pix toconfigurable status.hostnamePix# hostname nameChange thehostname to namecommandcommand usagecommentsinterfacePix(config)#interface e0 autoEnable ethernet0/1interfaces forsensing 10/100 autocommunication. NoIP address at thismoment.Configure PIXinterfacesPix(config)# ipAssign IP address toaddressthe outside and theoutside[inside]inside network192.x.x.x. 255.x.x.xinterface.ip addressPix(config)# show[interface ipaddress history ]show4Show command isoften used to verifycurrentconfiguration, inorder to find errorsat early age.
commandcommand usagecommentsPix(config)# globalGlobal command(outside) 1builds up a global IP192.x.x.20address pool to192.x.x.250 netmask translate inside IP255.x.x.0address into outsideIP address, in orderto let inner hostsaccess outside world.globalAdvanced PIXconfigurationPix(config)# nat(inside) 1 0 0natEnable the IPaddress translation.In this lab, natcommand allowsinside hosts foroutbound access.Pix(config)# route Set up the route tableoutside 0 0 192.x.x.1 to direct traffic toother network.routePix(config)# writememorywriteRecord the currentconfiguration to theflash memory inPIX.Configure PIX step by step Step 1:Pix enablePassword: ciscoPix#Pix# write erasePix# reloadPix enablePix# configure termPix(config)# hostname pixFinishNote: After reload, pix firewall will go into basic manufacture setup routine. We do notwant to use that routine. Thus, when you encounter the message “Preconfigure PIXfirewall now through interactive prompts [yes]?”, enter NO. Step 2:Pix(config)# interface e0 autoPix(config)# interface e1 autoPix(config)# show interfacePix(config)# ip address outside 192.168.1.2 255.255.255.0Pix(config)# ip address inside 10.0.1.1 255.255.255.0Pix(config)# show ip addressPix(config)# write memoryFinish5
Note:1. By default the interfaces are disabled. You must enable all interfaces you intend touse.2. Use show command often to verify each important configuration operation.a) show interface. (you should see)interface ethernet0 "outside" is up, line protocol is uphardware is i82559 ethernet, address is 0011.2040.2498 MTU 1500bytes, BW 100000 Kbit full duplex.interface ethernet1 "inside" is up, line protocol is upb) show ip address. (you should see)System IP Addresses:ip address outside 192.168.1.2 255.255.255.0ip address inside 10.0.1.1 255.255.255.0Current IP Addresses:ip address outside 192.168.1.2 255.255.255.0ip address inside 10.0.1.1 255.255.255.03. after write to memory, you should be able to see following message:Building configuration.Cryptochecksum: f0d9d025 7cfe9d97 c879550f cb74e78d[OK] Step 3:Pix(config)# global (outside)1 192.168.1.20-192.168.1.250netmask 255.255.255.0Pix(config)# show globalPix(config)# write memoryPix(config)# write terminalPix(config)# nat (inside) 1 0 0Pix(config)# show natPix(config)# route outside 0 0192.168.1.1Pix(config)# show routeFinishNote: The nat ID in command global and nat must match, in this case, it is 1. This allowsmultiple nat ip pools within one PIX firewall.After entering command show nat, you should see “1 0.0.0.0 0.0.0.0”.After entering command show route, you should see:outside 0.0.0.0 0.0.0.0 192.168.1.1 1 OTHER staticinside 10.0.1.0 255.255.255.0 10.0.1.1 1 CONNECT static6
outside 192.168.1.0 255.255.255.0 192.168.1.2 1 CONNECT staticAfter entering command show terminal, you should see:Building configuration.: Saved:PIX Version 6.3(3)interface ethernet0 autointerface ethernet1 autonameif ethernet0 outside security0nameif ethernet1 inside security100Task 2.2: Configuring the Router Port IP ConnectionsThis is the final step which sets the external and internal router port IP numbers before aconnection may be established.Router enablePassword:Router# show ip interfaceRouter# configure terminalRouter# interface fastethernet0/0Router(config-if)# ip address 192.168.1.1 255.255.255.0Router(config-if)# no shutdownRouter(config-if)# exitRouter(config)# interface fastethernet0/1Router(config-if)# ip address 10.10.10.1 255.255.255.0Router(config-if)# no shutdownRouter(config-if)# exitFinishTask 2.3: Verify the PIX Firewall Interfaces ConfigurationTo test the configuration of PIX interfaces and the operation of the global and nat statements byorigination connections through PIX firewall, we need to verify using following test cases:a)Case1: Go to “Client PC” and open the IE web browser. Use the web browser toaccess the outside server at IP address 10.10.10.2 by entering http://10.10.10.2.If you are successful, the browser page will have a message like “Hi This is theOutside Server!”Note: Observe the IP address translate table by using show xlate, you will see somethinglike following:1 in use, 1 most usedGlobal 192.168.1.20 Local 10.0.1.2A Global Address chosen from the low end of the global range has been mapped to theinside client.7
b)Case 2: Go to the “Web Server” and open the web browser. Use the webbrowser to access the outside server at IP address 192.168.1.3 by enteringhttp://192.168.1.3. If you are successful, the browser page will have a messagelike “Hi This is the DMZ Server!”.Note: This activity is just to show the concept of a DMZ server and is not actuallyconnected to a DMZ interface at the pix firewall or the any router.Task 2.4: Configure the Router to preventLetting an outside host freely access inside server usually is not a desirable thing. In thistask, we will learn how to setup access control rules for particular request using Cisco2600 router. The interfaces are already configured on the router. We will only add anaccess-list and associate it with the interface fastethernet0/0. This will prevent accessfrom the “Web Server PC” to the “DMZ Server PC”.Configure ACL step by stepRouter enablePassword:Router# show ip interfaceRouter# configure terminalRouter(config)# access-list 101 deny tcp host 10.10.10.2 host 192.168.1.3 logRouter(config)# access-list 101 permit tcp any anyRouter(config)# interface fastethernet0/0Router(config-if)# ip access-group 101 outFinishVerify that the IP Interface is correctly configured and the access-list has been nowassociated with the correct interface. Go to the “Web Server PC” and open the webbrowser. Use the web browser to access the outside server at IP address 192.168.1.3 byentering http://192.168.1.3. You will not be able to access the DMZ Server.Note: Check the log buffer of the router to see the details of the connection that wasdenied. The log should look something like the following:Log Buffer (11500 bytes):Mar 2 03:37:11.629: %SEC-6-IPACCESSLOGP: list 101denied tcp 10.10.10.2(0)- 192.168.1.3(0), 3 packetThe log buffer shows that 3 tcp packets were denied because of the access list 101This completes the lab.Task 3 – Configure advanced ACLs in PIX firewallsThe Access Control List (ACL) enables you to determine what traffic will be allowed or denied through thePIX Firewall. These lists are kept and may be adjusted to restrict outgoing or incoming traffic. Properconfiguration of the Outbound and Inbound ACL will help maintain a safe network.This task mainly consists of two sub-tasks: Disable ping to an interface Configure an Outbound ACL to limit traffic leaving the network8
Task overviewPIX configure modeCommand set:1. icmp2. clear3. conduitSub-task1:disable pingCommand set:1. access-list2. access-groupSub-task2:Outbound ACLFinishCommand descriptioncommandcommand usagecommentsicmpPix(config)# icmp[deny permit] anyecho-reply insideDeny or permit allping requests at theinside interfaceclearPix(config)# clearicmpEnable the IPaddress translation.In this lab, natcommand allowsinside hosts foroutbound access.conduitPix(config)# conduit[permit deny] icmpany any echo-replyEnable echo repliesfrom the outside tothe inside usingconduit commandaccess-listPix(config)# accesslist ACLOUTpermit tcp any anyeq wwwCreate access list toallow the internalnetwork to accessInternetaccess-groupPix(config)# accessgroup ACLOUT ininterface insideAdd the access listto a group, and bindit to inside interfaceConfigure ACLsTask 3.1: Disable Ping function to an interfaceIn this subtask, you will learn the process to disable ping within a network.9
Ping is a feature used for network debugging. It sends out a short data burst – a single packet – and listensfor a reply from the target. This can provide useful information about dropped, duplicated, or damagedpackets. It also calculates the Round Trip Time (RTT), checking for the speed of the network. The pingfeature is usually disabled on client PCs in companies. This is because hackers may use ping as a platformto launch Denial of Service attacks and flood the network.Configure/Verify icmp step by step (On Client PC) Step 1:On the command window to reach the DOS prompt ( Start- Run - Enter “cmd”as the program to Open) and ping the inside interface of the PIX Firewall from theClient PC (10.0.1.2).C:\ ping 10.0.1.1Note: ping message will look like this:Pinging 10.0.1.1 with 32 bytes of data:Reply from 10.0.1.1: bytes 32 time 10ms TTL 255.Ping statistics for 10.0.1.1:Packets: Sent 4, Received 4, Lost 0 (0% loss),Approximate round trip times in milli-seconds:Minimum 0ms, Maximum 0ms, Average 0msThe log buffer shows Step 2Ping outside interface of PIX firewall from Client PC (10.0.1.2). By default pingingthrough the PIX Firewall to a PIX Firewall interface is not allowed:C:\ ping 192.168.1.3Note: ping message will look like this:Pinging 192.168.1.3 with 32 bytes of data:Request timed out. Step 3: deny all ping requests at the inside interfacePix(config)# icmp deny anyecho-reply insidePix(config)# show icmpC: ping 10.0.1.1C: ping 192.168.1.3Pix(config)# clear icmpC: ping 10.0.1.1Pix(config)# conduit permit icmpany any echo-replyC: ping 192.168.1.3FinishNote: It is straightforward that whenever icmp is enabled the ping message will look likeshown in step2, whenever icmp is disabled the ping message looks like:Pinging 192.168.1.3 with 32 bytes of data:Request timed out.Task 3.2: Configure/Verify an outbound ACL10
In this sub-task, you are asked to setup an outbound ACL that satisfies followingrequirements. On the first run TCP and IP requests will be allowed, on the second runTCP will be disabled but IP access to the web server is still allowed.Configure/Verify ACLs step by step (On Client PC) test 1:C:\ ftp 10.10.10.2Pix(config)# access-list ACLOUTpermit tcp any any eq wwwPix(config)# show access-listPix(config)# access-groupACLOUT in interface insideOpen the IE on the inside clientPC. Use the web browser to accessthe outside server by enteringhttp://10.10.10.2C:\ ftp 10.10.10.2Note:On the first run of ftp, you must be able to access the outside web server via FTP. Afteryou setup the ACL, and access outside server via web browser, you can access. However,on the second run of ftp, the access will be denied due to implicit deny. test 2:Pix(config)# show access-listPix(config)# no access-group ACLOUTin interface insidePix(config)# show access-listPix(config)# write memoryPix(config)# access-list ACLOUT permit ip any anyPix(config)# access-group ACLOUT in interface insidePix(config)# no access-list ACLOUT permit tcp any any eqOpen the IE on the inside client PC.Use the web browser to access theoutside server by enteringhttp://10.10.10.2C:\ ftp 10.10.10.2FinishNote:Still, you must be able to access the outside web server via web browser. However, youcan access the outside server via FTP. Why?Using command show access-list, carefully observe the response messages, for eachusage, you may see something like:access-list ACLOUT; 3 elementsaccess-list ACLOUT line 1 permit tcp any any eq www (hitcnt 1)access-list ACLOUT line 2 permit ip any any (hitcnt 0)The denial prevents any ftp connections to be made through the client side.11
Report to deliver:The group report is to show what you did in the project. Please clearly state your resultsof this project. You are expected to hand in a report in the following formats:z A cover page (including project title) with group name and group membersz A table of contents with page numbersz Using double-spaced typing for convenient gradingz Hard copies only, Font size 12, Single columnz A bound or stapled document, with numbered pagesThe report should have the following sections. Each section has multiple items. You needto write a report section by section that covers all required items. But you do not have towrite the report item by item. Take screenshots if it is necessary.Section I: Introduction:You should have the following parts:z Describe the goal and motivation of this project. In addition to what has been statedin the project instruction, please tell your own expectation in this project.z Give an outline of this report, in which the content of each section needs to bebriefly described.Section II: Task 1You should have the following parts:z Briefly describe the concept of firewalls.z Briefly describe the features that Cisco Pix firewall has and the technologies that Pixuses.z Briefly describe the features of Cisco 2600 Router.Section III: Task 2/Task3You should have the following parts:z Please describe how you construct the Network step by step in detail and in order. Inorder to show the detail of each step, for example, you need to describe which port of theswitch you used, which interface in the router/pix you used, etc. You can take somesnapshots of the screen to facilitate your description.z After the Network is constructed, show the results you get from configuring thenetwork. For example, what command you used, and what response you got? Thismay not be the same as you see in the lab document.Section IV: QuestionsYou should answer the following 5 questions related to this lab (single choice):1.Which of the following is true?a.Interfaces with lower security levels can access higher security levels.b.The outside interface has the highest security levelc.The outside interface can access the inside interface.d.None of the above is true.2.Command used to deny all ping requests at the inside interface is :a.icmp deny any echo-reply insideb.ping deny all echo-reply insidec.All of the above.12
d.None of the above.3.The access-list command is used to create an access-list. What is/are thefunctions of the access-list?a.Allow the internal network internet access.b.Permit outbound IP Trafficc.Permit inbound FTP accessd.All of the above.4.An access list named OUT that permits all outbound IP traffic is .a. access-list OUT permit any anyb. access-list OUT permit ip 255.255.255.0 host 255.255.255.0 eq wwwc. access-list OUT permit ip any anyd. None of the above.5.Static address mapping is used :a.To creating a permanent mapping between a local IP address and a globalIP address.b.While accessing an interface of a higher security level from an interface ofa lower security level.c.To let in traffic from outside to inside networkd.All of the above.zTo answer above questions, you may need to refer to Cisco document:http://www.cisco.com/ OR the book you can find in lab.Section V: Experiment LogThis part should describe your activities in this project.z Clearly state the responsibility of each group member. If possible, give a table to tellwho did which task, who collected information of which device, who wrote whichpart of the report, who coordinated the group work activities, etc.z Give a log of your group activity, such as what you did on which day, and how manypeople attend.Grading RubricThis project has a number of specific requirements. The requirement for each section isdocumented in the above project instruction “Report to deliver”. Whether you will getcredits depends on the following situations:z You will get full credits on one item, if it is correctly reported as required and wellwritten.z You will get half credits on one item, if it is reported as required but there issomething definitely wrong.z You will not get any credit for one item, if it is not reported.The credits for each section are in the following. Each item in one section has equalcredits.1. Section I: Introduction (10%):Each item has 5 credits.2. Section II: Task 1(25%):First two items have 10 credits each, the third item has 5 credits.3. Section III: Task 2/Task 3 (30%):13
Each item has 15credits.4. Section IV: Questions (25%)Each question has 5 credits.5. Section IV: Experiment log (10%)z If you are responsible for some parts of your group work, you get 10 credits. If youdo nothing for your group work, you get 0.z If you attend more than 90% of your group activities, you get 10 credits. If youattend between 70% and 90%, you get 7 credits. If you attend between 50% and70%, you get 5. Otherwise, you get 0.NoteThis is a group project. Only hard copies of the report will be accepted. Be sure toinclude the names of all the teammates and email addresses in the report. The reportshould be turned in before class on the specified due date. Late grade will be deducted incase the submission is not made on time and prior permission is not obtained from the DrLiu for submitting later than the specified due date.14
Task 2.2: Configuring the Router Port IP Connections This is the final step which sets the external and internal router port IP numbers before a connection may be established. Task 2.3: Verify the PIX Firewall Interfaces Configuration To test the configuration of PIX interfa
