Transcription
WorkshopMICRO BR BR-80 Digital Recorder Using the BR-80 as an Audio Interface 2011 BOSS Corporation U.S.All rights reserved. No part of this publication may be reproduced in any form without the written permission of Roland Corporation U.S.Windows 7 , Windows XP , and Windows Vista are trademarks of Microsoft Corporation. Mac, OS X, and GarageBand are trademarks of Apple Inc. SONAR X1 LE and SONAR X1 Essential , SONAR X1 Studio, and SONARX1 Producer are Cakewalk by Roland products. Ableton Live is a trademark of Ableton AG. Microsoft Corporation, Apple Inc., and Ableton AG are not associated or affiliated with Roland in any manner.BR80WS051
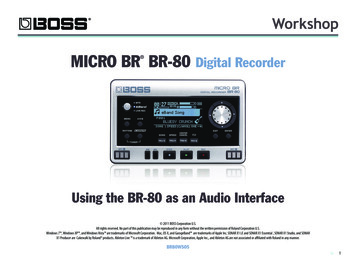
About the BOSS BR-80 Workshop BookletsThe BOSS MICRO BR BR-80 is an awesome portable tool for any songwriteror musician, especially if you’re a guitarist. Packed into its convenient,pocket-sized body are three incredibly useful tools: a stereo recorder forcapturing ideas and live sounds using the high-quality built-in mics, aneight-track multitrack recorder for developing your songs, and an irresistiblyfun eBand jamming system. The MICRO BR BR-80 also contains a library ofacclaimed BOSS COSM amps and effects, as well as tons of rhythms you canuse in your songs. If you’re a computer user, the MICRO BR BR-80 can serveas an effect-packed USB audio interface for your recording software, and itcomes with a copy of SONAR X1 LE for Windows.Each MICRO BR BR-80 Workshop booklet focuses on one MICRO BR BR-80topic, and is intended as a companion to the MICRO BR BR-80 Owner’sManual.The BR-80 and DAWsThe BR-80 as Your Audio InterfaceLive audio.through the BR-80.USBUSB.is recorded in the DAW.Hear the DAW’s audio output.About This BookletYou can use the BR-80 as an audio interface that brings mic and instrumentsounds into your computer for recording, and its onboard BOSS effectsallow you to get them sounding great before they even get there. Being socompact, it makes a perfect companion for a laptop-based recording systemon-the-go. This booklet explains how to use the BR-80 as an audio interface.Understanding the Symbols in This BookletThroughout this booklet, you’ll come across information that deservesspecial attention—that’s the reason it’s labeled with one of the followingsymbols.A note is something that adds information about the topic at hand.A tip offers suggestions for using the feature being discussed.Warnings contain important information that can help you avoidpossible damage to your equipment, your data, or yourself.One of the most important pieces of equipment you need to purchase whensetting up a DAW system is a device to which you can connect your mics andinstruments in order to get their sounds into your computer. Likewise, thedevice provides a way to properly listen to your DAW’s audio outputs. Thisdevice is your “audio interface.” The BR-80 can be the 44.1 kHz, 16-bit audiointerface for your DAW.We’ll explain how to use the BR-80 with Cakewalk by Roland’s SONAR X1 LE,Apple’s GarageBand, and Ableton Live.The BR-80 comes with a copy of SONAR X1 LE for Windows on theenclosed DVD. Install SONAR X1 LE according to the instructionsprovided on its disc.We’ll assume you know how to use your computer. If you need help,please consult its documentation.2
An Audio Interface Plus EffectsAn added bonus with the BR-80 is its BOSS effect processor. You can recordyour mics and instruments in your DAW without effects, or “dry,” or you cantake advantage of the BR-80’s effects, easily adding them to your sounds onthe way in to the computer. We’ll discuss how to do this later.Connecting the BR-80 to Your ComputerWe’ll start by connecting the BR-80 to the computer so it can get to thedriver software on the BR-80’s factory SD card.If you prefer to download the latest software, you can connect theBR-80 to your computer later. We’ll tell you where to find it later on.The BR-80 ships with the USB A/mini-B cable you’ll need for connectingit to your computer.1Turn on your BR-80.2Press the MENU button to display the Menu screen.3Highlight FUNCTION.4Press ENTER, and then highlight USB.We’re showing MTR mode’sMenu Function screen here,but you’ll find a similar screenin all of the BR-80’s modes.5Press ENTER.6If USB isn’t set to STORAGE, turn the Value dial so it is.If you need to change the setting from AUDIO to STORAGE, a dialogappears—press ENTER, restart your BR-80, and skip to Step 8 below.7If USB Mode’s already set to STORAGE, press EXIT three times.8Connect the mini-B end of the USBcable to the BR-80’s left side panel’sUSB jack, and the other end to anunused USB port on your computer.When you connect the BR-80 to yourcomputer via USB, you’ll typically get thebest results using USB jacks on the backof a desktop computer or on the side ofa laptop. We recommend not using a hub.Amini-BThe BR-80’s display shows “ACCESSING.” and then “IDLING.” as ithandshakes with the computer, and then waits for you.The BR-80’s SD card appears as a removable drive on your computer.If you’re on a Mac, it’ll be on your desktop. If you’re using Windows,it’ll appear as one of your computer’s drives.In OSX:BR-80EBANDIn Windows:BR-80 EBAND (E:)On Windows, you’ll need to wait a few moments as Windows installsthe necessary drivers for the BR-80 to become available.3
Copying the BR-80 Driver Software to Your Computer1Double-click the BR-80 removable drive on your computer to revealits Win folder (Windows) or Drivers folder (Mac).2If you’re using3 OS X—Double-click the Drivers folder and drag the BR80USBDriver.mpkg file to your desktop to copy it to your computer. Windows—Drag the Win file to your desktop. Then, right-clickthe file and select Extract All., choosing the Desktop as thedestination. Inside the extracted Drivers folder, there’s a foldercontaining the installer for the version of Windows you’re using.Unmount the BR-80 from your computer as you would any otherremovable drive.Installing the BR-80 DriversInstalling the BR-80 Drivers in Windows 7If you’re installing the drivers for Windows XP or Vista, please see theinstructions accompanying the installer files.Throughout the installation process, Windows 7 may ask you to allowthe installer to change your computer. Click Yes to continue.1Power up your PC with all USB cables disconnected except for yourkeyboard and mouse. If any applications are running, quit them.2You can install the drivers using theConfiguring the BR-80 for Audio Interface Use1Without turning off the BR-80, disconnect it from your computer.2Press the BR-80’s MENU button to display the Menu screen.3Highlight FUNCTION, press ENTER.4Highlight USB, and then press ENTER.5If USB isn’t set to AUDIO, turn the Value dial so it is.If you need to change the setting, a dialog appears—press ENTERtwice, and then restart your BR-80.7Switch to MTR mode if you’re not already there, and then turn offthe BR-80.installer you copied from the BR-80’s SD card, or the latest installer on the RolandUS website—by downloading theMICRO BR BR-80 Driver for Windows 7/Vista/XP file here.When you download the installer, save it to your desktop withoutopening it. Then, right-click the downloaded file and select ExtractAll., choosing the Desktop as the extraction destination. You’ll findthe installer file in the resulting folder.36 Double-click the installer Setup file to display the following window:You don’t need to re-connect the BR-80 to your computer yet—we’ll letyou know when it’s time to do that.4
4Click Next to display the installation start window:Once you do these things, Windows finishes installing the BR-80drivers.8Click the Close button.9Skip now to “Configuring the BR-80 for Audio Interface Use” on page 6.Installing the BR-80 Drivers in OS X15Click Next—Windows 7 begin to install the driver, and asks if youwish to complete the process.6Checkmark Always trust software from “Roland Corporation”, andthen click Install to proceed.7Windows 7 presents a window instructing you to make sure the BR-80 is turned off—and then connect the BR-80 via USB to your computer—as we described onpage 3, and then turn on the BR-80.Begin by locating the BR-80 driver software—you copied from the BR-80’sSD card, or downloading the approporiate MICRO BR BR-80 driver softwarefor the version of Mac OS X you’re using—from here. If you’reusing OS X 10.7 (Lion), click MICRO BR BR-80 USB Driver MacOS 10.7 v1.0.0. If you’re using Mac OS X 10.6, 10.5, or 10.4, clickMICRO BR BR-80 USB Driver Mac OS 10.6/10.5/10.4. Onceyou’ve downloaded the necessary file to your Downloads folder,double click its folder to reveal the installer file.2When the installer launches, the computer may display a messageabout verifying that your computer can use the BR-80 driver. If yousee this message, click Continue to display the installer’s Introductionscreen that lets you confirm you have the correct installer for yourversion of OS X.3Click Install to view the Installation Type screen.5
Using the BR-80’s InputsControlling the BR-80 InputsThe BR-80 uses a clever scheme for figuring out the input you want to use.Here’s how it works. To record using4Click Install—the installer asks for your admin login and password.5Enter your admin login and password, and click OK—the softwareis installed, and the installer tells you you need to restart your Mac.6the built-in mics—make sure nothing’s plugged into the GUITAR/MICLINE jack or the LINE IN jack. an electric guitar or bass, or external mic—connect your instrument ormic to the GUITAR/MIC LINE jack and make sure nothing’s connectedto the LINE IN jack. the LINE IN jack—connect your external device to the LINE IN jack. If youwant to record its signal alone—turn the turn the BR-80’s REC LEVEL wheel all the waydown, and adjust the connected device’s level from its ownoutput controls. mixed with the internal mics’ or GUITAR/MIC IN jack’s signal—usethe REC LEVEL wheel to set the balance between it and the LINEIN signal.Click Restart.If your Mac displays a message about reboot caches, click OK.8 Once your Mac has restarted, you can re-connect the BR-80 to yourcomputer, and then power up the BR-80.To connect the outputs of a stereo instrument to the LINE IN jack, usea dual-1/4”-to-stereo 1/8” (mini) adapter.6
Selecting the Desired BR-80 Output in the DAWWithin the DAW, you can choose to record Mono 1 or Mono 2 (BR-80 44.1kHz)—the left and right sides of the BR-80’sstereo output. Use either of these to record a mono instrument or vocalfrom the BR-80’s GUITAR/MIC IN jack.The BR-80 and SONAR X1 LESetting Up SONAR X1 LEYour BR-80 ships with SONAR X1 LE, so we’ll show you how to setit up for use with the BR-80. If you own another version of SONARX1—Essential, Studio, or Producer—you can follow the same setupinstructions for using your SONAR X1 version with the BR-80.Stereo 1/2 (BR-80 44.1kHz)—the entire stereo output of the BR-80. Usethis when you want to record the BR-80’s built-in mics a stereo signal from the BR-80’s LINE IN jack—such as a stereosynthesizer or beat box, a personal music player, or a turntable a mix of already-recorded BR-80 tracks1From SONAR X1 LE’s Edit menu, select Preferences. . a LIVE REC or eBand recording.2Click the Basic button in the lower left of the Preferences window.3Click Devices in the Audio section at the left of the screen if it’s notalready highlighted.4Un-check all of the available Input Driver and Output Drivercheckboxes except for IN (2- BR-80) and OUT (2- BR-80).Selecting the BR-80 as SONAR X1 LE’s Audio InterfaceAdding BR-80 Effects to Your SoundsYou can use the BR-80’s COSM effect on any sound you want to record byinserting an effect on its input, just as you would with a sound you weregoing to record on the BR-80 itself: Press the COSM button and choose or setup the desired effect. The BR-80 can produce both mono and stereo effects.(To turn off effects, press the COSM button again.)If you don’t see theBR-80 on this screen,jump to Step 8, andthen come backhere.About Using the BR-80’s Stereo OutputTo enable the BR-80’s stereo output to your DAW, select Stereo 1/2 (BR-8044.1kHz) in your DAW, and then set up the BR-80 as if you were about torecord a stereo track on the BR-80 itself, as follows.1Switch to MTR mode if you’re not already there.2On the MTR home screen, press TR1/2 and select TR 1/2.You can actually use anytracks for activating theBR-80’s stereo output: TR3/4, TR 5/6, or TR 7/8.At some point in the setup process, Windows may automatically checkthe audio interface’s specs.5Click Apply.6Click Driver Settings, and then set Playback Timing Master to 1: OUT(2: BR-80) and Record Timing Master to 1: IN (2: BR-80).7
Using SONAR X1 LE with the BR-80Selecting a BR-80 Input for Recording on a Track1In SONAR X1 LE, create an audio track or select one that’s not in use.Depending on the speed of your computer, you may hear a lag, or“latency,” between the sound of your instrument or vocal in the BR-80and then in SONAR X1 LE. To avoid latency as you record, you can turnoff the Input Echo button. (If you want to hear SONAR X1 LE’s effectson your signal as you record, leave it turned on.)27Click Apply.8Click Playback and Recording at the left of the window and make sureASIO from the Driver Mode popup is selected:Click the Input popup and select the desired BR-80 left, right, orstereo input signal.Input popup menuIf you want to record the BR-80’s stereo output, be sure to enable itas described in “About Using the BR-80’s Stereo Output” on page 7.Control your recording level in SONAR X1 LE using the BR-80’s RECLEVEL wheel, or a connected line-in device’s own controls.9Click Apply.If you didn’t see the BR-80 in the Devices pane earlier, click Devicesnow, and make sure only IN (2: BR-80) and OUT (2: BR-80) are checked.10Click Close.You can now listen to SONAR X1 LE through the BR-80, and recordfrom its inputs.8
The BR-80 and GarageBandSetting Up GarageBandSelecting the BR-80 as GarageBand’s Audio Interface1In GarageBand, select Preferences. from the GarageBand menu.2Click the Audio/MIDI tab.Selecting a BR-80 Input for Recording on a Track1Create a new Real Instrument track in GarageBand.2If the Track Info pane isn’t visible, click the Infobutton to open it.3From the Input Source popup menu, select the desired BR-80 input.If you want to record the BR-80’s stereo output, be sure to enable itas described in “About Using the BR-80’s Stereo Output” on page 7.43From the Audio Output popup menu, select BR-80 44.1kHz.4When GarageBand asks if you’re sure you want to change audiodrivers, click Yes.You’ll now hear GarageBand through headphones or earbuds you’veconnected to the BR-80’s PHONES/LINE OUT jack.5Set Monitoring as desired.Depending on the speed of your computer, you may hear a lag, or“latency,” between the sound of your instrument or vocal in the BR-80and then in GarageBand. To avoid latency as you record, you can setMonitoring to Off. (If you want to hear GarageBand’s effects on yoursignal as you record, turn Monitoring on.)Control your recording level in GarageBand using the BR-80’s RECLEVEL wheel, or a connected line-in device’s own controls.From the Audio Input popup menu, select BR-80 44.1kHz, and whenGarageBand asks again about changing audio drivers, click Yes.GarageBand can now use the BR-80’s audio inputs for recording.6Close the Preferences window.9
The BR-80 and LiveSelecting a BR-80 Input for Recording on a TrackCreate a new audio track or select an unused one.1Setting Up LiveBy default, a new audio track is set to Ext. In and Inputs 1/2, which arethe BR-80’s stereo output. If this is what you want, you’re good to go.Selecting the BR-80 as Your Audio Interface1If you want to record the BR-80’s stereo output, be sure to enable itas described in “About Using the BR-80’s Stereo Output” on page 7.From the Live menu, select Preferences. and click Audio along theleft edge of the Preferences window to open the Audio tab.2To record the mono sound from an instrumentor mic connected to the GUITAR/MIC IN jack,select either 1 or 2, the left or right BR-80output. (It doesn’t matter which one youchoose.)3Set the track’s Monitor popup as desired.Depending on the speed of your computer, youmay hear a lag, or “latency,” between the soundof your instrument or vocal in the BR-80 and thenin Live. To avoid latency as you record, you can setMonitor to Off. (If you want to hear Live’s effectson your signal as you record, turn Monitoring on.)2From the Audio Input Device and Output Device popup menus,select BR-80 44.1kHz (2 In, 2 Out).You can now listen to Live through the BR-80, and record from itsinputs.Live’s sample rate is set by the BR-80.Control your recording level in Live using theBR-80’s REC LEVEL wheel, or a connected linein device’s own controls.This is what your trackwill look like afterselecting a mono BR-80output and turning offMonitor.The EndWe hope you’ve found this workshop helpful. Keep an eye out for otherMICRO BR BR-80 Workshop booklets available for downloading atwww.Rolandus.com.Live has an easy-to-use system for setting the optimal buffer size, akey element in smooth audio-recording operations. To learn about it,see “Learn how to set up your audio hardware” in the Setup section ofLive’s built-in Help pane.10
Manual. About This Booklet You can use the BR-80 as an audio interface that brings mic and instrument sounds into your computer for recording, and its onboard BOSS effects allow you to get them sounding great before they even get there. Being so compact, it makes a perfect