Transcription
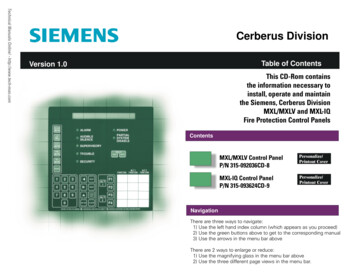
Technical Manuals Online! - http://www.tech-man.comCerberus DivisionTable of ContentsVersion 1.0This CD-Rom containsthe information necessary toinstall, operate and maintainthe Siemens, Cerberus DivisionMXL/MXLV and MXL-IQFire Protection Control PanelsContentsMXL/MXLV Control PanelP/N 315-092036CD-8Personalize/Printout CoverMXL-IQ Control PanelP/N 315-093624CD-9Personalize/Printout CoverNavigationThere are three ways to navigate:1) Use the left hand index column (which appears as you proceed)2) Use the green buttons above to get to the corresponding manual3) Use the arrows in the menu bar aboveThere are 2 ways to enlarge or reduce:1) Use the magnifying glass in the menu bar above2) Use the three different page views in the menu bar.
Cerberus DivisionCERBERUS PYROTRONICS MXL-IQ CONTROL PANELOperation, Installation, and Maintenance ManualSiemens Building Technologies, Inc.8 Fernwood RoadFlorham Park, New Jersey 07932P/N 315-093624CD-9Technical Manuals Online! - http://www.tech-man.comSiemens Building Technologies, Ltd.50 East Pearce StreetRichmond Hill, Ontario L4B 1B7 CN
CAUTIONALL WIRING MUST BE DONE AS DESCRIBED BELOWTO OBTAIN SAFE AND PROPER SYSTEM OPERATION.1. Earth ground the MXL-IQ enclosure properly; see the latest edition of the NationalElectrical Code for approved methods. Conduit ground is NOT adequate.2. Separate all wiring for initiating devices (i.e., detectors, manual stations, TRImodules, etc.) from all other wiring in the MXL-IQ enclosure. To wire the System in compliance with UL 864, refer to the Installation and Power LimitedWiring Instructions for the MSE-3L Enclosure, P/N 315-095445.3. INSULATE ALL CABLE DRAIN WIRES from any conduit or earth groundedelectrical box, including those in the MXL-IQ enclosure.4. Connect shield cable drain wire ONLY inside the MXL-IQ enclosure.5. No wiring used for any of the following can run outside the building: an ALD loop a RS-485 network an NAC circuit used for audibles a CZM-1B6 or CZM-4 initiating device loopFor additional wiring information, refer to this manual or call SiemensBuilding Technologies, Inc. Technical Support Department at1-800-248-7976.Technical Manuals Online! - http://www.tech-man.com
Table of ContentsDescription 1 - 1Chapter 1Introduction 1 - 1Software 1 - 1Minimum MXL-IQ Control Panel Configuration 1 - 3Components Of The Basic System 1 - 4SMB-2 Main Board 1 - 4MPS-6 Power Supply 1 - 5MPS-12 Power Supply 1 - 5MKB-4 Keyboard/Annunciator Panel 1 - 5PIM-1 Peripheral Interface Module 1 - 6PIM-2 Peripheral Interface Module 1 - 6PAL-1 1 - 6TSW-2 Tamper Switch 1 - 6BP-61 Batteries 1 - 7BTX Batteries 1 - 7Optional Modules 1 - 7MOM-2 Card Cage 1 - 8MOM-4 Card Cage 1 - 8CSM-4 Signal Module 1 - 8CMI-300 Interface Module 1 - 9CRM-4 Relay Module 1 - 9CZM-4 Conventional Zone Module 1 - 9ALD-2I Analog Loop Driver 1 - 10MOI-7 Voice and Annunciator Driver 1 - 10MOD-16 Output Driver 1 - 10MID-16 Input Driver 1 - 11NIM-1R Network Interface Module 1 - 11Technical Manuals Online! - http://www.tech-man.comi
Table of ContentsIntelligent/Analog Devices 1 - 12FP Intelligent Detector Series 1 - 12ICP Intelligent Control Point 1 - 12ICP-B6 Intelligent Control Point 1 - 12ID Intelligent/Analog Detector Series 1 - 12IL Intelligent/Analog Detector Series 1 - 13LIM-1 Loop Isolator Module 1 - 14MSI Intelligent Manual Station Series 1 - 14TRI Intelligent Interface Module Series 1 - 14CZM-1B6 Remote Conventional Zone Module 1 - 14Conventional Devices 1 - 15DI Ionization Detector Series 1 - 15DT-11 Thermal Detector 1 - 15PE Photoelectric Detector Series 1 - 15PBA-1191 Linear Beam Smoke Detector 1 - 15Chapter 2Installation 2 - 1General Guidelines For Installing The MXL-IQ 2 - 1Installation Instructions For The MXL-IQ Control Panel 2 - 2Install the MSE-3L Enclosure 2 - 2Install The TSW-2 Tamper Switch 2 - 2Pull All Field Wiring Into The Backbox 2 - 3Install the SMB-2 2 - 3Install the MPS-6/12 2 - 3Install the MKB-4 Keyboard/Annunciator 2 - 4Install the PIM-1, PIM-2, and PAL-1 2 - 5Install the MOM-2 or MOM-4 2 - 6Install the MOI-7, MOD-16, and MID-16 2 - 9Install Field Wiring 2 - 10Check Field Wiring 2 - 10iiTechnical Manuals Online! - http://www.tech-man.com
Table of ContentsStart Up Procedure 2 - 10System Function Checkout 2 - 16Operation 3 - 1Chapter 3Introduction 3 - 1Addresses 3 - 1System Modules 3 - 2Remote System Modules 3 - 2Using The MKB-4 Keyboard/Annunciator Panel In Local Mode 3 - 3The Display 3 - 3Internal Audible Alarm 3 - 4Modes Of Operation 3 - 5Alarm 3 - 6How The System Annunciates Fire Alarms 3 - 6Viewing the List of Alarms 3 - 7How to Block Acknowledge A Fire Alarm 3 - 7How to Individually Acknowledge A Fire Alarm 3 - 7Silencing The System 3 - 7Supervisories 3 - 8How The System Annunciates Supervisories 3 - 8Viewing the List of Supervisories 3 - 8How to Block Acknowledge a Supervisory 3 - 8How to Individually Acknowledge a Supervisory 3 - 9Troubles 3 - 9How The System Annunciates Troubles 3 - 9Viewing The List of Troubles 3 - 9How to Block Acknowledge a Trouble 3 - 10How to Individually Acknowledge a Trouble 3 - 10Technical Manuals Online! - http://www.tech-man.comiii
Table of ContentsSecurity Conditions 3 - 10How The System Annunciates Security Conditions 3 - 10Viewing the List of Security Conditions 3 - 11How to Individually Acknowledge a Security Condition 3 - 11Reset Procedures 3 - 11Hard Reset 3 - 11Soft Reset 3 - 11Using The MKB Keyboard/Annunciator Panel in Global Mode 3 - 12Limitations/Restrictions 3 - 12Global MKB Display Format 3 - 12Global Keypad Operation 3 - 13Using The Menu 3 - 14Operation of the Keys on the MXL-IQ Annunciator Panel 3 - 14Numeric Keypad 3 - 14The Command Keypad 3 - 14Overview of the Menu’s Structure 3 - 15Beginning a Menu Session 3 - 16Introduction to the Acknowledge Menu 3 - 16Introduction to the List Menu 3 - 16Introduction to the Control Menu 3 - 16Introduction to the Test Menu 3 - 16Entering Your Password 3 - 17Entering a Module Number and Device Number 3 - 17Entering a Device Number with the Module Number 3 - 17ACKNOWLEDGE Menu 3 - 18Entering the Acknowledge Menu 3 - 18Acknowledge Alarm 3 - 18Acknowledge Supervisory 3 - 19Acknowledge Trouble 3 - 20Acknowledge Security 3 - 21ivTechnical Manuals Online! - http://www.tech-man.com
Table of ContentsLIST Menu 3 - 22Entering the List Menu 3 - 22List Status 3 - 23List Alarm 3 - 23List Supervisory 3 - 24List Trouble 3 - 24List Security Conditions 3 - 25List Sensitivity Settings 3 - 26List Voltages 3 - 26List Temp 3 - 28List Module Type 3 - 28List Device Type 3 - 29List Message 3 - 29List Software Version 3 - 30List Output States 3 - 31List Device Usages 3 - 31List Node Address 3 - 32List ANALASER 3 - 32List ANALASER – SMOKE LEV 3 - 32List ANALASER – FLOW LEV 3 - 33List ANALASER – TRIP PTS 3 - 33List Percent/ft 3 - 34List Percent/ft – Senstvty 3 - 35List Percent/ft – Pre-alarm 3 - 35List Percent/ft – Analog 3 - 35List ASD apps 3 - 35CONTROL Menu 3 - 36Entering the Control Menu 3 - 37Control Reset 3 - 37Control Sensitivity 3 - 37Control Arm/dis 3 - 38Technical Manuals Online! - http://www.tech-man.comv
Table of ContentsControl Output on/off 3 - 38Control Loop Arm 3 - 39Control Loop Disarm 3 - 39Control Net Link Request 3 - 40Control ANALASER 3 - 40Control Percent/ft 3 - 41Control Percent/ft - Senstvty 3 - 41Control Percent/ft - Pre-alarm 3 - 41Control Change Apps 3 - 42TEST Menu 3 - 42Entering the Test Menu 3 - 43Test Set Time 3 - 43Test Ground Fault 3 - 44Test Power 3 - 44Lamp Test 3 - 45Test Device LED 3 - 45Test MOI Lamp Test 3 - 46Test Network (X-Network, M-Network) 3 - 46Test Override 3 - 46Detector Cleaning 3 - 47Event Log 3 - 47Test Pre-alarm 3 - 47Test ASD Devices 3 - 48Test Summarize 3 - 48Test Manual Activate 3 - 49Chapter 4Testing and Troubleshooting 4 - 1System Test 4 - 1Every Six Months 4 - 1Every Year 4 - 1Fuse Replacement 4 - 1Troubleshooting 4 - 2viTechnical Manuals Online! - http://www.tech-man.com
Table of ContentsWalktest Operating Instructions 5 - 1Chapter 5Introduction 5 - 1System w/AUD 5 - 2System SIL 5 - 2Loop w/AUD 5 - 2Loop SIL 5 - 2Zone wAUD 5 - 2Zone SIL 5 - 2Cancel 5 - 2Extend 5 - 2Suggested Walktest Proedure 5 - 2Walktest the System 5 - 3Walktest Ending Sequence 5 - 4Walktest Entire ALD Loop, MOI-7 (MID-16), or CZM-4 Module 5 - 4Walktest Ending Sequence 5 - 5Walktest Individual CZM-1B6 or CZM-4 Zone 5 - 5History Log 6 - 1Chapter 6CSG-M History Options 6 - 1Logging Methods 6 - 2Enabling the History Option in CSG-M 6 - 4From the MKB Menu 6 - 4Local History Log Query 6 - 5Query Selection 6 - 5Query Filters 6 - 5Navigating The History Display 6 - 6History Display Formats 6 - 6Device Event 6 - 6Reset Event 6 - 6Set Time Event 6 - 7Block Acknowledge Event 6 - 7Technical Manuals Online! - http://www.tech-man.comvii
Table of ContentsAudible Silenced Event 6 - 8Override Event 6 - 8Audible Unsilenced Event 6 - 8Password Event 6 - 8Configuration Changed Event 6 - 9Manual Sensitivity Set Event 6 - 9Auto Sensitivity Set Event 6 - 9Logic Sensitivity Set Event 6 - 10History Print Formats At The MXL-IQ Panel 6 - 10MXL-IQ To CSG-M Download Formats 6 - 13History Download Sequence 6 - 14Chapter 7Connections and Ratings 7 - 1ALD-2I 7 - 1CMI-300 7 - 3CRM-4 7 - 5CSM-4 7 - 7CZM-1B6 7 - 13CZM-4 7 - 17MOI-7, MOD-16, MID-16 7 - 19MOM-2 7 - 25MOM-4 7 - 27NIM-1R 7 - 29Silent Knight Model 5128/5129 7 - 33SMB-2 7 - 35viiiTechnical Manuals Online! - http://www.tech-man.com
Table of ContentsCompatible Devices A - 1AppendixDevice Analog Voltages B - 1MXL-IQ Battery Calculations C - 1MXL-IQ Power Supply Load Calculations D - 1Alarm Verification E - 1Envirolink F - 1Latching/Non-Latching Troubles G - 1Installing A Security Point H - 1Application Specific Detection (ASD) I - 1MXL-IQ Trouble Messages J - 1Power Limited Wiring K - 1New Two Stage Alarm L - 1Pre-alarm, Dual Criteria Logic Functions, and Percent Per FootObscuration Features M - 1MXL-IQ Spare Parts List N - 1New Features for MXL-I
the Siemens, Cerberus Division MXL/MXLV and MXL-IQ Fire Protection Control Panels Contents Navigation MXL/MXLV Control Panel P/N 315-092036CD-8 MXL-IQ Control Panel . servicing and troubleshooting (Se