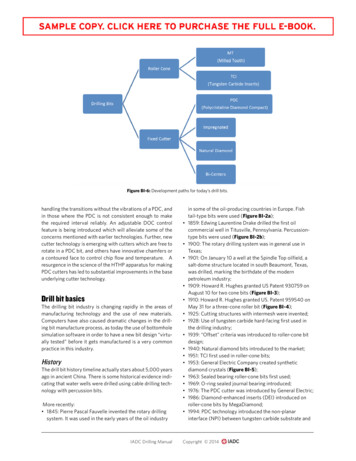
Transcription
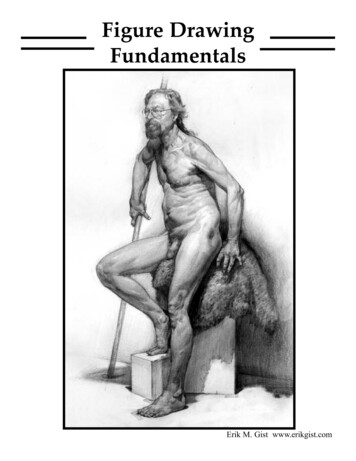
Figure DrawingFundamentalsErik M. Gist www.erikgist.com
Notes to the readerThis book is not meant as a step by step or a formula (art is not a formulaic pursuit) so do not study as such. This book is also not meant tosolve all your problems, which can only be done by you through diligentstudy and hard work. This book is intended to be a guide through theworld of figure drawing. Careful practice of the principles documented inthis book will improve your drawings more than copying the drawingsused to demonstrate these points. The best way to use this book is to finda good piece of photo reference, or better yet get into a life drawing classand apply what you have learned in this book to the problem in front ofyou. It does you little good to copy the drawings in this book because forthe most part the problems have already been solved for you.It is more important for you as an artist to learn the principles behindwhat I do and the reasoning used to govern my, or any one else’s “style”.In so doing you will begin to produce original art, and not just mimic,what has come before. In art there are no rules. Rules are what we oftenuse to simplify key principles and concepts for those newly initiated intothe fraternity of artists. Always try to get from any instructor why they dowhat they do, not how they do it. Why we do what we do is what makesus good artist’s, how we do it makes us individuals. If you simply drawhow someone else draws you will never be an individual. So when youstudy from an artist or an artist’s work try to figure out why the make thechoices they do, not merely copy the decisions they make.My recommendation to you is get out your sketchbook, read throughthe following pages all the way to the end, and make notes where you feelnecessary. Then put away the book, and get out a good piece of photo reference and your drawing pad and get to work. Only get the book outwhen you run into a problem. This is the best way to test how much of thematerial you have retained. Every time you get out the book make a markon the chapter you needed to review, this will show you the areas you stillneed to study. Next get your butt into a life drawing class. this is the bestway to learn.Good luck,E-Erik M. Gist www.erikgist.com
GestureErik M. Gist www.erikgist.com
Chapter 1: The GestureThere are few things in art more challenging than drawing the human figure. I havefound that when facing a daunting challengethe best thing to do is attempt to break theprocess down and simplify. That is what I amgoing to try to teach you in the following chapters; to break down the process into separate butinterwoven steps and principles. The reason fordoing this, is so you only have to worry abouton thing at a time rather than fifty.The first step in this process is to establish the gesture or linear lay-in. This is the mostimportant step of the drawing because it dictates all other steps in the process.Before going any further, lets define gesture. In it’s simplest form, gesture is the actionof the pose or movement between its forms.However, this is too vague because gestureshould also establish the length, width anddirection of all the masses of the figure. In amore abstract sense, the gesture is the life, flowand energy of the figure. This is why I say gesture is the most important step of the drawingprocess. If your linear lay-in doesn’t have theforementioned elements neither will your finish.As you take your drawing toward completion, itwill typically become more stiff and uptight, sotry to give your gesture as much energy as youcan with out sacrificing accuracy.Lets begin to capture the gesture. Thegesture should be established using the longestlines possible. Anything else is a scribble not aline. In the first pass through the figure youshould find the triangular or pyramid shape ofthe pose. Almost all poses fit in to a triangle ofone proportion or another. Next, begin to establish the gesture of the pose using those longlines we talked about earlier.Remember above all else, keep it light.Nothing is a mistake until you can’t erase it.1There are threebasic lines:c-curves-curvestraight23Erik M. Gist www.erikgist.com
1) Establish the head first using either a bloatedtriangle or an oval (which ever works best foryou), and the sweep of the neck.42) Next establish the sweep of the shouldersfrom acromium process to acromium process(the acromium process is the visible and palpable bump near each end of the collar bone)3) Now find your way to the ground as efficiently as possible. This is usually through thecenter line, or from the pit of the neck to theweight baring foot.4) From the acromium process on each sidedraw a line mimicking the center line down tothe crotch. Then draw a line from the outside ofthe neck to the hip on each side. These linesshould establish the gesture of the torso andhips while ignoring the true breadth of the ribcage and pelvis.5From here you should inject only as much structureas is needed to connect the limbs.5) Establish the gesture of the limbs by firstdrawing the flow of the limb (usually the tendenous inner portion). Then by establishing thewidth (the boney outer portion). Also terminatethe limbs with the hands and feet, use simplegeometric shapes at this time.6) Complete the gesture with any supportingelements, in this case the stool, block, pole, etc.6Erik M. Gist www.erikgist.com
Before moving on I want to discuss a fewmore principles of gesture with you. Lets startwith one of the most important, Stretch andPinch. Stretch and pinch is essentially the ideathat in any natural pose the body has an activeor “pinch” side and an inactive or “stretch”side. This is best seen through the bean bagmetaphor. When you bend a bean bag you cansee the fabric elongate on one side and bunchup on the other. In fact you can stick arms, legsand a head on the bean bag and have a decentrepresentation of a human figure.This theory actually applies to most partsof the figure, but none so obviously as the trunkof the body. As I mentioned, the stretch andpinch happens all throughout the body, even inrepose. As you can see, stretch and pinchappose each other on opposite sides of the figure, and you will rarely have stretching orpinching simultaneously on both sides of thefigure. This creates a “Michelein Man” orsnowman effect, which is dumpy and undesirable.Plumb lines are another helpful tool during the lay-in stage of the drawing. Plumb linesare basically straight vertical or horizontal linesto help establish proper placement in yourdrawing. This is especially helpful in the case offoreshortening. The way plumb lines work is tohold up your pencil exactly vertical or horizontal. Where things line up on either a vertical orhorizontal axis, they should line up exactly thesame way in your drawing. This is a good wayof double checking your drawing with themodel.badgoodErik M. Gist www.erikgist.com
Characteristics of Gesture1) Movement between forms2) Curved, fluid, graceful3) Lifeline4) Connecting line5) Long6) Keep it simple (s-curve c-curve straight)7) Stretch8) Two-dimensionalBooks and Artists To Study ForThese PrinciplesAndrew Loomis:Figure Drawing For All Its WorthGlenn Vilppu:Vilppu Drawing ManualFrank FrazettaJohn Paul RubensSteve HustonHenrich KleyErik M. Gist www.erikgist.com
StructureErik M. Gist www.erikgist.com
Chapter 2: StructureStructure is the movement around aform. While gesture is more or less a twodimensional lay-in, Structure adds a thirddimension, depth. Essentially structure turns ashape into a form. The main difference betweena shape and a form breaks down like this. Asquare is a shape, a cube is a form; a circle is ashape, while a sphere is a form.In the second stage of the drawing we aregoing be adding volume to our linear construction. The reason for using this method is so wecan all be sure we understand the volumes andare not just mimicking superficial shading tricksthat we have seen used by other artists. Weshould understand the principles behind thetricks so that we can come up with our ownway of communicating with the viewer and notbe stuck being a second rate copy of some otherartist.Here we are mainly going to be workingwith cross contour lines, which essentially takethe gesture line and turn them either into arounded cylindrical form, a squared of boxyform or anything in between. This is basically atool for you to use later on in the drawing, ashorthand or road map for guiding you in yourshading of a the form, much the way you willdraw in a guideline before cutting a piece ofwood.So let us begin. First we need to analyzeeach form and decide three things:1) What is the primitive form, is it a cylinder, acube, sphere or a cone? 2) How rounded orsquared off is this form? 3) What is its positionin three-dimensional space? Is it angledtowards me, away from me, or parallel to me?These principles are going to dictate our crosscontours.
Characteristics of Structure1) Movement over form2) Three-dimensional3) Pinch, flexion, tension4) Form, depth, perspective5) StrengthBooks and Artists To Study ForThese PrinciplesAndrew Loomis:Figure Drawing For All Its WorthGlenn Vilppu:Vilppu Drawing ManualFrank FrazettaGeorge BridgmanSteve HustonBurne HogarthAll of his booksErik M. Gist www.erikgist.com
ShapesErik M. Gist www.erikgist.com
Chapter 3: Shape AnalyzationShape analyzation is probably one of themost difficult aspects of drawing for most people. It requires you to put aside most of whatyou have spent so long learning for a time andtrust your eye. We spend most of our liveslearning what an eye or nose or arm looks like.We essentially acquire a library of symbols thatstand in place of reality in our mind. The problem with this is that when we sit down to drawfrom life part of the goal is to make it look likethe person or thing that is the subject of ourstudy that day. Now weather you are drawingyour “Grandpa Joe” or a vase your approachshould not change, you are still drawing YOUR“Grandpa Joe” or THAT specific vase so, at leastfor the purposes of training your eye, it shouldlook like your “Grandpa Joe” or that specificvase.The best way I have found for improvingshape analyzation skills is just practice, practice,practice. That cannot be taught. However whatcan be taught or rather shared are a few tricks Ihave learned over the years that have helpedme to break away from what drawing symbolsrather than what is in front of you. The firstthing that has helped me in seeing shapes moreaccurately is to squint. By squint I don’t meansquint, and then strain to see through mysquinted eyes. The best way I have found tosquint is to sit at one arms length from mydrawing surface, relax, then close my eyes andopen them back up slowly until I can make outthe figure as a series of blurry light and darkshapes. Don’t worry that you cannot see anyhalftones or detail, this is actually the idea. Thisis the proper way to see when analyzing shapes.Now you are probably saying “That’sgreat, I can see the shapes, but how do I drawthe darn things?”. The best trick I have learnedfor getting my self to draw the shapes moreaccurately it to think of it almost like connectthe dots, but (and here is the trick) you have tofind the dots. So basically when looking at theperimeter of a shape I mentally, or physically ifyou find it helps, put a dot on my drawing surface where ever I see a major change of angle.Then I connect the dots with with a straight orErik M. Gist www.erikgist.com
slightly curved line, whichever seems mostappropriate to me. Where exactly you choose toput these “dots” and curved and straight lines iscalled your “design sense”. The result of seeingand drawing this way is the simplifiction of theincredibly complex visuals that nature presentsus with into a geometric, posterized, two valueversion of reality.There are times that what works visuallyin the real three-dimensional world will notwork in the illusionary two-dimensional worldof our drawing pad. This is why we sometimehave to interpret what we see and not simplytranslate. The things that each artist choose tochange to create a better illusion of three-dimensions on their pad is very individual, so takewhat is presented in the rest of this chapter witha grain of salt and realize these are ways that Ihave found to improve my drawing on a personal level not so much an academic one.When drawing a form that is slightlyforeshortened, (which by the way almost allforms are) instead of pushing that form moreinto profile like a lot of beginning artists do (thisis one of the things that gives a lot of artists thatvery stiff uptight look) I push it more into foreshortening just slightly. Another thing I like todo is push the outlines of a forms closer to tome in front of the outlines of forms farther fromme. For instance if the models arm is pointed atme I push the lines of the hand in front of thethose of the wrist, those of the wrist in front ofthe forearm, etc.One last thing I like push in my drawingsare a anatomical indications that show the volume of a form and conversely remove or playdown those that go against that form. Forinstance I might push the hip insertion of a foreshortened leg, but not the downward bowingarch of the teardrop shape of the vastus internus.Erik M. Gist www.erikgist.com
1) SquintBooks and Artists To Study ForThese Principles3) SquintAlphonse MuchaKeys to shape analyzation2) Squint4) Two values5) Connect the dots6) Keep it simpleHarley BrownJ. C. LeyendeckerMike Mignola7) Visually relate lights and darksErik M. Gist www.erikgist.com
ValuesErik M. Gist www.erikgist.com
Chapter 4: ValuesAs mentioned in the previous chapter,we want to start our drawing with two values,this two value breakup is very important tomaintain through the drawing. Once you havethis established you can add as many values asyou want (it is not advisable however) as longas you keep the added values secondary to thebig two value separation. Th
Books and Artists To Study For These Principles Andrew Loomis: Figure Drawing For All Its Worth Glenn Vilppu: Vilppu Drawing Manual Frank Frazetta John Paul Rubens Steve Huston Henrich Kley Characteristics of Gesture 1) Movement between forms 2) Curved, fluid, graceful 3) Lifeline 4) Connecting line 5) Long 6) Keep it simple (s-curve c-curve straight) 7) Stretch 8) Two-dimensional. Erik M .