Transcription
COSA PRIMELink General GuideFor The Updated PRIMAVERA UNIFIERUpdated – Feb 6, 2020PRIMELink HelpdeskPhone: 210‐207‐2019E‐mail: primelink@sanantonio.govWebsite: dor-Resources/COSA-PRIMELink
1
Table of ContentsConfiguring Settings for IE, Firefox, Safari and Google . 3Logging into ORACLE Access Manager . . .4If you need to change your Password later . 5Navigation, Layout and Upgrades to PRIMELink . .6Different Items in PRIMELink .11View Pending Tasks . 12View Draft Records . 13CoSA Tab . 14Letters before Project Names stand for the following: . 15Bookmarks . 16PRIMELink Forms – Task Details, Data Details, Invoice Request & Standard Data Forms . 17Help Files in PRIMELink . 21Workflows . 21Assign Task in Workflow . 22Add a Proxy . 23Remove Proxy . 24Login as a Proxy . 24User Access Request Form . 25Reports - User-Defined and Custom Reports .31Google Chrome PDF Viewer Problem . 322
Configuring Settings for IE, Firefox, Safari and GoogleConfiguring Settings for Microsoft Internet ExplorerDO NOT USE INTERNET EXPLORER!!!An updated was done to Internet Explorer in Mid December 2015and PRIMAVERA Unifier does not work with it.Configuring Settings for Mozilla Firefoxhttps://www.mozilla.org/en-US/1) Open Mozilla Firefox.2) Open Options.3) In the Options dialog box:a. Select the Content tab.b. Deselect (Uncheck) the Block pop-up windows option.c. Click OK to save your options and close the dialog box. General Setup TasksConfiguring Settings for Apple Safari1) Open Apple Safari.2) From the Settings dropdown, select Preferences.3) In the General dialog box, select Security.4) In the Web Content section, deselect (Uncheck) Block pop-up windows.5) Close the dialog box.Configuring Settings for Google p/index.html1) In Google click on the Screen with the x in the Address Bar (See below)2) Change it to “Always allow pop-ups from cosaprimelink-unifier.oracleindustry.com”If you have already being using Google Chrome,please do the following –1)2)3)4)5)6)Click on the 3 vertical dots in the upper right hand cornerClick on Settings, then click on“Privacy and security”Scroll down and find then click on “Content Settings”, Scoll down to and click on “Pop-ups”Click on “Add” and input - https://unifier.oraclecloud.com/cosaprimeClick on “Add” in the lower right hand cornerGo back to Login Screen3
Logging into the new ORACLE Access ManagerTo login into ORACLE Access Manager, go to in Logon PageYou will enter your username that you used in PRIMELink andthe new password that Oracle or that we sent to you in the emailAfter you have click on Login, this page will show up.Please change your password and select and answer the Challenge Questions.Your old password is the one Oracle or we told you. (NOT YOUR OLD PASSWORD)(Passwords should be at least 8 characters long, with at least one capital letter & one special character[{ !@# %&*()- ;:"’, . /?}]Password Change and Secret Question Page4
After you have click on “Submit”, this page will show up.1. To go into PRIMAVERA UNIFIER, click on Unifier2. To change your password or change your proxy, click on Oracle Identity ManagerClick this Icon to open PRIMAVERA UNIFIERTo change user information such asName, Email, Password, Challenge Questions & ProxiesClick on the Oracle Identity ManagerIf you need to change your Password later1.2.To login into ORACLE Access ManagerClick on Oracle Identity Manager 1. Click on My Information,2. then click on Change Password3. Input your current password in Old Password and input your new password twice then click on “Apply”.5
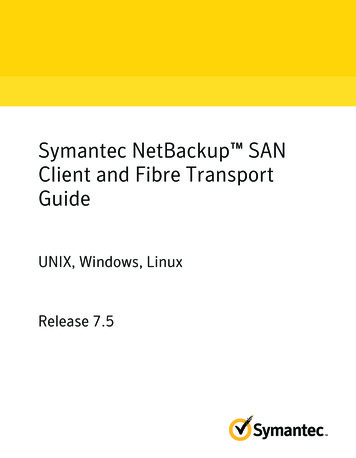
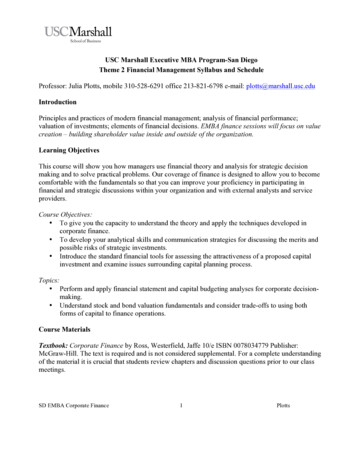
Navigation, Layout and Upgrades to PRIMELink1. The navigation remains the same. It will continue to use tabs for each project and on-callcontract. The Home Tab will always remain on the upper left corner. Users can continue touse the search bar to locate their projects and on-call contracts. Below is a screenshot ofEGthe updated appearanceFDBCAHA.B.C.D.E.F.G.H.Home Tab (Cannot be removed)Tab 1Tab 2Icon to add tabs and display search barREMOVED - Button to switch between new and old interface. Old interface has been removed.BookmarksHelp MenuSearch bar2. The Home Tab will have an updated appearance. Users will continue to access all of their Tasks,notifications, Drafts and Mailbox.Click on number toview all pending tasksClick on view all recordsuser copied (CC’d)Click to view internalEmailsChart displays number alllate and pending tasksClick on line here and you canincrease or decrease this!!!6
3. The Tasks Log will have a new appearance. The default view is to display tasks received inlast 7 days. We highly recommend changing to “All Tasks” to view all outstanding tasks.The section on the right displays additional record information such as workflow progressand attachments.NOTE - Please change View to “All Tasks”!!!!!Double Click on item to Open Task .Click to View additional information4. The form layout has changed a lot!! The Accept and Decline location moved to the upperright hand corner, and the Send location move to the upper right hand corner too.See the following screenshot.New Location for Accept and Decline ActionsNew Location for Send Actions,Clicking on Send will bring up a new window with Workflow Action Details7
5. Users using new user interface will have a new form when records are closed/completed.The following screenshot shows the new form layout. However, users can switch to the oldinterface to view the classic form layout. Refer to letter E under Section 3 to switchinterface.The Standard tab displays the Detail line items.This section has the informationfrom the upper formClick on links to view Attachments,Comments and Linked RecordsOr the Invoice Request tab displays the Detail line items.6. A user can have multiple proxies from their respective organization. Users can select theirproxies under Preferences. See the following screenshot to setup proxies.Select your nameAnd then click on “Preferences”Click on “Proxy”Click on to add new proxiesSelect Person and click on Trashcan to remove proxy8
7. Users can print multiple records from the logs into a single file. Users can selectmultiple records by holding down the Ctrl or Shift key. Under Actions select Print andthen select the format (HTML, PDF, etc.) to generate the file.8. When adding line items to Task Orders, Contract Change Requests, etc., you can addadditional items without having to close the entry form. Select the “Save & Add New”button to save time when entering line items.9
9. The Document Manager has 3 different views in the interface - following is screenshotsof the new views – Flat View, Tile View and Tree ViewIn the Tile View it displays a thumbnail preview of photographs. You can also searchfor files across all folders in the Document Manager.Upload(Flat View)DownloadClick to Createnew subfoldersSearch featuresavailable to findfiles inDocumentManager or PageSwitch between Tile orList View. Tile willshow thumbnails.List is the detailed listof files.(Tile View)(Tree View)10
Different Items In PRIMELink1. When you click on Tasks you will see something like the below:Tasks Tasks: displays all tasks that you have received. Tasks include items that requirereview, approval, comment, etc.o A new task appears in BOLDo A late task appears in REDo A previously viewed task but not completed appears in normal fontMessages: displays copies of items which you have been cc’dDrafts: displays saved drafts of items you have created but not sentMailbox: displays internal e-mail messages sent within the systemTo View Items that are more than 7 days old you will need to click on the down arrow11
View Pending Tasks2. To View All Pending Tasks:a. Click on the Home Tabb. Click on Taskc. Click on the down arrow, then click on All TaskDown ArrowThen Clickon All TasksProject Specific:Go to your project or from Home tab click on the sign and input your project’s name into thesearch engine and click on it there When you click on your project the following will appear –You will need to click on Summary to see the Details PageSelect Tasks from the DashboardClick on the sign andinput the project’s name or numberTasks12
Pending TasksThis is where you can use the stuff shown to you on Page 6 .View Draft RecordsWhen you start a new item in PRIMELink (Payment Request, RFI, Submittal or other item) and thesystem drops you out or you have to get out, sometimes the system will store it has a Draft Record.Please keep an eye on this item. You do not want to have a lot of Draft Records. To clear them do thefollowing:1.2.3.4.On the Home Screen, click on Draft in the upper right cornerHighlight the ones you want to deleteClick on Actions, then on DeleteIf you need to delete more, go back to step 2.13
CoSA TabThe CoSA tab contains all the current On-Call Contracts, Projects, ROW Permits and TaskOrder Contracts Group. The new location is on the close to the top left and select either:On-Call Contracts, Project, ROW Permits or Task Order Contracts Group.Click on DepartmentsAnd Select eitherOn-Call Contractsor Projector ROW Permitsor Task Order Contracts GroupTo find you project – find and click on ProjectClick Expand ViewClick to Close Map ViewMapView14
Click to turn on Search Find ViewTo Find your contract or projectInput part of the name of the item in the Project Find BoxTo open your Contract or ProjectYet - Click on the nameLetters before Project Names stand for the following:A – Aviation ProjectsB – Building and Equipment ServicesE – Environmental On-Call ContractsF – Traffic Management/Operations Projects and On-Call ContractsH – CIMS and Public Works Horizontal Projects and On-Call ContractsJ – JOC On-Call ContractsK – Parks Department ProjectsP – Public Works On-Call Contracts and ProjectsR – Real Estate On-Call ContractsT – Technical Services On-Call ContractsV – CIMS Vertical Projects and On-Call ContractsVS – Convention Center Expansion Projects and On-Call Contracts15
BookmarksYou can create Bookmarks to frequently accessed Projects or On-Call Contracts.1. Navigate to the desired Project or On-Call Contract2. Click the Bookmarks Star on the upper left section of the window3. Click Add to create the bookmarkBookmarkslinkClick “Add” to createBookmarkIf you want PRIMELink to open at your project, click on Organize then put a Checkmark in theDefault Logon block.16
PRIMELink FormsYou will be completing forms by entering information into form fields or selecting optionsthrough pickers, drop-down lists, and check boxes.PRIMELink forms consist of one or more sections: Task Detail Form, Action Location, andData Details Form.Action LocationTask Detail FormData Details Form17
Task Details FormThe Task Details form contains basic information. Fields in all forms will vary: editable,required, and read-only fields. Editable fields are shown by a white background text boxRequired fields are shown by a red * after the fieldRead-only fields are show by a blue-gray text boxPickers allow selecting from a list of options. Once selected, a dialog box will appearallowing to select from a list.If you received an Email about an taskYou must either - click on Accept Task or Decline TaskAccepting the task does not approve the task Declining the task just mean someone else will be working on it!!!Declining a task DOES NOT reject it .Different items have different formsIf it has a Picker/Selector, if you know the infothat it is requesting, you can type into that lineand it will bring in the informationPicker / SelectorThe Gray items are Read-only fieldClick here to remove the Information FormThe White Fields without the * arenot required information fieldsYou can onlyedit WhiteFieldsEditable fieldsThe White Fields with the * are Required field18
Task Details and Data Details FormsTask Details and Data Detail will show that the task will be assigned to in the next workflowstep, who it will be emailed to and workflow status.Clicking on this arrowwill bring upDifferent items--------See other items belowDepending on the setup,the To and Cc boxes willauto-populateOnce you accept a taskand you need to SendClick on SendClick on Accept,Will bring up the itemYou will need to do something withThis Workflow Actions Details box will openClick on Workflow Actions and select who to sendIt to. (There could me many)You can add people to the CCThen click on Send to forward theItems to the next approver19
Invoice Request and Standard Data FormsThe Invoice Request and Standard Data Forms contains fiscal information and has the maincontent of the record, such as line items for a payment request, change order and task orders.The following is an example of a List Items list.To Add items, you will need to click on addTo increase or decreaseAn item, click on the item thenIncrease or decrease its amountOnce you are done,Click on SaveThen find and increasethe quantity of the itemTo Add items, you will need to click on addAdding on Change Ordersis done on the left side.More information on this in theVendor and Internal Users Manuals20
Help Files in PRIMELinkOn some items there Help Files at the top, to see if there are help files on an item,do the following: (You must be on your project and on the item you want help with)(The User, Admin and Reference Guides are from Oracle and not the PRIMELink Helpdeskthese will not help you with your problems)Task Request Contracts Group Help, Field Work Directive Help, PRN Help, RFIs HelpAre just some of the help files that may have a PDF help file.Most do not have a help file yet.To Access the Help Files, Click on the this ICONThen click on the Help fileWorkflowsMost business processes in PRIMELink have an associated workflow.When you take and action on a form, you are completing a step on the workflow.Below is a Request for Information (RFI)Workflow:21
Assign Task in WorkflowYou can assign a task to someone else assuming it is allowed.1.2.3.4.5.6.7.Open the taskDo Not Accepting the task!!Click on the 3 horz linesClick on “Add more assignees ”Highlight the person(s) or group(s)Click on the arrowClick DoneYou will receive a message – “New assignees have been added to .”Click on the 3 horz linesClick on Add more assignees Highlight the person(s) or group(s) you want to addthen click on the arrowWhen you are done add people, click on Done22
Add a ProxyProxy will be utilized when you would like to permit someone else to process items in yourabsence.1. Click on your name in the top right corner of the page2. Click on Preferences3. Click on Proxy tab4. Click on plus sign5. Click on Select Click on Search, Input the first or last name of the person, click Apply Select the name23
6. Enter Start & End Dates (optional)7. Click OkRemove Proxy1.2.3.4.Click on your name in the top right corner of the pageClick on PreferencesClick on Proxy tabHighlight the name you want to remove5. Click on the TrashcanLogin as a Proxy1.2.3.4.5.6.7.Click on your name in the top right corner of the pageClick on PreferencesClick on Proxy tabClick on “I am Proxy”Highlight the name under – Users I can act as their proxyClick Proxy LogonYou will logon on their behalf24
User Access Request FormThis form will be used by the PRIMELink Helpdesk to grant and remove access within the system and track whorequested/authorized the user’s access. 1.2.Form must be completed by the requestor/authorizer within PRIMELink in order to request, remove or modify auser’s access to the system.Only personnel who already have PRIMELink access will be able to request/authorize access.User Access form functions as other PRIMELink forms, i.e. form is completed, a Workflow Action is selected and toinitiate workflow action the user is required to click on Send action button. Note: Users are able to copy fromprevious requests or individual line items within the form tabs.A single request can be used to request accounts for more than one person, assign a person to more than oneproject, assign multiple people to multiple projects or assign people to both Projects and On‐Call Contracts.Logon to PRIMELinkClick on Company Workspace Tab, click and expand Company Logs line and double-click on the User Access –Company business process.Step 1 – Click on Company WorkspaceStep 2 – Click on Company LogsStep 4 – Click on User Access - Company3. Click New icon on action bar in active window to create a new requestStep 5 – Click on CreateList of your previous requests25
4. On the beginning of the Create New User Access – Company form, denote in the Remarks text field, a briefdescription of what the access request will entail and/or any other information that will be helpful in understandingthe request(s). This information is used by the Helpdesk personnel to determine what needs to be done.Notes: The first page identifies who is requesting/authorizing the user access. The fields (Record Number, Status, and creation date) in the Header part of User Access form are auto‐populatedonce the request is submitted.5. Click on the appropriate Tab(s) to open up the detail portion of form for completion,see Steps 5a – 5d.Notes: There are four Detail Forms with tabs entitledAccounts, Projects, OnCall Contracts, ROW Permits and Templates.User can use more than one tab on a single request. The type of access request determines which tab(s) will need to be completed.Five TabsSend Button5a. Click on Accounts Tab, to add, delete or modify a user’s PRIMELink account.Add ButtonClick on “Add” function button on the top of the Create New User Access – Company form.26
To Add User Account1. Select Add from Action drop‐down list.IF THE PERSON ALREADY HAS ACCESS TO PRIMELink, DO NOT USE THIS!GO TO ONE OF THE OTHER TABS2. On the left hand side, the Account Information form will appear.a. Must complete all of required fields (marked with red asterisk *)3. Ignore the Name field (i.e. user will be unable to find name in name list since access has not beenestablished yet) and complete the remainder of the fields in the account inf
Feb 06, 2020 · For The Updated PRIMAVERA UNIFIER Updated – Feb 6, 2020 . use the search bar to locate their projects and on-call contracts. Below is a screenshot of the updated appearance A. Home Tab (Cannot be removed) B. Tab 1 . The Document Manager has 3 different views in the interface - follow