Transcription
mobilehotspotK779HSDLUser ManualDOC20200411
Table of ContentsIntroduction .3Device Overview . 3Display Layout and Icons . 4Hardware Installation. 5Device configuration . 8Log in to your Device.8SMS .10Settings.10Internet .10Wireless. 11Network.13Features.14Management.16Logout .20Troubleshooting .20Health and Safety Information . 222
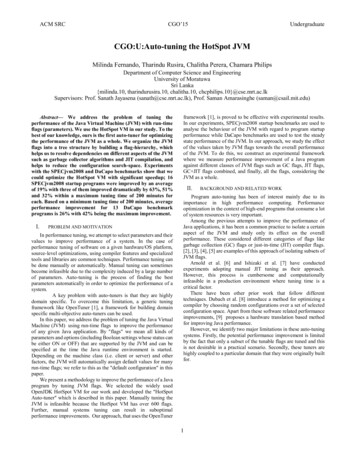
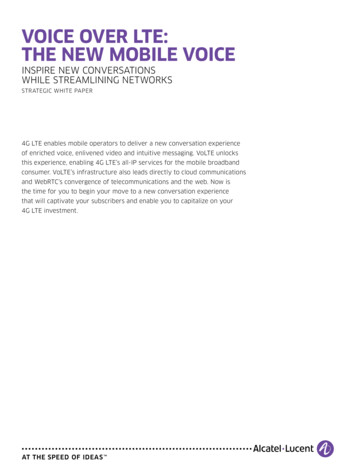
INTRODUCTIONDevice Overview1134526789101. Menu button5. Unread messageicon2. Signal and Roamingstatus icon6. Battery icon3. Network mode icon7. Power button4. Wi-Fi signal icon8. Micro USB port39. Battery cover10. Notch for removingback cover
Display Layoutand IconsIconDescriptionSignal and Roaming status iconNetwork mode iconData flow iconWi-Fi signal and number of access usersThe number of unread messages;maximum is 100Battery capacity icon; if battery is lowerthan 25%, this icon is redWPS status indicatorDownload and upload data speed4
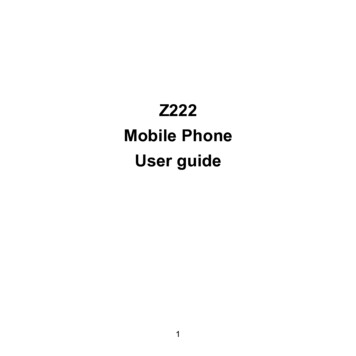
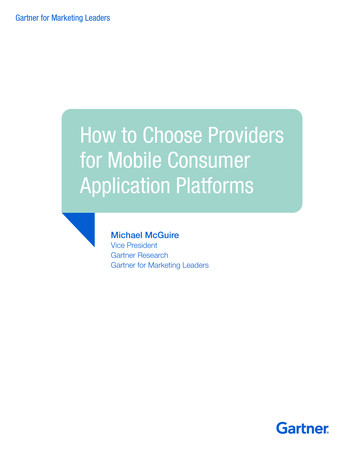
Hardware InstallationInstalling the SIM CardFollow the below instructions to install the SIM card:1. Remove the SIM card from the outer card, being carefulnot to touch the gold contacts.2. Ensure the device is powered off. Remove the battery cover,and take the battery out.3. Locate the SIM card slot. The metal SIM tray cover slidesright and left to open or lock the SIM tray, respectively. Slidethe SIM tray cover to the right to unlock the cover, and holdthe SIM card so the gold contacts are facing down andproperly aligned in the SIM card slot.4. Insert the SIM card into the slot until it is fully inserted, andthen slide the SIM tray cover to the left to lock the SIM tray.Note: Do not bend or scratch the SIM card and avoid exposing theSIM card to static electricity, water or dirt.Inserting and Charging the Battery1. Remove the battery cover and align the battery contactswith the terminals in the battery compartment as shown.Push the battery down until it clicks into place.2. Replace the battery cover over the battery compartmentand press down on the four corners of the battery cover untilit clicks into place.5
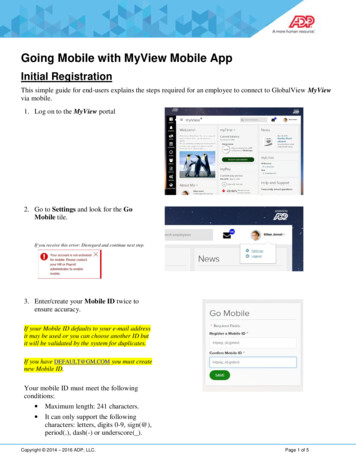
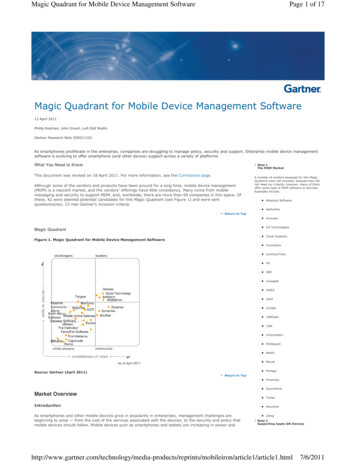
3. Your device comes with a charger. To charge, plug one endof the charger into an electrical outlet and the other endinto the device’s MicroUSB port.Removing the SIM card1. Ensure the device is powered off. Remove the battery coverand take out the battery.2. Slide the SIM tray cover to the right to open the SIM tray,and gently remove the SIM card from the SIM card slot.Setting up Wi-Fi connection1. Press and hold the Power Button for 3 seconds until the welcome logo appears on the display. After a few seconds, theWi-Fi signal icon will appear on the display.2. Look for the network (SSID) “Moxee HotspotXX 2.4G”or “Moxee HotspotXX 5G”, where XX are the last two digitsof the device IMEI.6
3. Click “Connect” and enter the default password found onyour device. Your Wi-Fi SSID and password information canbe found on your device’s “Wi-Fi Info” screen or on the SSIDlabel located underneath the battery cover.Note: This device will search for software updates periodically andmay result in a small amount of data usage.Setting up your WPSIf your terminal supports WPS, you do not have to input thepassword manually once your WPS has been set up.To use WPS please follow these steps:1. Enable WPS in the WebUI through Settings Wireless WLAN Settings WPS.2. Press the Menu Button on the device until the “WPS Active”page appears on the display.3. Press the Power Button to activate the WPS function.4. Enable the WPS function on your terminal to connect tothe hotspot.Logging into the WebUI1. Make sure your hotspot is connected to the computer orother terminal via Wi-Fi or MicroUSB cable.2. Open a browser on your computer or other connecteddevice, and input http://192.168.1.1 orhttp://device.WebUI into the address bar.3. Enter your username and password, and click “Log In”.The administrator has the right to check and modify configuration permissions.Note: The default username is “admin”; the default password is“12 XXX”, where “XXX” is the last three digits of your hotspot’s IMEI.Note: You can find the default username and password printed onthe device label by removing the back cover and battery.7
DEVICE CONFIGURATIONLog in to your DeviceTo configure your device, open a web browser on your terminal andinput the default URL:1. Make sure to connect your terminal (e.g. tablet, PC, etc.) to thehotspot via Wi-Fi or MicroUSB cable.2. Log in to http://192.168.1.1 or http://device.WebUI in your browser.3.The default user name is: admin.The default password is: 12 followed by the last 3 digits of thedevice IMEI (for example: 12 123).It is suggested to change the default login and password of theWebUI to prevent unauthorized users from changing the hotspot’ssettings.Congratulations! You have successfully logged in to your hotspot.Once you have logged in to your hotspot via your web browser,you can see the Home page for the hotspot.8
Home PageIn the Home section, you can select one of the below three optionsto configure your device: Internet Info Button: Allows you to check the Internet status by clicking theicon. The Internet mode, network status, connection timeand connection related parameters will be displayed. Wi-Fi Status Button: Allows you to check the Wi-Fi information of thehotspot by clicking theicon . The 2.4GHz & 5GHz Wi-Fi status,SSID and password will be displayed.9
Clients Button: You can check the connected client information byclicking theicon. The connected client’s device name, IP addressand MAC address will be displayed.SMSYou can click “SMS” to see text messages you may receive fromyour service provider or others.Inbox: You can read, select, delete, refresh and select multiple textmessages.Note: The device only receives SMS and does not send SMS.SettingsYou can click “Settings” on the main page to configure thehotspot.InternetMobile ConnectionIn this menu, you can configure your mobile data connection.Note: If you are unsure of your APN settings, please contact yourservice provider. The hotspot supports auto-APN, which means youdo not need to edit APN settings in most cases.10
Mobile Data: To Enable/Disable Mobile connection Data Roaming: To Enable/Disable Roaming connection Carrier Name: APN Profile Name Network Mode: 4G-LTE Network Operator: Auto/Manual, it is suggested to select “Auto”Wireless WLAN SettingsIn this menu, you can configure the Wi-Fi settings for your hotspotdevice.You can change the Wi-Fi SSID and password in this section, afterupdating your settings click “Apply”.Note: Any changes made in this section may require you to reconnectto Wi-Fi.2.4GHz is for 802.11 b/g/n5GHz is for 802.11 a/ac/n11
Note: If you are unsure of the Wi-Fi Channel or Channel Width, it issuggested to select “Auto” . WLAN MAC FilterMAC address filtering (also known as link-layer filtering) is a featurefor IPv4 addresses that allows you to include or exclude computersand devices based on their MAC address. Every Ethernet devicehas a unique MAC (Media Access Control) address. The MACaddress is assigned at the factory and consists of six pairs ofhexadecimal characters (for example: 00:DS:GG:22:35:01).You need to know the MAC address of the devices you wish tofilter.You can choose “Whitelist” or “Blacklist”. Both can be configuredby selecting the WLAN MAC Filter option.12
Disable will disable the WLAN MAC filter. Whitelist will only allow devices with the selected MAC address(es)connect. Blacklist will only deny devices with the selected MAC address(es)from connecting.Network DHCPIn this menu, you can configure the DHCP settings. The defaultvalues are: DHCP server is enabled Gateway IP address: 192 .168.1.1 DHCP IP Range: 192.168.1.100 to 192.168.1.200 DHCP lease time: 24 hours (86400 seconds)Click “Apply” after configuring new settings.13
Features FirewallYour hotspot’s high-performance firewall feature continuouslymonitors internet traffic, protecting your network and connecteddevices from malicious internet attacks. In this section you can“Enable” or “Disable” the Firewall/IP Filter settings.Note: In order to enable the IP Filter, the Firewall setting must be set to“Enable” first. IP FilterYou can filter the packages by IP address, Protocol or Port number.IP Filtering’s settings includes LAN IP address, LAN port, WAN IPaddress, WAN port and Protocol functions. Whitelist: Set websites that users are allowed to access.If the whitelist is empty, users will not be able to access theInternet. Blacklist: Set websites that you do not want users to access.14
The value range of the LAN/ WAN Port is 1-65535. Settings will not take effect until the “Apply” button is clicked. Port ForwardingIn this section you can enable external computers to access FTP orother services provided by the LAN. IP address: Assigned to each device connected to a computernetwork that uses the Internet Protocol for communication. LAN/WAN port: The part of the computer that provides services.It is a single part, and the value range of LAN/ WAN Port is1-65535. Protocol: Protocols applied by services.Example: How to set up Port Forwarding for port 21 (FTP server)15
Note: This will enable you to provide access to others to your FTP serveron your LAN through WAN.Step 1: Assign a static IP to your local computer that is hosting theFTP server.Step 2: Log in to the Gateway, and go to Settings Features PortForwarding.Step 3: Set WAN Port to 21;Set LAN IP Address to be the static IP of computer; andSet LAN port to 21.Step 4: Click “Apply” to activate. DMZ SettingsDMZ (Demilitarized Zone) allows an outside network to connect andcommunicate with internal LAN devices via this WAN interface.IP Address: Give a static IP address to the DMZ Host when Enabledradio button is checked. Be aware that this IP will be exposed tothe WAN/Internet.Management SNTPIn this section you can synchronize the system clock on the devicewith the network.16
PIN ManagementIn this section you can enable or disable the PIN on your SIM card.Please be aware that you can only enter the incorrect PIN 3 timesbefore the SIM card will be locked. To unlock the SIM card, a PUKcode will need to be entered.Note: You will need to request the PUK code from your service provider. Device InformationIn this section, you can view basic information about your device.Please contact your service provider for more information.17
Device Name: Name of the hotspot for identification purposes. Software Version: Software version currently loaded on the hotspot. Hardware Version: Hardware version of the hotspot. IMEI: The unique identification number that is used to identify the4G-LTE module. IMSI: The international mobile subscriber identity used to uniquelyidentify the 4G-LTE module. MAC: A unique number that identifies the hotspot. System AdminThe admin account can change all hotspot settings. Click “Apply”to set the new username and password.Note: To keep your hotspot secure, it is recommended to create astronger password.17 18
UpgradeYour hotspot can automatically detect firmware updates. In thissection you can manually check if there is new firmware for yourhotspot, and update. When there is a new version, it will display a“new” icon in the WebUI, and you can select the icon to proceedwith the update. You can also check the current software andhardware information on this page.Manually check for update:Click the button “Check for update” to confirm if there is an updateavailable. If there is one available, it will guide you to confirm if youwant to proceed with the update. Reboot & ResetIn this section you can reboot your device or reset it to factorydefault settings. Reboot: Select to reboot your device. Reset: Select to reset your device.19
Log outClick "Log out" to log out from your hotspot. Once you log out, you willreturn to the login page.Troubleshooting:If you are having trouble with the device, here are a fewtroubleshooting tips:1. If the device is not responsive, restart it by pressing thePower Button for 8 seconds.2. If restarting the device does not solve the issue, try restoringthe device to its default factory settings.Q&AQ: What do I do if I see the SSID but failed to connect?A: 1. Check if the password you entered is the correct one.2. Check if WPS security is enabled on your PC. If so,check the device to see if it is expecting a WPS actionfrom your PC.Q: What if there's no service?A: The possible reasons are an unstable network signal, or ahardware problem.You can try the following solutions:1. If you are inside a building or near a structure that maybe blocking the signal, change the position or location ofthe device. For example, try moving the device close to awindow.2. Check the hardware for any loose parts or damage.3. Log in to the WebUI to review any error messages.There are two kinds of error messages that may pop upwhen you log in to the WebUI as below. Please followthe steps provided.20
Q: What if I have forgotten my Wi-Fi Password?A: 1. You can find the Wi-Fi Password in the Wi-Fi Info pageon the LCD.2. You can also reset the device to factory defaults bypressing the reset button for 5 seconds.Q: What to do if the PIN or PUK locks up?A: If the SIM card is locked, you will need to enter a PIN. Login to the WebUI (http://192.168.1.1 or http://device.WebUI)and input the PIN or PUK code you received from yourservice provider.Note: If you entered the incorrect PIN code 3 times, the PUKwill be needed, and if the wrong PUK is entered 10 times,the SIM card will be locked permanently.21
Health and Safety InformationTo the Owner Some electronic devices, such as the electronic system ofvehicles, are susceptible to electromagnetic interferencesent by your device if inadequately shielded. Pleaseconsult the manufacturer of your device before using ifnecessary. Operating your device may interfere with medical deviceslike hearing aids and pacemakers. Please always keepthe device more than 20 centimeters away from suchmedical devices when they are turned on. Turn your deviceoff if necessary. Consult a physician or the manufacturerof the medical device before using your device. Be aware of usage limitations when using your devicein places such as oil warehouses or chemical factories,where there are explosive gases or explosive productsbeing processed. Turn off your device if required. The use of electronic transmitting devices is forbidden inaircrafts, at gas stations, and in hospitals. Please observeand obey all warning signs, and power off your device inthese conditions. Do not touch the inner antenna area if not necessary; itwill affect your device’s performance. Store your device out of the reach of little children. Yourdevice may cause injury if used as a toy. Do not touch the metallic parts of your device when thedevice is operating as this may cause burns.Using Your Device Please use original accessories or accessories that areauthorized. Using any unauthorized accessories may affectyour device’s performance, and violate related nationalregulations about telecom terminals. Avoid using your device near or inside metallic structuresor establishments that can emit electromagnetic waves; itmay influence signal reception.22
Your device is not waterproof. Please keep it dry and storein a shady and cool place. Do not use your device immediately after a suddentemperature change. In such a case, sudden temperaturechanges can produce moisture inside and outside yourdevice. Wait until it becomes dry before powering on andusing your device. Handle your device carefully. Do not drop, bend, or strikeit; your device may get damaged. Do not attempt to disassemble the device. An operating temperature range of 14 F (-10 C) to 113 F( 45 C)and humidity range of 5% - 95% are recommended.Battery Handling Do not short-circuit the battery, as this can causeexcessive heat and fire. Do not store the battery in hot areas or dispose of it in a fire,as this can cause an explosion. Do not disassemble or modify the battery. When not using the battery for a long period, remove itfrom your device and store it in a cool, dry place. Never use a damaged or worn-out charger or battery. Return the worn-out battery to the provider or put it in anapproved recycling container. Do not put it in your regularhouse trash.WARNING!Do not handle or touch the battery if it is damaged.Limited WarrantyThis warranty does not apply to defects or errors in theProduct caused by:i. Reasonable abrasion.ii. End User’s failure to follow appropriate installation,operation or maintenance instructions or procedures.iii. End User’s mishandling, misuse, negligence, or improper23
installation, disassembly, storage, servicing or operationof the Product.iv. Modifications or repairs not made by the manufacturer or anapproved service center.v. Power failures, surges, fire, flood, accidents, actionsof third parties or other events outside the manufacturer'sreasonable control.vi. Usage of third-party products, or usage in conjunctionwith third-party products, provided that such defects aredue to the combined usage.vii. Any other cause beyond the range of normal usageintended for the Product. End User shall have no right to reject or return theProduct, or receive a refund for the Product fromKonnectONE under the above-mentioned situations. This warranty is KonnectONE’s sole liability for defective ornonconforming items, and is in lieu of all other warranties,expressed, implied or statutory, including but not limitedto the implied warranties of merchantability and fitnessfor a particular purpose, unless otherwise required underthe mandatory provisions of the law.Limitation of LiabilityKonnectONE shall not be liable for any loss of profits orindirect, special, incidental or consequential damagesresulting from or arising out of or in connection with usageof this product, whether or not KonnectONE had beenadvised, knew or should have known of the possibility ofsuch damages, including, but not limited to lost profits,interruption of business, cost of capital, cost of substitutefacilities or product, or any downtime cost.Radio Frequency (RF) EnergyThis device model meets the government’s requirements forexposure to radio waves.24
This device is designed and manufactured not to exceed theemission limits for exposure to radio frequency (RF) energyset by the Federal Communications Commission of the U.S.Government:The exposure standard for wireless devices employs a unitof measurement known as theAbsorption Rate, orSAR. The SAR limit set by the FCC is 1.6 W/kg. Tests
3 Device Overview INTRODUCTION 1. Menu button 2. Signal and Roaming status icon 3. Network mode icon 4.