Transcription
Presto! PageManager 9Wi n d o w sUser's GuideS/N: 207910-02-01-W-E-040210-08
Copyright 2010, NewSoft Technology Corp. All Rights Reserved.No portion of this document may be copied or reproduced in any manner without prior writtenpermission from NewSoft Technology Corp. (NewSoft).NewSoft has no warranties to this documentation and disclaims any implied warranty ofmerchantability or fitness for a particular purpose. All information contained herein is subject tochange without notice.All sample images and electronic files included in the documentation and distribution materialsare copyrighted by their respective photographers and not allowed to be copied or reproducedin any manner.PDFlib (C) 1997-2007, PDFlib GmbH and Thomas Merz.The Xpdf source code (C) 1996-2007, Glyph & Cog, LLC.Outside in Viewer Technology (C) 1991-2007, Oracle Corp.JPEGlib (C) 1998 Independent JPEG Group.ABBYY FineReader Engine 7.1 (C) 1993-2005 ABBYY Software House (BIT Software).TrademarksIBM, PC, and VGA are registered trademarks of International Business Machines Corporation.XP, Vista, Windows 7, and Microsoft are registered trademarks of Microsoft Corporation.FlashPix(TM) is a trademark of Eastman Kodak CompanyPDFlib is a registered trademark of PDFlib GmbH.Oracle is a registered trademark of Oracle Corporation.FineReader is a trademark of ABBYY Software House (BIT Software).All other trademarks are the properties of their respective soft.co.jpwww.newsoft.eu.comwww.newsoft.com.cnii
ContentsChapter 1 Introducing PageManager1Features . 2System Requirements . 3Installing PageManager. 4License Manager. 4Live Update. 5Chapter 2 Getting Started6Getting Familiar with the Desktop . 6Menu Bar . 7Command Toolbar . 7Quick Links . 10Tree View Window . 10Application Bar. 11Presto! Scan Buttons . 11Display Area . 12Document Pallet. 12Status Bar . 12Viewing Files . 12Thumbnail View . 13List View . 14Tile View . 14Page View. 15OCR View . 16Setting Preferences . 17Chapter 3 Working with PageManager21Getting Files . 22Acquiring Images from Scanners . 22
Setting Preferences for Scanning. 23Getting Images from Scanners. 24Getting Files with Presto! Scan Buttons . 25Customizing Presto! Scan Buttons . 26Getting Images with the Quick Button on Your Scanner . 27Deskewing an Image. 28Loading Photos from Digital Cameras . 28Getting Files from Digital Storage Devices . 28Downloading Files from an FTP Site. 29Getting Files by Importing . 29Importing from Lotus Notes . 30Importing from Presto! Wrapper . 30Using the Document Pallet. 32Using the Application Bar . 32Sending Files through the Application Bar . 33Adding Applications to the Application Bar . 33Removing Applications from the Application Bar . 34Changing the Properties of Applications on the Application Bar35Managing Files . 36Arranging . 36Creating a New Folder . 37Moving Files . 37Duplicating Files . 37Removing Files. 37Form Dispatching. 37Adding a New Form. 38Dispatching Forms . 38Checking Sorted Forms. 39Renaming . 39Renaming a File . 39Batch Renaming Files . 39Stacking . 40Saving. 41iv
Saving a File . 41Saving a File as PDF. 42Saving a File as XPS (Windows Vista or above) . 42Annotating Files. 42Image Annotation Toolbar. 43Text Annotation Toolbar. 44XPS Annotation Toolbar (Windows Vista or above). 45Enhancing Images . 47Touchup Toolbar. 47Making a Slide Show . 50Setting up a Screen Saver . 51Putting up Wallpaper. 51Converting Images to Text (OCR). 51Deleting OCR Text . 52Backing up Files . 52Searching for Files. 53Specifying the File or Folder Properties . 54Searching Files . 55Searching Contents . 57Indexing Service Searching . 57Searching the Backup Files . 57Printing and Faxing Files . 58Setting up for Printing and Faxing. 58Printing. 59Faxing . 59Using PrintFun . 59Moving Faxes or Mail to a Folder . 61Exporting Files . 62Exporting to Lotus Notes. 62Exporting with Presto! Wrapper . 63Uploading Files to an FTP Site . 64v
Uploading Files to SharePoint . 65Appendix66Menu Commands . 66File Menu . 67Edit Menu. 69View Menu . 70Tools Menu . 71Page Menu . 73OCR Menu. 74Touchup Menu . 75Annotation Menu. 76Help Menu . 76Supported File Formats. 77vi
Chapter 1Introducing PageManagerFast, fun, and efficient–Presto! PageManager makes it easy to scan, share,and organize your photos and documents. Presto! PageManager helps younot only to convert piles of papers into organized, digitized files, but also toview, edit, send, and back up files in many formats. Presto! Wrapperremoves file sharing problems by creating a self-executable file that can beput on a floppy disk, attached to e-mail, or downloaded from the Internet.Presto! PageManager makes it easy to scan, share, and organize your files.Let's first take a look at these exciting features, system requirements, andstart-up procedures. Features System Requirements Installing PageManager License Manager1
Introducing PageManager Live UpdateFeatures Use Thumbnail view, List view, Tile view to easily arrange and find files. Share files by converting them to portable file formats like PDF(Portable Document Format), XPS (XML Paper Specification), andPresto! Wrapper, an executable file. Connect to the Internet or an FTP (File Transfer Protocol) server fromPageManager.This feature may not be available or has limitedfunctionalities in the OEM edition. Import from and export to a Lotus Notes database. Scan double-sided and send images to your favorite programs with justa click. Easily organize files just like Windows Explorer. Assign categories to forms. View files without opening other applications with PageManagerdocument and image viewers. Preview audio or video files in Thumbnail view. Easily stack related image and document files–even with different fileformats. Get text out of an image with reliable and accurate OCR (OpticalCharacter Recognition). Easily find backup files, annotations, title, author, and memoinformation with the efficient search function.2
Introducing PageManager Easily burn backup files to disc.This feature may not be available or has limitedfunctionalities in the OEM edition. Add annotations without affecting the original file with handy annotationtools, such as text, stamp, highlighter, freehand line, straight line, stickynote, and bookmark. Enhance images with a set of image tools such as crop, rotate, flip,invert color, auto-enhancement, brightness, and contrast, coloradjustment, and remove noise.System Requirements Personal computer with Pentium III, 800 MHz or better processor forWindows XP; Pentium 4, 1.0 GHz processor for Windows Vista andWindows 7. Windows XP SP2 or above, Windows Vista, Windows 7. 350 MB free hard disk space for installation. 512 MB RAM. Microsoft Internet Explorer 5.0 or later. SVGA (1024 x 768) or Better (high resolutions provide more detailedimages). CD-ROM drive required.Recommended: 1 GB RAM TWAIN or WIA-compliant digital camera or scanner. Windows-compatible fax-modem and printer. Outlook, Outlook Express, Netscape Mail, Microsoft Mail, Lotus Notescc:Mail, or other electronic mail software.3
Introducing PageManagerInstalling PageManager1. Insert the PageManager installation CD into your CD or DVD-ROMdrive.2. The installation program will start automatically, or select the Presto!PageManager option to start the installation.3. Follow the instructions to complete the installation.The Import Old Data function will get the data from theprevious version of PageManager including annotationsand stacked files. However, OCR will have to beperformed again, if you did not save the files that hadbeen processed with OCR as another file type.License ManagerWhen you open Presto! PageManager, the program requests the serialnumber in order to use the program. If the number of users for the serialnumber is over the limit set in the local network, you have to either enteranother serial number or wait until the number of users for that serialnumber is below the limit.You can see the limits for each serial number by clicking License Manageron the Tools menu and entering the numbers.In the OEM version, you don’t need to enter the serialnumber when opening PageManager, but if you want toactivate Internet-related features, please type a validserial number in the License Manager dialog box.This feature may not be available or has limitedfunctionalities in the OEM edition.4
Introducing PageManagerLive UpdateWhen starting PageManager, if you have not registered with NewSoft LiveUpdate, a dialog box appears asking you to register. Registering withNewSoft Live Update allows you to receive notices of any new programupdates. You can always click the Live Update icontoolbar to check for available updates.5on the Command
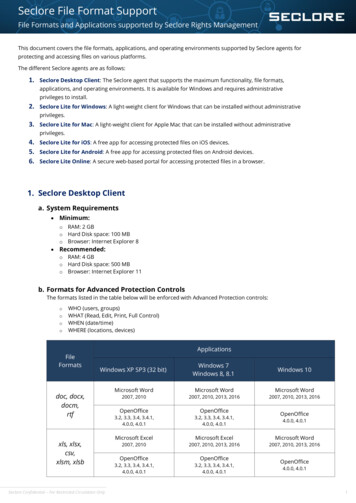
Chapter 2Getting StartedThis chapter provides a quick look at PageManager. The desktop, variousways you can view your files, and the preferences will be introduced in thefollowing sections. Getting Familiar with the Desktop Viewing Files Setting PreferencesGetting Familiar with the DesktopHere is the default look for PageManager. You can customize it from theView menu. You can change the size of the thumbnails and show or hideother areas as you wish.The PageManager desktop6
Getting Started1. Menu Bar2. Command Toolbar3. Quick Links4. Tree View Window5. Application Bar6. Presto! Scan Buttons7. Display Area8. Document Pallet9. Status BarMenu BarThe Menu bar provides the commands you use to perform the functions ofthe program. See the Menu Commands section for details.Command ToolbarThe Command toolbar includes most commonly used commands. Justclick one to execute the command.Acquire Image DataAcquire images from a TWAIN or WIA-compliantdevice.Enable or disable Presto! Scan ButtonsShow or hide Presto! Scan Buttons7
Getting StartedPresto! Scan Buttons SettingsCustomize Presto! Scan ButtonsConnect/Disconnect ServerConnect to an FTP site. Clickto disconnect.Save AsSave the selected file as a new one.Save as PDFSave the active document in PDF format.Save as XPS (Windows Vista or above)Save the active document in XPS format.Export to Presto! WrapperSave the file in the Presto! Wrapper (.exe) format.FindSet parameters for searching files and folders.StackStack selected files.UnstackSpread out a stack.8
Getting StartedThumbnail ViewSee files in Thumbnail view.List ViewSee detailed information for the files including Type,Size, Image Information, Date Modified Time, DateCreated, Annotations, and Author.Tile ViewSee both thumbnails and detailed information.Page ViewView the selected file at full size.OCR ViewDisplay text in files that have been processed withOCR.Browse InternetConnect to and surf the Internet.Zoom OutReduce the thumbnail or image size.Zoom InEnlarge the thumbnail or the image size.PreferencesChange the settings for JPEG compression, OCRlanguages, document viewing options, and logonsettings.9
Getting StartedLink to NewSoft WebsiteYou can get NewSoft product information from theWeb.Live UpdateRegister with NewSoft Live Update. Registeredusers will receive notices of new programs, NewSoftnews, and program patches.Quick LinksYou can drag frequently used folders to the Quick Links area. Foldersdragged here are shortcuts only and not actual folders. You can right-clickshortcuts to open, rename, or remove them without affecting the realfolders.Tree View WindowThe Tree View window displays the folder organization for your computerjust as in Windows Explorer. When you click a folder, files in the folder willbe displayed as thumbnails or lists in the Display Area.10
Getting Started1. You can drag often-used folders to the Quick Links area.2. When connected to an FTP server, the FTP icon will appear at thetop of the Tree View window.PageManager creates a folder, My PageManager in theMy Documents folder. This folder contains sample filesfor you to practice with.Application BarYou can send files directly to another program or device by dragging themto the Application bar.Presto! Scan ButtonsPresto! Scan Buttons combine scanning and sending files into one step.Once clicked, PageManager scans and sends the data to the designatedprogram or device.11
Getting StartedDisplay AreaThis area shows files in the selected viewing mode. Refer to the ViewingFiles section for more details.Document PalletYou can pick files from different folders and drag them to the DocumentPallet, and then send them together to a folder or an e-mail message.Status BarThe Status Bar displays information about the selected item and currentactivity.Viewing FilesPageManager can view many image, and document file formats.You can open a file by double-clicking a thumbnail in the Display area. Ifthis is an image file, it will be opened directly in PageManager. If it is not animage file, a dialog box will open to ask you to view the file either inPageManager or in the originating application.You may need to enter the password before opening a PDF file withpassword security.PageManager provides a choice of viewing modes. You can view your filesin the manner that is best suited for your documents and purposes. Thissection introduces the following viewing options. Thumbnail View List View Tile View Page View12
Getting Started OCR ViewThumbnail ViewThe first time PageManager starts, it will be in Thumbnail view. Go toon the Command toolbar. EachThumbnail view by clickingthumbnail represents a file in the selected folder.You can change the thumbnail size from the View menu.From the View menu, point to Sort, and click By Name, By Type, By Size,By Author, By Date, and By Keyword to arrange the thumbnails invarious ways. Click Descending or Ascending to arrange or reverse theorder of the thumbnails.The file name is at the bottom of each thumbnail, and an icon indicating thefile type is at the upper-left. Images have no icons. There may be one of thefollowing icons that reveal important information about the file.If an audio file
2. When connected to an FTP server, the FTP icon will appear at the top of the Tree View window. PageManager creates a folder, My PageManager in the My Documents folder. This folder contains sample files for you to practice with. Application Bar You can send files directly to another prog