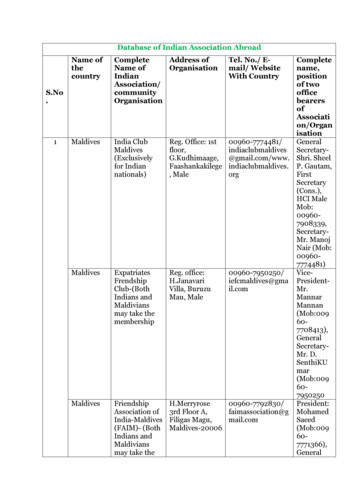
Transcription
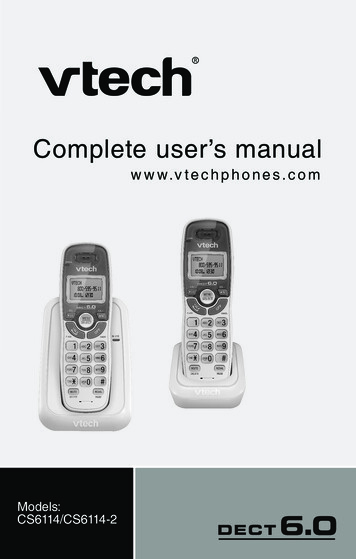
Complete user’s manualw w w.v t e c h p h o n e s . c o mModels:CS6114/CS6114-2
Congratulationson purchasing your new VTech product. Before using this telephone, pleaseread Important safety instructions on page 33 of this manual.This manual has all the feature operations and troubleshooting necessaryto install and operate your new VTech telephone. Please review thismanual thoroughly to ensure proper installation and operation of thisinnovative and feature rich VTech product. For support, shopping, andeverything new at VTech, visit our website at www.vtechphones.com.In Canada, please visit www.vtechcanada.com.The ENERGY STAR program (www.energystar.gov) recognizesand encourages the use of products that save energy and helpprotect our environment. We are proud to mark this product withthe ENERGY STAR label indicating it meets the latest energyefficiency guidelines.Compatible withHearing Aid T-CoilTelephones identified with this logo have reduced noise andinterference when used with most T-coil equipped hearing aids andcochlear implants. The TIA-1083 Compliant Logo is a trademark ofthe Telecommunications Industry Association. Used under license.TTIA-1083Register online to get an additional 3-month warranty!Visit www.vtechphones.com.RegistrationRegister your product online for enhancedwarranty support.Product newsLearn about the latest VTech products.
Table of contentsGetting started.1Parts checklist.1Telephone base and chargerinstallation.2Wall mounting.2Battery installation.3Battery charging.5Telephone base layout.5Handset layout.6Are you a new cable or VoIPsubscriber?.8Did you subscribe to voicemailservice from your telephoneservice provider?.8Dial a redial entry.16Delete a redial entry.16Directory.16Add a directory entry.17Character chart.18Review the directory.18Alphabetical search.19Dial a directory entry.19Edit a directory entry.19Delete a directory entry.20About caller ID.20Call log.21Missed call indicator.21Memory match.22Review the call log.22View dialing options.22Dial a call log number.23Save a call log entry to thedirectory.23Delete the call log entries.24Call log display screenmessages.24Telephone settings.9Using the menu.9Ringer volume.9Ringer tone.9LCD language.10Clear voicemail.10Key tone.11Set date and time.11Home area code.12Dial mode.12Website.12Appendix.25Display screen messages.25Handset and telephone tant safety instructions.33Precautions for users of implantedcardiac pacemakers.34Operating range.34Maintenance.34About cordless telephones.35The RBRC seal.35Warranty.36FCC, ACTA and IC regulations.37Technical specifications.39Telephone operation.13Make a call.13Predial a call.13Answer a call.13End a call.13Volume.13Mute.13Call waiting.13Temporary ringer silencing.14Temporary tone dialing.14Find handset.14Multiple handset use .14Chain dialing.15Redial list.15Review the redial list.15Index.40ii
Getting startedParts checklistYour telephone contains the following items. Save your sales receipt andoriginal packaging in the event warranty service is necessary.Charger andcharger adapterBatterycompartment coverTelephoneline cord(1 for CS6114-2)(1 for CS6114 and2 for CS6114-2)Battery(1 for CS6114)(2 for CS6114-2)Abridged user’s manualCANCELTelephone basepower adapterHandsetTelephone baseAbridged user’s manual(1 for CS6114)(2 for CS6114-2)To purchase a replacement battery or power adapter, visit our websiteat www.vtechphones.com or call 1 (800) 595-9511. In Canada, go towww.vtechcanada.com or call 1 (800) 267-7377.
Getting startedTelephone base and charger installationInstall the telephone base and charger as shown below.Make sure that the electrical outlet is not controlled by a wall switch.If you subscribe to digital subscriber line (DSL) high-speed Internet servicethrough your telephone line, you must install a DSL filter between thetelephone line cord and telephone wall jack. The filter prevents noise andcaller ID problems caused by DSL interference. Contact your DSL serviceprovider for more information about DSL filters.Electrical outlet(not controlledby a wall switch)Telephonewall jackA DSL filter (notincluded) isrequired if you haveDSL high-speedInternet serviceTelephone basepower adapterChargeradapterTelephoneline cordTelephone baseCharger Use only the power adapters and batteries supplied with this product.To order a replacement, visit our website at www.vtechphones.com orcall 1 (800) 595-9511. In Canada, go to www.vtechcanada.com or call1 (800) 267-7377. The power adapters are intended to be correctly oriented in a verticalor floor mount position. The prongs are not designed to hold the plug inplace if it is plugged into a ceiling, under-the-table or cabinet outlet.CAUTION: If you subscribe to telephone service from a cable companyor a VoIP service provider, contact your cable/VoIP service provider formore information.Wall mountingYour telephone comes ready for tabletop use. If you prefer to mountyour telephone on the wall (optional), it is designed to mount on astandard telephone wall plate.You can mount the telephone base on[A]the wall by positioning the top hole at theback of the telephone base against thetop mounting stud [A]. Then slide thetelephone base down on theMountingmounting studs [A] and [B]studsuntil it locks into place.[B] Telephone base
Getting startedBattery installationAfter you install the handset battery, the handset will prompt you to set thedate and time. The handset will also prompt you to set the date and timeafter a power failure. For instructions, see Set date and time on page 11.To skip, press OFF/CANCEL.Install the battery as shown below.1. Plug the battery connector securely into the socket inside the handsetbattery compartment.2. Place the battery with the label THIS SIDE UP facing up and the wiresinside the battery compartment.
Getting startedBattery installation (continued)3. Align the cover flat against the battery compartment, then slide ittowards the center of the handset until it clicks into place.4. Charge the handset by placing it in the telephone base or charger. TheCHARGE light remains on whenever the handset is charging.CHARGElightCANCEL If the handset will not be used for a long period of time, disconnect andremove the battery to prevent any possible leakage. To purchase a replacement battery, visit our website atwww.vtechphones.com or call 1 (800) 595-9511. In Canada, go towww.vtechcanada.com or call 1 (800) 267-7377.IMPORTANT:Check for a dial tone by pressingis successful. If you hear a dial tone, the installationIf you do not hear a dial tone: Make sure the installation procedures described above are properly done. It may be a wiring problem. If you have changed your telephoneservice to digital service from a cable company or a VoIP serviceprovider, the telephone line may need to be rewired to allow all existingtelephone jacks to work. Contact your cable/VoIP service provider formore information.
Getting startedBattery chargingOnce you have installed the battery, the screen indicates the batterystatus (see the table below). If necessary, place the handset in thetelephone base or charger to charge the battery. For best performance,keep the handset in the telephone base or charger when not in use. Thebattery is fully charged after 16 hours of continuous charging. See the tableon page 27 for battery operating times.If the screen is blank, you need to charge the handset without interruptionfor at least 30 minutes to give the handset enough charge to use thetelephone for a short time. When the battery is low, the handset displaysLow battery along with a flashing icon. If you are on a call in low batterymode, the handset beeps every 50 seconds.The following table summarizes the battery charge indicators and actionsto take.Battery indicatorsBattery statusActionThe screen is blank,or displays Place incharger and flashes.Battery has very little orno charge. The handsetcannot be used.Charge without interruption(at least 30 minutes).The screen displaysLow battery andflashes.Battery has enoughcharge to be used for ashort time.Charge without interruption(about 30 minutes).The screen displaysHANDSET X and--:-- --/--.Battery is charged.To keep the battery charged,place it in the telephonebase or charger when notin use.If you place the handset in the telephone base or charger without pluggingin the battery, the screen displays No battery.Telephone base layoutIN USE lightOn when the handset is in use.Flashes quickly when there is anincoming call.Flashes when another telephonesharing the same line is in use./FIND HANDSETPress once and then release to pageall system handsets (page 14).
Getting startedHandset layoutCHARGE lightOn when the handset is charging in thetelephone base or charger (page 4).CID/VOLPress to review the call log when thetelephone is not in use (page 22).During a call, press to decrease thelistening volume. A double beep soundsat the lowest setting (page 13).Press to scroll down while in a menu, orreviewing the directory, call log or redial list.When entering numbers or names inthe directory, press to move the cursorto the left./FLASHPress to make or answer a call (page 13).During a call, press to answer anincoming call when you receive a callwaiting alert (page 13).CANCEL1Press repeatedly to add or remove 1 infront of the call log entry before dialing orsaving it to the directory.Dialing keysPress to enter numbers or characters.TONEPress to switch to tone dialing temporarilyduring a call (page 14).MUTE/DELETEWhile on a call, press to mute themicrophone (page 13).While using the dialing keys, press todelete digits or characters.While the handset is ringing, press tosilence the ringer temporarily (page 14).When reviewing the directory, call log orredial list, press to delete the displayedentry (page 20, 24 or 16).
Getting startedHandset layoutMENU/SELECTPress to show the menu.While in a menu, press to select an item,or save an entry or setting./VOL Press to review the directory when thetelephone is not in use (page 18).During a call, press to increase thelistening volume. A double beep soundsat the highest setting (page 13).Press to scroll up while in a menu, orreviewing the directory, call log orredial list.When entering numbers or names inthe directory, press to move the cursorto the right.OFF/CANCELDuring a call, press to hang up.While the handset is ringing, press tosilence the ringer temporarily (page 14).While the telephone is not in use,press and hold to erase the missed callindicator (page 21).While in a menu, press to return to theprevious menu.While in a menu, press and hold toreturn to idle mode.While predialing, press to delete digits(page 13).CANCEL#Press repeatedly to show other dialingoptions when reviewing a call log entry(page 22).REDIAL/PAUSEPress repeatedly to review the redial list(page 15).While dialing or entering numbers intothe directory, press and hold to insert adialing pause (pages 13 and 17).
Getting startedAre you a new cable or VoIP subscriber?If your answer is yes, the existing telephone jacks in your home may nolonger work. You cable/VoIP service provider uses a different connection,separate from your old traditional telephone service, to connect the model/router/terminal adapter installed in your home.To allow all existing telephone jacks to work, contact your telephoneservice provider for solutions, such as rewiring services (fees may apply).If your answer is no, your existing telephone jacks will continue to workas normal.OLDConventionaltelephone line jackCANCELMainlandlineNEWCANCELCable orInternetModem/Router/Terminal adapterDid you subscribe to voicemail service from your telephoneservice provider?This telephone does not have a built-in answering system. Thistelephone supports voicemail feature offered by your telephone serviceprovider (subscription is required, and fees may apply).To use the voicemail:To retrieve your voicemail messages, you typically dial an access numberprovided by your telephone service provider, and then enter a securitycode. Contact your telephone service provider for instructions on how toconfigure the voicemail settings and listen to messges.
Telephone settingsUsing the menuTo enter the handset menu:1. Press MENU/SELECT when the telephone is not in use.2. Press CID oruntil the screen displays the desired feature menu.3. Press MENU /SELECT to enter that menu. To return to the previous menu, press OFF/CANCEL. To return to idle mode, press and hold OFF/CANCEL.Ringer volumeYou can adjust the ringer volume or turn the ringer off.1. Press MENU/SELECT when the handset is not in use.2. Press CID oruntil the screen displaysRingers, then p ress MENU /SELECT twice.3. The screen displays Volume: with the currentsetting flashing. Press CID orto choose Off,Low or High. A sample of each ringer volume playsas you scroll through the choices.4. Press MENU /SELECT to save your selection. Youhear a confirmation tone.RingersVolume:High If the ringer volume is set to Off, the idle screen displays Ringer off. When the ringer volume is set to Off, the handset still rings when youpress /FIND HANDSET.Ringer tone ou can change the handset ringer tone.Y1. Press MENU/SELECT when the handset is not in use.2. Press CID oruntil the screen displaysRingers, then press MENU /SELECT.3. Press CID oruntil the screen displaysRinger tone, then press MENU /SELECT.4. The screen displays Tone: with the current settingflashing. Press CID orto choose 1, 2, 3, or 4.A sample of each ringer tone plays as you scrollthrough the choices.5. Press MENU /SELECT to save your selection. Youhear a confirmation tone. If you turn off the ringer volume, you will not hear ringertone samples. RingersRinger toneTone: 1
Telephone settingsLCD languageThe LCD language is preset to English. You can select English, French orSpanish to be used in all screen displays.To change the setting:Settings1. Press MENU/SELECT when the handset is not in use.2. Press CID oruntil the screen displaysSettings, then press MENU /SELECT twice.3. Press CID orto choose English, Français orLCD languageEspañol, then press MENU /SELECT to save yoursetting. You hear a confirmation tone.Clear voicemailThis telephone does not have a built-in answering system.Voicemail is a feature available from most telephone service providers.It may be included with your telephone service, or may be optional. Feesmay apply. If you subscribe to voicemail service offered by your telephoneservice provider, New voicemail andappear on the handset when youhave new voicemail messages. Contact your telephone service providerfor more information and assistance about using your voicemail service.After you have listened to all new voicemail messages, the indicators onthe handset turn off automatically.Use the clear voicemail feature when the telephone indicates there is newvoicemail but there is none. For example, when you have accessed yourvoicemail while away from home. The clear voicemail feature only turns offthe indicators; it does not delete your voicemail messages. As long as youhave new voicemail messages, your telephone service provider continuesto send the signal that turns on the indicators.To manually turn off these indicators:1. Press MENU/SELECT when the handset is not in use.2. Press CID oruntil the screen displaysSettings, then press MENU /SELECT.3. Press CID oruntil the screen displaysClr voicemail, then press MENU /SELECT. Thescreen displays Clear VM icon?4. Press MENU /SELECT to confirm your selection. Youhear a confirmation tone.Your telephone service provider may alert you of newmessages with a broken (stutter) dial tone. Contactyour telephone service provider for details.10SettingsClr voicemailClear VM icon?
Telephone settingsKey toneYou can turn the key tone on or off.1. Press MENU/SELECT when the handset is not in use.2. Press CID oruntil the screen displaysSettings, then press MENU /SELECT.3. Press CID oruntil the screen displaysKey tone, then press MENU /SELECT.4. Press CID orto choose On or Off, then pressMENU /SELECT to confirm your selection. You hear aconfirmation tone.SettingsKey toneOnSet date and timeI f you subscribe to caller ID service, the day, month and time are setautomatically with each incoming call. You can also set the date andtime manually.1. Press MENU/SELECT when the handset is not in use.2. Press CID oruntil the screen displaysSettingsSettings, then press MENU /SELECT.3. Press CID oruntil the screen displaysSet date/time, then press MENU /SELECT.4. When the month is flashing, press CID oruntilSet date/timethe screen displays the correct month and then pressMENU /SELECT; or, press the dialing keys (0-9) toenter the current month (for example, if the month isMarch, you must enter 03).5. Repeat step 4 to set the correct date and year andDate: 03/25/10then press MENU /SELECT to advance to set the time.6. When the hour is flashing, press CID oruntilthe screen displays the correct hour and then pressMENU /SELECT; or, press the dialing keys (0-9) toTime: 02:35 PMenter the current hour (for example, if the time istwo o’clock, you must enter 02).7. Repeat step 6 to set the correct minute.8. When AM or PM is flashing, press CID ortoselect AM or PM. Press MENU /SELECT to save yoursettings. You hear a confirmation tone.When there is a power failure or after battery replacement, the date andtime needs to be reset.11
Telephone settingsHome area codeIf you dial local calls using only seven digits (area code not required), youcan program your home area code so that when you receive a call withinyour local area, the telephone number is automatically stored in the call logwithout the area code.To change the setting:1. Press MENU/SELECT when the handset is not in use.2. Press CID oruntil the screen displaysHome area codeSettings, then press MENU /SELECT.3. Press CID oruntil the screen displaysHome area
Press to scroll down wh le n a menu, or rev ew ng the d rectory, call log or red al l st. When enter ng numbers or names n the d rectory, press to move the cursor to the left. /FLASH Press to make or answer a call (page 13). Dur ng a call, press to answer an ncom ng call when