Transcription
How to set up Pulse Secure HostChecker SSL VPN with OPSWAT GearsClientAbout This Guide . 2Method #1: Antivirus Policy . 3Method #2: Custom Process and Registry Check . 8Method #3: Third Party Policy: Distribute Gears for Guest Devices. 18 2015 OPSWAT, Inc. All rights reserved. OPSWAT, Gears and the OPSWAT logo are trademarks of OPSWAT, Inc.All other trademarks, trade names, service marks, service names and images mentioned and/or used hereinbelong to their respective owners.1
About This GuideGears is a platform for network security management for IT and security professionals thatprovides visibility over all types of endpoint applications from antivirus to hard disk encryptionand public file sharing, as well as the ability to enforce compliance and detect threats. Moreinformation on Gears may be found at https://www.opswatgears.com.Gears can be leveraged by Pulse Secure’s Endpoint Security Host Checker policies to provideenhanced compliance checking capabilities for the Junos Pulse application. There are threestandard methods for configuring the Pulse Secure Host Checker policy to leverage Gears tocontrol network access. Each method has its pros and cons, and each can be used incombination with the others on the same or multiple realms. The three methods covered bythis guide:1. Create an Antivirus Rule in Pulse Secure Host Checker to leverage GearsoSummary: Checks if Gears is running and the endpoint is in a compliant state§ Pro: Easy setup§ Con: Only verifies compliance state, but not to which account/policy itcomplies2. Create a Custom Process and Registry Check in Pulse Secure Host Checker to leverageGearsoSummary: Checks if Gears is running, endpoint belongs to a certain account, and is ina compliant state§ Pro: Works with all client types; Checks state and require a specificaccount/policy§ Con: Setup is marginally more complicated than #13. Create a Third Party Policy in Pulse Secure Host Checker to leverage GearsoSummary: Similar to #2 but first automatically distributes Gears portable to theendpoint§ Pro: No need to separately deploy Gears to the endpoints§ Con: Only supported for Windows endpoints; limited auto-remediationoptions** Auto-remediation for guest devices is being added in Q4/2014-Q1/2015More information on the benefits of integrating Gears with Pulse Secure Host Checker can befound at ess.This guide specifically illustrates how to establish Gears policy checks for Windows and Mac OSdevices through Pulse Secure Host Checker. Please note that in order to leverage these checksadditional configurations must be made to the Realms, Roles, and Profiles. These standardPulse Secure device configurations options are outside the scope of this guide.2
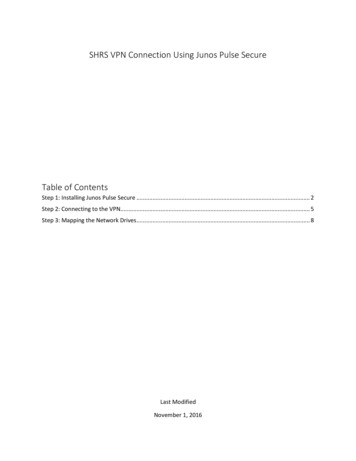
Method #1: Antivirus PolicyThe first method of configuring Pulse Secure Host Checker to utilize Gears for compliancechecks uses an Antivirus rule in the Endpoint Security/Host Checker portion of Junos Pulse.Once completed, if the Gears client is installed and running on an endpoint, it will be detectedas an antivirus. When a check for real-time-protection is performed, the Gears client will returnEnabled only if Gears client is currently running and the endpoint device is meeting all policy*requirements established within Gears.*Note: This method cannot check to which account/policy an endpoint is compliant, only that itis or isn’t compliant.Step 1:Under Endpoint Security, select the Host Checker tab.3
Step 2:Under Policies, you can create a New policy or Edit an existing one. When creating a new policy,users will be prompted to provide a policy name.4
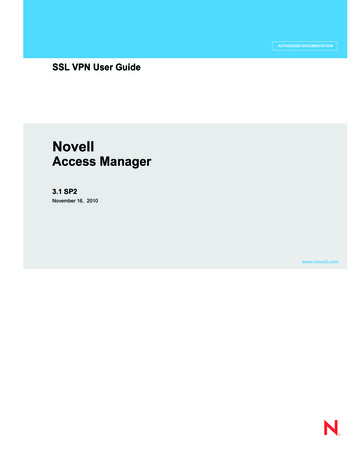
Step 3:This step allows you to add a rule for the Antivirus. Please note that by default Windows will beselected. For a Mac OS rule please select Mac and enter the same information outlined below.Select Predefined: Antivirus from the drop down and click Add. Ensure under Require that All ofthe above rules is selected and under Remediation you have selected Send Reason Strings (thedefault configuration).5
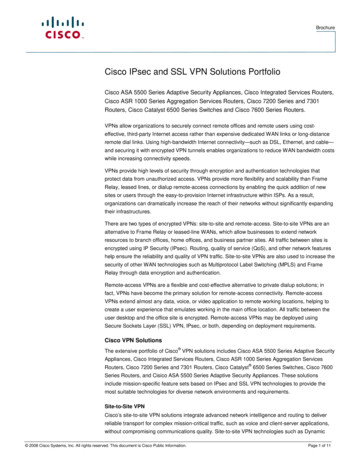
Step 4:Establish a name for the rule and set the criteria along with any optional checks.A User may require any supported product or go with a specific set of vendors and or products.For Gears specifically, users will select the following: Vendor – OPSWAT, Inc. Product – Gears ClientStep 5:You can setup any other compliance requirements relevant to your organization at this time.Under Save Changes, click Save Changes.Host Checker is now setup for the Antivirus Compliance policy and will check for the presenceof Gears Client as well as the status of real time protection. An endpoint will only pass thisantivirus compliance policy if Gears client is installed, running and reporting that the endpointis compliant with the policy set in Gears Cloud. The next step will be to apply this policy to theAdministrative and or User Realms as necessary.6
7
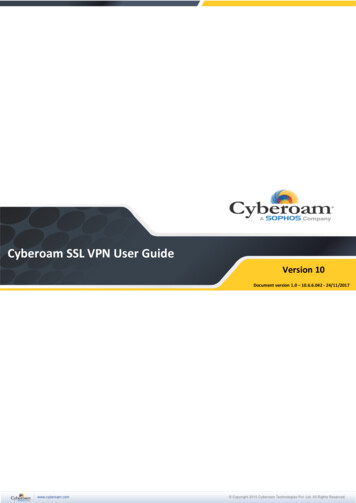
Method #2: Custom Process and Registry CheckPulse Secure Host Checker can also be configured to utilize Gears for compliance checks usinga combination of custom process and registry checks in the Endpoint Security/Host Checkerportion of Junos Pulse. This requires more configuration than method #1, but has the benefitof also checking to which account/policy an endpoint is compliant.Together, these checks will ensure that endpoint devices are meeting all compliancerequirements established by the organization through the Gears admin console. The processcheck first ensures that the Gears Client is actively running on the device; second, the registrycheck determines whether the device is compliant with the defined Gears policy.Step 1:Under Endpoint Security, select the Host Checker tab.8
Step 2:Under Policies, either create a New policy or Edit an existing one. When creating a new policy,users will be prompted to provide a policy name.Step 3:This step allows you to add a Custom Process. Please note that by default Windows will beselected. For the Mac configuration, select the Mac tab. Select Customer: Process from the dropdown and click Add. Please note that for Mac devices within Host Checker Policy, you arecurrently only able to monitor the running Gears process, not the service.9
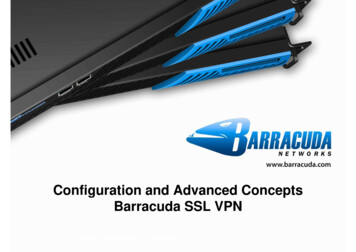
Step 4:In Host Checker Policy we are creating a new custom rule. Here we will create the new rulename and add a requirement for the Gears process to be running.Windows For the persistent, installed Gears client, check for the processGEARSAgentService.exe For the on demand, portable Gears client, check for the process opswatgears-od.exeMac For the persistent, installed Gears client, check for the process GearsAgent For the on demand, portable Gears client, check for the process opswat-gears-od10
Step 5:Once setup is complete click on Save Changes, then return to the Host Checker policy page.11
Step 6:Under ‘Policies’, either create a new policy or edit an existing one. When creating a new policy,users will be prompted to provide a policy name.Step 7:This step allows you to create a Custom Registry Setting. Select Custom: Registry Setting from thedrop down and click Add. By default Windows will be selected.12
The following steps will outline the how to establish the registry check for both 32-bit and 64-bitWindows devices.Step 8:Establish the registry setting for the 64-bit system by first creating the rule name for the check.This name should be unique to designate the difference between the two checks. Now addrequirements for the following Registry details.Confirm the Registration Key on the Client matches the Account.1. For the persistent, installed Gears client: Registry root key – HKEY LOCAL MACHINE Registry subkey – \SOFTWARE\Wow6432Node\OPSWAT\GEARS Client\Config Name – RegistrationKey Type – REG SZ Value should match the account Registration Key2. For the on demand, portable Gears client: Registry root key – HKEY CURRENT USER Registry subkey – \SOFTWARE\OPSWAT\GEARS OnDemand\Config Name – RegistrationKey Type – REG SZ Value should match the account Registration KeyCheck the Compliance state on the endpoint.1. For the persistent, installed Gears client: Root key – HKEY Local Machine Subkey – \SOFTWARE\Wow6432Node\OPSWAT\GEARS Client\Status Name – Policy Type – DWORD Value – 0x0000000 (1)2. For the on demand, portable Gears client: Root key – HKEY Current User Subkey – \SOFTWARE\OPSWAT\GEARS OnDemand\Config Name – Policy Type – DWORD Value – 0x0000000 (1)Policy Key Values:a. 0 NOT in compliance with policy, check Gars Cloud for details on the deviceb. 1 in compliance with policy, check Gears Cloud to view the defined policy13
Save changes to enable the check for a 64-bit registry.The combination of the two values, both Policy and Registration Key, ensure that the clientinstalled is assigned to the Account that manages the defined Polices.Step 9:To create the 32-bit check, create a Custom Registry Setting. Select Custom: Registry Setting fromthe drop down and click Add.14
Step 10:Establish the registry setting for the 32-bit system by first creating the rule name for the check.This name should be unique to designate the difference between the two checks. Then addrequirements for the following Registry details.Confirm the Registration Key on the Client matches the Account.1. For the persistent, installed Gears client: Registry root key – HKEY LOCAL MACHINE Registry subkey - HKEY LOCAL MACHINE\SOFTWARE\OPSWAT\GEARSClient\Config Name – RegistrationKey Type – REG SZ Value should match the account Registration Key2. For the on demand, portable Gears client: Registry root key – HKEY CURRENT USER Registry subkey – \SOFTWARE\OPSWAT\GEARS OnDemand\Config Name – RegistrationKey Type – REG SZ Value should match the account Registration KeyCheck the Compliance state on the endpoint.1. For the persistent, installed Gears client: Root key – HKEY Local Machine Subkey – \SOFTWARE \OPSWAT\GEARS Client\Status Name – Policy Type – DWORD Value – 0x0000000 (1)2. For the on demand, portable Gears client: Root key – HKEY Current User Subkey – \SOFTWARE\OPSWAT\GEARS OnDemand\Config Name – Policy Type – DWORD Value – 0x0000000 (1)Policy Key Values:a. 0 NOT in compliance with policy, check Gears Cloud for details on the deviceb. 1 in compliance with policy, check Gears Cloud to view the defined policyThe combination of the two values, both Policy and Registration Key, ensure that the clientinstalled is assigned to the Account that manages the defined Polices.15
Step 11:For Mac devices, the client provides a file with the Registration Key and Policy value. Toconfigure for the Mac:1. Select the Mac tab within Host Check Policy.2. Under Rule Settings, Select Custom: Process, the select Add.3. Create a New Process4. Add file:a. For the persistent, installed Gears client: Applications/OPSWAT GEARSClient/Policies.b. For the on demand, portable Gears client:/Users/username/Documents/OPSWAT/GEARS OnDemand5. Look for file named:a. For the persistent, installed Gears client: GEARS gears license key policyvalue .txt, where the gears license key will be where you add your AccountRegistration Key, and Policy Value would be 1 if the device passes the policydefined in the Gears dashboard.b. For the on demand, portable Gears client: GEARS gears licensekey policy value , where the gears license key will be where you add yourAccount Registration Key, and Policy Value would be 1 if the device passes thepolicy defined in the Gears dashboard.This file includes a combination of two values, Policy and LicenseKey, to ensure that the clientinstalled is assigned to the Account that manages the defined Polices.The Policy value will be defined as the following:a. 0 NOT in compliance with policy, check Gears Cloud for details on the deviceb. 1 in compliance with policy, check Gears Cloud to view the defined policyStep 12:To finalize the configuration of the Host Checker Policy, confirm the following: Ensure that Require is checked with Any of the Above Rules Enable Custom instructions - The Custom Instructions should include a brief note on whya user may be running into issues passing this compliance check and next steps theymay take. Disable Send Reason Strings - This will ensure that registry key information is not sent tothe user and avoids further confusion.16
Step 13:Complete setup of any other requirements and save the changes. Once completed, this checkwill determine if Gears policies are being met by the endpoint device.Host Checker is now setup for the Custom Process and Registry Compliance policies. The nextstep will be to apply these policies to the Administrative and or User Realms as necessary.17
Method #3: Third Party Policy: Distribute Gears for Guest DevicesGears for Guest Devices can be integrated with Pulse Secure Host Checker as a third partypolicy. With this option, Host Checker will cause Windows endpoints to download a 3MBportable Gears client and perform an on-demand compliance and malware scan. When the VPNsession is ended, the Gears client will automatically be deleted from the endpoint.The portable Gears client must be manually uploaded (one-time) by the network admin to thePulse Secure device. The format of the upload is a ZIP file with an INI for configurations, and aDLL for executing the process. Automatic updates are not supported. To update the clientversion, the network admin must download the latest Gears for Guest Devices client, put it inthe ZIP package, and upload to the Pulse Secure device.Method #3 only works with Windows endpoints.The screenshots included here are from a Pulse Secure SA2500 running 8.0R5.Step 1: Download the third party policyContact OPSWAT to get a copy of the DLLStep 2: Retrieve Gears portable EXE and license key Log in to your Gears account at www.opswatgears.com Go to the dashboard and click DEVICES in the header bar Click Enable Gears client on this device in the dialog box On the resulting page, copy down the license key displayed on the bottom left Download the Windows Client from Run without installing (admin or non-admin version) Rename the downloaded file opswat-gears.exe18
Step 2: Prepare the policy package Unzip the file Move the downloaded gears-opswat.exe file into the directory Open GEARSConfig.ini in a text editor Change the configuration optionsoserver: Which Gears environment you are using (regular or beta)okey: Your account license keyodeepScan:0 – Malware scan only listed running processes;1 – Also scan linked libraries. Enabling this (1) increases scan time from 60seconds to 2-3 minutesoshowRemediation:0 – Only display summary remediation message in Pulse Secure webpage;1 – Also show detailed and user-friendly self-remediation instructions in a newwebpageodebugLog:0 – Disable debug log on local machine1 – Enable debug log on local machine (log is deleted when session ends)19
Step 3: Rezip the packageRezip the package, without further changing any files names or folder structure. The zip fileitself can be given any name. Expected package uniperHCIF.dllopswat-gears.exeStep 4: Log in to Pulse Secure console, Navigate to Endpoint Security Host Checker20
Step 5: Create a New 3rd Party Policy21
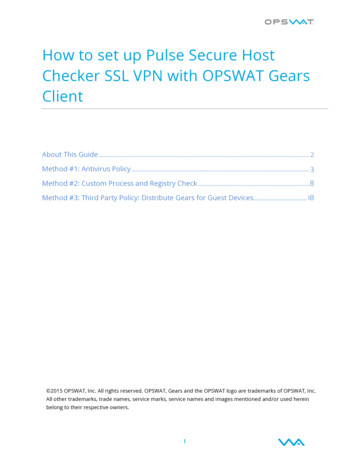
Step 6: Name the policy and upload the ZIP packageStep 7: Click ‘Save Changes’Leave Remediation options at default settings22
Step 8: Assign the Host Checker Policy to a User Realm(Using a User Realm that you have already created) Assign the new Host Checker Policy to thetarget User Realm. The policy to use will be called Name Given in Step 6 .isMachineCleanFor more information, or if you have any questions about the steps above, please log into theOPSWAT Portal at https://portal.opswat.com and submit a ticket to request assistance from oursupport team.23
Pulse Secure Host Checker can also be configured to utilize Gears for compliance checks using a combination of custom process and registry checks in the Endpoint Security/Host Checker portion of Junos Pulse. This requires more configuration than method #1, but has the benefit of also c