Transcription
FH AdvancedFeature Reference
1993 - 2008 Affiliated Computer Services, Inc. (ACS) All rights reserved.2900 100th St., Suite 309Urbandale, Iowa, 50322CopyrightsTrademarksCopy and UseRestrictionsWarrantyManuals andDocumentationLifeART image 2005 Lippincott Williams & WilkinsWSpell ActiveX Spelling Checker Medical Dictionary 1997-2002 Wintertree Software Inc.PDFRasterizer.NET 2001-2005 TallComponents BVMapping 1999-2005 ESRI Inc. (portions of this work 1998-2004 Leica GeosystemsGIS Mapping, LLC.; 1996-2003 Microsoft Corporation; 1995-2003 LizardTech Inc.,MrSID is protected by the U.S. Patent No. 5,710,835. Foreign Patents Pending; based in parton the work of the independent JPEG Group.1st 09/06FIREHOUSE Software is a registered trademark of Affiliated Computer Services, Inc.(ACS). All rights reserved. Microsoft, and Microsoft FoxPro are registered trademarks.Windows is a trademark of Microsoft Corporation. All other products or services mentionedin this manual are identified by the trademarks or service marks of their respectivecompanies or organizations. ACS disclaims any responsibilities for specifying which marks areowned by which companies or organizations.FIREHOUSE Software is protected by the copyright laws that pertain to computer software.It is illegal to make copies of the Software except for backups. It is illegal to rent, lease,sublicense, or otherwise transfer any of the materials. It is illegal to remove or obscureproprietary notices. It is illegal to duplicate and distribute the Software by any other means,including electronic transmission. To protect trade secrets contained in the Software, youmay not decompile, reverse engineer, dissemble, or otherwise reduce the Software tohuman perceivable form. You may not modify, adapt, translate, rent, lease, or createderivative works based upon the Software or any part thereof.ACS warrants the original diskettes are free from defects in material and workmanship,assuming normal use, for ninety (90) days from the date of purchase.Except for the express warranty of the original diskettes/CDs set forth above, ACS grants noother warranties, express or implied, by statute or otherwise, regarding the diskettes andrelated materials, their fitness for any purpose, their quality, their merchantability, orotherwise. The liability of ACS under the warranty set forth above, shall be limited to theamount paid by the customer for the product. In no event shall ACS be liable for any special,consequential, or other damages for breach of warranty. 1993-2008 ACS — Printed in the United States. All rights reserved. No part of this workcovered by copyright hereon may be reproduced in any form or by any means — graphic,electronic, or mechanical — including photocopying, recording, taping, or storage in aninformation retrieval system, without the written permission of the copyright owner.Contacting FIREHOUSE Software:Sales:InternationalPhone: 800 921 5300 ext. 1 Fax: 515 288 4825 fhsales@acs-inc.comAZ, CA, NV, OR, WACT, MA, ME, NH, NY, RI, VT, OntarioJim BrandarizPeter EleftherakisPhone: 800 796 1614, 530 621 0981Phone: 888 362 4446, 508 362 4446Fax: 530 621 2171Fax: 508 362 5932AK, AL, CO, FL, GA, HI, IA, inc.comIL, MI, MN, MT, NC, ND, NE,NM, SC, SD, TN, UT, WI, WYRoger Dedoncker Jason TrotterJustin PowellAR, KS, LA, MO, MS, OK, TXDE, IN, KY, MD, NJ, OH, PA, VA, WVPhone:800 921 5300 ext. 1Mike RogersForrest NaceFax: 515 288 4825Phone: 888 941 3473, 214 504 0242Phone: 800 285 8685, 724 285 3090fhsales@acs-inc.comFax: 214 504 0244Fax: 724 283 mTechnical Support: Phone: 800 921 5300 ext. 2 support@firehousesoftware.com
ContentsAbout This Guide2Who Should Use This Reference?3Import External Data Source5Prepare Data Source6Create an Import Definition9Using Import Definitions19Sample Import21System Rules and Default Values23About Field-Level Rules and Default Values24About Record-Level Rules28Remove All User-Defined Rules for Current Table29Setup Automated Tasks31Adding Automated Tasks32Use Automated Tasks45Station Management48Using Station Export and Import5058Available User-Defined Field Areas59Anatomy of a User-Defined Fields Form60Layout Form61About User-Defined Fields64Adding and Accessing a QueryCreating and Modifying ReportsReport Creation OverviewAccess Report Layout118Report Bands119Report Form Objects124Auto Generated NarrativesSetting Up Auto-NarrativesAdding Signature CaptureAbout Signature CaptureCreating and Modifying Graphs135136141142155Graph Creation Overview156Sample Graph160User-Defined Fields To State163Available User-Defined Field Areas164Add User Fields to NFIRS Export16557The Idea Behind User-Defined FieldsCreating Queries11747Maintain Station RosterUser-Defined FieldsReport Designer Layout Reference75779798Sample Report103Modify Sample Report108Create Batch/Collated Report115Contents-1
Chapter 1About This GuideThe Advanced Feature Reference is a comprehensive reference for the followingFIREHOUSE Software advanced features: Import External Data, Chapter 2System Rules and Default Values, Chapter 3Setup Automated Tasks, Chapter 4Station Management, Chapter 5User Fields, Chapter 6Creating Queries, Chapter 7Creating and Modifying Reports, Chapter 8Report Designer Layout, Chapter 9Auto-Generated Narratives, Chapter 10Signature Capture, Chapter 11Creating and Modifying Graphs, Chapter 12User-Defined Fields in Transaction Files, Appendix AAdditional information is available while running FH by pressing F1.1
Who Should Use This Reference?Procedures in this manual assume FIREHOUSE Software is alreadyrunning, that you have a basic understanding of how to navigate inWindows programs (for example, you are familiar with how to use amouse to select a menu), and are familiar with the basic purpose ofeach module installed.If FIREHOUSE Software has not been installed, follow the installationinstructions included with the installation CDs.If you are not familiar with FIREHOUSE Software, you shouldfamiliarize yourself with the basic functions of the software detailed inthe Tutorial section of the User Guide. When you encounter anunfamiliar form press F1 to display specific information about theform. Access to related information can be displayed by pressing Clickfor related topics.AdvisoriesThere are three levels of advisories present. Each level is indicatedwith a symbol:Notice advisories contain general information that maysave time and effort within FH.Caution advisories contain information that can help youavoid minor inconveniences.Danger advisories contain crucial information for avoidingloss of information.More InformationIf there are any questions this manual does not answer, check the FH 7help file provided with all versions of this program. To access the helpfile from FH, press F1 or select an option from the Help menu.2About This Guide
Use The Help File For ProceduresThe help file is context sensitive. When you are using specific areas inFIREHOUSE Software, press F1 and information about the area isdisplayed. The help file can also be run separately from within FH byselecting the Help menu FIREHOUSE Software Help File option.With the help file displayed, you can use the FH 7 Help File Contents tolocate specific information, or go to Search, type in the keywords tosearch for, then press List Topics. Select a topic then press Display.More help on using the help file is available from the Tips for UsingThis File link at the bottom of the help file home page.Who Should Use This Reference?3
Chapter 2Import External Data SourceMuch of the information that needs to be entered into FIREHOUSE Software mayalready be available. Rather than reentering the data into FIREHOUSE Softwaremanually, you can import data from other programs as long as the data is in or canbe converted to a format accepted by FH.Acceptable data sources are listed on page 7.The process for importing external data into FH is straightforward: Prepare data source. See page 6 for details.Access external data source definitions area. See page 9 for details.Add new definition. See page 9 for details.Preview Import (optional). See page 19 for details.Run External Data Source Definition. See page 19 for details.5
Prepare Data SourceFamiliarity with FH and planning prior to importing external data willhelp assure that the data is properly imported. Before starting theimport process, consider the following: Identify import data elements. Decide what data elements from thesource should be imported into FH. Complete master records, if necessary. Ensure that master recordsare available if the source includes child records.Master Records are described on page 7. Save data source to an acceptable format if it is not already in anacceptable format.Acceptable formats are listed on page 7.Identify Import Data ElementsTo be able to use the source data, you should determine if FH tracksthe information and where. Run reports to determine the FH datastructure to determine where the source information should bedirected.For a complete listing of FH data tables: From the Reports menu, select the Administrative Reportsoption. The Reports listing is displayed. Select the Database Structure Report. Press Run. The Output Report To form is displayed. Select an output option then press OK. The Query Parameters formis displayed. Press OK. A complete listing of FH data tables is directed to thespecified output.At a minimum, your import must create values in the required fields tocreate a record in that area. For example, to create a valid staff record,you must import or create a Staff ID (STF MAIN.DBF, Staff ID field),and a First, and Last name (STF MAIN.DBF, FIRST field and LASTfield).If you do not know which fields are required, run the import definition,then press View Import External Data History Log. after the importresults are displayed. If records are skipped because of missing fields,the missing fields are referenced. Also determine required fields fromthe main data entry form for the record — by default empty requiredfields are yellow and completed required fields are blue.6Import External Data Source
Contact area agencies and find out what information they haveavailable. Consider the following possibilities: Streets: Your city or county government may have a list of streetsfor your coverage area. Occupancy Records: Your city or county government may haverecords about properties that you can import into the OccupancyManagement module. Hydrants: Your local water works department may have hydrantinformation.Interfaces to a number of CAD systems are available. Contact your salesrepresentative for more information.Master RecordsMaster records contain primary information of a specific type (forexample, staff information). Related child records include additionaldetails about master records when additional detail is available,eliminating the need for empty data elements in the master record.Master and child records are related together using an ID. The ID fieldis a unique value that identifies a specific unique record, and whenused in a child record, associates the child record with a specificmaster record.When importing external data that goes to target FH child records, acorresponding master record must be available. For example, staffrecords need to be added to FH before you can import staff activitiesfor that staff member. When you import a child record that relates to amaster record, you must use the exact ID FH uses to identify themaster record. Generally you will be importing external data intomaster records.Save Data Source to Acceptable FormatFH can import the following data formats directly:Acceptable SourceFormatsDescription of the Source File FormatComma-Delimited.csv fileFields are separated by a comma (“,”). Most spreadsheets and databasescan generate this format.Tab-Delimited.txt fileFields are separated by a tab. Most spreadsheets and databases cangenerate this format.Space-Delimited.prn fileFields occupy defined positions in the source file. Some spreadsheets anddatabases can generate this format.DBF TableFields are stored in a standard database format. An advantage to thisformat is that fields in the source will be identified by a field name.Prepare Data Source7
ODBC Data Source ODBC is an abbreviation for Open DataBase Connectivity, ODBC makes itpossible for FH to access any ODBC-compliant data. The ODBC source isset up outside of FH before FH can use the source.If your data source is not in one of the accepted formats, try exportingthe data into an accepted format. If the external data source cannotexport to an acceptable format, try a third-party program (for example,spreadsheet programs can often open a variety of data types and aregenerally capable of saving to a format accepted for FH import) to openthe external file, then save it to an accepted format.8Import External Data Source
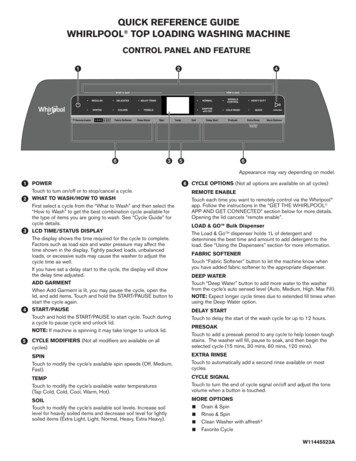
Create an Import DefinitionAn import definition is a set of instructions that include a path to anexternal data source and directions for where external source dataelements should go in FH target tables. You create the import definitionusing FH.Accessing External Data ImportsYou can create as many external data imports as needed.InstallableComponentImport definitions can be shared between separatedepartments using Copy to/Install from feature. Thisfeature is described in the help file “Copy and InstallComponents” topic.To Add an External Data Definitionx From the Administration menu, select the DatabaseAdministration option, Import From External Data Source option. The External Data Imports form is displayed.The External DataImports form Importsection lists all importdefinitions added to thesystem.See page 19 for the steps to previewan import. See page 19 for the stepsto run an import definition.With the External DataImports form displayed,press New. The SelectImport Type dialog isdisplayed.1. Select either Standard Database Importor Lookup Table Import x Choose Lookup Table Import if thesource file only includes data to importinto a single category in a specificlookup table (for example, the “Streets”category in General System Codes).x Select Lookup Table. The Category field is required.Create an Import Definition9
xPressand highlight a lookup table and category, thenpress Select. The selected lookup category is added to thefield. The rest of the process for completing the importdefinition is the same as for a standard import, except targetfields are all automatically added for the lookup.x Choose Standard Database Import for source files that includenon-lookup table data or lookup table data for multiplecategories.2. Press OK. The External Data Import Definition form is displayed.3. Type the name of theimport in Import Nameand select the externaldata source.SuggestionSelect aname forthe importdefinitionthat brieflydescribesthe type ofdata included in the import.4. Specify the type of source data in Source Types. Available types: Comma-Delimited Tab-Delimited Space-Delimited DBF Table ODBC Data SourceExternal SetupSelect ODBC only if an ODBC source has been set up onyour workstation. ODBC set up is completed outside ofFH. FH cannot provide assistance in setting up ODBCsources for external data sources as part of its regularsupport services.More information on acceptable data source formats is listed on page 7.5. Select the source file:x Pressand locate the source file, then press Open. The pathto the source file is inserted into the Source File Name field.x Press ODBC Setup. (only enabled when the selected sourceformat is ODBC) to access and select the ODBC source.All data elements added to the import definition are added to thearea.The steps to add fields to the import definition are detailed on page 11. Setting rulesfor the import definition is described on page 15.10Import External Data Source
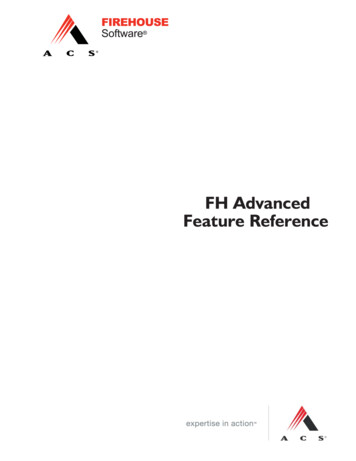
To Add a Field to a DefinitionWith the External Data Import Properties form displayed, press Addto specify the target fieldwhere a specific external dataelement will be sent. TheExternal Data Import FieldProperties form is displayed.The form to the right is displayed forDBF source files. Sample data forASCII tab- and comma-delimited filesare displayed on the same form butfield names are not listed. Spacedelimited files use a different form,requiring that the start position andlength for each field be specified.xSelect the FH table wherethe source data will be imported in Target Table.A complete list of FH target tables and fields is available. See page 6 for instructions.xxxSelect a field in the target table where a specific source field will beimported in Target Field. All available fields in the source file arelisted in thearea with sample data from the firstrecord. Note that the way the fields are named depends on thesource type:x Comma-Delimited. Source fields are listed by number, startingat “1”. In the source file, fields are separated by commas. Aparagraph return marks the next record.x Tab-Delimited. Source fields are listed by number, starting at“1”. Fields are separated by tabs. A paragraph return marks thenext record.x Space-Delimited. Source fields are located by their startingposition and length.x DBF. Source fields are identified by field name.x ODBC. How fields are listed varies based on the ODBC source.Highlight the source field you want to direct into the selected targetfield. Setting rules for importing the field are detailed next.You can optionally specify additional rules for how the current fieldare imported:Create an Import Definition11
To accept default rules for this fieldwithout making any changes, skip to“Finish Adding Field To Import” onpage 14.x To automaticallyreplace a target fieldvalue with a literalvalue or expression:x Click Replace fieldwith literal value orexpression. TheReplace field withliteral value orexpression form isdisplayed.x Enter a literal valueor expression.The value enteredhere replaces anyvalue in the sourcefield. Note that thevalue specified needs to match the format of the FH targetfield. For example, if the target field is numeric, thereplacement value needs to be numeric.An Examplex12If you were importing staff member records and wantedthe staff member’s station to always be “2” even thoughthe source staff member records may include values otherthan “2”, you would type “2” (no quotation marks needed).The expression entered varies depending on the type ofsource file:Comma-Delimited. Expressions refer to source fields asDATA(x) where x is the source field column.Tab-Delimited. Expressions refer to source fields asDATA(x)where x is the source field column.Space-Delimited. Expressions refer to source fields asSubstr(cRecord,x,y)where x is the start positionfor the source field and y is the number of positionsallocated for the source field.DBF. Expressions refer to source fields assource.field name where source is the temporaryname assigned for the source database and Field nameis the name of the field from source table.ODBC. Expressions refer to source fields asodbc.field name where odbc is the temporary nameassigned for the source database and Field name is thename of the field from source table.Press OK to make the literal value or expression replace thesource values when the import is run.Import External Data Source
xClick Replace field with literal value or expression again todisable replacement (entered values are saved and availableby enabling the option again).x To choose a single word from a source field that includesmultiple words to fill the target field:x Check Replace field with a single extracted word. TheReplace field with a single extracted word. form isdisplayed.x Enter the word number and thecharacter that always separateswords in the source field.An ExampleTo select a street name ina source file that listscounty, street name, and city in a single field with
FIREHOUSE Software, press F1and information about the area is displayed. The help file can also be run separately from within FH by selecting the Help menu FIREHOUSE Software Help File option. With the help file displayed, you can use the FH 7 Help File Contents to locate specific information, or go to Search, type in the keywords to