Transcription
support@magestore.comsales@magestore.comPhone: 1-415-954-7137WEB POSUSER GUIDEExtension Version 2.0Magento Compatibility: CE 2.01Web POS Magento 2Copyright (c) 2009 – 2016 www.magestore.comCop
Table of Contents1.INTRODUCTION .4Outstanding Features .4Front-end POS essentials .4Take orders & pick out products quickly .4Process payments with ease .5Pull up customer data & record new info .5Get better in-store management .6Peripheral Devices .6Others .62.HOW TO CONFIGURE .72.1. How to enable a payment method for Web POS .72.2. How to set up a shipping method for Web POS .82.3. What is default customer & how to configure Default Guest Checkout .92.3.1. What is default customer .92.3.2. How to configure Default Guest Checkout.92.4. How to change logo of Web POS .112.5. How to add a Web POS staff .112.6. How to differentiate access permissions of Web POS users .142.7. How to connect Web POS with peripheral devices .163.HOW TO USE.173.1. How a Web POS user logs in & manages his account.173.2. How Web POS user deletes/ reloads data in local manually.19How to use:.19Notes: .193.3. How to filter & search products quickly .203.4. How to add products to cart.223.4.1. Add products to cart: .223.4.2. Edit products in cart.233.4.3. Remove products in cart .233.5. How to add a custom sale item to cart .242Web POS Magento 2Copyright (c) 2009 – 2016 www.magestore.comCop
3.5.1. What is custom sale item & what it is for .243.5.2. How to add Custom Sale to cart .243.6. How to apply a coupon code or a cart discount.253.7. How to apply a custom discount or custom price to a product .263.8. How to handle customer information at checkout .293.8.1. Customer Checkout .293.8.2. Guest Checkout .313.8.3. Customer list .313.9. How to add comments to an order.323.9.1. When you need to add comments .323.9.2. How to add comments .323.9.3. How to check order comment .333.10.How to process at checkout for a customer .343.11. Split & Partial Payment with Web POS .38How to make payment via Web POS using multiple methods (split payment).38Process part of order payment and keep orders on hold.39How to make payment less than the due amount (partial payment) .413.12.How to keep orders on hold for further processing .423.13.How to print receipt and email order information .433.14.How to review orders .453.15.How to issue invoice for an order .473.16. How to create shipment or issue refund for an order .483.16.1. How to create shipment .483.16.2. How to issue refund .523.17. How to run sales report .543.17.1. Staff Report .553.17.2. Location report .563.17.3. Payment Report .583.18. How to manage working shift .603Web POS Magento 2Copyright (c) 2009 – 2016 www.magestore.comCop
1.INTRODUCTIONRunning a quick service, retail store or restaurant? Then you know how important it isto have an effective POS to cut the long queue of customers waiting to check out. Formost of the time, your shop assistants have to carry out the checkout procedures forcustomers, either in physical stores or when receiving orders through phone or email. So,wouldn't it be great if this process could be hastened, helping save time for moreprofitable actions! With Magestore’s Magento 2 POS integration extension, you will beable to create orders quickly and conveniently from an admin panel on just a singleone page! Try now and youwillbefascinatedby itsconvenienceandtheamount of time saved.We would love to discuss your specific needs but we think you might like some ofour customer favorite features below.Outstanding FeaturesFront-end POS essentials Responsive web-based POS with native app UI/UX Fasten order processing speed by saving local data in IndexedDB browser (HOT)Take orders & pick out products quickly Visualize product lists with thumbnail images Search products by any product attribute, such as manufacturer, color. Avoid adding out-of-stock product Use barcode scanner to quickly add product to cart Select/edit options of configurable, bundle, grouped products via popup boxes Create custom sale items (e.g. for new arrivals) in 2 clicks Keep orders on hold for further processing4Web POS Magento 2Copyright (c) 2009 – 2016 www.magestore.comCop
Process payments with ease Apply custom discounts per item in cart Apply custom discounts or coupon code on the whole cart Apply discounts by percent or fixed amount Apply split payments Apply partial payments (NEW) Select which payment methods are enabled for Web POS, set default paymentmethod Set shipping fee for shipments made by Web POS Enable partial shipment (NEW) Process refund via POS & allow returning items to stock (NEW) Enable to choose automatically generating receipts and shipment or notPull up customer data & record new info Choose an existing or add a new customer when creating an order Use the default customer info for guest checkout (No merchant account needed) Edit customer info right on POS screen Search customers by name, email, or address Set customer’s account to subscribe newsletter or not Assign customer’s account to different group Manage customer’s sales, order & refund history (NEW)5Web POS Magento 2Copyright (c) 2009 – 2016 www.magestore.comCop
Get better in-store management Set different roles for different staff, to manage order, discount and manageinventory (UPDATED) Set highest discount rate for each staff (NEW) Control sales location Record sales by staff or location Run sales reports on daily, weekly, monthly basis or in custom period Run Z-report for each working shift (NEW)Peripheral Devices Barcode reader Receipt printer Card Swiper (Authorize.Net & Stripe) (NEW)Others Magento POS integration is 100% Open Source License Certificate valid for 1 live Magento installation and unlimited testMagento installations (No license key required). Magento POS system is easy to install and configure User-friendly interface6Web POS Magento 2Copyright (c) 2009 – 2016 www.magestore.comCop
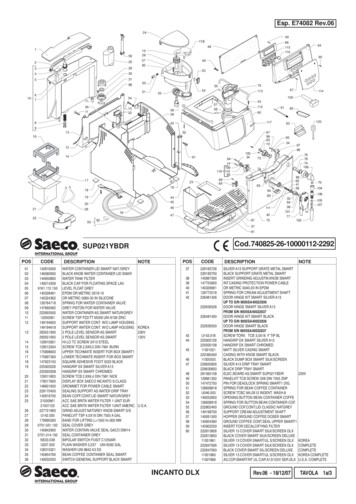
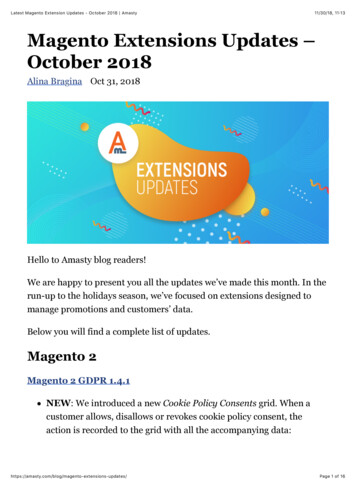
2. HOW TO CONFIGUREBefore using Web POS to check out, admin needs to configure it in backend first. Pleaseread the user guide carefully to know how to configure information you want.2.1. How to enable a payment method for Web POSTo set up payment method for Web POS, go to Web POS Settings Payment for POS.Then, you will be able to see:- Applicable payments: If you want to apply all payments, choose All Allowed Payments If you want to apply some particular payment methods only, choose Specific Payments.Then in Specific Payments field, select payment method as your preference. Hold Shift Click to choose more than one.- Default Payment Method: the default mode is Cash On DeliveryIf you want to set Credit Card to be the default payment method for instance, you firsthave to choose it in Specific Payments field. Then, select option Web POS – Credit Cardin Default Payment Method field.7Web POS Magento 2Copyright (c) 2009 – 2016 www.magestore.comCop
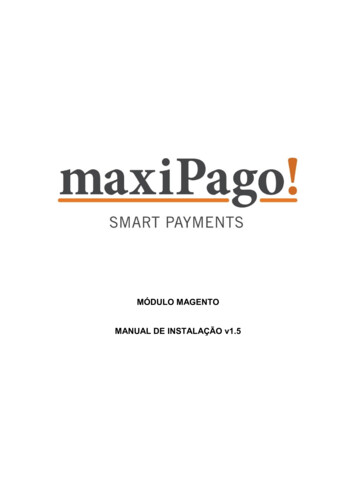
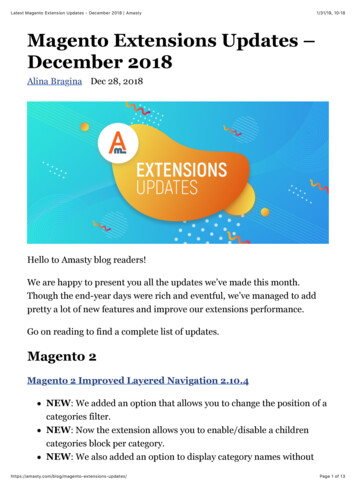
2.2. How to set up a shipping method for Web POSTo set up Shipping Methods for Web POS, go to Sales Web POS Settings, thenchoose Shipping for POS, the following page will be shown as below:8Web POS Magento 2Copyright (c) 2009 – 2016 www.magestore.comCop
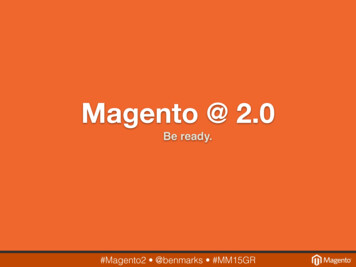
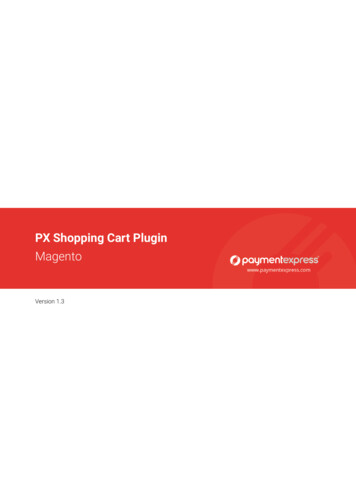
-Applicable Shipping: If you want to apply all shipping methods, choose All Allowed Shipping If you want to apply some particular shipping methods only, choose SpecificShipping. Then in Specific Shipping field, select shipping method as your preference.Hold Shift Click to choose more than one.-Default Shipping Method: the default mode is Store Pickup.If you want to set Flat Rate to be the default shipping method for instance, you first haveto choose it in Specific Payments field. Then, select option Flat Rate Shipping in theDefault Payment Method field.2.3. What is default customer & how to configure Default Guest Checkout2.3.1. What is default customerDefault customer is the customer whose information will be used for Guest Checkout orwhen customer information is not enough, default value will be filled automatically.2.3.2. How to configure Default Guest CheckoutTo configure Default Guest Checkout, you go to Web POS Settings Default GuestCheckout. You will see the configuration page as below:9Web POS Magento 2Copyright (c) 2009 – 2016 www.magestore.comCop
Fill in all information as you want to use as default, including Default CustomerID, First Name, Last Name, Street, Country, State/Province, City, Zip/PostalCode, Telephone and Email. After finishing, click on Save Config button to save yourwork.10Web POS Magento 2Copyright (c) 2009 – 2016 www.magestore.comCop
2.4. How to change logo of Web POSTo change logo of Web POS, go to Web POS Settings General Configuration. Inthis tab, you can see configuration as follows:- Web POS logo: Upload your logo here. Please note that recommended size is 260*120px and supported files are jpeg & png.- Web POS Color: Enter code of the color- Enable Delivery Date: Choose Yes/ No to enable/disable the field of Delivery Date forshipment- Session Timeout: An expired time limit for a logged in Web POS user which has beeninactive for a period of time.- Allow Backorder: Choose Yes/ No to create order for temporarily out-of-stock productsAfter finishing, click on Save Config button to save your work.2.5. How to add a Web POS staffTo add new user using Web POS, go to Sales Web POS Manage POS Staffs.Here you can see a list of users that have been created.11Web POS Magento 2Copyright (c) 2009 – 2016 www.magestore.comCop
You can also export user list to csv/xml file or add new Web POS user. Click on Add Staff button then you will be directed to the following page:Fill in all information of the user, including User Name, Password, PasswordConfirmation, Display Name, Email Address. Then you go to User Settings field.12Web POS Magento 2Copyright (c) 2009 – 2016 www.magestore.comCop
In this field you can set customer group, location, role and access to sales report for salestaff.Please note that to select the role for user, you need to add a role first. Please go to thesection: 2.7. How to differentiate access permissions of Web POS users for more details.To edit a user, click on the Edit link in POS Staff page. Then you can edit information ofthat user account.13Web POS Magento 2Copyright (c) 2009 – 2016 www.magestore.comCop
2.6. How to differentiate access permissions of Web POS users To grant different permission for Web POS user, go to Sales Web POS Manage Roles. The Role page will be shown. You can export role user list to csv/xmlfile: To add a new role, click on Add Role button in the top right corner. You will seethe New Role page. Here there are three tabs, including General, Permission and StaffList. In General tab, please make sure you fill in enough information- Role Name: Enter a specific name for the role in order to find it easily- Maximum discount percent (%): limit the highest discount percent that each userrole can offer customers- Description: Enter text that describes the role14Web POS Magento 2Copyright (c) 2009 – 2016 www.magestore.comCop
In Permission tab, tick on users who will have corresponding permission in WebPOS system.In field Resource Access, you can choose Custom or All. Choose All if you want usershaving this role will have access to all resources, click on Save or Save And ContinueEdit button to save your work. If you choose Custom, you can tick to assign specificpermissions for that role. In Staff list tab, tick on sale staff name that you want to assign this new role. To edit a current role, click on "Edit" link on Role Manager page, then you willbe redirected to Edit Role page:15Web POS Magento 2Copyright (c) 2009 – 2016 www.magestore.comCop
When finishing editing, please click on Save or Save And Continue Edit button to savethe change.2.7. How to connect Web POS with peripheral devicesMagestore Web POS extension can connect with Barcode readers, Card swiper &Receipt printers. Barcode readers: any devices that connect with ipad/laptop/pc (no matter throughusb port, wifi or bluetooth) - as long as the scanner can read barcodes & fillencoded information into Web POS search box Card swiper: only devices connected through USB port (supports Authorize.Net &Stripe) Receipt printers: any devices that connect with iPad/laptop/PC (no matter throughusb port, wifi or bluetooth).16Web POS Magento 2Copyright (c) 2009 – 2016 www.magestore.comCop
3.HOW TO USEYou have finished settings for Web POS, now please move to the part of HOW TO USEWeb POS for checkout3.1. How a Web POS user logs in & manages his accountAfter you creates user with specific permission in using Web POS, you can send himWeb POS checkout link or guide him to access from Web POS backend by going toSales Web POS POS Checkout. Then, a login form will appear. User needs to fillin your account & password to continue:To manage his account, the user should go to Setting Account:17Web POS Magento 2Copyright (c) 2009 – 2016 www.magestore.comCop
Then, click on Account tab and the user can see his/her information. The user can alsochange his/her password if he/she wants.18Web POS Magento 2Copyright (c) 2009 – 2016 www.magestore.comCop
3.2. How Web POS user deletes/ reloads data in local manually When to use:In the first time a user log in to Web POS Checkout screen, the extension will load datalike products, customers, tax calculations, etc. to his local. Then the system willautomatically update new data about products, customers. when having any changes inadmin panel.In some cases, a user's local data is not 100% synced with data in the back-end. If the usernotices any discrepancy, he can delete and reload data manually. How to use:To reload data, go to Setting Synchronization then choose Reload (to reload eachcategory) or Reload All (to reload all data). Notes:For data storage, in case the user closes his browser or restarts the system, Web POS stillkeeps all previous data so he can continue working without any problem.19Web POS Magento 2Copyright (c) 2009 – 2016 www.magestore.comCop
3.3. How to filter & search products quicklyIn POS screen, you can configure to search products by going to Setting General In tab Catalog: Enable Display out-of-stock products in search results bychoosing Yes option.Product Search section:- Product Attribute(s) for Search: Select attributes by which you want to searchproducts. The default attributes are Name & SKU. If you want to search quickly bybarcode, choose barcode attribute. Hold Shift Click to pick more than one.In frontend, you can search products by 3 ways, which are categories, productattributes and barcode20Web POS Magento 2Copyright (c) 2009 – 2016 www.magestore.comCop
Use categories: In frontend, you can click on All Categories link to quicklysearch products by categories. Choose the corresponding categories as you prefer. Use product attributesTo search by product attributes, click on Search icon, then a search bar will be shown.Enter your search terms and matching products will display right away.21Web POS Magento 2Copyright (c) 2009 – 2016 www.magestore.comCop
Use barcode- Connect Web POS with barcode reader devices (Please refer to 2.8. How to connectWeb POS with peripheral devices for more details)- Scan barcode and then the barcode attribute will be filled automatically in the searchbox (To set barcode attribute, go to 3.3. How to filter & search products quickly toknow more)- The matching product will be shown in the list.3.4. How to add products to cart3.4.1. Add products to cart:- With simple products, you just need 1 click to add them to cart- With configurable, bundle, grouped products, after clicking, you wi
Pull up customer data & record new info Choose an existing or add a new customer when creating an order Use the default customer info for guest checkout (No merchant account needed) Edit customer info right on POS screen Search customers by name, email, or address Set c