Transcription
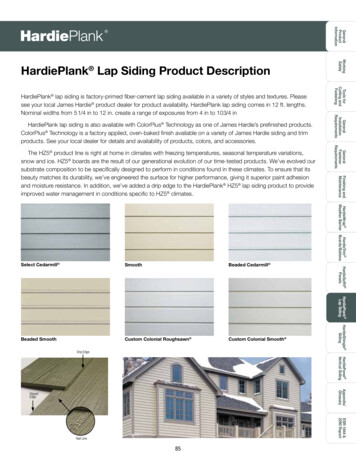
tsFinishing andMaintenanceThe HZ5 product line is right at home in climates with freezing temperatures, seasonal temperature variations,snow and ice. HZ5 boards are the result of our generational evolution of our time-tested products. We’ve evolved oursubstrate composition to be specifically designed to perform in conditions found in these climates. To ensure that itsbeauty matches its durability, we’ve engineered the surface for higher performance, giving it superior paint adhesionand moisture resistance. In addition, we’ve added a drip edge to the HardiePlank HZ5 lap siding product to provideimproved water management in conditions specific to HZ5 k lap siding is also available with ColorPlus Technology as one of James Hardie’s prefinished products.ColorPlus Technology is a factory applied, oven-baked finish available on a variety of James Hardie siding and trimproducts. See your local dealer for details and availability of products, colors, and accessories.Tools forCutting andFasteningHardiePlank lap siding is factory-primed fiber-cement lap siding available in a variety of styles and textures. Pleasesee your local James Hardie product dealer for product availability. HardiePlank lap siding comes in 12 ft. lengths.Nominal widths from 51/4 in to 12 in. create a range of exposures from 4 in to 103/4 inWorkingSafelyHardiePlank Lap Siding Product DescriptionHardieWrap HardieTrim Weather Barrier Boards/BattensBeaded Cedarmill Beaded SmoothCustom Colonial Roughsawn Custom Colonial Smooth HardiePlank Lap SidingSmoothHardieSoffit PanelsSelect Cedarmill HardieShingle SidingDrip EdgeHardiePanel Vertical SidingAppendix/GlossarySlopedEdgeESR-1844 &2290 ReportNail Line85
GeneralProductInformationWorkingSafelyInstallation of HardiePlank Lap SidingINSTALL A STARTER STRIPThe bottom of the starter strip should be installed even with the bottom ofthe mudsill or the bottom edge of the sheathing. The strip must be installedover the water-resistive barrier, but occasional gaps should be left in the starterstrip to allow any accumulated moisture behind the siding to drain away safely.Water-resistive barrierInstall starterstrip over theweather barrierand even withthe bottom ofthe sheathing.StarterstripTIP: For accurate fastening, snap vertical chalk lines onthe water-resistive barrier at the center of every studlocation.OVERVIEW OF HARDIEPLANK LAP SIDING10.2Water-resistive barrierFramed wall withstructural sheathingHardieShingle SidingHardiePlank Lap SidingHardieSoffit PanelsHardieTrim HardieWrap Boards/Battens Weather BarrierFinishing stallationRequirementsTools forCutting andFastening10.1HardiePlank lap siding requires a starter strip beneath the first course to setit on the proper angle and to create a proper drip edge at the bottom of thesiding. Starter strips are easily made by ripping 1¼ in. pieces of HardiePlanksiding from full or partial planks.ESR-1844 &2290 ReportAppendix/GlossaryHardiePanel Vertical SidingInstall factory ends ofplanks at butt joints.Stagger butt joints a minimum of 2 stud bays for 16in. O.C. framingJoint flashingEnds of planks mustland over a stud.Starter strip builds out sidingto the proper angle.86Framing square andtorpedo level transferthe course elevations
GeneralProductInformationWorkingSafelyINSTALLING THE PLANKS10.3Tools forCutting andFasteningThe first course of HardiePlank siding iscritical to the proper installation of the plankon the rest of the building. The first courseshould start at the lowest point of the houseand within required clearances. Specialattention should be made to ensure that it’sstraight and level. Attention should also bepaid to staggering any butt joints in the planksso that the installation is attractive while making efficient use of material.GeneralInstallationRequirementsUse a level 4 ft. or3. Run the siding to the HardieTrim board leaving a 1/8 in. gap between the siding and trim.PLANK ALIGNMENT AT CORNERSDonotthegodownDo not godownstackthe stack87ESR-1844 &2290 ReportTIP: When taking planks from the pallet installation, avoidrepeating the texture pattern by working across the pallet. Twoto four planks can be removed from a stack at one time. But thenmaterial should be taken from adjacent stacks, again workingacross the pallet. Texture repeat is typically a concern on largewalls with few breaks such as windows or doors.Appendix/GlossaryPull from across the stackPull from across the stackHardiePanel Vertical SidingIMPORTANT: To prevent damage to the drip edge, extra care should be taken when removing planks from the pallet, while handling, and when installingwith a lap gauge. Planks are interlocked together on the pallet, therefore theyshould be removed from the pallet horizontally (side to side) to allow planks tounlock themselves from one another.End plankcourses 1/8 infrom verticaltrim andfill gap withpermanentlyflexible caulk.HardieShingle SidingHANDLING10.4HardiePlank Lap SidingFor the best looking installation, make sure that the heights of the plankcourses match on both sides of a corner. Use a framing square, speedsquare or a level to match up the plank heights. Check every few courses tomake sure proper heights are being maintained.HardieSoffit PanelsThe bottom of the siding should be kept even with the bottom of the trim, or if desired, the trim may extend belowthe bottom of the siding. But the siding should never hang below the trim. *When installing the first course makesure ground clearances are in accordance with James Hardie requirements and those of local codes.HardieWrap HardieTrim Weather Barrier Boards/Battens2. Position the bottom edge of the first course of siding a minimum ¼ in below the edge of the starter strip (maintainrequired clearances) and secure.Finishing andMaintenancelonger level to check1. Use a level (4 ft. or longer) or chalked levelthe first course.line to be sure that the first course is level.Snapped chalk line guides the first course.As installation proceeds up the wall, periodically check the level and straightness of the courses. When correcting for flatness over products such as exteriorinsulation, use drywall shims. It is good practice to snap a chalk line every 3 to 5 courses to keep the planks straightand level.GeneralFastenerRequirements6 in minKeep bottomedge of the firstcourse even withthe bottom ofthe corner trim.
GeneralProductInformationWorkingSafelyTools forCutting FastenerRequirementsFinishing andMaintenanceHardieTrim HardieWrap Boards/Battens Weather BarrierBLIND NAILING (nailing through top of plank)Blind nailing is recommended for installingany type of HardiePlank lap sidingincluding ColorPlus siding. With blindnailing, each course covers the fastenerson the course below, which provides abetter looking installation.For blind nailing HardiePlank lap siding,James Hardie recommends drivingfasteners 1 in. from the top edge of theplank. Additionally fasteners should be10.5Blind nailing measurments10.6HardieShingle SidingHardiePanel Vertical SidingAppendix/GlossaryESR-1844 &2290 ReportBlind nailingNails for blind nailing shallbe between 3/4 in and1 in. from the top of theboard.Fasteners arehidden by thecourse above.Nails aredriventhrough thesheathinginto thestuds.Keep nails3/8 in fromends ofboards.placed no closer than 3/8 in from the ends of the plank.HardiePlank HZ5 Lap Siding is manufactured with a nail line that should be used as a guide for proper nailplacement when blind nailing. This nail line should not be used as a lap line.Avoid placing fasteners near the top edge of the plank. This practice, called “high nailing”, may lead to looseplanks, unwanted gaps or rattling. Pin-backed corners may be done for aesthetic purposes only. Finishnails are recommended for pin-backs. Headed siding nails are allowed. Place pin-backs no closer than1in. from plank ends & 3/4in. from plank edge into min. 3/8in. wood structural panel. Pin-backs are not asubstitute for blind or face nailingFACE NAILING (nailing through the overlap at the bottom of the plank)10.7 Face nailingAlthough blind nailing is recommended by James Hardie, face nailing maybe required for certain. installations including: installations in high wind areas,fastening into OSB or equivalent sheathing without penetrating a stud, orwhen dictated by specific building codes. Refer to Appendix D for relatedcode matters.Exposedfastenersare driventhrough theface of theboards.Drive fastenersonly whereplanks overlapHardiePlank Lap SidingHardieSoffit PanelsInstallation of HardiePlank Lap Siding (cont.)STAGGERING THE BUTT JOINTS10.8For walls longer than 12 ft, it is necessary to butt joint additionallengths of HardiePlank siding. These butt joints should be staggeredto avoid noticeable patterns, which is determined by the placementof the first course. Butt joints between consecutive courses shouldbe spaced apart by at least two stud bays for 16 in, o.c. framing orone bay for 24 in. o.c. framing.While random placement of the planks is usually the mostaesthetically pleasing, a progressive stagger pattern can make thejob easier and faster without the pattern becoming too noticeable.With this strategy, the cut off piece for one course becomes thestarter piece for a course above, making efficient use of materialsand ensuring that all butt joints land on studs. The pattern can bemodified for different stud placement.88Cutoff piecesform thestarter piecesfor coursesabove.For walls longer than 12 ftland butt joints over studs,staggering the joints at least24 in (for 24 in. o.c. framing)or 32 in. (two stud bays for16 in. o.c. framing).
GeneralProductInformationWorkingSafelyJOINT FLASHING10.9Flashing behind to add anadditional layer of protection fromwater infiltrationA. Joint Flashing (James Hardie recommended)GeneralInstallationRequirementsB. Caulking* (Caulking is not recommended for ColorPlus for aesthetic reasonsas the Caulking and ColorPlus will weather differently. For the same reason,do not caulk nail heads on ColorPlus products.}GeneralFastenerRequirementsC. “H” jointer coverExtend flashing1 in. onto thecourse below10.10HardieWrap HardieTrim Weather Barrier Boards/BattensTIP: Joint flashing can be quickly and easily made by cutting a 6 in. wide sectionoff a roll of housewrap. Tape the roll tightly at the cut mark and cut the section offusing a miter saw with a carbide blade. Individual sheets then can be cut to lengthwith a utility knife.HardieShingle SidingJOINT PLACEMENT AND TREATMENT10.1189ESR-1844 &2290 ReportButt planks withmoderate edgecontactAppendix/GlossaryPlace cut ends where the siding meets a corner, door,window trim, or other break in the wall where the joint isto be caulked. If cut ends are used in a butt joint betweenplanks, James Hardie requires sealing cut ends for allproducts. For ColorPlus products, use the color-matchededge coater to seal the cut end.COLORPLUS TIP: Wheninstalling HardiePlanklap siding with ColorPlusTechnology, position the plankin the immediate area wherethe plank is to be fastened.Do not place the plank on thecourse below and slide intoposition. Doing so may scuff orscratch the ColorPlus finish onthe installed piece.HardiePanel Vertical SidingButt joints in HardiePlank lap siding should always land ona stud. Butt joints between studs are not recommendedand should be avoided. Whenever possible, factoryfinished ends should be used at butt joints.HardiePlank Lap SidingCaulking at HardiePlank lap siding buttjoints is not recommended for ColorPlus Do not usereasonscaulk on asHardiePlanklap andfor aestheticthe caulking technology For thesiding withColorPluswill ColorPlusweather differently.same reason, do not caulk exposed nailheads. Refer to the ColorPlus touch-upsection for detailsHardieSoffit PanelsTIP: Use light-colored joint flashing when using light-colored ColorPlus lap sidingor other siding with a light-colored finish. Dark-color joint flashings should beused on siding with dark finishes.Finishing andMaintenanceFlashing behind butt joints provides an extra level of protection against the entryof water at the joint. James Hardie recommends 6 in. wide flashing that overlapsthe course below by 1 in. Some local building codes may require different sizeflashing.Joint-flashing material must be durable, waterproof materials that do not reactwith cement products. Examples of suitable material include finished coil stock andcode compliant water-resistive barriers. Other products may also be suitable.Tools forCutting andFasteningOne or more of the following joint treatment options are required by code (asreferenced 2009 IRC R703.10.2)
GeneralProductInformationWorkingSafelyInstallation of HardiePlank Lap Siding (cont.)CONTINUING THE INSTALLATIONESR-1844 &2290 ReportAppendix/GlossaryHardiePanel Vertical SidingHardieShingle SidingHardiePlank Lap SidingHardieSoffit PanelsHardieTrim HardieWrap Boards/Battens Weather BarrierFinishing stallationRequirementsTools forCutting andFastening10.12 Planking around windowsOnce the initial course of HardiePlanksiding is fastened to the wall, continueinstalling successive courses with full12 ft. pieces (follow the stagger patternfor longer walls), or until a window, dooror other opening interrupts the course(fig 10.12). Notch planks as needed tofit around windows and doors. Again,be sure to seal all cut edges. Avoidplacing butt joints directly above or belowwindows or above doors. Separate thejoint from the opening by at least onecourse of siding. Where butt joints land on a stud, makesure there is enough stud space for plankon both sides of the joint to land properly.Optimally both sides of a butt jointshould land in the middle of a stud with3/4 in landing space for each side. Theminimum stud space for aplank to land is 3/8 inPay special attention to window,doors, and corners that have beentrimmed before the siding goes on.Vertical trim boards may cover the kingstuds beside windows or doors, or theymay cover up corner studs leaving noroom for nailing the siding. In theseNotch plankaround windowtrim and flashing.Keep butt joints morethan one course awayfrom top of window.Add an extra stud if necessary for nailing the endsof the planks.COLORPLUS TIP: HardiePlank lap sidingwith ColorPlus Technology is shippedwith a protective laminate slip sheet,which should be left in place duringcutting and fastening to reduce marringand scratching. The sheet should beremoved immediately after each plank isinstalled.places add extra studs as needed.If corners are trimmed with HardieTrim 5/4, 4/4 boards, it may be necessary to measure and cut the first pieces ofsiding to make sure the butt joints land on studs.INSTALLING HARDIEPLANK SIDING ON GABLE WALLSSiding gable walls can be challenging, and some of the keys to siding gable walls efficiently are determining the angleor pitch of the roof, properly staging materials, and ensuring that the plank lengths are measured accurately.To estimate the amount of siding needed to complete a gable end, use the estimating tools located in Appendix C.Stage enough material on the pump jacks or scaffolding to complete the gable end, but take care not to overload thestaging. When possible, a cut table should be located on the pump jacks or scaffolding, which frees up crew membersto work on other walls.90
GeneralProductInformationTo cut planks for the gable:10.134 Draw the angle, cut and1. Tack up a small scrap piece of siding where the first gable course is going.2. Hold a second small piece of siding against the eave or rake board.Tip for fast gable installation3. Trace the angle onto the scrap.10.14piece on the overlap linesand mark the length.Angle TemplateDrawlinehere2 Before installing, measuredown the 11/4 in. overlap atthe top of the board.1 Measure, cut and fit lowest1. Cut and fit the lowest course ofsiding.HARDIEPLANK SIDING FASTENER SPECIFICATIONSwoodstuds91624 in o.c.3.093 in x .222 in. x 2 inface nail2524 in o.c.25No 11ga 1.25 in long6Dsiding nailroofing nail7Ribbed Bugle-Head No. 8.323 in x 1.625 inscrews816 in o.c.Ribbed Wafer-Head No. 8 (.375 in x 1.25 in)81312[AKN-100] .100 in x .25 in x 1.5 in24 in o.c.ET&F[AGS-100] .100 in x .313 in x 1.5 in16 in o.c.71224 in o.c.57/16 in OSB orequivalent (face nailed).113 in x .260 in x 2.375 in164When blind fastening 9.5 in or widerproduct onto steel studs, use screws.91No 11ga 1.75 in long.091 in. x .221 in. x 1.5 in8Dcommonroofing nail4D sidingnailindicates recommended fastenersESR-1844 &2290 Report4*masonry nail[ASTM C-90] ASM-144-125 (P/C).30 in x .14 in x 1.25 inAppendix/Glossary14Direct to Masonry14HardiePanel Vertical Sidingface nail13HardieShingle Sidingblind nail16 in o.c.6Dcommon.113 in x .267 in x 2 in9steelstuds*TIP: Stainless steel fasteners are recommendedwhen installing James Hardie products.3Fastener Type2HardiePlank Lap Siding4. Draw the gable angle with thetemplate, cut the angle and thenrepeat the process for the nextcourse.16 in o.c.ApprovedFastenerHardieSoffit Panels3. Set a piece of uncut siding ontop of the first piece, aligning thebottom edge with the overlapmarks. Transfer the lengthdirectly to the uncut piece.blind nailFastenerSubstrateHardieWrap HardieTrim Weather Barrier Boards/BattensThe Fastener Specifications table shows fastener options for a variety of different nailingsubstrates. Please refer to the applicable ESR report online (see back page) to determinewhich fastener meets your wind load design criteria.2. Before installing, lay it flat andmeasure down 1¼ in. from thetop edge of the plank for thecourse overlap. Make a markon both ends.Finishing andMaintenancegable plank using gable angletemplate.Scrap pieceof sidingGeneralFastenerRequirementsScrap pieceof siding heldagainst rakeboardThe quickest way to measureand cut consecutive courses ofsiding for a gable is to work offthe previous piece.3 Place a plank for the nextGeneralInstallationRequirements5. Periodically check the angle asyou progress up the wall.Tools forCutting andFastening4. Cut that line and label the scrap as the template for the gable angle. Thetemplate can then be used to transfer the angle onto the larger pieces forcutting and installation.WorkingSafelyrepeat the process for thenext course.
HardiePlank Lap Siding EFFECTIVE SEPTEMBER 2019IMPORTANT: FAILURE TO FOLLOW JAMES HARDIE WRITTEN INSTALLATION INSTRUCTIONS AND COMPLY WITH APPLICABLE BUILDING CODES MAY VIOLATE LOCAL LAWS, AFFECTBUILDING ENVELOPE PERFORMANCE AND MAY AFFECT WARRANTY COVERAGE. FAILURE TO COMPLY WITH ALL HEALTH AND SAFETY REGULATIONS WHEN CUTTING AND INSTALLINGTHIS PRODUCT MAY RESULT IN PERSONAL INJURY. BEFORE INSTALLATION, CONFIRM YOU ARE USING THE CORRECT HARDIEZONE PRODUCT INSTRUCTIONS BY VISITINGHARDIEZONE.COM OR CALL 1-866-942-7343 (866-9-HARDIE)STORAGE & HANDLING:Store flat and keep dry and covered prior toinstallation. Installing siding wet or saturated mayresult in shrinkage at butt joints. Carry planks onedge. Protect edges and corners from breakage.James Hardie is not responsible for damage causedby improper storage andhandling of theproduct.CUTTING INSTRUCTIONSOUTDOORS1. Position cutting station so that airflow blows dust away from theuser and others near the cutting area.2. Cut using one of the following methods:a. Best: Circular saw equipped with a HardieBlade saw bladeand attached vacuum dust collection system. Shears(manual, pneumatic or electric) may also be used, notrecommended for products thicker than 7/16 in.b. Better: Circular saw equipped with a dust collection feature(e.g. Roan saw) and a HardieBlade saw blade.c. Good: Circular saw equipped with a HardieBlade saw blade.INDOORSDO NOT grind or cut with a power saw indoors. Cut using shears (manual, pneumatic orelectric) or the score and snap method, not recommended for products thicker than 7/16 in.- D
3. Run the siding to the HardieTrim board leaving a 1/8 in. gap between the siding and trim. The bottom of the siding should be kept even with the bottom of the trim, or if desired, the trim may extend below the bottom of the siding. But the siding should never ha