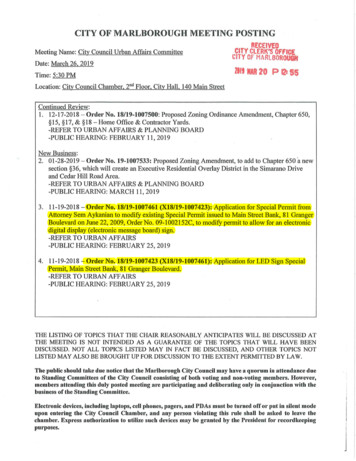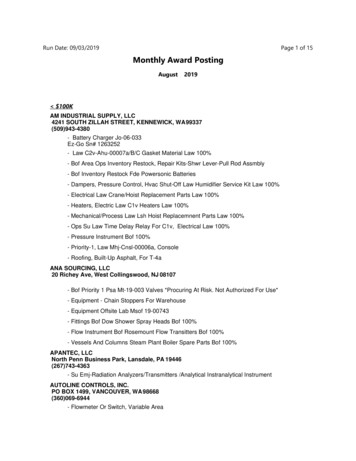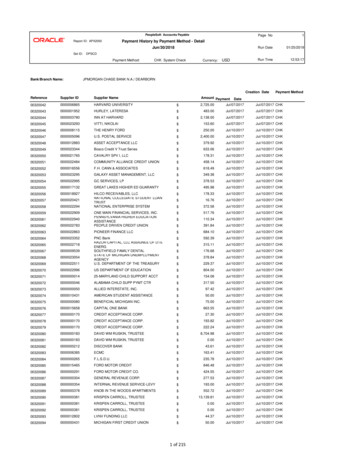
Transcription
Payment Posting GuideThe Payments section of Kareo Practice Management enables you to easily post and manage payments. Through the FindPayments action, you can view a complete log of financial transactions associated with each charge, and view or re-open settledcharges. Posting payments can be done in two ways: Manually: Payments received in person or by mail from patients, insurance companies (Explanation of Benefits or EOB's)and other payers are applied manually. Patient payments made with a credit card or electronic check are also appliedmanually.Automatically: Payments received electronically from an Electronic Remittance Advice (ERA) can be appliedautomatically.Manual Payment PostingPayments received in person or by mail from patients, insurance companies (Explanation of Benefits or EOB's) and other payersare applied manually. There are essentially two steps to the process:1) Enter information about the payment.2) Apply the appropriate amounts of the payment to the service lines on the encounter in Kareo.Note that Kareo captures and tracks electronic coordination of benefits information. If a secondary insurance associated withthe patient and encounter is set up for electronic claim submission, a claim will automatically be placed in the queue for you tosubmit to the secondary insurance after you manually post a payment from an EOB.Enter a CopayThere are various methods of entering a copay and it depends on the process outlined by your practice. Two common examplesare outlined below. Once encounters are entered, patient copays are tracked within Kareo. Kareo can be set up to automaticallybill patients, concurrently with the insurance billing process, for any missed copays.Copyright 2014 Kareo, Inc. All rights reserved. Updated November 20141
Payment Posting GuideTo enter a copay as a received payment1. Click Encounters Find Payments.Note: To avoid duplication, a best practice is to first search the payment database to see if the payment already exists inthe system.2. If the payment is not in the system, click New at the bottom of the window.3. Enter payment details: See image.4. Once payment details have been entered, do one of the following: Click Save to save the payment record and apply payments at a later time. A pop-up window will ask if you want tocontinue without applying the payment: Click Yes. Note that if you choose this option, you will need to remember toapply the payment once you receive benefit information. Click Apply Now to apply payment to the lines of service. Note that if you choose this option and the insurancecovers the copay, you may need to reverse the payment and issue a refund once you receive benefit information.Copyright 2014 Kareo, Inc. All rights reserved. Updated November 20142
Payment Posting Guidea. Batch #: Optional. Entering a batch number is helpful for running reports. For example, if you consistently use anaming convention such as date posted initials of person posting (021411CB), you can easily run reports forspecific users who manage payment posting in your office.b. Post Date: Defaults to current date. You can override with the date of your choice, for example, the date themoney was deposited in the bank.c. Type: Select Patient from the drop-down list.d. Patient: Click the Patient button to select the patient.e. Appointment: Optional. Click the Appointment button to select the patient appointment associated with thepayment.f. Category: Optional. These categories are specific to your practice and must be set up in the Kareo system by youradministrator. See section New Category.g. Method: Select the method of payment.h. Reference #: If applicable, enter the reference number of the check.i.Amount: Enter the payment amount.To enter a copay on a new encounter1. Click Patients Find Patients.2. Once you find the patient, click on the name once to highlight it. Click Create Encounter.3. Enter payment details: See image next page.4. Once payment details have been entered, click Save as Draft or Save for Review.Copyright 2014 Kareo, Inc. All rights reserved. Updated November 20143
Payment Posting Guidea. Copay Due: If a copayamount has been pre-setfor the patient, it willdisplay here.b. Payment Amount: Enterthe amount paid.c. Method: Select themethod of payment.d. Category: Optional. Thesecategories are specific toyour practice and must beset up in the Kareo systemby your administrator. SeeCategories.e. Batch #: Optional.Entering a batch number ishelpful for running reports.For example, if youconsistently use a namingconvention such as dateposted initials of personposting (021411CB), youcan easily run reports forspecific users who manage payment posting in your office.f. Reference #: If applicable, enter the reference number of the check.g. Procedures: Enter procedure information. If the "Apply Payment" column is left blank or as 0.00 when theencounter is approved, the payment will be created but not applied. Note that if you choose to apply the copayamount to the line of service and the insurance covers the copay, you may need to reverse the payment and issue arefund once you receive benefit information.Copyright 2014 Kareo, Inc. All rights reserved. Updated November 20144
Payment Posting GuideEnter Payments from Patient or Explanation of Benefit (EOB)Payments received in person or by mail from insurance companies (EOB's), patients and other payers are applied manually.There are essentially two steps to the process:1. Enter information about the payment.2. Apply the appropriate amounts of the payment to the lines of service within the Kareo system.To enter payment information1. Click Encounters Payments.2. Click New at the bottom of the window.3. Enter payment details: See image next page.4. Once payment details have been entered, do one of the following: Click Apply Now to apply payment to the lines of service. See Apply Payments from Patient or Other Payers or ApplyPayments from EOBs. Click Save to save the payment record and apply payments at a later time. Click Save & New to save the payment record and enter a new payment.Note: To speed data entry, clicking Save & New copies the batch number, post date and payer type to the nextpayment being entered.Copyright 2014 Kareo, Inc. All rights reserved. Updated November 20145
Payment Posting Guidea. General: Click to enter informationabout the payment.b. Batch #: Optional. Entering a batchnumber is helpful for running reports.For example, if you consistently use anaming convention such as dateposted initials of person posting(021411CB), you can easily run reportsfor specific users who managepayment posting in your office.c. Post Date: Defaults to current date.You can override with the date of yourchoice, for example, the date themoney was deposited in the bank.d. Type: Select type of payment fromthe drop-down list. If Insurance: Click the Insurance button. The Select Insurance Plan window opens. Select the insurance planassociated with the payment. In the Adjudication Date field, enter the adjudication date: This is the date theinsurance company processed the claim(s) and should be provided on the Explanation of Benefits (EOB). If Other: Enter the payment source and click the Appointment button to select the patient appointmentassociated with the payment. If Patient: Click the Patient button to select the patient. Click the Appointment button to select the patientappointment associated with the payment.e. Reference #: If applicable, enter the reference number of the check.f. Method: Select the method of payment.g. Category: Optional. These categories are specific to your practice and must be set up in the Kareo system by youradministrator.h. Amount: Enter the payment amount.Copyright 2014 Kareo, Inc. All rights reserved. Updated November 20146
Payment Posting GuideEnter Payments from Credit CardThe Integrated Credit Card Processing service enables you to process patient payments made with a credit card over the phoneor in person. Integrated Credit Card Processing is a service you must be enrolled in to use.There are essentially three steps to the process of applying credit card payments:1. Enter information about the payment.2. Process the credit card.3. Apply the appropriate amounts of the payment to the lines of service within the Kareo system.Note: To process credit card payments by swiping a credit card, a credit card reader attached to your computer is required.To enter and process a credit card payment1. Click Encounters Receive Payment in the top menu.2. In the New Payment window, enter payment details: See image next page.3. Once payment details have been entered, do one of the following: Click Apply Now to apply payment to the lines of service. See Apply Payments from Patient or Other Payers. Click Save to save the payment record and apply payments at a later time. Click Save & New to save the payment record and enter a new payment.Note: To speed data entry, clicking Save & New copies the batch number, post date and payer type to the nextpayment being entered.You can cancel out of a transaction at any time. At the end of processing a credit card payment, you will receive anauthorization number. You can print the details of the transaction or save and print a receipt.a. General: Click to enter information about the payment.Copyright 2014 Kareo, Inc. All rights reserved. Updated November 20147
Payment Posting Guideb. Batch #: Optional. Entering a batch number is helpful for running reports. For example, if you consistently use anaming convention such as date posted initials of person posting (021411CB), you can easily run reports for specificusers who manage paymentposting in your office.c. Post Date: Defaults to currentdate. You can override with thedate of your choice, forexample, the date the moneywas deposited in the bank.d. Type: Select “Patient” from thedrop-down list. Click the Patient buttonto select the patient. Click the Appointmentbutton to select thepatient appointmentassociated with thepayment.e. Category: Optional. Thesecategories are specific to your practice and must be set up in the Kareo system by your administrator. See sectionNew Category.f. Method: Select “Credit Card” from the drop-down list. Click Process Credit Card Payment. The Process Credit CardPayment window opens to process the credit card transaction. Select “Swipe Card” to process a credit card through a credit card reader attached to your computer; selectEnter information to manually type in the credit card information. When finished, click Process Payment.g. Reference #: Optional. Enter a reference for your records.h. Amount: Amount you entered for the credit card or electronic check transaction.Copyright 2014 Kareo, Inc. All rights reserved. Updated November 20148
Payment Posting GuideFind PaymentTo find a payment1. Click Encounters Payments.2. Once you find the payment record, double-click the record to view it.a. If you are enrolled in the Patient Billing service, you can search payments made online.b. To search for a specific payment, type all or part of a word or number sequence, then click Find Now.c. To search in a specific field, select from the drop-down list, then click Find Now.d. Check to view unapplied payments only.Copyright 2014 Kareo, Inc. All rights reserved. Updated November 20149
Payment Posting GuidePrint Payment ReceiptTo print a receipt1. Click Encounters Payments.2. Once you find the payment record, double-click the record to open it.3. Click Save & Print Receipt. The print window opens.4. Select the printer and click Print.Edit PaymentTo edit a payment1. Click Encounters Payments.2. Once you find the payment record, double-click the record to open it. This opens the Edit Payment window.3. Make the necessary changes to the payment record.4. Click Save at the bottom of the window.Delete PaymentTo delete a payment1. Click Encounters Payments.2. Once you find the payment record, click on the record to highlight it.3. Click Delete at the bottom of the window.Copyright 2014 Kareo, Inc. All rights reserved. Updated November 201410
Payment Posting GuideApply Payments from Explanation of Benefits (EOBs)After a payment has been entered (see Enter Payments from Patient or EOB), the appropriate amounts of the payment areapplied to the service lines within the Kareo system.To apply payments1. After payment information has been entered on the General tab click Apply Now.2. On the Apply tab, select the encounter or the patient.3. Select the service line and enter payment amount: See image next page.4. Once payments have been applied, do one of the following: Click Next Line to move to the next service line. Click Add Encounter to select another encounter. Click Save & New to save the payment record and enter a new payment. Click Save to save the payment record.Copyright 2014 Kareo, Inc. All rights reserved. Updated November 201411
Payment Posting GuideYou can use your Tab key to navigate to each field.a. Claim ID (encounter number).b. Lines of service associated with an encounter.c. List of transactions as payment is being applied.d. Add Encounter or Patient: Allows you to pull up the service lines you want to work with. For encounter: Select "Add Encounter"; in the blank field enter the full or partial encounter numberprinted on the EOB.Copyright 2014 Kareo, Inc. All rights reserved. Updated November 201412
Payment Posting Guide For patient: Select "Add Patient" from the drop-down list; in the blank field enter the full or partial nameof the patient.e. Payer: The Payer field is auto-populated with what you entered under the General tab.f. Allowed: Enter the allowed amount as reported on the EOB. If a claim has been denied, leave the allowed fieldat 0.00.g. Contract Adj: Auto-calculated after you entered the Allowed amount. Optional: Select an adjustment codefrom the drop-down list on the right. These codes are set up in the Kareo system by your administrator. SeeNew Insurance Company.h. Second Adj: If applicable, enter a second adjustment reported on the EOB. Optional: Select an adjustmentcode from the drop-down list on the right. These codes are set up in the Kareo system by your administrator.See New Insurance Company.i.Paid: Enter the portion of the payment that is to be applied to this claim.j.Deductible: If applicable, enter the deductible amount reported on the EOB.k. Coinsurance: If applicable, enter the coinsurance amount reported on the EOB.l.Copay: If applicable, enter the copay amount reported on the EOB.m. Status: How any remaining balance will be handled after the payment and adjustments have been applied. Youcan override Default by selecting an action from the drop-down list. Optional: Select a Status reason code fromthe drop-down list on the right.n. Note: Optional: Enter any free form notes as necessary.Tips When entering a payment from an EOB, enter the information exactly as it appears on the EOB. This information willbe packaged and sent electronically to any secondary payers. To manually search for a patient or encounter: Select either Add Encounter or Add Patient. In the blank field to theright, press Enter on your keyboard. This opens the Find window. Once you find the patient or encounter, double-clickthe line item to add it to the New Payment record.Copyright 2014 Kareo, Inc. All rights reserved. Updated November 201413
Payment Posting GuideApply Payments from Patient or Other PayersAfter a payment has been entered (see Enter Payments from Patient or EOB), the appropriate amounts of the payment areapplied to the service lines within the Kareo system.To apply payments1. After payment information has been entered on the General tab click Apply Now.2. On the Apply tab, select the encounter or the patient.3. Select the service line and enter payment amount: See image next page.4. Once payment has been applied, do one of the following: Click Next Line to move to the next service line. Click Add Patient to select another patient. Click Save & New to save the payment record and enter a new payment. Click Save to save the payment record.Copyright 2014 Kareo, Inc. All rights reserved. Updated November 201414
Payment Posting GuideYou can use your Tab key to navigate to each field.a. Lines of service associated with the patient.b. List of transactions as payment is being applied.c. Patient name and ID.d. Paid: Enter the amount you want to apply to the service line.e. Status: How any remaining balance will be handled after the payment has been applied. You can overrideDefault by selecting an action from the drop-down list. Optional: Select a Status reason code from thedrop-down list on the right.f. Note: Optional: Enter any free form notes as necessary.Copyright 2014 Kareo, Inc. All rights reserved. Updated November 201415
Payment Posting GuideAutomatic Payment PostingPayments received electronically from ERA's can be applied automatically. The automatic posting supports denials, reversals,underpayments, over-payments, and other complex electronic remittance scenarios.If you have an ERA that includes payment to another billing system, see below on how to address that scenario within Kareo.Apply Payments from Electronic Remittance Advice (ERA)Payments received electronically from ERA's can be applied automatically. The automatic posting supports denials, reversals,underpayments, over-payments, and other complex electronic remittance scenarios.If you have an ERA that includes payment to another billing system, see below on how to address that scenario within Kareo.To apply payments1. Click Encounters Clearinghouse Reports.2. Click the Electronic Remittance tab.3. Double-click a report.4. Review the ERA report.5. Click Post Payment on the bottom of the window. This displays the New Payment window. On the Apply tab, paymentsand adjustments are automatically populated in the corresponding fields.6. Make any necessary changes. See Tips.7. Optional: Click the General tab to enter a batch number. Batch numbers are helpful for running reports. For example, ifyou consistently use a naming convention such as date posted initials of person posting (021411CB), you can easily runreports for specific users who manage payment posting in your office.8. Once you finish reviewing the report click Save.Note: Once you open an ERA report, click Post Payment, and save the new payment, Kareo will automatically mark yourERA report as "Reviewed."Copyright 2014 Kareo, Inc. All rights reserved. Updated November 201416
Payment Posting GuideTo adjust ERA payments split between other billing systems1. Click Encounters Clearinghouse Reports.2. Click the Electronic Remittance tab.3. Double-click a report.4. Review the ERA report.5. Click Post Payment on the bottom of the window. This displays the New Payment window. On the Apply tab, paymentsand adjustments are automatically populated in the corresponding fields.6. Make any necessary changes. See Tips.7. Optional: Click the General tab to enter a batch number. Batch numbers are helpful for running reports. For example, ifyou consistently use a naming convention such as date posted initials of person posting (021411CB), you can easily runreports for specific users who manage payment posting in your office.8. In the Notes section, enter a note that the unapplied amount goes to another system.9. In the Amount field, change the amount to reflect the "Payment Applied to Charges."10. Click Save.Tips When applying payments from an ERA, leave the payment and adjustment information exactly as it appears on theERA. This information will be packaged and sent electronically to any secondary payers.Copyright 2014 Kareo, Inc. All rights reserved. Updated November 201417
Payment Posting GuideMove ERAERA's can be moved to another practice within the Kareo application. The ability to move an ERA is available only if a) you haveaccess to more than one practice and b) the ERA has not ye
2) Apply the appropriate amounts of the payment to the service lines on the encounter in Kareo. Note that Kareo captures and tracks electronic coordination of benefits information. If a secondary insurance associated with the patient and encounter is set up for electronic claim submission, a claim will automatically be placed in the queue for .File Size: 1MB