Transcription
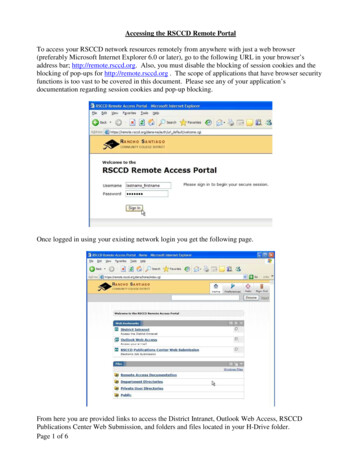
Accessing the RSCCD Remote PortalTo access your RSCCD network resources remotely from anywhere with just a web browser(preferably Microsoft Internet Explorer 6.0 or later), go to the following URL in your browser’saddress bar; http://remote.rsccd.org. Also, you must disable the blocking of session cookies and theblocking of pop-ups for http://remote.rsccd.org . The scope of applications that have browser securityfunctions is too vast to be covered in this document. Please see any of your application’sdocumentation regarding session cookies and pop-up blocking.Once logged in using your existing network login you get the following page.From here you are provided links to access the District Intranet, Outlook Web Access, RSCCDPublications Center Web Submission, and folders and files located in your H-Drive folder.Page 1 of 6
Working with the H – Drive through the Remote PortalOnce logged into the remote portal you are provided access to the same folders and files that areavailable on a district desktop computer’s H – Drive.What is presented under “Files” are directlinks to the folders available under theH – Drive.You will find your own private folderunder “Private User Directories”; just asyou would at work when logged into yourdesktop.Once in your folder you will see a list ofall folders and files you have.You can download individual files byclicking directly on the filename you wishto retrieve.You may also choose to downloadmultiple files and folders by placing acheckmark next to each item you want toretrieve and then initiate the finaldownload by clicking the “Download ”button.Page 2 of 6
When downloading multiple files and orfolders you are asked to choose a namefor your ZIP Archive. This is then theZIP file that will be downloadedcontaining all the items selected in theprevious dialog.When downloading a file from the remoteportal always choose “Save” in the filedownload dialog. If you choose “Open”,the file will be placed in a randomlygenerated temporary location on yourcomputers’ hard drive and the file will benext to impossible to locate later.To save a file back to your H – Drive usethe “Upload Files ” button.When uploading files you may choose upto five files to upload at a time. Thesystem cannot handle the uploading offiles larger than 500 MB.Page 3 of 6
The “Upload Status” dialog keeps track offile upload progress and completion.If uploading a file with an identical nameof a pre-existing file, the newly uploadedfilename will be appended with timestamp information based on the time thenew version was uploaded.To create a new folder just click on the“New Folder ” button.To finish creating the folder, just type inthe folder name wanted and click the“Create Folder” button.To delete files or folders, just check theassociated check box of the files orfolders that you want to delete and clickthe “Delete ” button.After clicking the “Delete ” button youwill get a deletion confirmation dialogwhich lists the objects to be deleted.From here you can confirm or cancel thedeletion request. Be very careful whendeleting! Folders with all their contentsdelete just as easily as files.Page 4 of 6
Other Useful FeaturesThere is a button bar at the top of themain portal page which provides fornavigating back to the “Home” portalpage, accessing preferences, andsigning out. There also is a countershowing how much time you have leftin your current login session.In Preferences you can reorder theappearance of your “User Home”.You can change your login passwordfrom the Preferences’ “General” tab.And on the Preferences’ “Advanced”Tab you can securely force the deletionof all browser cookies used during thecurrent logon session.Page 5 of 6
Other Useful Features Continued You can collapse or expand an entirepanel by clicking on the the “Expandor Collapse” button which isavailable at the far right of everypanel header.You can browse any network serveror share that you happen to know thename of. You simply type theproperly formatted network sharename in the text box located underthe main toolbar and click the“Browse” button.If after finding the network share youwould like to use you can“Bookmark” it. Just check the boxnext to the folder/resource you wouldlike to “Bookmark” and click thebutton labeled “BookmarkSelected ”Then make sure to name it somethingmeaningful and click on the buttonlabeled “Add Bookmark”.Now there exists a Bookmark in you“Files” Panel on your homepagewhich provides single click access tothe network folder/resources.Page 6 of 6
Page 1 of 6 Accessing the RSCCD Remote Portal To access your RSCCD network resources remotely from anywhere with just a web browser (preferably Microsoft Internet Explorer