Transcription
erwin Data ModelerAutomated Metadata HarvestingRelease 2019 R1
Legal NoticesThis Documentation, which includes embedded help systems and electronically distributedmaterials (hereinafter referred to as the “Documentation”), is for your informational purposes only and is subject to change or withdrawal by erwin Inc. at any time. This Documentation is proprietary information of erwin Inc. and may not be copied, transferred,reproduced, disclosed, modified or duplicated, in whole or in part, without the prior writtenconsent of erwin Inc.If you are a licensed user of the software product(s) addressed in the Documentation, youmay print or otherwise make available a reasonable number of copies of the Documentation for internal use by you and your employees in connection with that software,provided that all erwin Inc. copyright notices and legends are affixed to each reproducedcopy.The right to print or otherwise make available copies of the Documentation is limited to theperiod during which the applicable license for such software remains in full force and effect.Should the license terminate for any reason, it is your responsibility to certify in writing toerwin Inc. that all copies and partial copies of the Documentation have been returned toerwin Inc. or destroyed.TO THE EXTENT PERMITTED BY APPLICABLE LAW, ERWIN INC. PROVIDES THISDOCUMENTATION “AS IS” WITHOUT WARRANTY OF ANY KIND, INCLUDING WITHOUTLIMITATION, ANY IMPLIED WARRANTIES OF MERCHANTABILITY, FITNESS FOR APARTICULAR PURPOSE, OR NONINFRINGEMENT. IN NO EVENT WILL ERWIN INC. BE LIABLETO YOU OR ANY THIRD PARTY FOR ANY LOSS OR DAMAGE, DIRECT OR INDIRECT, FROMTHE USE OF THIS DOCUMENTATION, INCLUDING WITHOUT LIMITATION, LOST PROFITS,LOST INVESTMENT, BUSINESS INTERRUPTION, GOODWILL, OR LOST DATA, EVEN IF ERWININC. IS EXPRESSLY ADVISED IN ADVANCE OF THE POSSIBILITY OF SUCH LOSS OR DAMAGE.The use of any software product referenced in the Documentation is governed by the applicable license agreement and such license agreement is not modified in any way by the termsof this notice.The manufacturer of this Documentation is erwin Inc.Provided with “Restricted Rights.” Use, duplication or disclosure by the United States Government is subject to the restrictions set forth in FAR Sections 12.212, 52.227-14, and 52.227-19(c)(1) - (2) and DFARS Section 252.227-7014(b)(3), as applicable, or their successors.Copyright 2019 erwin Inc. All rights reserved. All trademarks, trade names, servicemarks, and logos referenced herein belong to their respective companies.
Contact erwinUnderstanding your SupportReview support maintenance programs and offerings.Registering for SupportAccess the erwin support site and click Sign in to register for product support.Accessing Technical SupportFor your convenience, erwin provides easy access to "One Stop" support for all editions oferwin Data Modeler, and includes the following:Online and telephone contact information for technical assistance and customer servicesInformation about user communities and forumsProduct and documentation downloadserwin Support policies and guidelinesOther helpful resources appropriate for your productFor information about other erwin products, visit http://erwin.com/products.Provide FeedbackIf you have comments or questions, or feedback about erwin product documentation, youcan send a message to techpubs@erwin.com.erwin Data Modeler News and EventsVisit www.erwin.com to get up-to-date news, announcements, and events. View videodemos and read up on customer success stories and articles by industry experts.3
ContentsLegal Notices2Contents4Introduction5Installing and Configuring Automated Metadata Harvesting (AMH)6AMHSettings.cfg File12Upgrade Considerations13Creating and Running Jobs13Creating or Importing an Application13Creating a Datastore15Setting a Reverse Engineering (RE) Option Set17Creating a Job19Running a Job22Viewing Job History23Deleting a Job26Best Practices28Viewing Mappings29Viewing Reports314
IntroductionAutomated Metadata Harvesting (AMH) integrates erwin Data Modeler (DM) with erwinData Governance (DG) and provides a way for Automatic Reverse Engineering (RE) for thedatabases used by your applications. It provides you with a way to govern all your applications. In other words, it keeps you informed about what data an application stores and howit is stored.In short, the following sequence of events occurs:1. A job is scheduled on erwin DG, telling the AMH utility which DB to reverse engineer.2. The AMH utility processes the request serially as follows:a. Checks the job queue for scheduled jobsb. Based on the queue, reverse engineers the applicationc. Creates the model with its name in the format, Application's Line Of Business.Application ID.DataStore name.TableOwner.erwind. If an NSM file is available, applies naming standards on the REDB modele. Saves the model:DG, Mart, and Web PortalDG onlyDG and MartThe AMH utility consists of two Windows services:erwinDG Queue ServiceThis service communicates with the erwin Data Governance (DG) platform to look foravailability of new jobs. It creates a queue of jobs based on the information receivedfrom the erwin DG platform.erwinDG DM ServiceThis service communicates with the ErwinDG Queue Service to check for any jobs inthe queue and executes them.This section contains the following topics5
Installing and Configuring Automated Metadata Harvesting (AMH)Configuring JobsRunning JobsInstalling and Configuring Automated Metadata Harvesting(AMH)The AMH utility is one of the components in the erwin Data Modeler (DM) installer.Installing AMH installs erwinDG Queue Service and erwinDG DM Service on your environment. Also, the installation creates a Config folder at C:\Program Files\erwin\DataModeler r9\, which contains the following:1. AMHSettings.cfg: Stores AMH services-related configuration. For more information,read the AMHSettings.cfg File topic.2. Mart.cfg: Stores erwin Mart-related configuration3. Platform.cfg: Stores erwin Data Governance (DG) platform-related configuration4. MartWP.cfg: Stores erwin Mart Web Portal-related configuration5. Databases.csv: Stores database connectivity-related configuration, used for reverseengineeringNote: Table Owner, Mart Folder, RE Option Set, and Model Target and Use DBAViews are handled by the DG Server instead of Databases.csv. Also, Table Owner andMart Folder's size limit is 255.6. REOptionSet folder: Contains three reverse engineering option sets for each database; custom, all, and defaultNote: At a later point in time, if you wish to change the settings or update any of the abovefiles manually, for the changes to take effect, run the following commands in Windows command line utility (in erwin home directory, with administrator privileges) and then restartAMH Windows services (erwinDG Queue Service and erwinDG DM Service):6
lAMHSettings.cfg:erwinDMAPI.exe -SettingslMart.cfg / Platform.cfg / Databases.csv:erwinDMAPI.exe -encryptOther than the above files and folders, another file, DM AMH Trace.log, is created atC:\Program Files\erwin\Data Modeler r9\Logs. This file logs information about the actionsperformed by AMH.Follow these steps to install AMH on your environment:1. On the erwin DM installer, select Automated Metadata Harvesting and click Next.7
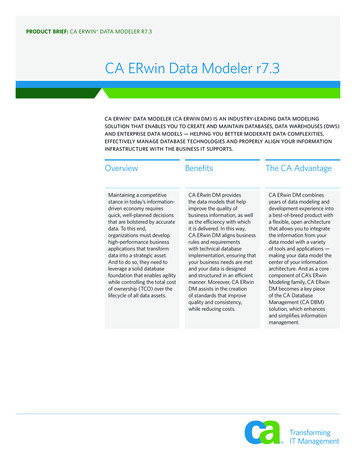
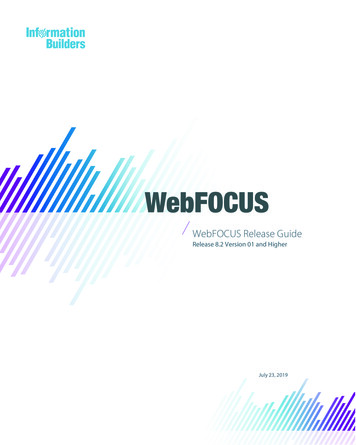
2. Enter values for erwin Mart Server settings and click Next.Field descriptions:Server Name: Indicates the name of the web server where you have installederwin Mart. The default value is localhost.Note: Do not use an IP address as server name to avoid the naked domain problem.Port: Indicates the port number to access the web server. The default value is18170.Use SSL (https): Indicates whether you want to connect to the mart through asecured connection. By default, this check box is not selected.IIS Port: Indicates the IIS port number. The default value is set to 80.8
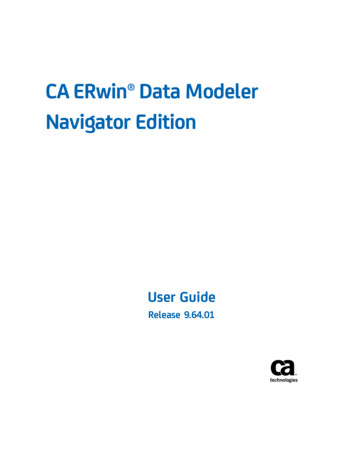
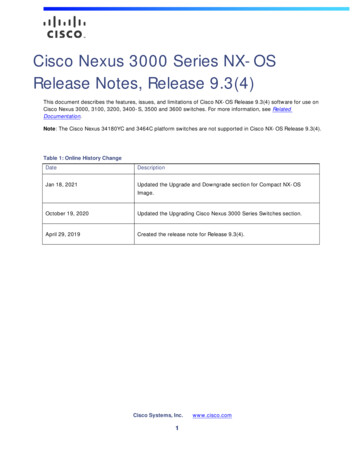
Use IIS: Indicates whether you want to use IIS to connect to the Mart. By default,this check box is not selected.User Name: Indicates your erwin Mart user name.Password: Indicates your password to connect to erwin Mart.The settings you make here are saved to a configuration file, Mart.cfg, at C:\ProgramFiles\erwin\Data Modeler r9\Config.3. Enter values for erwin DG platform settings and click Next.Field descriptions:Server Name: Indicates the name of the web server of the erwin DG platform.This format is client Name . web server . For example, erwin-poc-amh.myerwin.io. By default, the web server is set to myerwin.io. Client Name indicatesthe name of client page for each customer. For example, erwin-poc-amh.9
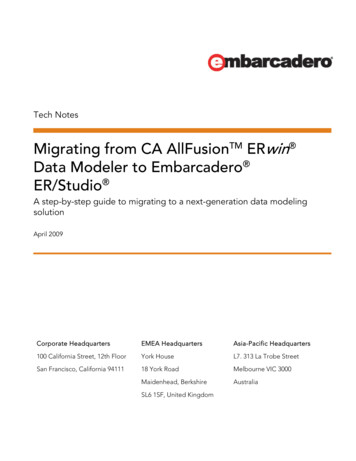
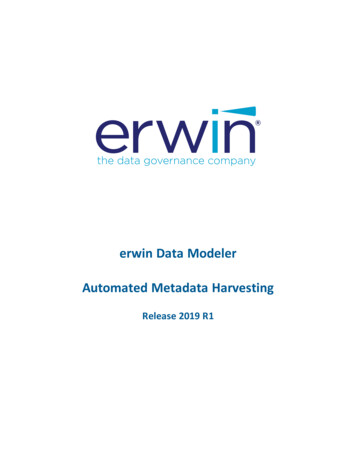
Port: Indicates the port number to access the web server. The default value is443.Use SSL (https): Indicates whether you want to connect to the erwin DG platform through a secured connection. By default, this check box is selected.User Name: Indicates your erwin DG platform user name.Password: Indicates your password to connect to erwin DG platform.The settings you make here are saved to a configuration file, Platform.cfg, at C:\Program Files\erwin\Data Modeler r9\Config.4. Enter values for erwin Mart Web Portal settings and click Next.Field descriptions:Server Name: Indicates the machine name of the Web Portal server running onthe machine. By default, it is set to localhost.10
Version: Indicates the Web Portal server's version. By default, it is set to 2018R1.Port: Indicates the port number to access the web portal. The default value is11680.Use SSL (https): Indicates whether you want to connect to the erwin Mart WebPortal through a secured connection. By default, this check box is not selected.Published Configuration Name: Indicates the name of the folder under whichmodels should be published on the Web Portal.The settings you make here are saved to a configuration file, MartWP.cfg, at C:\Program Files\erwin\Data Modeler r9\Config.5. Click Next and then click Install. AMH (ErwinDG Queue Service and ErwinDG DM Service) will be installed on your environment.Also, a Databases.csv file that contains all the information that you need for reverseengineering is created at C:\Program Files\erwin\Data Modeler r9\Config.11
AMHSettings.cfg FileThe AMHSettings.cfg file contains the following configuration:DG Queue Interval Time: Indicates the interval in which the ErwinDG Queue Serviceasks erwin DG server for availability of new jobs. The default value is 5000 milliseconds (5 seconds).DM Interval Time: Indicates the interval in which the ErwinDG DM Service reads thejob queue to check for new jobs. The default value is 10000 milliseconds (10 seconds).Model Name With Time: Indicates whether you want to save the reverse engineeredmodels with a name that includes model name and the timestamp. The default valueis No.DM Instance: Indicates the ID of your erwin DM object for which you want to runreverse engineering. You can find this on the erwin DG Platform. The default value isset to 0, which creates a new erwin DM object with your localhost name, on erwin DGPlatform.TraceLogLevel:Info: General activity messages, including error messages. This is the defaultvalue.Verbose: Info and detailed messagesDebug: Verbose, developer-specific messages, erwin DG Queue Trace message(Event log viewer displays this message)Detail: Debug and detailed messages (For example, repeated general headermessages)The AMHSettings.cfg file is saved at C:\Program Files\erwin\Data Modeler r9\Config.12
Upgrade ConsiderationsWhile upgrading from erwin Data Modeler (DM) 2018R1 onward to the latest version,ensure that you follow this:1. Back up the following folders:lConfig (C:\Program Files\erwin\Data Modeler r9\Config)lLogs (C:\Program Files\erwin\Data Modeler r9\Logs)2. Uninstall erwin DM (2018R1) and then install erwin DM (2019R1 or latest).3. (Optional) Restore the Config and Logs folders.Creating and Running JobsCreating jobs is where erwin Data Governance (DG) platform comes into picture. When youinstall erwin Data Modeler (DM) with Automated Metadata Harvesting (AMH), an object ofyour erwin DM installation is created on the erwin DG platform with your machine name asthe erwin DM object name.Use AMH for reverse engineering requires you to go through each of the following steps:1. Creating or importing an application2. Creating a datastore3. Setting a Reverse Engineering (RE) option set4. Creating a job5. Running a jobCreating or Importing an ApplicationTo be able to create a reverse engineering job, you first need to have your application available on the erwin DG platform. Then, you can create and associate a datastore to it.To create or import an application, follow these steps:13
1. Log on to erwin DG platform.2. On the navigation bar on the left, clickThis opens the Inventory page.3. Click the Applications tab.This opens a list of available applications and their corresponding information.4. Click.To create an application:a. Click.A new application instance is openedb. Enter the Name, Description, Application ID, and Line of Business.14
c. Expand each tab and select / enter values of each parameter on the tabs. Setthe existing datastores associated with the application. Also, enter audit information.d. Click Save.An application is created.To import an application:a. Click.The import pane is opened.b. Select the type of file that you want to import.c. Depending on the type that you select, set/select other options.d. Drag and drop or click the Click to Upload button to select the file that you wantto import.e. Click Import.Creating a DatastoreTo be able to create a reverse engineering job, you first need to create a data store andassociate it with your application. To create a datastore, follow these steps:1. Log on to erwin DG platform.2. On the navigation bar on the left, clickThis opens the Inventory page.15
3. Click the Data Stores tab.This opens a list of data stores available and their corresponding information.4. Click.A new data store instance is opened16
5. Enter the Name and Description.6. Expand each tab and select / enter values of each parameter on the tabs. Set theapplications associated with the datastore. Also, enter audit information.Note: Database Designs are created by the reverse engineering process. You do nothave to set it.7. Click Save.A data store is created.Setting a Reverse Engineering (RE) Option SetOnce you have a data store in place, set an Reverse Engineering (RE) option set for it. To setan RE option set, follow these steps:1. Log on to erwin DG platform.2. On the navigation bar on the left, click.This opens the Reverse Engineering Administration page.17
3. Select your application.The list of associated data stores is displayed in the Data Stores pane.18
4. Clickto open your data store's RE configuration.5. Select the Reverse Engineering Option Set, Notation, and other options.6. Click Save.The RE option set for your data store is set.Creating a JobAfter you have created your data store and its RE option set, to create a reverse engineeringjob, do the following:1. Log on to erwin DG platform.2. On the navigation bar on the left, click.This opens the Reverse Engineering Administration page. A list of applications is displayed.19
3. Select your application.A list of associated data stores is displayed.4. Select the data store for which you want to create a job and clickThe Create Job dialog is displayed.20.
5. Enter a Name.6. Select Schedule Window Start and Schedule Window End to define the time window inwhich the job should run.Use the following values (indicative) as a guideline:llFor a non-Oracle database, with around 5000 tables, a reverse engineering jobwould take around 30-45 minutes.For an Oracle database, with around 5000 tables, a reverse engineering jobwould take around 3-4 hours.7. Enter a Table Owner.8. Select an application and an erwin DM Instance.9. Click Save.A new job is created and added to the list of jobs for your application.21
Running a JobOnce you have scheduled a job, ensure that the Automated Metadata Harvesting (AMH) services are running.By default, the AMH services keep running in the background. Once the scheduled job runs,the reverse engineered models are saved locally, on erwin DM Mart, and on the erwin DataGovernance Platform.You can view the status of your job in the DM AMH Trace.log file, located at C:\ProgramFiles\erwin\Data Modeler r9\Logs. You can also view the status on the erwin DataGovernance platform at Data Usage erwin DM Instances your erwin DM object Job.In case you must run the services manually, run them in following order:1. erwinDG Queue Service2. erwinDG DM ServiceTo run these services manually, do the following:1. Press the Windows and R (Windows R) keys.This opens the Run dialog box.2. Type services.msc and click OK.This opens the Windows Service Manager.3. Locate the erwinDG Queue Service in the list of services, right-click and click Start.4. Similarly, locate the erwinDG DM Service, right-click and click Start.This will run the reverse engineering job that you scheduled.Note: Jobs are run serially. Hence, schedule jobs in a way that the schedule window isreasonable. Ensure that you consider the DB, its size, and the approximate job duration of the current jobs and then schedule a new job accordingly.For example, consider the following scenario.Job Serial Number Scheduled Time Actual Required Time (Approximately)A12 hours2 hours22
B24 hours6 hoursC330 minutes30 minuteslllJob A will run its course and complete in the scheduled window.Job B, according to you must complete in four hours. However, it takes 6 hoursand keeps running beyond the scheduled window.Job C does not run and remains in scheduled state (becomes dormant) becausejob B kept running beyond the scheduled window and overlapped job C's window.To run job C, you need to reschedule it.Viewing Job HistoryFor each data store, you can view its job history. To view the history, do the following:1. On the Reverse Engineering Administration page,2. Select your application.A list of associated data stores is displayed.3. Select the data store for which you want to view the job history.A list of current jobs and job history is displayed.23
4. Select the Job History tab.Job history for your data store is displayed.Alternately, you can view all the jobs on your account. To view all the jobs, do the following:1. Log on to erwin DG platform.2. On the navigation bar on the left, clickThis opens the Inventory page.24
3. Click the Jobs tab.A list of all jobs on your account is displayed. You can filter the list to view current or25
completed jobs.4. Select a job to view its details, such as its schedule, status, data store, application, DMobject, and so on.Deleting a JobWhen you delete a job, the element representing your job is deleted. Consider the followingcases while deleting a job:llIf the job is in queue, to be processed, it will be deleted from the queue and will notrun.If the job is running:llIf you have direct access to erwin Data Modeler (DM), you can stop erwin DMprocess to avoid the model from being saved anywhere.If you do not have direct access to erwin DM, the reverse engineering (RE) process will continue and the model will be saved to the erwin Mart and erwinWeb Portal. It will not be saved to erwin Data Governance (DG) platform.26
To delete a job, do the following:1. Log on to erwin DG platform.2. On the navigation bar on the left, clickThis opens the Inventory page.3. Click the Jobs tab.A list of all jobs on your account is displayed. You can filter the list to view current or27
completed jobs.4. Select a job and click Delete.Best PracticesConsider the following while scheduling and running jobs:Ensure that you select all the parameters pertaining to job scheduling correctly. Else,a job might not run at all, even though you are able to schedule it.If a reverse engineering job executed in less than a minute, it means that either thetable owners were not evident
Version: Indicates the Web Portal server's version. By default, it is set to 2018 R1. Port: Indicates the port number to access the web portal. The default value is 11680. Use SSL (https): Indicates whether you want to connect to the er