Transcription
Zscaler Deployment GuideVersion elegt22.06.20181.1SGuddatSmall correctionsFile: Zscaler Deployment Guide.docDate: 22.06.2018Copyright Ó 2018 LANCOM Systems GmbHAuthor: Stefan GuddatPage: 1/33
ContentINTRODUCTION. 3ACRONYM TABLE . 31CONFIGURATION VIA LANCONFIG. 31.1VPN . 31.2IPV4 NETWORK RULE . 41.3IKE PROPOSAL . 51.4IPSEC PROPOSAL. 71.5IKE KEY AND IDENTITIY . 101.6CONNECTION PARAMETERS. 111.7VPN PEER . 121.8ROUTING ENTRY . 141.9DNS FORWARDING . 161.10 SERVICE VALIDATION . 162CONFIGURATION VIA LANCOM MANAGEMENT CLOUD (LMC) . 172.1VPN . 182.2IPV4 NETWORK RULE . 192.3IKE PROPOSAL . 202.4IPSEC PROPOSAL. 232.5IKE KEY AND IDENTITIY . 262.6CONNECTION PARAMETERS. 272.7VPN PEER . 282.8ROUTING ENTRY . 302.9DNS FORWARDING . 322.10 SERVICE VALIDATION . 33File: Zscaler Deployment Guide.docDate: 22.06.2018Copyright Ó 2018 LANCOM Systems GmbHAuthor: Stefan GuddatPage: 2/33
IntroductionThis deployment guide describes the configuration of a VPN connection to the “ZscalerCloud Security Platform”. The use of IPSec allows the use of dynamic WAN addresses onthe client side.Acronym tableThe following table describes terms used in this deployment guide.TermDPDIKEIPSECOCSPPFSRIPShort Hold TimeExplanationDead Peer DetectionInter Key ExchangeInternet Protocol SecurityOnline Certificate Status ProtocolPerfect Forward SecrecyRouting Information ProtocolDescribes the hold time for outgoing connections.“0” – Connection will not be initiated automatically but hold theconnection forever without disconnect“1-9998” - Connection will not be initiated automatically butwill disconnect the connection if there is no traffic within thedefined time“9999” - Connection will be initiated automatically and alwaysreconnect after disconnect (keepalive)1 Configuration via LANconfigTo set up a connection to the Zscaler cloud platform via LANconfig you need to create anIKEv1 connection. To do that you need to open the device configuration and go to“Configuration – VPN”.1.1 VPNFirst you need to activate the VPN function at “Configuration – VPN - Activated”.File: Zscaler Deployment Guide.docDate: 22.06.2018Copyright Ó 2018 LANCOM Systems GmbHAuthor: Stefan GuddatPage: 3/33
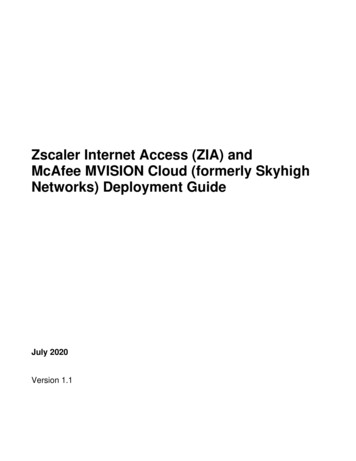
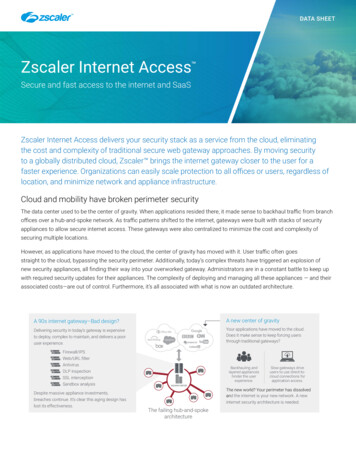
1.2 IPv4 Network RuleNext you need to create a network rule to support any traffic going into and coming from theVPN tunnel. This can be done under “Configuration - VPN – General – Network rules – IPv4rules”. Please name the entry as you like (e.g. ANY-TO-ANY) and set the local and remotenetworks both to “0.0.0.0/0” as shown in the picture below:File: Zscaler Deployment Guide.docDate: 22.06.2018Copyright Ó 2018 LANCOM Systems GmbHAuthor: Stefan GuddatPage: 4/33
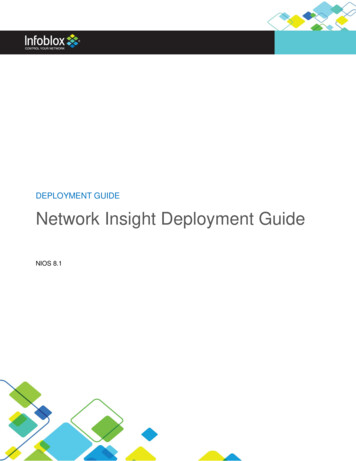
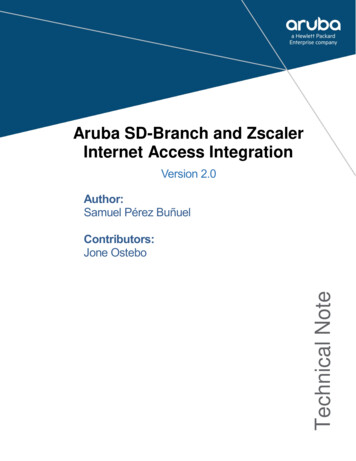
1.3 IKE proposalThen you need to set up the IKE proposal for the desired VPN tunnel. This can be doneunder “Configuration – VPN – IKE/IPsec – IKE proposals”.Click on “add” to create a new entry. Name the entry as desired (e.g. ZSCALERIKE) and usethe following settings:IKE proposalIdentitficationEncryptionKey lengthHashAuthenticationLifetimeFile: Zscaler Deployment Guide.doce.g. ZSCALERIKEAES-CBC256 bitSHA256Preshared key84.400 seconds0 kBytesDate: 22.06.2018Copyright Ó 2018 LANCOM Systems GmbHAuthor: Stefan GuddatPage: 5/33
Now you need to set up an IKE proposal list with this newly created IKE proposal. This canbe done in “Configuration – VPN – IKE/IPsec – IKE proposal lists”. There create a new entrynamed as desired (e.g. ZSCALERIKEPROP) and add the previously created proposal to thelist:File: Zscaler Deployment Guide.docDate: 22.06.2018Copyright Ó 2018 LANCOM Systems GmbHAuthor: Stefan GuddatPage: 6/33
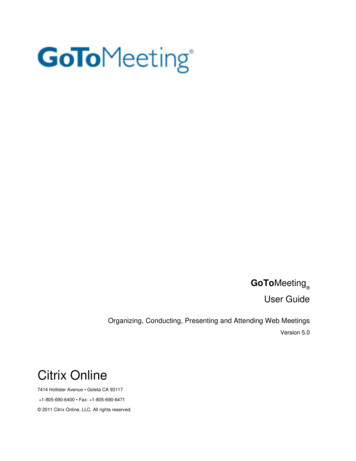
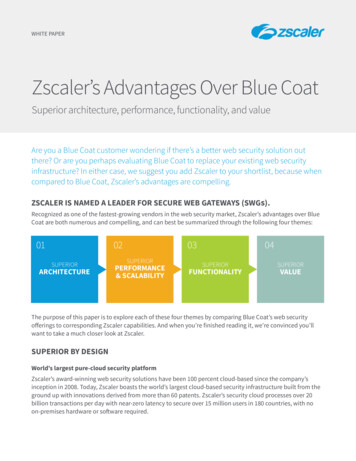
1.4 IPSec proposalThe next step is to set up an IPSec proposal for the desired VPN tunnel. This can be doneunder “Configuration – VPN – IKE/IPsec – IPSec proposals”. There create a new entrynamed es desired (e.g. ZSCALERIPSEC1) and use the following settings:IPSec proposalIdentificationModeESP encryptionESP authenticationAH authenticationIPCOMP compressionLifetimeFile: Zscaler Deployment Guide.doce.g. ZSCALERIPSEC1TunnelNULLHMAC-MD5No AHNo IPCOMP0 seconds2.000.000 kBytesDate: 22.06.2018Copyright Ó 2018 LANCOM Systems GmbHAuthor: Stefan GuddatPage: 7/33
File: Zscaler Deployment Guide.docDate: 22.06.2018Copyright Ó 2018 LANCOM Systems GmbHAuthor: Stefan GuddatPage: 8/33
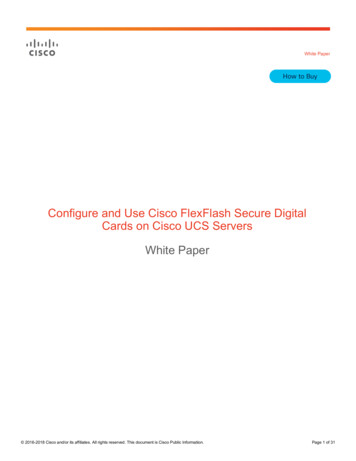
Next you need to create an IPSec proposal list entry. You can do that in “Configuration –VPN – IKE/IPsec – IPSec proposal lists”. There create a new entry named as desired (e.g.ZSCALERIPSECPROP) and add the previously created proposal to the list:File: Zscaler Deployment Guide.docDate: 22.06.2018Copyright Ó 2018 LANCOM Systems GmbHAuthor: Stefan GuddatPage: 9/33
1.5 IKE key and identitiyThe next step is to set up the IKE key and identity for the desired VPN tunnel. This can bedone under “Configuration – VPN – IKE/IPsec – IKE keys and identities”. There create a newentry named as desired (e.g. ZSCALERKEY) and use the following settings:IKE keys and identitiesIdentificationPreshared keyLocal identity typeLocal identityRemote identity typeRemote identityFile: Zscaler Deployment Guide.doce.g. ZSCALERKEYas givenDomain name (FQDN)as givenNo identity-Date: 22.06.2018Copyright Ó 2018 LANCOM Systems GmbHAuthor: Stefan GuddatPage: 10/33
1.6 Connection parametersNow you need to link the created proposal and key information to a connection parameterentry. This can be done in “Configuration – VPN – IKE/IPsec – Connection parameters”.Please use the following settings:Connection parametersIdentificationPFS groupIKE groupIKE proposalsIKE keyIPSec proposalsFile: Zscaler Deployment Guide.doce.g. ZSCALERNo PFS2 (MODP-1024)ZSCALERIKEPROP (as created in step 1.3)ZSCALERKEY (as created in step 1.5)ZSCALERIPSECPROP (as created in step1.4)Date: 22.06.2018Copyright Ó 2018 LANCOM Systems GmbHAuthor: Stefan GuddatPage: 11/33
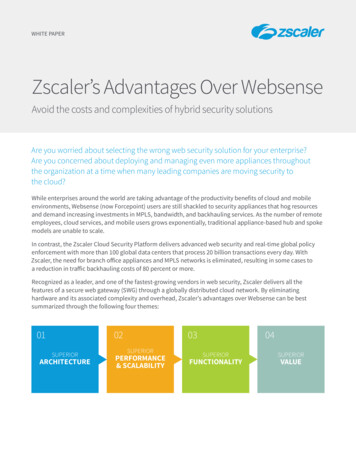
1.7 VPN peerNow you need to create a VPN peer entry for the VPN connection. This can be done in“Configuration – VPN – IKE/IPsec – Connection list”. Please use the following settings:Connection listName of connectionShort hold timeDead peer detectionExtranet addressGatewayRouting tagConnection parametersDynamic VPN connectionIKE exchangeOCSP checkIKE-CFGXAUTHIPsec-over-HTTPSRule creationIPv4 rulesIPv6 rulesFile: Zscaler Deployment Guide.doce.g. ZSCALER9.999 (keep alive)300.0.0.0e.g. fra4-vpn.zscloud.net (or as given)1ZSCLAER (as created in step 1.5)No dynamic VPNAggressive modeNoOffOffOffManualANY-TO-ANY (as created in step 1.2)-Date: 22.06.2018Copyright Ó 2018 LANCOM Systems GmbHAuthor: Stefan GuddatPage: 12/33
File: Zscaler Deployment Guide.docDate: 22.06.2018Copyright Ó 2018 LANCOM Systems GmbHAuthor: Stefan GuddatPage: 13/33
1.8 Routing entryThe next step is to change the default route to the VPN tunnel. To do this go to“Configuration – IP Router – Routing – IPv4 routing table”. There please change the defaultroute to use the VPN tunnel created above:IPv4 routing tableIP addressNetmaskRouting tagEnable stateRouterDistanceIP masqueradingComment255.255.255.2550.0.0.00Route is enabled and will always bepropagated via RIP (sticky)ZSCALER (as created in step 1.7)0IP Masquerading switched off-Now all traffic which is not routed anywhere else (e.g. local networks) will be forwarded to theZscaler cloud security platfrom.Note: Please make sure that you have a second default route (WAN) to be able to connectto the VPN tunnel endpoint as configured in step 1.7 (- ”Gateway”), otherwise the routerwon’t be able to establish a VPN connection. To do that please set up your original defaultroute (WAN) to your local internet provider again, but this time with the routing tag 1:File: Zscaler Deployment Guide.docDate: 22.06.2018Copyright Ó 2018 LANCOM Systems GmbHAuthor: Stefan GuddatPage: 14/33
IPv4 routing tableIP addressNetmaskRouting tagEnable stateRouterDistanceIP masqueradingComment255.255.255.2550.0.0.01Route is enabled and will always bepropagated via RIP (sticky)INTERNET (or as named during set up ofthe internet connection)0masking Intranet and DMZ (default)-The routing table will then look like that:File: Zscaler Deployment Guide.docDate: 22.06.2018Copyright Ó 2018 LANCOM Systems GmbHAuthor: Stefan GuddatPage: 15/33
The first route is for the VPN tunnel to be established. The second route will route all othertraffic to the Zscaler cloud security platform.1.9 DNS forwardingThe last step is to create a DNS forwarding entry for a proper DNS resolution. To do this goto “Configuration – IPv4 – DNS – Forwarding”:DNS ForwardingDomainRouting tagRemote site*0INTERNET (or as named during set up ofthe internet connection)1.10 Service validationTo verify your configuration works fine please visit the webpage http://ip.zscaler.com/. Thereyou can see if the data is sent through the newly created VPN tunnel.File: Zscaler Deployment Guide.docDate: 22.06.2018Copyright Ó 2018 LANCOM Systems GmbHAuthor: Stefan GuddatPage: 16/33
2 Configuration via LANCOM ManagementCloud (LMC)To set up a VPN connection to the Zscaler cloud platform via LANCOM Management Cloudyou need to create an IKEv1 connection. To do that you need to open the detail configurationof the desired device at “Devices – DeviceName – Detail configuration”:File: Zscaler Deployment Guide.docDate: 22.06.2018Copyright Ó 2018 LANCOM Systems GmbHAuthor: Stefan GuddatPage: 17/33
2.1 VPNFirst you need to activate the VPN function of the device at “VPN - Activated”.File: Zscaler Deployment Guide.docDate: 22.06.2018Copyright Ó 2018 LANCOM Systems GmbHAuthor: Stefan GuddatPage: 18/33
2.2 IPv4 Network RuleNext you need to create a network rule to support any traffic going into and coming from theVPN tunnel. This can be done under “VPN – General – Network rules – IPv4 rules”. Pleasename the entry as you like (e.g. ANY-TO-ANY) and set the local and remote networks bothto “0.0.0.0/0” as shown in the picture below:File: Zscaler Deployment Guide.docDate: 22.06.2018Copyright Ó 2018 LANCOM Systems GmbHAuthor: Stefan GuddatPage: 19/33
2.3 IKE proposalThen you need to set up the IKE proposal for the desired VPN tunnel. This can be doneunder “VPN – IKE/IPsec – IKE proposals”.Click on “add” to create a new entry. Name the entry as desired (e.g. ZSCALERIKE) and usethe following settings:IKE proposalIdentitficationEncryptionKey lengthHashAuthenticationLifetimeFile: Zscaler Deployment Guide.doce.g. ZSCALERIKEAES-CBC256 bitSHA256Preshared key86.400 seconds0 kBytesDate: 22.06.2018Copyright Ó 2018 LANCOM Systems GmbHAuthor: Stefan GuddatPage: 20/33
Now you need to set up an IKE proposal list with this newly created IKE proposal. This canbe done in “Configuration – VPN – IKE/IPsec – IKE proposal lists”. There create a new entrynamed as desired (e.g. ZSCALERIKEPROP) and add the previously created proposal to thelist:File: Zscaler Deployment Guide.docDate: 22.06.2018Copyright Ó 2018 LANCOM Systems GmbHAuthor: Stefan GuddatPage: 21/33
File: Zscaler Deployment Guide.docDate: 22.06.2018Copyright Ó 2018 LANCOM Systems GmbHAuthor: Stefan GuddatPage: 22/33
2.4 IPSec proposalThe next step is to set up an IPSec proposal for the desired VPN tunnel. This can be doneunder “Configuration – VPN – IKE/IPsec – IPSec proposals”. There create a new entrynamed es desired (e.g. ZSCALERIPSEC1) and use the following settings:IPSec proposalIdentificationModeESP encryptionESP authenticationAH authenticationIPCOMP compressionLifetimeFile: Zscaler Deployment Guide.doce.g. ZSCALERIPSEC1TunnelNULLHMAC-MD5No AHNo IPCOMP0 seconds2.000.000 kBytesDate: 22.06.2018Copyright Ó 2018 LANCOM Systems GmbHAuthor: Stefan GuddatPage: 23/33
File: Zscaler Deployment Guide.docDate: 22.06.2018Copyright Ó 2018 LANCOM Systems GmbHAuthor: Stefan GuddatPage: 24/33
Next you need to create an IPSec proposal list entry. You can do that in “Configuration –VPN – IKE/IPsec – IPSec proposal lists”. There create a new entry named as desired (e.g.ZSCALERIPSECPROP) and add the previously created proposal to the list:File: Zscaler Deployment Guide.docDate: 22.06.2018Copyright Ó 2018 LANCOM Systems GmbHAuthor: Stefan GuddatPage: 25/33
2.5 IKE key and identitiyThe next step is to set up the IKE key and identity for the desired VPN tunnel. This can bedone under “Configuration – VPN – IKE/IPsec – IKE keys and identities”. There create a newentry named as desired (e.g. ZSCALERKEY) and use the following settings:IKE keys and identitiesIdentificationPreshared keyLocal identity typeLocal identityRemote identity typeRemote identityFile: Zscaler Deployment Guide.doce.g. ZSCALERKEYas givenDomain name (FQDN)as givenNo identity-Date: 22.06.2018Copyright Ó 2018 LANCOM Systems GmbHAuthor: Stefan GuddatPage: 26/33
2.6 Connection parametersNow you need to link the created proposal and key information to a connection parameterentry. This can be done in “Configuration – VPN – IKE/IPsec – Connection parameters”.Please use the following settings:Connection parametersIdentificationPFS groupIKE groupIKE proposalsIKE keyIPSec proposalsFile: Zscaler Deployment Guide.doce.g. ZSCALERNo PFS2 (MODP-1024)ZSCALERIKEPROP (as created in step 2.3)ZSCALERKEY (as created in step 2.5)ZSCALERIPSECPROP (as created in step2.4)Date: 22.06.2018Copyright Ó 2018 LANCOM Systems GmbHAuthor: Stefan GuddatPage: 27/33
2.7 VPN peerNow you need to create a VPN peer entry for the VPN connection. This can be done in“Configuration – VPN – IKE/IPsec – Connection list”. Please use the following settings:Connection listName of connectionShort hold timeDead peer detectionExtranet addressGatewayRouting tagConnection parametersDynamic VPN connectionIKE exchangeOCSP checkIKE-CFGXAUTHIPsec-over-HTTPSRule creationIPv4 rulesIPv6 rulesFile: Zscaler Deployment Guide.doce.g. ZSCALER9.999 (keep alive)300.0.0.0e.g. fra4-vpn.zscloud.net (or as given)1ZSCLAER (as created in step 2.6)No dynamic VPNAggressive modeNoOffOffOffManualANY-TO-ANY (as created in step 2.2)-Date: 22.06.2018Copyright Ó 2018 LANCOM Systems GmbHAuthor: Stefan GuddatPage: 28/33
File: Zscaler Deployment Guide.docDate: 22.06.2018Copyright Ó 2018 LANCOM Systems GmbHAuthor: Stefan GuddatPage: 29/33
2.8 Routing entryThe next step is to change the default route to the VPN tunnel. To do this go to“Configuration – IP Router – Routing – IPv4 routing table”. There please change the defaultroute to use the VPN tunnel created above:IPv4 routing tableIP addressNetmaskRouting tagEnable stateRouterDistanceIP masqueradingCommentFile: Zscaler Deployment Guide.doc255.255.255.2550.0.0.00Route is enabled and will always bepropagated via RIP (sticky)ZSCALER (as created in step 2.7)0IP Masquerading switched off-Date: 22.06.2018Copyright Ó 2018 LANCOM Systems GmbHAuthor: Stefan GuddatPage: 30/33
Now all traffic which is not routed anywhere else (e.g. local networks) will be forwarded to theZscaler cloud security platform.Note: Please make sure that you have a second default route (WAN) to be able to connectto the VPN tunnel endpoint as configured in step 2.7 (- ”Gateway”), otherwise the routerwon’t be able to establish a VPN connection. To do that please set up your original defaultroute (WAN) to your local internet provider again, but this time with the routing tag 1:IPv4 routing tableIP addressNetmaskRouting tagEnable stateRouterDistanceIP masqueradingCommentFile: Zscaler Deployment Guide.doc255.255.255.2550.0.0.01Route is enabled and will always bepropagated via RIP (sticky)INTERNET (or as named during set up ofthe internet connection)0masking Intranet and DMZ (default)-Date: 22.06.2018Copyright Ó 2018 LANCOM Systems GmbHAuthor: Stefan GuddatPage: 31/33
The routing table will then look like that:The first route is for the VPN tunnel to be established. The second route will route all othertraffic to the Zscaler cloud security platform.2.9 DNS forwardingThe last step is to create a DNS forwarding entry for a proper DNS resolution. To do this goto “Configuration – IPv4 – DNS – Forwarding”:DNS ForwardingDomainRouting tagRemote siteFile: Zscaler Deployment Guide.doc*0INTERNET (or as named during set up ofthe internet connection)Date: 22.06.2018Copyright Ó 2018 LANCOM Systems GmbHAuthor: Stefan GuddatPage: 32/33
2.10 Service validationTo verify your configuration works fine please visit the webpage http://ip.zscaler.com/. Thereyou can see if the data is sent through the newly created VPN tunnel.File: Zscaler Deployment Guide.docDate: 22.06.2018Copyright Ó 2018 LANCOM Systems GmbHAuthor: Stefan GuddatPage: 33/33
Title: Microsoft Wor