Transcription
User Manual 册V1.0 / 2014
General InformationPlease review the product manual carefully, handlethe product in strict accordance with the manual.Welcome To UseThanks for purchasing a product from ALLScanner Tech Co., Ltd.This manual provides a comprehensive overview and standardconfiguration for users.This manual describes product information, hardware connection,software installation and usage etc significant information.Please read this instruction manual and familiarize yourself withyour device before operating. The manual only states theoperational method of use,specificvehiclediagnosisandmaintenance please refer to original maintenance manual.ALLScanner reserves the rights to make any change to productdesigns and specifications without notice.CopyrightCopyright 2014 by ALLScanner Tech Co., Ltd. All rights reserved.No part of this publication may be reproduced, stored in aretrieval system, or transmitted in any form or by any means,electronic, mechanical, photocopying, recording or otherwise,without the prior written permission of ALLScanner.Trademarkis a registered trademark of ALLScanner Tech Co., Ltd.is a registered trademark of ALLScanner Tech Co., Ltd.In addition to the above-mentioned, All other names of actualcompanies and products mentioned herein may be thetrademarks of their respective owners.1
Product IntroductionProfileBrand-new design VXDIAG, first integrated the three automotiveindustry standards, supports all major vehicle bus protocols,have strong compatibility and it is the best equipment to realizeOEM level diagnostic functions.FeaturesOne Device to Support Multiple OEM Diagnostics Achieved the world's most of brand OEM level vehiclediagnostic, One device can replace mass expensive OEM tools Advanced Diagnostics fully consistent with the OEM tools, evenbeyond the OEM tools One-click to install OEM support driver and update online, Easyto useBrand-New Design VXDIAG Hardware Equipped with high-speed processor VXDIAG is ahigh-performance Vehicle Network Interface Support 4 x CAN BUS and 2 x K-Line/L-Line, supportmulti-protocol high-speed and concurrent communication With the innovation design of OBD-II intelligent bus multiplexhardware, one device can diagnosis all models and fully meetthe future demand for complex vehicle communication. Supports 24V heavy-duty and diesel vehicles communication Rugged design can be used in a variety of harsh environmentsCompatible with Three Automotive Industry Standard SAE-J2534-1/2 Pass-Thru Driver with EURO 52
ISO-22900-1/2 MVCI with D-PDU Driver RP-1210A/B/C Heavy Duty VDA DriverJ2534 OEM Level ECU Reprogramming Function ECU software update and calibration ECU replace flash and programmingOEM Vehicle Diagnostic Function#OEMDiagnostic SoftwareCompatibleStatus1PASSTHRUSAE-J2534-1/2 Pass-ThruYESRelease2PORSCHEPorsche PIWIS-II TesterYESRelease3TOYOTATOYOTA Techstream TISYESRelease4HONDAHONDA Diagnostic System HDSYESRelease5SUBARUSUBARU Select Monitor SSMYESRelease6VOLVOVOLVO VIDAYESRelease7JLRJaguar & Land Rover SDDYESRelease8CHRYSLERChrysler wiTECH DiagnosticYESDevelop9GMGM GDS2YESDevelop10GMGM Tech2WinYESDevelop11FORDFORD IDSYESDevelop12MAZDAMAZDA IDSYESDevelop13KIAKIA GDSYESDevelop14HYUNDAIHYUNDAI GDSYESDevelop15MMCMitsubishi MUT-IIIYESDevelop16NISSAN* NISSAN Consult-III PlusYESDevelop17SUZUKI* Suzuki SDT-IIYESDevelop18VAG* VW & AUDI ODISYESDevelop19BMW* BMW RHEINGOLD ISTA/DYESDevelop20BENZ* BENZ XENTRYYESDevelop21FERRARI* Ferrari DEIS TesterYESDevelop22MASERATI* Maserati Diagnosi MDVCIYESDevelopVehicle Protocols Coverage3
Supported AutomotiveISO-9141 K-LineProtocolsISO-14230 K-LineISO-15765 CANSAE-J1850-VPW (GM Class2)SAE-J1850-PWM (FORD SCP)ISO-11898-2 DWCANISO-11898-3 DWFTCANSAE-J2411 Single Wire CAN (GMLAN)VAG TP16 CANVAG TP20 CAN (SAE-J2819)VAG KW81 (SAE J2818)SAE-J2610 SCI (Chrysler)SAE-J1567 CCD BUS (Chrysler)SAE-J2740 GM ALDLSAE-J2809 (HONDA DIAG-H)NISSAN DDL UART with CLOCKBMW DS2FORD UBPSupported -J1939 CANSAE-J1708/J1587 On RS485CAT DATALINK (Caterpillar)ATA DATALINK (Caterpillar)SpecificationsITEMDESCRIPTIONCPU32bit 180MHz ARM CPUStorage1MByteCable Interface(PC)USB2.0Network Interface(Optional)LAN 10/100M EthernetWireless Interface(Optional)WLAN 802.11 b/g/n Wi-Fi4
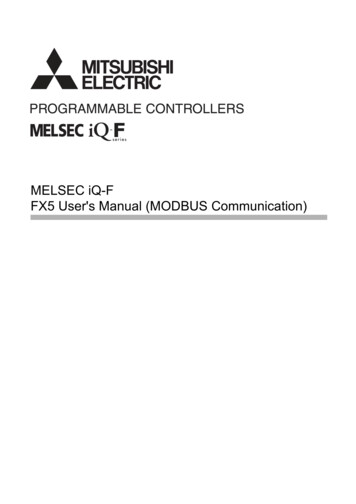
Diagnostic Interface24PIN highly reliable and easy-swapinterface to OBD-II 16PINIndicator Light4 LED: Power, Wireless, Host and Vehicle.PowerVehicle power input: DC 9V-36VCompatible: 12V&24VPower Dissipation2WSizeL x W x H 175 x 110 x 45(mm)WeightDevice Weight: 0.6 KgPackage Weight: 2.3 KgShellAluminum metal & Rugged plastic shellWorking Temperature-20 70 CStorage Temperature-40 85 CStandard CertificationCertification of Euro CE and US FCCProduct OverviewDevice Operation Status (Red)Wireless Network Status (Blue)Host Communication Status(Blue)Vehicle Communication Status(Blue)5
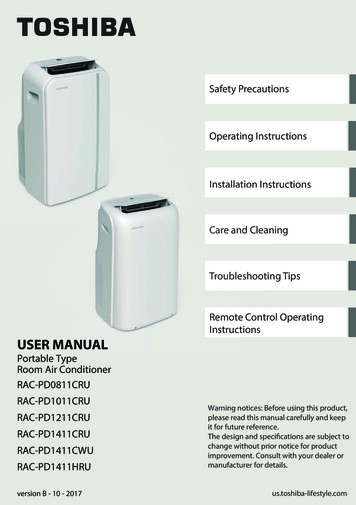
Product PackageVCI DeviceUSB LAN cableOBD-II diagnostic cableTool box and packageCD, User Manual, Fix Card6
Software SetupComputer Requirements Processor: Pentium 4 / 1.6GHz . Memory: 2G Bytes or more. Hard disk: 40G or more. Display: Resolution 1024x768 or higher. Network interfaces: LAN 10 / 100M or 802.11b / g. Communication Interface: USB2.0 or USB3.0 Operating System: Windows XP / Vista / Win7 / Win8 / Win8.1.Software InstallationBefore start to diagnose vehicle, you have to install VX Managerand driver which are stored in the CD-ROM, or you can browsehttp://www.vxdiag.net to download the newest setup files.1Run VX Manager.exe tosetup7
2Click [Next]3Select [I accept theagreement], then click[Next]4During installation,disconnect USB cable tothe computer, then click[Next]8
5Software Installing 6VXDIAG SDK Driverinstalling 7Setup complete. Theshortcut will create on thedesktop9
Start to UseHardware ConnectionConnect OBDII cable to the vehicle 16pin diagnostic port, andUSB cable to the computer.After device boot complete, the power led will flash, andthe buzzer will prompt.Install USB driver for Windows 7 / 8 / 8.1The first time to connect USB cable to the computer, Windowswill prompt [Installing device driver].Windows automatically complete driver installation.Install USB Driver for Windows XPThe first time to connect USB cable to the computer, Windowswill prompt [Found New Hardware],Please follow these steps to complete USB driver installation.10
1Select [No, not this time],then click [Next]2Select [Install DriverAutomatically], then click[Next]3Please wait while thewizard installs thesoftware11
4Complete Found NewHardware Wizard, click[Finish]Thereafter, it will pop up the second time [Found New HardwareWizard], same as above.The USB Driver installed completed:After USB driver is successfully installed, PC LED willflashing.12
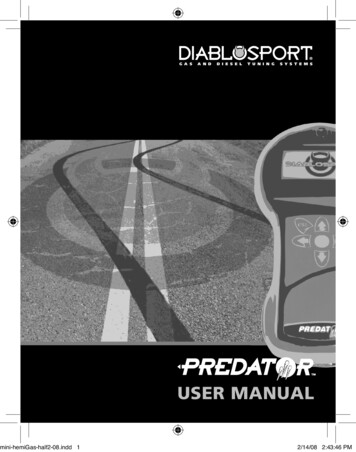
VX ManagerPlease make sure the device is connected. Run VX Manager, Theinformation of device will be displayed in “Device Manager”.Basic FunctionsReConnectTo establish a connection with the deviceFirmwareUpgrade device firmware from serverLicenseUpdate device license from serverRestartReset device and start to runSelf TestRun device test program and reportHW TestDevice LED flashing and buzzer beep13
Device LicenseYou can check your license status in “Device License”. you wantto buy the License, please contact the dealer.Vehicle DiagnosisVX Manager can manage multiple original diagnosis functions.14
To use the original factory diagnosis functions, you will need toinstall corresponding vehicle diagnosis driver.Click an application in vehicle diagnosis window, and you will geta driver installation window.【Install】 VX Manager will download the newest diagnosticdriver from server and install, then you can start to use theoriginal diagnosis function. The installation UI is below:【Update】 Update installed diagnostic driver from server.【Uninst】 Uninstall the diagnostic driver.【Run】Run the original diagnostic application.15
Warranty TermsOne Year Warranty1. The warranty is valid from the date of dispatch until the endof 1 year. If the invoice is lost, the warranty is valid from thedate of manufacture.2. Warranty covers repairs or replacement of item in the eventthat the damages are caused by design or material defect orfault of production during the warranty period. The invoicemust be presented in order to make this claim.3. During the warranty period, we will cover the cost of postagefor product repairs; after the warranty period, you will beresponsible the delivery cost.4. The warranty offered is strictly for the purchased item only.We will not be held liable for any defects or damage on anyother item(s) used in conjunction with this product.5. The laptop that comes with the product is not built by us. Themanufacturer of the laptop is responsible for its after-saleservice.6. We also cover damages excluded in the quality assurance. Ifaccessory replacement is necessary, we will let you know inadvance. You will be responsible for the material cost anddelivery cost.General Exclusions (What's NOT Covered):1.Faults caused by fire, dust, sand, water contamination oringress, fall or shock, chemical corrosion, blown fuse, theft,dirt, dampness or corrosion, leaky batteries, incorrect use ofpower supply or other adverse weather conditions.16
2.Damages caused by repair or tuning or improper installationor repairs by unauthorized personnel.3.Damages caused by illegal operation such as reading orchanging product programs.4.Products whose mechanical serial number or electronic serialnumber has been deleted, changed or damaged.5.Malfunction caused due to exposure to excessive heat orextreme cold.6.Wear or damages of qualified parts through natural use.17
VX Manager can manage multiple original diagnosis functions. 15 To use the original factory diagnosis functions, you will need to install corresponding vehicle diagnosis driver. Click an application in vehicle diagnos