Transcription
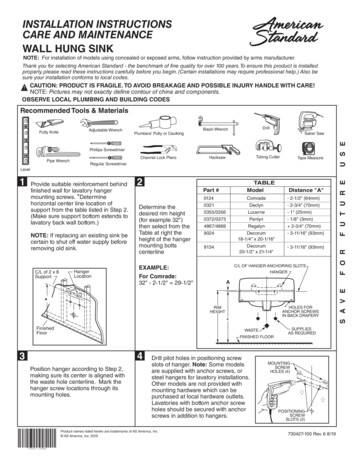
INSTALLATION INSTRUCTIONSCARE AND MAINTENANCEWALL HUNG SINKNOTE: For installation of models using concealed or exposed arms, follow instruction provided by arms manufacturer.Thank you for selecting American Standard - the benchmark of fine quality for over 100 years. To ensure this product is installedproperly, please read these instructions carefully before you begin. (Certain installations may require professional help.) Also besure your installation conforms to local codes.! CAUTION: PRODUCT IS FRAGILE. TO AVOID BREAKAGE AND POSSIBLE INJURY HANDLE WITH CARE!NOTE: Pictures may not exactly define contour of china and components.OBSERVE LOCAL PLUMBING AND BUILDING CODESRecommended Tools & MaterialsPlumbers' Putty or CaulkingDrillBasin WrenchSaber SawPhillips ScrewdriverPipe WrenchChannel Lock PliersTubing CutterHacksawTape MeasureRegular ScrewdriverU S EAdjustable WrenchPutty KnifeNOTE: If replacing an existing sink becertain to shut off water supply beforeremoving old sink.C/L of 2 x 8SupportHangerLocation2TABLEModelPart #Determine thedesired rim height(for example 32")then select from theTable at right theheight of the hangermounting " x 20-1/16"Decorum20-1/2" x 21-1/4"9134Distance "A"- 2-1/2" (64mm)- 2-3/4" (70mm)- 1" (25mm)- 1/8" (3mm) 2-3/4" (70mm)- 3-11/16" (93mm)- 3-11/16" (93mm)C/L OF HANGER ANCHORING SLOTSEXAMPLE:For Comrade:32" - 2-1/2" 29-1/2"HANGERA*HOLES FORANCHOR SCREWSIN BACK DRAPERYRIMHEIGHT*FinishedFloorWASTEFINISHED FLOOR43Position hanger according to Step 2,making sure its center is aligned withthe waste hole centerline. Mark thehanger screw locations through itsmounting holes.Drill pilot holes in positioning screwslots of hanger. Note: Some modelsare supplied with anchor screws, orsteel hangers for lavatory installations.Other models are not provided withmounting hardware which can bepurchased at local hardware outlets.Lavatories with bottom anchor screwholes should be secured with anchorscrews in addition to hangers.Product names listed herein are trademarks of AS America, Inc. AS America, Inc. 2019F O RProvide suitable reinforcement behindfinished wall for lavatory hangermounting screws. *Determinehorizontal center line location ofsupport from the table listed in Step 2.(Make sure support bottom extends tolavatory back wall bottom.)SUPPLIESAS REQUIREDMOUNTINGSCREWHOLES (4)POSITIONINGSCREWSLOTS (2)730427-100 Rev. 6 8/19S A V E1F U T U R ELevel
5Affix hanger to wall (hand tighten only). Mountlavatory for positioning, level the deck, and markbottom anchor screw holes (if applicable). Removelavatory, tighten the hanger positioning screws anddrill pilot holes for anchor screws and 4 mountingscrews. Install and tighten the mounting screws.6Following manufacturers instructions, install faucetand drain assembly. (Not included). Be certain toapply a bead of sealing putty on the underside ofthe drain (Part "A") in order to ensure a watertightseal between the lavatory and drain. Removeexcess putty after installing drain on lavatory.Steel HangerMounting ScrewAPositioning ScrewAnchor Screw(if used)Lavatory87Return the fitted lavatory tothe installed position. Connecttrap to drain assembly handtight to check alignment. Itmay be necessary to cut offpart of the tailpiece (area "B")or part of the horizontal leg ofthe trap (area "C").9CBInstalling Optional ShroudPosition semi-pedestal/shroud under basinand secure to wall using 2" (51mm) screws.CONCEALED ARMCARRIER HOLESBASIN ANCHORHOLESFIGURE 2SLOTS FORBASIN LEG BOLTSSEMI-PEDESTAL/SHROUD*ANCHOR HOLES*SHROUD SOLD SEPARATELYBEND FLEXIBLESUPPLYTUBES3-1/2"(89mm)FIGURE 38-1/2"(216mm)10-1/2"(267mm)7-1/2"(191mm)BARRIER FREE34" (864mm)*33" (838mm)*IN ONTARIO10"(254mm)WASTEFINISHED FLOORSecure lavatory onhanger as shown in 5.Insert and tighten anchorscrews if applicable.Connect hot and coldsupply lines to theshut-off valves. Tightentrap joints for watertightassembly. Apply a beadof caulk around the edgewhich contacts the wallas shown.CaulkShut-offValvesAS AMERICA, INC. ONE YEAR LIMITED WARRANTYIf inspection of this AS America, Inc. (“American Standard”) plumbing product, within one yearafter its initial purchase, confirms that it is defective in materials or workmanship, AmericanStandard will repair or, at its option, exchange the product for a same or similar model.This limited warranty applies only to the original purchaser and installation of these products. Inthe event of a limited warranty claim, proof of purchase will be required—save sales receipts.This limited warranty does not apply to local building code compliance. Since local building codesvary considerably, the purchaser of this product should check with a local building or plumbingcontractor to ensure local code compliance before installation.This limited warranty will be void if the product has been moved from its initial place ofinstallation; if it has been subjected to faulty maintenance, abuse, misuse, accident or otherdamage; if it was not installed in accordance with American Standard's instructions; or if it hasbeen modified in a manner inconsistent with the product as shipped by American Standard.American Standard's option to repair or exchange the product under this limited warranty doesnot cover any labor or other costs of removal or installation including any costs of anysurrounding material such as tile or marble. American Standard is not responsible for any otherincidental or consequential damages attributed to a product defect or to the repair or exchange ofa defective product, all of which are expressly excluded from the warranty. This limited warrantydoes not cover the extension beyond the duration of this limited warranty of any implied limitedwarranties, including those of merchantability or fitness for an intended purpose. (Some states orprovinces do not allow the exclusion or limitation of implied warranties, so this exclusion may notapply to you.)This limited warranty gives you specific legal rights. You may have other statutory rights that varyfrom state to state or from province to province, in which case this limited warranty does notaffect such statutory rights.For service under this warranty, it is suggested that a claim be made through the contractor ordealer from or through whom the product was purchased, or that a service request (including adescription of the product model and of the defect) be sent to the following address:In the United States:American Standard Brands,1 Centennial AvePiscataway, New Jersey 08854Attention: Director of Consumer AffairsFor residents of the United States, warrantyinformation may also be obtained by callingthe following toll free number: (800) 442-1902www.americanstandard.comIn Canada:LIXIL Canada ULC5900 Avebury RoadMississauga, OntarioCanada L5R 3M3Toll Free: (800) 387-0369www.americanstandard.caIn Mexico:Customer Service ManagerAS Maquila, S.A. de C.V.Via Morelos #330Col. Santa ClaraEcatepec 55540 Edo. Mexicowww.americanstandard.com.mxTHIS WARRANTY IS NOT TRANSFERABLEFROM ORIGINAL CONSUMER PURCHASER.2730427-100 Rev. 6 8/19
DIRECTIVES D'INSTALLATIONSOINS ET ENTRETIENLAVABO FIXÉ AU MURNOTA: Pour l’installation des modèles avec bras dissimulés ou exposés, suivre les instructions fournies par le fabricantNous vous remercions d'avoir choisi American Standard - synonyme de qualité supérieure depuis plus de 100 ans. Afin de s'assurerque ce produit soit bien installé, veuillez lire ces directives attentivement avant de commencer. (Certaines installations peuventrequérir une aide professionnelle.) Assurez-vous également que votre installation se conforme aux codes locaux.! AVERTISSEMENT : CE PRODUIT EST FRAGILE. POUR ÉVITER LES BRIS ET DES BLESSURES, MANIPULER AVEC SOIN!REMARQUE : Les dessins peuvent ne pas correspondre exactement aux contours de l'appareil ou des composants.RESPECTER LES CODES DE PLOMBERIE ET DU BÂTIMENTClé à lavaboPerceuseScie sauteuseTournevis cruciformeClé à pipesPinces à coulisseCoupoir à tuyauScie à métauxRuban à mesurerTournevis platNiveau1Assurer un renfort approprié derrièrele mur fini pour les vis de fixation dusupport du lavabo* Trouverl’emplacement de la ligne centralehorizontale du support à partir dutableau présenté à l’étape 2.(S’assurer que le bas du supportcouvre le dos du lavabo au bas du mur).NOTE: Lorsqu'un lavabo déjà installédoit être remplacé, s'assurer defermerl' alimentation d'eau avantd'enlever le vieux lavabo.L/C du supportde 2 x 82Déterminer la hauteursouhaitée pour le rebord(par exemple 813 mm),puis sélectionner à partirdu tableau (à droite) lahauteur de la lignecentrale des boulons defixation du support.TABLEAUModèleNo deDeclynLucernePenlynRegalynDecorum18-1/4" x 20-1/16"Decorum20-1/2" x 21-1/4"9134EXEMPLE:Pour Comrade:813 mm - 64 mm 749 mm- 93mm (3-11/16 po)SUPPORTA*HAUTEURDU REBORDTROUS POUR LESVIS D’ANCRAGE AUDOS DE LA COLONNE*PlancherFiniREJETSOL FINIPositionner le support en fonction desdirectives présentées à l’étape 2;s’assurer que le centre soit bien alignéavec la ligne centrale du rejet. Marquerl’emplacement des vis du support parles trous de fixation.- 64mm (2-1/2 po)- 70mm (2-3/4 po)- 25mm (1 po)- 3mm (1/8 po) 70mm (2-3/4 po)- 93mm (3-11/16 po)L/C DES FENTES DE FIXATION DU SUPPORTEmplacement desvis d'ancrage oudes tire-fond3Distance "A"4U S A G EMastic de plomberiePercer les avant trous en positionnant lesfentes des vis du support. (Nota: Certainsmodèles sont fournis avec des vis de fixationou des supports métalliques pour l’installationdu lavabo. D’autres modèles ne sont pas livrésavec la quincaillerie de fixation, on peut enfaire l’achat dans une quincaillerie locale. Leslavabos munis dans le bas de trous pour lesvis d’ancrage doivent être fixés avec les visd’ancrage en plus des supports.Les noms des produits nommés ci-après sont des marques de commerce déposées d’AS American Standard Inc. AS America, Inc. 2019FOURNITURESAU BESOINTROUS DES VISDE FIXATION (4)FENTES DEVIS DUSUPPORT (2)730427-100FR Rev. 6 8/19P O U RClé universelleC O N S E R V E RSpatule de vitrierU L T É R I E U ROutils et matériaux recommandés
5Fixer le support au mur (serrer à la main uniquement). Monterle lavabo pour le positionner, mettre le tablier à niveau etmarquer l’emplacement des trous inférieurs des vis d’ancrage(le cas échéant). Retirer le lavabo, serrer les vis de réglage dusupport et percer les avant-trous pour les vis d’ancrage et lesquatre (4) vis de fixation. Installer et serrer les vis de fixation.6Installer la robinetterie et l'assemblage de vidage (noninclus) en suivant les instructions du manufacturier.S'assurer d'appliquer un trait de mastic scellant sous lerebord du vidage (A) pour assurer un joint étanche entrele lavabo et le vidage. Enlever l'excédent de mastic aprèsl'installation du vidage sur le lavabo.Support MétalliqueVis de FixationAVis de RéglageLavaboVis d'ancrage(si elles sont utilisées)87Retourner le lavabo avec larobinetterie et la colonne à laposition d'installation. Raccorderle siphon à l'assemblage duvidage à la main pour vérifierl'ajustement. Il pourrait êtrenécessaire de couper un boutde la crépine d'aspiration (B)et/ou un bout du coude dusiphon (C).9CBInstallation d’une gaine en optionPlacez la demi colonne ou la gainesous le bassin et fixez la au mur avecdes vis de 2 po (51 mm).TROUS DE FIXATIONDES BRASDISSIMULÉSTROUSD'ANCRAGEDU LAVABOFIGURE 2ENCOCHES POURLES BOULONS DUPIED DE LAVABOTROUS D'ANCRAGE*POUR DEMI-COLONNE/TABLIER*TABLIER VENDU SÉPARÉMENTD'ALIMENTATIONFLEXIBLESFIGURE 38-1/2 po(216mm)10-1/2 po(267mm)3-1/2 po(89mm)7-1/2 po(191mm)ACCÈS FACILE34 po (864mm)*33 po (838mm)*EN ONTARIO10 po(254mm)ÉVACUATIONPLANCHER FINIFixer le lavabo au supportselon les indications présentéesà l’étape 5. Insérer et serrer lesvis d’ancrage (le cas échéant).Raccorder les conduitsd’alimentation d’eauchaude etd’eau froide aux soupapes defermeture d’eau. Resserrer lesjoints du siphon pour rendrel’ensemble étanche. Appliquer untrait de mastic de plomberie lelong de la surface en contact avecle mur (selon ce qui est indiqué).MasticSoupapesde fermeture d’eauGARANTIE LIMITÉE D'UNE ANNÉE AS AMERICA, INC.Si au cours de l’année suivant l’achat initial d’un produit de plomberie d’AS America, Inc. («American Standard »), son inspection confirme qu’il est défectueux en ce qui a trait aux matériauxou à la main-d’œuvre, American Standard réparera ou échangera, à sa convenance, le produit pourun modèle identique ou semblable.Cette garantie limitée s'applique uniquement à l'acheteur original et à l’installation initiale de cesproduits. Dans un cas de réclamation en vertu de la garantie limitée, une preuve d'achat sera exigée- conservez donc tous les reçus de vente.Cette garantie limitée ne s'applique pas aux conformités des codes du bâtiment locaux. Puisque lescodes du bâtiment locaux varient considérablement, l'acheteur de ce produit devrait vérifier auprèsd'un entrepreneur local en construction ou en plomberie afin de s’assurer de la conformité au codelocal avant l'installation.Cette garantie limitée est nulle si le produit a été déplacé de son emplacement initial d’installation ;s'il a fait l’objet d’un entretien défectueux, d’abus, de mauvaise utilisation, d’un accident ou a subid’autres dommages ; s'il n'a pas été installé conformément aux directives d’American Standard ; ous'il a été modifié d’une façon qui est incompatible avec le produit tel qu’il a été livré par AmericanStandard.L'option d'American Standard de réparer ou de remplacer le produit en vertu de la présente garantielimitée ne couvre pas les coûts de main-d’œuvre ni aucun autre coût pour l'enlèvement oul'installation du produit incluant les coûts liés à quelque matériel environnant comme, entre autre, lecarrelage ou le marbre. American Standard sera nullement tenue responsable de quelquedommage autre, qu’il soit de nature consécutive ou indirecte qui soit attribuable à une défectuositéd’un produit ou à la réparation ou à l'échange d'un produit défectueux, tous étant expressémentexclus de la présente garantie limitée. Cette garantie limitée ne couvre nullement la prolongationau-delà de la durée de la présente garantie limitée de quelque garantie limitée implicite, incluant laqualité marchande ou le caractère approprié à un but particulier. (Certains États ou provinces nepermettent pas l'exclusion ni la limitation de garanties limitées implicites ; cette exclusion pourraitdonc ne pas s'appliquer à vous.)Cette garantie limitée vous donne des droits juridiques spécifiques. Vous pourriez vous prévaloird'autres droits prévus par la loi qui varient d'une province à l'autre ou d'un État à l'autre et, dans cescas, la présente garantie limitée n'a aucun effet sur ces droits prévus par la loi.Pour obtenir un service en vertu de cette garantie, il est suggéré qu'une réclamation soit adresséepar l'entremise de l'entrepreneur ou du marchand auprès de qui le produit a été acheté, ou qu'unedemande de service (incluant une description du modèle du produit et de la défectuosité) soitacheminée à l'adresse suivante :Aux États-Unis :Marques American Standard1 Centennial AvePiscataway, New Jersey 08854À l'attention de : Directeur à la consommationLes résidents des États-Unis peuventaussi obtenir l'information à propos de lagarantie en composant sans frais le : 800-442-1902www.americanstandard.comAu Canada :LIXIL Canada ULC5900 Avebury RoadMississauga, OntarioCanada L5R 3M3Sans frais : 800-387-0369www.americanstandard.caAu Mexique :Directeur, Service à la clientèleAS Maquila, S.A. de C.V.Via Morelos n 330Col. Santa ClaraEcatepec 55540 Edo.Mexiquewww.americanstandard.com.mxL’ACHETEUR CONSOMMATEUR ORIGINALNE PEUT CÉDER CETTE GARANTIE.2730427-100FR Rev. 6 8/19
INSTRUCCIONES DE INSTALACIÓNCUIDADO Y MANTENIMIENTOLAVABO EMPOTRADONOTA: Para instalación de modelos con soportes ocultos y expuestos, siga las instrucciones proporcionadas por el fabricante.Gracias por elegir American Standard - el parámetro de primera calidad por más de 100 años. Para asegurarse de que elproducto esté instalado correctamente, por favor lea estas instrucciones cuidadosamente antes de comenzar. (Ciertasinstalaciones pueden requerir ayuda profesional). Asegúrese de que su instalación cumpla con los códigos locales.!PRECAUCIÓN: EL PRODUCTO ES FRÁGIL. ¡MANIPÚLELO CON CUIDADO PARA NO ROMPERLO Y EVITAR POSIBLES LESIONES!NOTA: es posible que las imágenes no definan con exactitud el contorno de la loza y los componentes.CUMPLA LAS NORMAS LOCALES DE PLOMERÍA Y or PhillipsPinzas con ajustesCortador de tubosSierra para metalesCinta métricaU S ODestornillador planoNivel1Provea refuerzos adecuados atrás dela pared acabada para los tornillos demontaje de la ménsula. Consulte latabla en el paso 2 para determinar ellugar de instalación de la línea céntricahorizontal del refuerzo. Asegúrese deque la parte inferior del refuerzoextienda hasta la parte inferior de laparte posterior del lavabo.NOTA: Si va a reemplazar otro lavabo,es necesario cerrar el suministro deagua antes de quitar el lavabo viejo.Línea céntricadel soporte 2x6lugar de instalaciónde la ménsula2TABLANúmerode ParteDetermine la alturacorrecta del rim (porejemplo #32) ydespués, consulte latabla a la derechapara determinar laaltura de la líneacéntrica de lostornillos de 4ModeloDistancia "A"ComradeDeclynLucernePenlynRegalynDecorum18-1/4" x 20-1/16"Decorum20-1/2" x 21-1/4"- 2-1/2" (64mm)- 2-3/4" (70mm)- 1" (25mm)- 1/8" (3mm) 2-3/4" (70mm)- 3-11/16" (93mm)- 3-11/16" (93mm)LÍNEA CÉNTRICA DE LAS ABERTURAS DE ANCLAJEMÉNSULAEJEMPLO:APara Comrade:32" - 2-1/2" 29-1/2"*PERFORACIONESPARA LOS TORNILLOSDE ANCLAJE EN LAPARTE POSTERIORDEL LAVABOALTURADEL RIM*DESPERDICIOPisoAcabado3Coloque la ménsula según el paso 2,asegurando de que su centro estéalineando con la línea céntrica de lostornillos de anclaje. Marque los lu-garesde instalación de los tornillos de anclajepor las aberturas de montaje.PISO ACABADO4Taladre agujeros guía en las ranuras de lostornillos de posición del soporte.Nota: Algunos modelos se propor-cionancon tornillos de anclaje o soportes colgantesde acero para instalar los lavabos. Otrosmodelos no se proveen con equipo que sepuede comprar en tiendas de herramientas.Los lavabos que tienen agujeros en la parteinferior de la ménsula para los tornillos deanclaje se deben asegurar con los tornillosde anclaje en adición a las ménsulas.Los nombres de productos que aparecen en este documento son marcas comerciales de AS America, Inc. AS America, Inc. 2019SUMINISTROSEGÚN SE REQUIRAAGUJEROS PARALOS TORNILLOSDE MONTAJE (4)RANURAS DELOS TORNILLOSDE POSICIÓN (2)730427-100SP Rev. 6 8/19U NLlave de plomeríaPA RALlave para lavabosIN ST RUC C I O N ESMasilla de plomeroo "Caulking"ESTASLlave ajustableGUA RD EEspátulaFU TU ROHerramientas y Materiales Recomendados
5Instale la ménsula a la pared (sólo apriete con la mano).Monte el lavabo para colocación, nivele la base, y marquelos lugares para los tornillos de anclaje para la parteinferior del lavabo (si se aplica). Quite el lavabo, aprietelos tornillos de posición del soporte y taladre agujerosguía para los tornillos de anclaje y los cuatro tornillo demontaje. Instale y apriete los tornillos de montaje.6Siguiendo las instrucciones del fabricante, instale elequipo de la llave y del drenaje (no se incluye). Esnecesario aplicar un poco de sellador en la parteinferior del drenaje para asegurar un sello herméticoentre el lavabo y el drenaje. Quite el excedente delsellador después de instalar el lavabo.Soporte colgante de aceroTornillo de montajeATornillo de posiciónTornillos de anclaje(si es usa)Lavabo87Coloque el lavabo otra vez enla posición de instalación.Conecte la trampa al drenajey apriete con la mano paraverificar la alineación. Esposible que vaya a tener quecortar parte de la piezaposterior (área B) o parte deltubo horizontal de la trampa(área
NOTA: Pour l’installation des modèles avec bras dissimulés ou exposés, suivre les instructions fournies par le fabricant 730427-100FR Rev. 6 8/19 AVERTISSEMENT : CE PRODUIT EST FRAGILE. POUR ÉVITER LES BRIS ET DES BLESSURES, MANIPULER AVEC SOIN! REMARQUE : Les dessins peuvent ne pas correspondre