Transcription
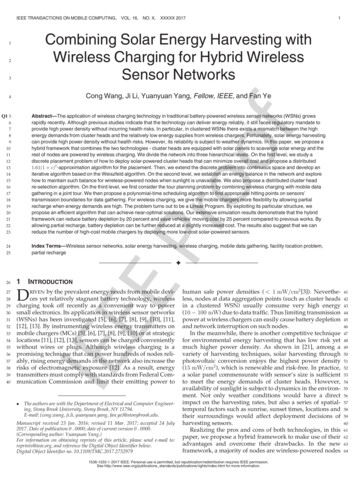
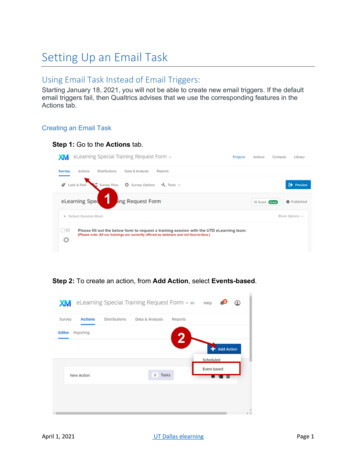
Task-Based Training (TBT) Combining of Templates to Create a New TemplateSection 3 of 4 – Making the Link Between Linkable Templates and Other TemplatesLinkable Templates allow a user to combine two or more Task-Based Training (TBT) templates to create a new, singlecourse of TBT and keep the ‘linked’ training current should changes be made. This keeps a unit from having to assigntwo or more Templates to an individual in order for them to complete a course of TBT while ensuring that the training iscurrent. For example, a unit may elect to add tasks to a Higher Headquarters (HHQ) designated course of TBT for anaircrew. Linking a HHQ Linkable Template with a local TBT Template allows the course of TBT to be updated when theHHQ Linkable Template is changed. For example, if task X is added to or deleted from the HHQ Linkable Template, thechange will ‘flow down’ to the local Template, updating it.Additionally, GTIMS can be set up to warn that a Template has been updated. The person warned is the one set up tobe notified via the Event Notification Editor (see Section 4) of changes made to those assigned TBTs that include aLinkable Template. Crewmembers that have completed at least one task in their assigned TBT template will not beaffected, i.e., they will not have to be assigned the updated Template.As with any GTIMS application, a user’s permissions determine the extent to which they can interact with LinkableTemplates. Users should contact the GTIMS Help Desk to be granted the permissions appropriate for theresponsibilities associated with their position.This checklist is divided into four sections as follows:Section 1 provides an overview (or Rules of the Road) for Linkable Templates.Section 2 deals with creating Linkable Templates.Section 3 discusses making the link between Linkable Templates and other Templates.Section 4 shows how GTIMS notifies a user of changes when a Template contains a Linkable Template that has beenchanged.Section 3: Making the Link Between Linkable Templates and Other TBT TemplatesSelecting Ops Manager - Task-Based Training - Templates: Opens the Template Picker window (below).1b1a11 – Double-click thedesired Template toopen it [must have nocheckmark in theLinkable column (1a)and may be in eitherActive or Draft Status(1b)]. Or, highlight theTemplate and select OK.Skip to Step 3.– OR – Start with Step 2.22 –Select the Add New Template button to create a new Template. Skip to Step 4.Either Step 1 or Step 2 will open a Template in which a Linkable Template may be included.
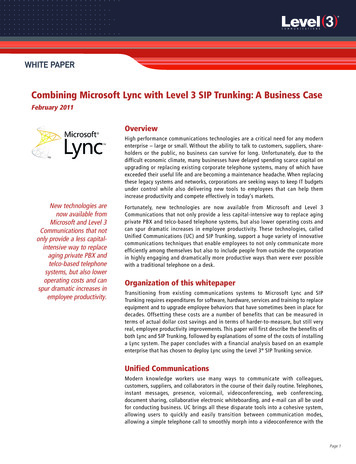
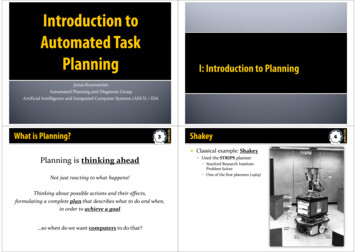
3 – On the TBT Template window that opens when an Active Template was chosen, select Version Template, changethe Version details and make necessary changes to the Template details. Skip to Step 5.NOTE: The system adds (New Version) to the existing Version number to preclude users from saving the newly createdTemplate with the same Version number as the old. Users should modify the Version number as desired (e.g., forbelow, 2014. 1.5) AND delete (New Version). If not removed, the next Version will appear as 2014.1.5 (New Version).On the TBT Template window that opens when a Draft Template is chosen (below), make any necessary changes to theTemplate details. Skip to Step 5.In both cases above, as well as in Step 4, the Template being worked with will be in Draft Status.34 – When the Add New Template button is selected, a blank TBT Template opens (details section seen below).Enter values for the Template details.NOTE: Those details withnext to them require a value.455 – Do NOT select the Is Linkable checkbox as this will then be a Linkable Template. vs a Template in which a LinkedTemplate can be included. NOTE: A Linkable Template can NOT be included in another Linkable Template.
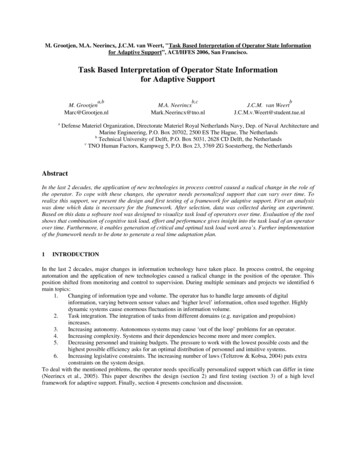
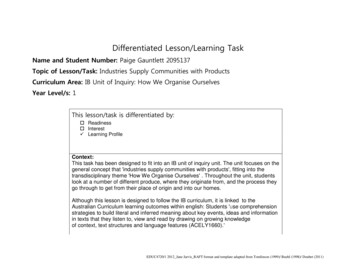
6 – Drag and drop Tasks from the Available Training Task list to the Template Training Tasks container, or else use thearrows (6a) to move/remove them.NOTE: Templates require at least one Task to be valid.NOTE: TBT Templates and Assignment have been modified to organize Tasks by Category, as they are in Grading.Categories can be reordered using thebuttons at the bottom of the grid. Use thegrid to collapse down to the Category level (left-hand set) or to the Task level (right-hand set).buttons below theWhen Tasks are dropped onto an existing Task: They will be added to the same Category above the specific Task.When Tasks are dropped onto a Category: They will be added at the bottom of the Category and the Category of the dropped Task will be set to the targetCategory, if there is one. If that will result in a Category change (e.g. the Task being moved had a Categorydefined,) the user will be asked whether to change the Category. The user is given the option to remembertheir choice for the remainder of the session.766aNOTE: For simplicity, only two Tasks (above) were selected for this Template.7 – Once the Template is configured, select the Links ellipsespage).to open the Select Linkable Templates window (next
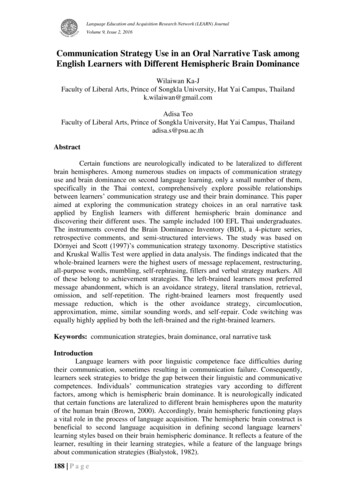
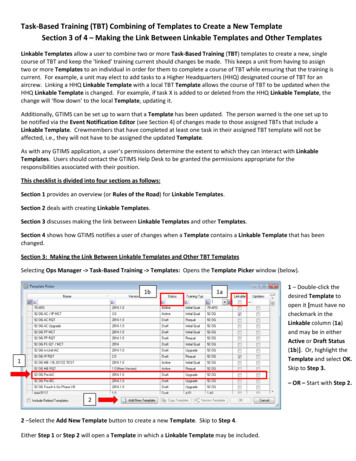
8 – Select the desired Linkable Template(s)to include in the new Template.9 – Select OK.8NOTE: To inlcude more than one LinkableTemplate, hold the Control key on thekeyboard, click on the desired LinkableTemplates and then select OK. If a LinkableTemplate is added subsequent to selectionof the OK button, the system will overwritethe earlier selections with the new one.910 – The selected Linkable Template(s) appear in the Links container and the associated Tasks and Sub-Tasks are nowadded to the Tasks comprising the Template (10b).NOTE: If a selected Linkable Template is not visible in the Links box due to the number of Linkable Templates included,click in the box and scroll using the arrows on the keyboard to see them all.1010b
Once all required Linkable Templates have been included in the Template:11 – Using the Status drop-down menu, change the Status of the new Template from Draft to Active.12 – Select the Save icon on the toolbar.1211A new Template containing one or more Linkable Templates has been created, it is Active, and it may now be assigned.Additional SupportTo open a Help File at any point within a G/TIMS interface, either press the F1 key or select File at the top of thewindow and click Help.For additional questions, please contact your G/TIMS Administrator or the ESD Help Desk:Commercial (210) 652-8989 or DSN 487-8989
To open a Help File at any point within a G/TIMS interface, either press the F1 key or select File at the top of the window and click Help. For additional questions, please contact your G/TIMS Administrator or the ESD Help Desk