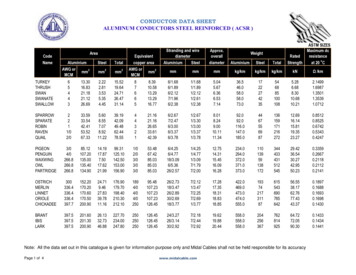
Transcription
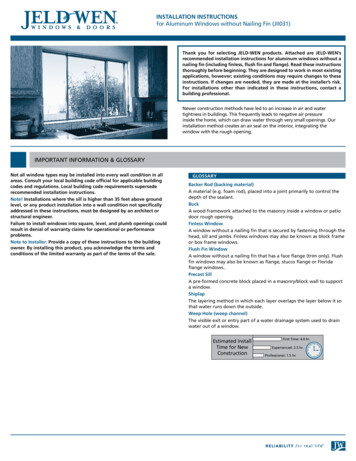
Installation Instructionsfor Aluminum Windows without Nailing Fin (JII031)Thank you for selecting JELD-WEN products. Attached are JELD-WEN’srecommended installation instructions for aluminum windows without anailing fin (including finless, flush fin and flange). Read these instructionsthoroughly before beginning. They are designed to work in most existingapplications, however; existing conditions may require changes to theseinstructions. If changes are needed, they are made at the installer’s risk.For installations other than indicated in these instructions, contact abuilding professional.Newer construction methods have led to an increase in air and watertightness in buildings. This frequently leads to negative air pressureinside the home, which can draw water through very small openings. Ourinstallation method creates an air seal on the interior, integrating thewindow with the rough opening.Important Information & GlossaryNot all window types may be installed into every wall condition in allareas. Consult your local building code official for applicable buildingcodes and regulations. Local building code requirements supersederecommended installation instructions.Note! Installations where the sill is higher than 35 feet above groundlevel, or any product installation into a wall condition not specificallyaddressed in these instructions, must be designed by an architect orstructural engineer.Failure to install windows into square, level, and plumb openings couldresult in denial of warranty claims for operational or performanceproblems.Note to Installer: Provide a copy of these instructions to the buildingowner. By installing this product, you acknowledge the terms andconditions of the limited warranty as part of the terms of the sale.GlossaryBacker Rod (backing material)A material (e.g. foam rod), placed into a joint primarily to control thedepth of the sealant.BuckA wood framework attached to the masonry inside a window or patiodoor rough opening.Finless WindowA window without a nailing fin that is secured by fastening through thehead, sill and jambs. Finless windows may also be known as block frameor box frame windows.Flush Fin WindowA window without a nailing fin that has a face flange (trim only). Flushfin windows may also be known as flange, stucco flange or Floridaflange windows.Precast SillA pre-formed concrete block placed in a masonry/block wall to supporta window.ShiplapThe layering method in which each layer overlaps the layer below it sothat water runs down the outside.Weep Hole (weep channel)The visible exit or entry part of a water drainage system used to drainwater out of a window.Estimated InstallTime for NewConstructionFirst Time: 4.0 hr.Experienced: 2.5 hr.Professional: 1.5 hr.11 12 11092348765
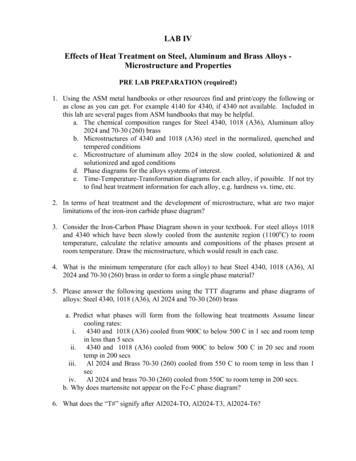
INSTALLATION INSTRUCTIONSfor Aluminum Windows without Nailing Fin (JII031)rough openingsThese instructionsspecifically address: Installation of a flushfin window into amasonry wall.MasonryWall Installation of afinless window intoa masonry or studframed wall.With BuckThis installationassumes that a buildingprofessional has alreadyproperly fastened andsealed a framework ofBuckstuds (often called abuck) to the concrete/masonry wall.If using a precast sill,the buck will be installed only on the head and jambs.STUD FRAMED WALL CONSTRUCTIONmasonry/block wall constructionWindows can be installed into a rough masonry opening with orwithout a buck.The window will bemounted inside of therough opening.SheathedWallHeaderWithout A BuckThe window will be attached directly to the Cripple studsSafety & handlingwindow & materials handlingsafety Read and fully understand ALL manufacturers’ instructions beforebeginning. Make sure operable windows are closed and locked prior toinstallation. Do not work alone. Two or more people are required. Use safe liftingtechniques. Heed material manufacturers’ handling and application instructions. Use caution when handling glass. Broken or cracked glass can causeserious injury. Protect adhesive surfaces from dirt, moisture, direct sunlight andfolding over onto themselves. Handle in vertical position; do not carry flat or drag on floor. Wear protective gear (e.g. safety glasses, gloves, ear protection, etc.). Do not put stress on joints, corners or frames. Operate hand/power tools safely and follow manufacturer’s operatinginstructions. Store window in dry, well-ventilated area in vertical, leaning positionto allow air circulation; do not stack horizontally. Use caution when working at elevated heights. Protect from exposure to direct sunlight during storage. Install only into vertical walls and when conditions and materials aredry.If injury occurs, immediately seek medical attention!Needed Materials & toolsNEEDED MaterialsNote! Follow all material manufacturers' instructions for proper useand compatibility. #10 x 2 1/2" corrosion-resistant flat head screws. Screws mustpenetrate at least 1" into framing (or as required by local code) 3/16" x 2 1/2" self-tapping concrete screws for masonry applications(or as required by local code) Sealant (Protecto Wrap Protecto Sealant 25XL or equivalent) Backer rod Non-compressible or water degradable shims Polyurethane low expansion foam (Dow Great StuffTM Window andDoor or equivalent)2For installations into a masonry wall: Liquid applied flashing (Protecto Wrap LWM 200 or equivalent) Self adhesive flashing and spray adhesive/primer if required by localcode (Protecto Wrap Safseal Systems 5500 or as recommended bythe self-adhesive flashing manufacturer)For installations into a stud-framed wall:JELD-WEN drain mat material or equivalentTOOLS Tape measure Utility knife Level (4' minimumrecommended) ScrewdriverPutty knifeCaulking gunDrill with bits
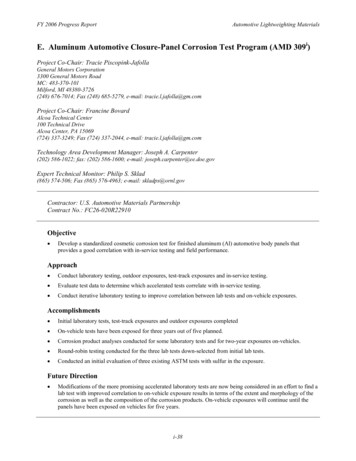
INSTALLATION INSTRUCTIONSfor Aluminum Windows without Nailing Fin (JII031)1remove packaging & Inspect windowremove packagingRemove shipping materials such as corner covers, shipping blocks orpads. If there is a protective film on the glass, do not remove it untilinstallation and construction are complete.Inspect window Correct product (size, color, grid pattern, handing, glazing, energyefficiency requirements, etc.)If any of the above conditions represent a concern, or if you expectenvironmental conditions to exceed the window's performance rating,do not install the window. Contact your dealer or distributor forrecommendations. Cosmetic damage Product squareness (diagonal measurements not more than 1/8"different)2inspect rough opening Verify the widthand height of thewindow are each1/2" smaller thanthe rough openingwidth and height. Verify the roughopening is square.The (A) and (B)measurementsabove should bethe same. Maximumallowable deviationfrom square forwindows over 20 sq.ft. is 1/4" and forwindows under 20sq. ft. is 1/8".3 Verify the rough opening is level and plumb (C) and (D). Themaximum allowable deviation is 1/8".Verify Square, Level, & Plumb Verify the rough opening sill is not crowned or sagged (D). Verify the exterior face of the rough opening is a single plane (E) withless than 1/8" twist from corner to corner. Verify the rough opening is structurally sound.ACBEDInstallation into masonry begins with section 3 “PREPARE MASONRY/BLOCK WALL”; installation into a stud-framed wall begins with section4 “PREPARE STUD-FRAMED WALL.”prepare masonry/block wallNote! This sectionapplies to installationsinto a masonry wallLiquidonly. For installationsappliedinto a stud-framedflashingwall, begin withsection 4, “PREPARESTUD-FRAMED WALL.”If installing a windowSealant jointsinto a masonry wallwithout a buck, coverthe entire roughopening surface withliquid applied flashingor self-adhesiveflashing in the samemanner as the following instructions for a buck.1. Seal any joint larger than 1/16" in the buck and between the buckand the concrete/masonry with sealant.2. Cover the buck and the surrounding concrete/masonry at the headand jambs with liquid applied flashing as shown.3. If installing into a four-sided buck, seal the sill in a similar manner.3 Correct any deviations before installing the window.Note! Shims must beat least 1/2" shorterthan the depth of thewindow sill, shouldShimlevel the roughopening sill and be nomore than 1/4" thick.4. Shim the sill 4"from each corner,at 8" intervals,and on both sidesof mull jointswith non waterdegradable or compressible shims. Secure shims with sealant.End of masonry instructions, SKIP TO SECTION 5, “INSTALL WINDOW.”
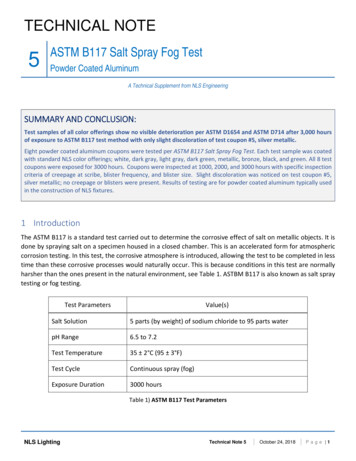
InstallatIon InstructIonsfor Aluminum Windows without Nailing Fin (JII031)4prepAre sTud-FrAmed WAllFor rEtroFIt InstallatIonsAfter removing theold window, removesufficient sidingto expose enoughintact building wrapto properly sealthe window to theopening. If damaged,apply new buildingwrap in shiplapmanner. verify therough openingframing is structurally sound. Continue with the instructions.PrEParE BuIlDInG WraPnote! check with the building wrap manufacturer to verify thefollowing steps will not void their product warranty. Followmanufacturers’ instructions.Trim building wrap flush with the rough opening.PrEParE sIll1. measure the widthof the window’sWidth6"sill, plus 1/8"of roughopeningand transfer themeasurement ontothe rough openingsill. This is wherethe back of theJeld-WeN drainreleasetapemat will sit.Wicking2. Cut a piece of drainmat the length of3"Foamthe sill plus 6".wedge3. Without cutting the3"drain mat material,Forremove 3" ofnarrowfoam wedge fromFrameseach end of theJeld-WeN drainWidth ofTrimframemat. If the widthof the frame isnarrower than the width of the foam wedge, also trim the front edgeof the foam until it is the same width as the frame.5releasetapesealcornersINsTAll WINdOWcaution! to avoid injury, use at least two people to install. adequatelysupport the window until fully installed. Mark fastener locations on the jambs and head 3"– 6" from eachcorner and at 8" intervals (some holes may be pre-drilled). At each fastener location, drill a pilot hole through the frame.IF InstallInG a FlusH FIn WInDoW Apply a 3/8" bead of sealant to the interior face of the flush fin whereit will contact the opening.44. place drain mat onrough opening sill,wrapping the drainmat up 3" on eachjamb as shown.5. pull release tapeand set Jeld-WeNdrain mat intoplace.6. lift up the back ofthe wicking andstaple into place onthe sill.7. Fold the drain matdown onto thesheathing. stapledrain mat to thewall and seal thecorner edges asshown.8. smooth out anybubbles or creaseswith a J-roller. place window in theopening, making surethe window restson the shims andpress firmly onto theexterior face. Thewindow and sealantmust have continuouscontact with therough opening.continue with “allInstallatIons.”sealantshimWicking
InstallatIon InstructIonsfor Aluminum Windows without Nailing Fin (JII031)5INsTAll WINdOW - CONTINuedIF InstallInG a FInlEss WInDoWplace window ontothe shims and tilt intothe rough opening.The window sillmust rest on and besupported by the shims.continue with “allInstallatIons.”6"JambcutawayFrom topInterlock8"1/4" sealant gaproughopeningJambCentershimInterior1/4" sealant gapall InstallatIons2. Fasten windowthrough a side jamb3"-6" from one lowercorner as follows:a. Apply sealant tothe screw anddrive through thepilot hole.b. Cover the screwhead with sealant.3. Inspect windowfor square, levelscrewand plumb (adjustwith sealantshims or remove andreinstall if necessary).4. Fasten window ina similar mannerthrough the remaining corners, and then through the rest of thefastener locations.1. shim the side jambs at each pre-drilled hole. shims must be set atleast 1/4" back from the interior of the window frame. secure shimswith sealant. secure shims with sealant.6COmpleTe INsTAllATION1. Create a continuousair seal on theinterior by filling thegap between therough opening andthe window framewith low expansionpolyurethane foamor backer rod andsealant.2. On the exterior,apply backer rod andsealant between thewindow frame andthe rough opening(not applicable toflush fin windows).aFtEr InstallatIon ensure weep holes/channels are clear of debris for proper waterdrainage; do not seal weep holes/channels if present.Gap Adjust window for best operation.sealantjointBackerrod protect recently installed units from damage from plaster, paint, etc.by covering the unit with plastic.Please visit jeld-wen.com/resources for warranty and careand maintenance information.thank you for choosing 2009 Jeld-WeN, inc. Jeld-WeN and reliability for real life are registered trademarks of Jeld-WeN, inc., Oregon usA.All other trademarks are the property of their respective owners.5(03/09)
installation method creates an air seal on the interior, integrating the window with the rough opening. thank you for selecting JElD-WEn products. attached are JElD-WEn’s recommended installation instructions for aluminum windows wit